WiFi: Windows 10 Setup Guide | IT@UMN | The people behind the technology
Mục Lục
Connecting to Campus WiFi
Your Windows 10 computer will automatically find all wireless networks in range.
- Click the WiFi button in the bottom right corner of your screen to view the available networks.
- There are two UofM Networks: eduroam and UofM Guest. Select eduroam.
- Click Connect.
- Enter your full university email ([email protected]) and password, then submit.
Sometimes, it may be necessary to connect manually.
Manually Connect to WiFi in Windows 10
Create the WiFi network
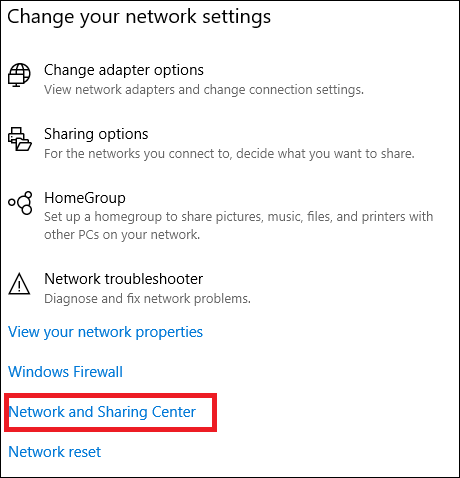
- Navigate to Network and Sharing Center.
- Use Cortana (“Ask me anything” box in taskbar):
- Type “network and sharing” in Cortana search box. If you can’t find it, click the white circle to the right of the Windows Start button.
- Select Network and Sharing Center in results.
- Type “network and sharing” in Cortana search box. If you can’t find it, click the white circle to the right of the Windows Start button.
- Use Start Menu:
- Click on the Windows Start button in the lower left corner.
- Select Settings.

- Select Network & Internet. The Status window will open.
- Click Network and Sharing Center. This is the second link from the bottom of the page. The Network and Sharing Center window will open.

- Click on the Windows Start button in the lower left corner.
- Use Cortana (“Ask me anything” box in taskbar):
- Click Set up a new connection or network.

- Select Manually connect to a wireless network in the Set Up a Connection or Network wizard
- Click Next
- Network Name: eduroam
- Select WPA2-Enterprise from the Security type dropdown menu
- Click Next.
- Click Change connection settings.
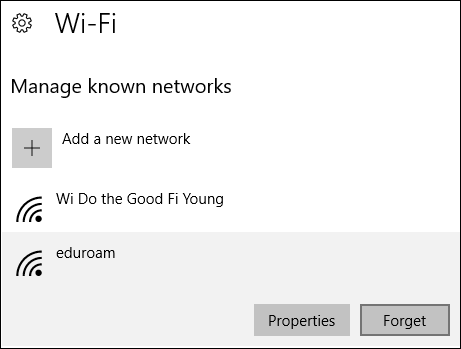
- NOTE: If you receive a prompt saying the network already exists, try to “Forget” the network in WiFi Settings > Manage WiFi Networks, or attempt to use a different name.
- Click the Security tab in the Wireless Network Properties window
- Click Settings under Choose a network authentication method.
- Set the following Protected EAP Properties:
- Check Verify the server’s identity by validating the certificate
- Check Connect to these servers
- type “wireless.netaccess.umn.edu” or “eduroam.netaccess.umn.edu”
- Check AddTrust External CA Root or USERTrust RSA Certification Authority
- Select Authentication Method: Secured password (EAP-MSCHAP v2)
- Click OK.
- Set the following Protected EAP Properties:
- Click Advanced settings button in Wireless Setup Properties window
- Check Specify authentication mode
- Select User authentication
- Click Save credential
- Enter your University of Minnesota login credentials including the @umn.edu.
- Click OK in all remaining open windows to finish setup.
Forget (delete) a WiFi Network profile in Windows 10
-
Right click the Network icon on the lower right corner of your screen
-
Click Network & Internet Settings
-
Choose Wi-Fi on the left navigation bar.
-
Click Manage known networks
-
Select the network you want to delete.
- Click Forget. The wireless network profile is deleted.

For further questions or to report problems please visit contact Technology Help..


![Toni Kroos là ai? [ sự thật về tiểu sử đầy đủ Toni Kroos ]](https://evbn.org/wp-content/uploads/New-Project-6635-1671934592.jpg)


