
VALORANT Killjoy Guide – Turrets, bots and controlling your way to victory
Mục Lục
VALORANT Killjoy Guide – Turrets, bots and controlling your way to victory
Killjoy, the German sentinel is one of the most laid-back Agents in the game.


Her utility does most of the work for her, and she’s a very comfortable pick for anyone who’s just getting started in their Valorant journey. Moreover, Killjoy has seen a wide spread of use throughout all updates and metas, which makes her all the more important to pick up.
In this Valorant Killjoy guide we will do a deep rundown of her abilities and explain how to use Killjoy in Valorant efficiently.
How to play Killjoy and assert control in your VALORANT matches
Valorant’s most iconic Sentinel has some general rules you should follow:
- Killjoy is not the greatest on attack due to the fact that she has to stay in range of her utility for it to stay active, playing for flanks should always be your priority.
- Farming ultimate orbs whenever possible since her ultimate is a great tool for taking over and locking down entire sites.
- Since her kit can cover a lot of ground when defending, you never want to place all of your utility on the same set of angles.
Now let’s get into her abilities and learn all the Valorant Killjoy tips and tricks to make use of!

(C) Nanoswarm
- Cost: 200
- Duration: 45.s
- Activation Delay: 0.5s
- Damage: 45dps
- Detection range: 3.5m
Killjoy equips a Nanoswarm grenade which you can throw towards your desired location. She can have up to two grenades per round. Once it lands on the ground it goes covert, meaning that it becomes invisible until in a certain range of the enemy. Once the enemy is in range, your swarms give off a sound and visual cue of their location, and if the enemy is quick enough, they can destroy it.
You can activate your Nanoswarms from anywhere on the map, making it Killjoy’s only ability not limited by range. Use this to your advantage (especially while defending) since it allows you to place and activate them on one site, while placing the rest of your utility to defend another. You can also use your mollies to force enemies out of key positions while attacking or for post plant situations. When it comes to post-plant, Killjoy is flexible due to the fact that you can both learn line-ups to throw your Nanoswarms from a safe distance, or placing them down immediately after planting before retreating to a safer position. Knowing when to make use of your line-ups is key.
Since the range of her mollies penetrates through walls, you can get away with sneaky placements, which won’t allow the enemy to destroy your utility upon entering a site. This method works best while defending B site on Ascent.
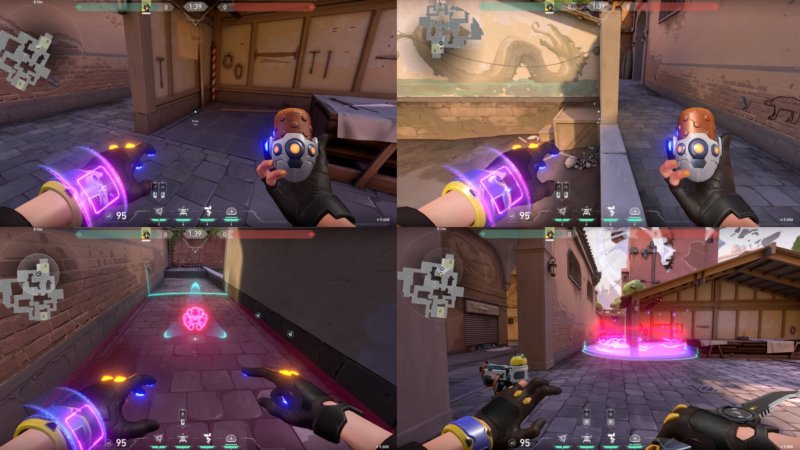
When defending B site on Ascent, place your Nanoswarms and Alarmbot as shown on the picture and wait for the enemy. More often than not, the enemy will look to use this path since it’s the fastest and most secure way of entering the site. When entering, they’re going to look for your swarms on the ground to destroy them, and won’t expect you to hide them behind the walls. Once you hear the enemy rushing in and your bot catches them, activate your Nanoswarms and the enemy won’t know what hit them.
This setup also nullifies quick smoke or flash entries with agents like Skye, due to your utility helping you maintain control until the flashes/wolves expire.
(Q) Alarmbot
- Cost: 200
- Stealth activation: 1.75
- Debuff duration: 4s
- Detection range: 7m
- Cooldown after pickup: 20s
- Deactivation range: 40m
Equip an Alarmbot that becomes covert upon placing it on the ground. This little bot chases any enemy that enters its range and explodes upon reaching its target. Any enemy caught by your Alarmbot will become vulnerable, meaning that they take double damage from any source.
This effect is especially powerful when combined with your Nanoswarms. Placing your grenades near your Alarmbot and activating them after your bot has caught enemies can secure you multiple kills in a matter of seconds. This is why the most powerful and best Valorant Killjoy gameplay will require strategic placements and swift reaction time.
One of the best Valorant Killjoy tricks to take advantage of is to use your Alarmbot to safely check corners or even smokes. For example, if you place your Alarmbot inside a smoke in which the enemy is hiding, your bot will activate and reveal their whereabouts. The same applies for checking corners without having to peek and expose yourself.
One thing to take note of: Once you leave your Alarmbot’s range, it will automatically deactivate. You can also recall it at any point and choose a different place for it, or save it.
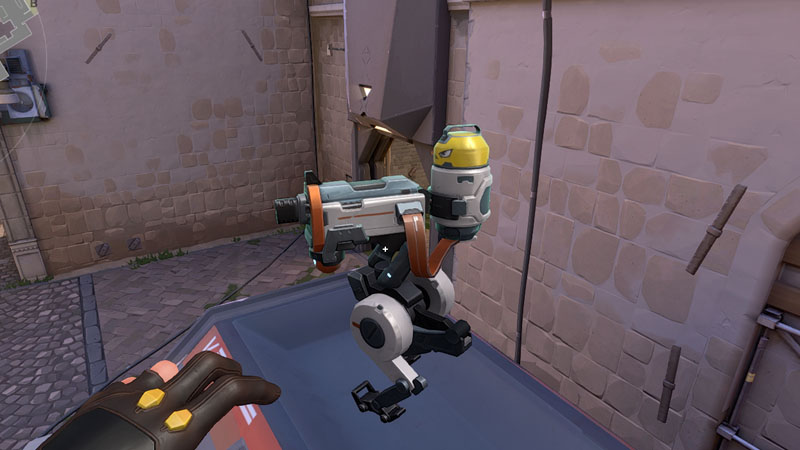
(E) Turret
- Cost: Free
- Health: 125HP
- Activation time: 2s
- Delay to shoot: 0.75s
- Cooldown after pickup: 20s
- Deactivation range: 40m
- Tagging slow: 29.5%
You can equip and place down a Turret that fires at enemies in a 180 degree cone. As with her Alarmbot, her Turret deactivates after you leave its range. You can also recall it anytime you want.
The Turret does different amounts of damage, depending on the distance of the enemy.
- 0-20m the turret does 8 dmg per bullet
- 20-35m 6 dmg per bullet
- 35m+ 4 damage per bullet
While her Turret has the ability to damage and kill enemies, it’s damage isn’t significant enough for that to be it’s sole purpose. More often than not, you’ll want to use your Turret for gathering information. For example, you can use your Turret to protect from a flank and recall it later on to protect the spike or give info on the whereabouts of the enemy.
Turret is especially powerful during pistol rounds since it’s not that easy to kill and does significant damage to the enemy if they don’t have shields. Also, recalling your Turret after the enemy has shot it with a few pistol bullets and then placing it later again with full HP will annoy your enemies.
Since both your Turret and Alarmbot have a reactivation cooldown, make sure to plan ahead.
(X) Lockdown
- Cost: 7 ultimate points
- Health: 150 HP
- Countdown: 13s
- Debuff duration: 8s
Equip a Lockdown device and FIRE to deploy and start its activation countdown. After 13 seconds, her Lockdown will detain all enemies caught in its area of effect.
Killjoy’s Ultimate is perhaps the strongest tool for taking and retaking a site if the enemy doesn’t have the means to destroy it. What if the enemy has taken over your site and your team doesn’t have the utility to fight them off, or you’re looking to push to the enemy site and plant the spike? Just lock them down, force them to either retreat or detain them for easy takedowns.
If placed correctly, its radius is large enough to cover the entirety of almost every site in the game. Therefore, playing a couple of custom games and figuring out where to best position your ultimate is highly advised. With Killjoy Valorant, you have the opportunity to clutch your way through a win if you know how and when to efficiently make use of your ultimate.
Another important thing to mention in this Valorant Killjoy Guide; Since your Lockdown can be destroyed, you can also bait the enemy into using their utility and ultimates on destroying your Lockdown. If you see that an enemy Brimstone has his ultimate up, you can fake ult a different site and bait him into rotating and destroying your Lockdown while your team is actually pushing towards a different site.
Pro tip: Always communicate a Lockdown execute with your team. It’s ideal to peek/enter the site when the lockdown is about 2 seconds from completing.
Become a distinguished inventor with Killjoy
Even though Killjoy is not the typical Sentinel you’d expect, she’s more than capable to get her team out of tight situations and/or clutch. Her playstyle is quite passive, and makes it so that she’s extremely beginner friendly. Even though her skill cap is not high, she’s remarkably powerful. Whether you’re just starting your Valorant journey or you’re looking to climb up the ladder, she’s the perfect fit.
With this Valorant Killjoy Guide, we hope to secure you with the sufficient information to get you started or help you master the scientist of Valorant Protocol. Do note you wont see much of Killjoy in pro play, as her role has been recently taken over by Chamber, but you will still her plenty in ranked play.


![Toni Kroos là ai? [ sự thật về tiểu sử đầy đủ Toni Kroos ]](https://evbn.org/wp-content/uploads/New-Project-6635-1671934592.jpg)


