Unidentified Network on Windows (No Internet Access): SOLVED
Mục Lục
Unidentified Network on Windows (No Internet Access): SOLVED
Learn to get your internet working properly again
4
Share
X
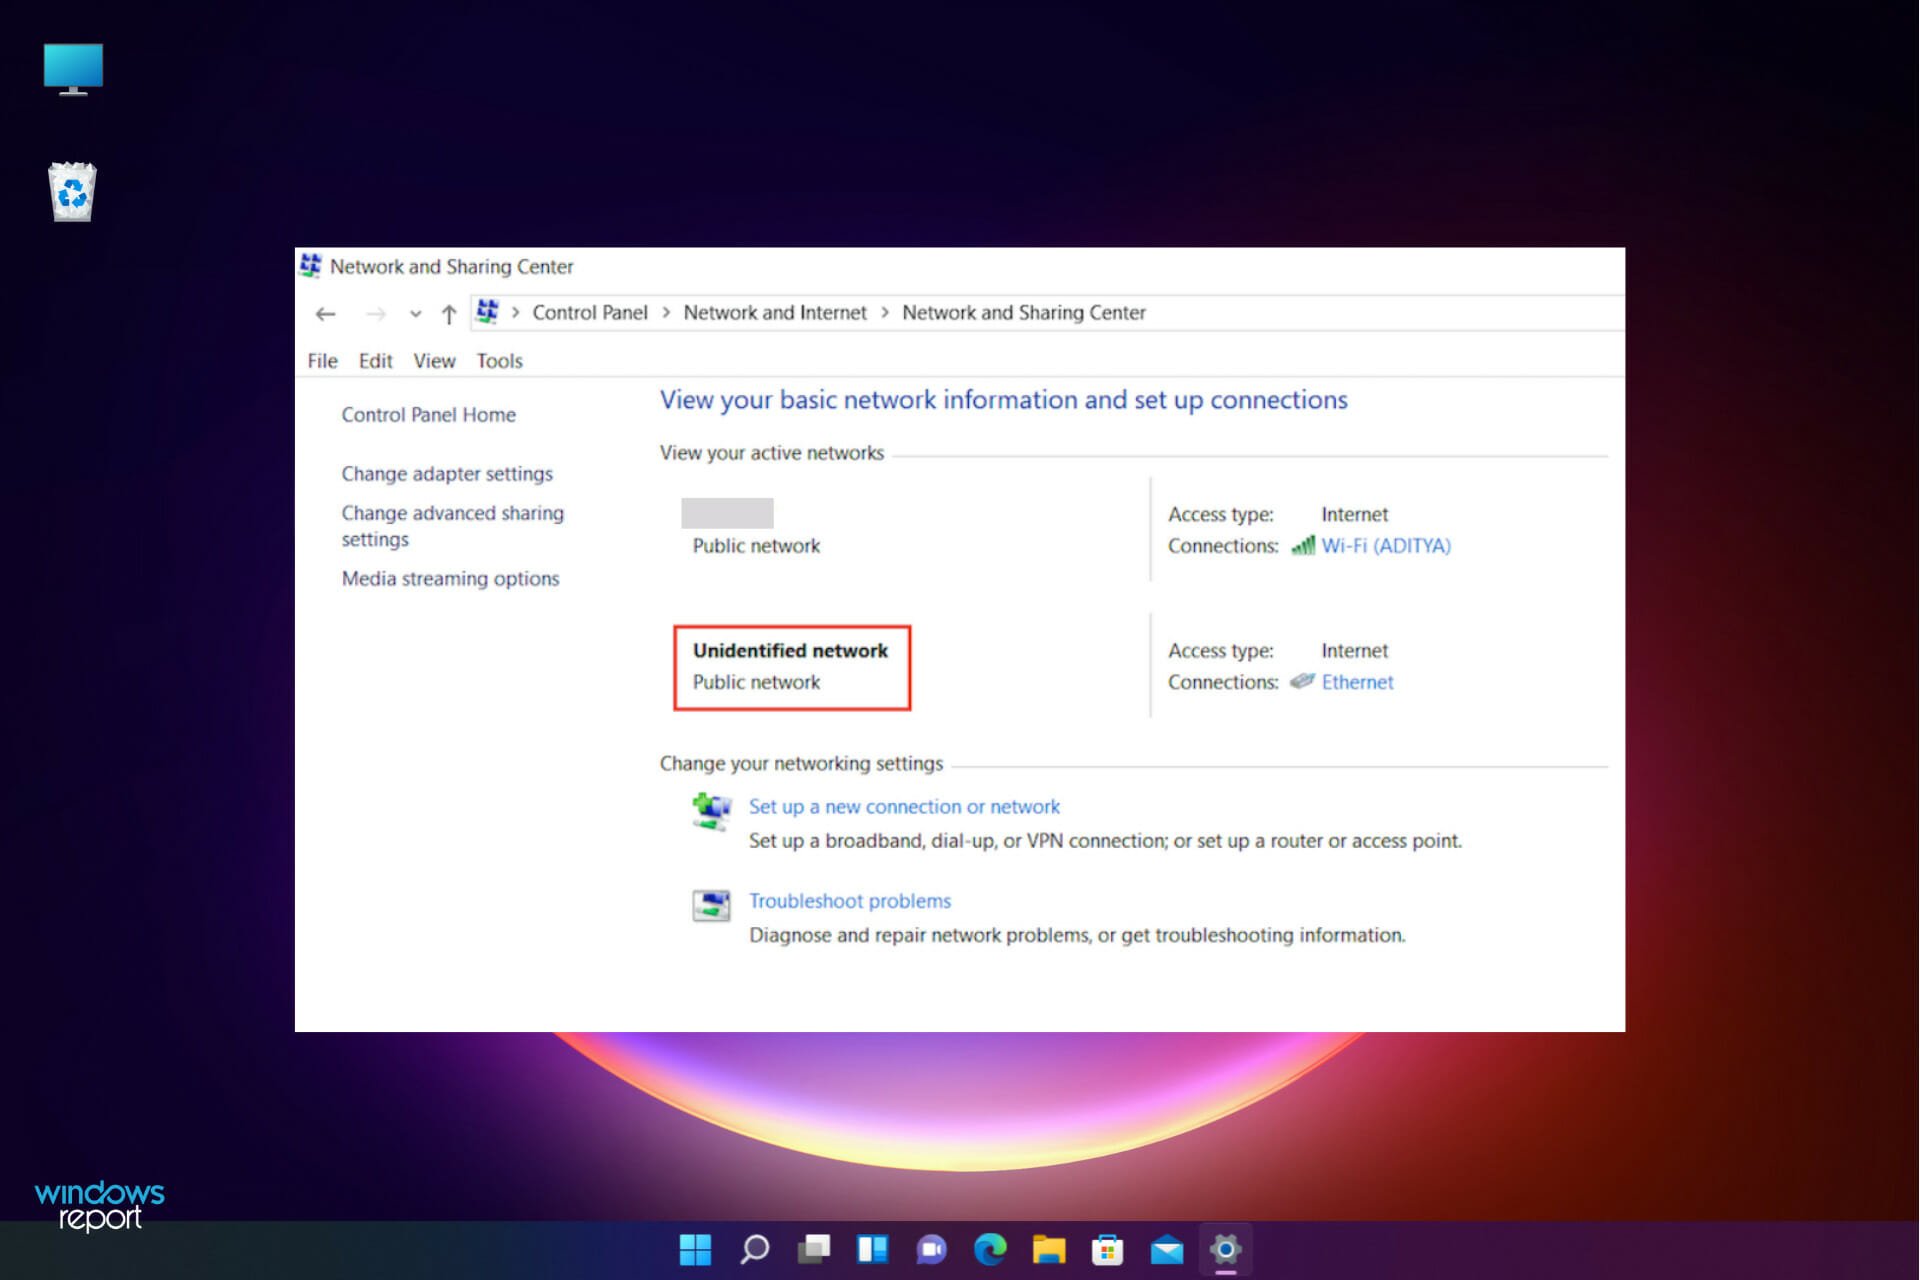
- If you received the Ethernet unidentified network message, that means you can’t access the Internet and this is frustrating.
- The error may occur due to many problems, including damaged cables or wrong network settings but we cover all possibilities.
- This issue can also be caused by malware, so make sure that your computer is safe by running anti-malware tools.
X
INSTALL BY CLICKING THE DOWNLOAD FILE
To fix various PC problems, we recommend DriverFix:
This software will keep your drivers up and running, thus keeping you safe from common computer errors and hardware failure. Check all your drivers now in 3 easy steps:
- Download DriverFix (verified download file).
- Click Start Scan to find all problematic drivers.
- Click Update Drivers to get new versions and avoid system malfunctionings.
- DriverFix has been downloaded by
0
readers this month.
We use the Internet on daily basis, and it’s a major problem for many users if they can’t access it. Many of our readers reported Unidentified network or Unidentified network no Internet messages on their PCs, and today we’re going to show you how to fix that problem.
Whether it’s happening on your Ethernet or Wi-Fi connection, our solutions will cover all the possible issues that cause these errors on Windows 10 and Windows 11.
But first, let’s go through some preliminary methods of troubleshooting some of the main disruptions that may occur.
What causes the Unidentified Network issue?
Before getting to any solutions listed below, let’s verify some of the most common problems that may cause Internet connection errors:
➡ Check all local networking components
Several users reported that this issue occurs due to the Ethernet cable. One workaround that might help is to unplug and reconnect your Ethernet cable from your PC and router or modem.
Repeat the process several times and check if that solves the problem. In addition, be sure to check your Ethernet cable. If your Ethernet cable is damaged, you might encounter this message.
To fix the problem, you should try replacing your cable. We have a list including the best Cat6 and Cat5E cables that you can choose from.
Restarting and resetting your router and/or modem can also fix this problem quickly and you will see how you can do that in one of our solutions below.
➡ Make sure you are close to your Wi-Fi hotspot
If these errors occur while your device is connected to a Wi-Fi hotspot, make sure that you have enough signal strength.
Move your device closer to the router and eliminate all possible obstacles between the two devices.
That being said, you can start troubleshooting the problems, step by step, as shown below. It’s important to follow the exact procedures in order to fix the errors.
How do I fix the
Unidentified network
error in Windows 10?
1. Turn off Airplane mode
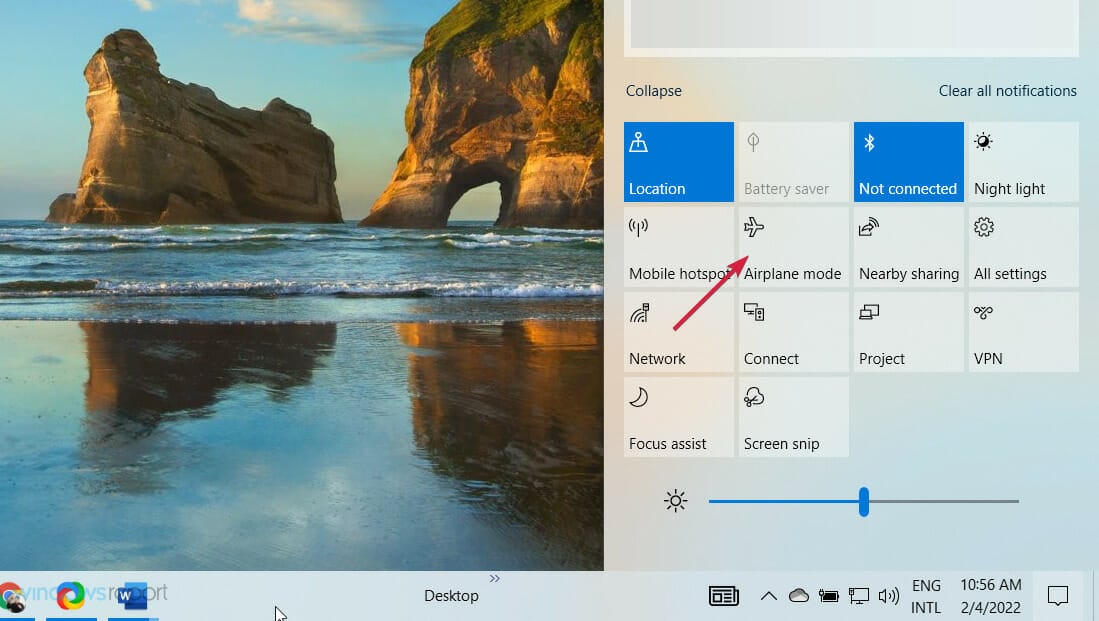
- Press Windows key + A to open Action Center, then click the Airplane mode icon to disable the feature.
- If this option isn’t available, press the Windows key and select Settings.

- Go to Network & Internet section.

- Navigate to Airplane mode tab, locate the Airplane mode option and turn it off.

Windows 10 supports Airplane mode, but if you turn on this feature, it will block your Internet connection.
You can also use a hardware switch on your device to turn off Airplane mode. Many devices have this button available, so be sure to look for it on your device.
If you encounter other problems, check our guide on how to fix Airplane mode errors and get more information.
After disabling Airplane mode using the aforementioned methods, Unidentified network message should hopefully disappear.
2. Remove your antivirus software
- Open the Settings app by clicking on the Start icon and selecting it from the list.
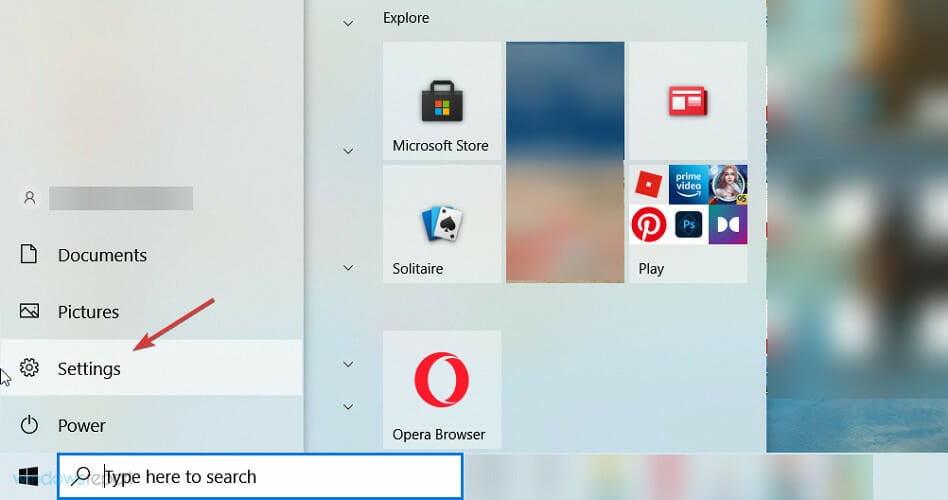
- Click on Apps from the Home menu in Settings.

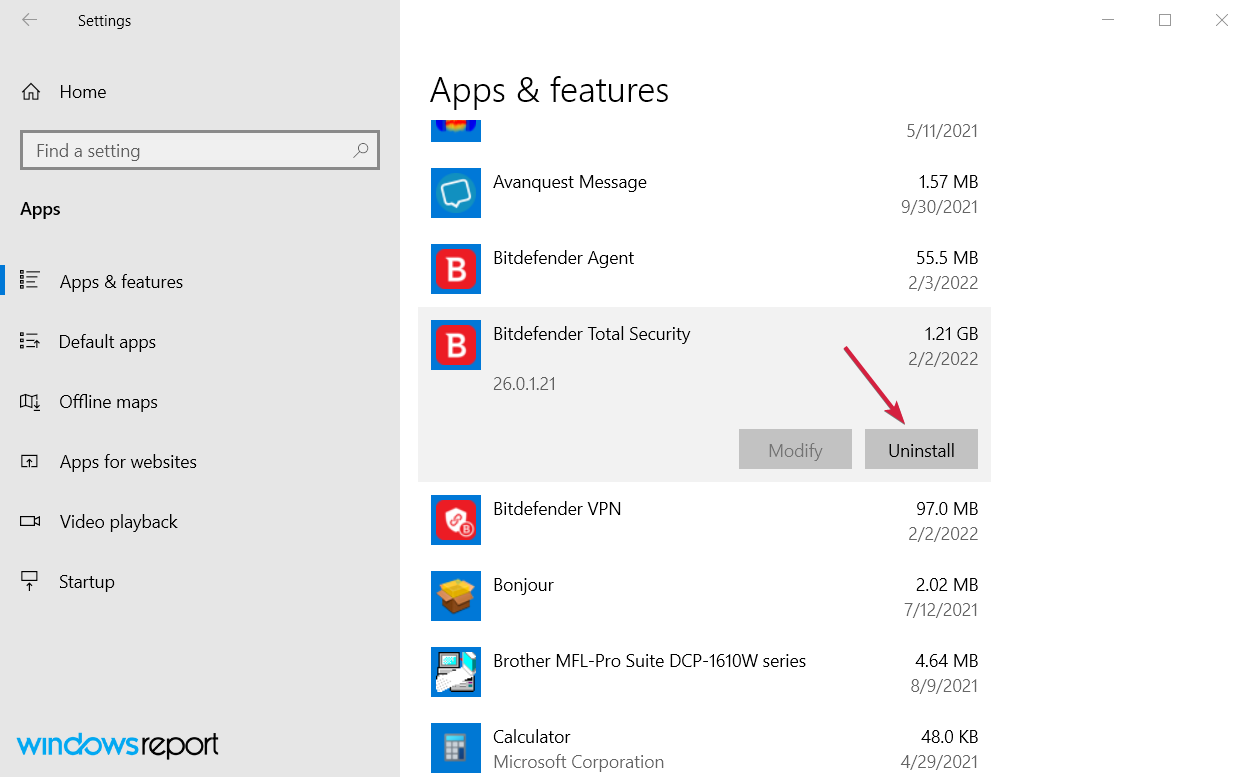
- The list of installed applications will appear on the right pane. Select the antivirus program from the list and click on the Uninstall button.
- After the antivirus is removed, restart your PC and see if the problem has been solved.
Antivirus software is one of the most important tools that you can have on your PC and it’s paramount for system protection.
However, some antiviruses can sometimes interfere with your network connection and cause Unidentified network message to appear.
Users reported that the cause for this problem was Avast, and in order to fix the issue you need to remove it completely.
Should you have another antivirus installed, you can start by disabling first and check if the Internet connection is fixed.
If uninstalling your antivirus software fixes the problem, you need to update your antivirus software to the latest version. Alternatively, you can switch to a better antivirus tool.
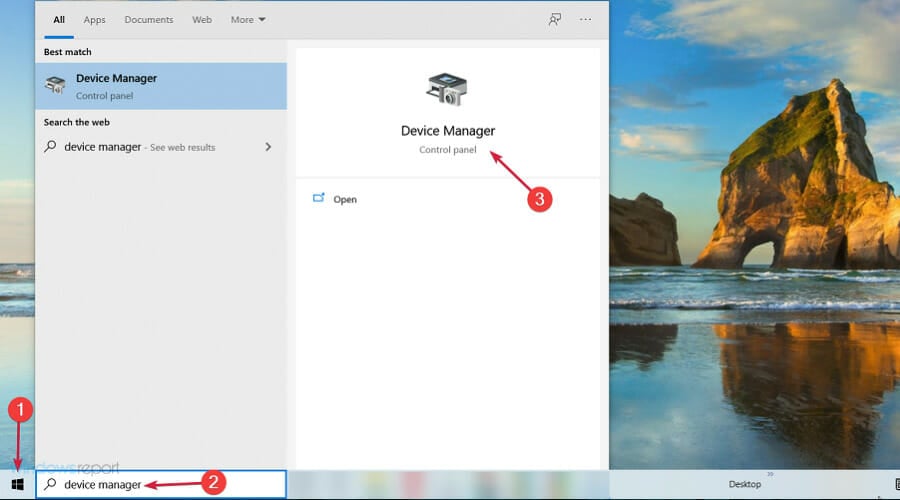
- Press the Start icon, type device manager and select the app from the results.
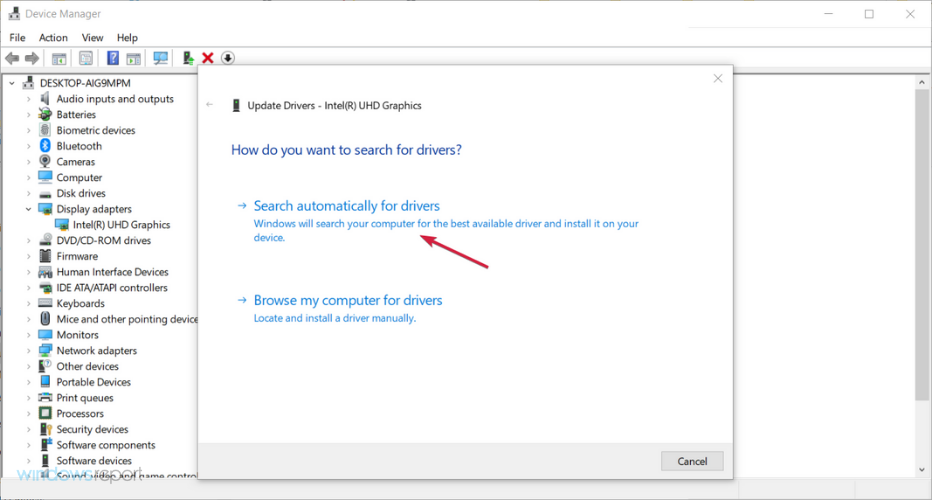
- Locate the Network adapters section, click on it to expand, then right click on your network adapter and choose Update driver from the menu.

- Click on Search automatically for updated driver software option and wait while Windows 10 downloads the suitable driver for your network adapter.
If you’re getting Unidentified network message, you might have to update your network drivers to fix this issue.
Although Device Manager allows you to update your drivers easily, sometimes it’s better to download the necessary drivers from your network adapter manufacturer.
For that, visit your network adapter manufacturer’s website or the device manufacturer website and locate the drivers section.
Select your network adapter from the list, download the suitable driver and install it. If you don’t have Internet access at all, you’ll need to use a working computer or any other device to download the drivers.
In order to prevent PC damage by installing the wrong driver versions, we suggest doing it automatically by using a specialized tool like DriverFix.
The software below will do all the job on your behalf by updating the correct version of drivers for your device.
4. Turn off Fast Startup
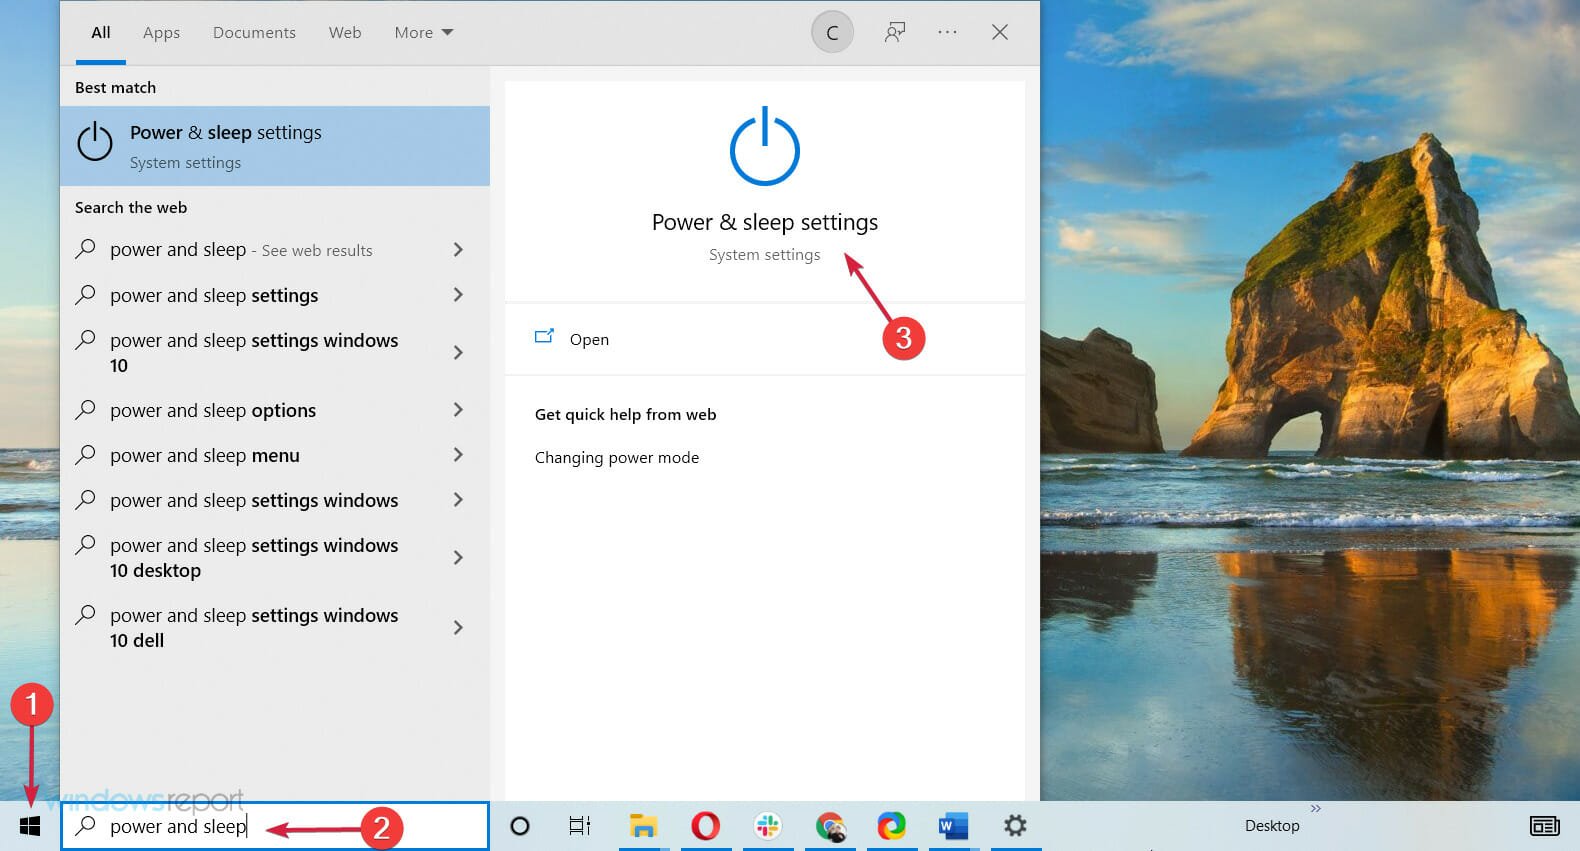
- Click the Start button, type power and sleep, and select Power & sleep settings from the results.
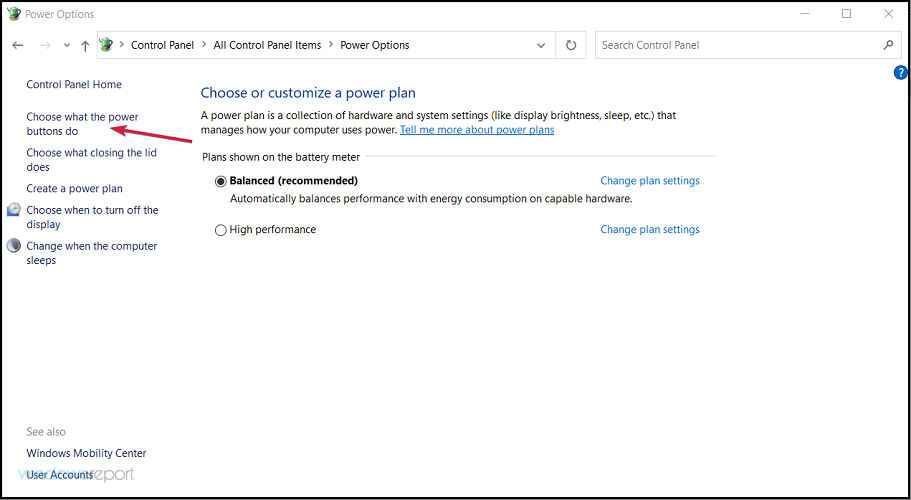
- When Power Options window opens, click on Choose what the power buttons do.
- Now click on Change settings that are currently unavailable.
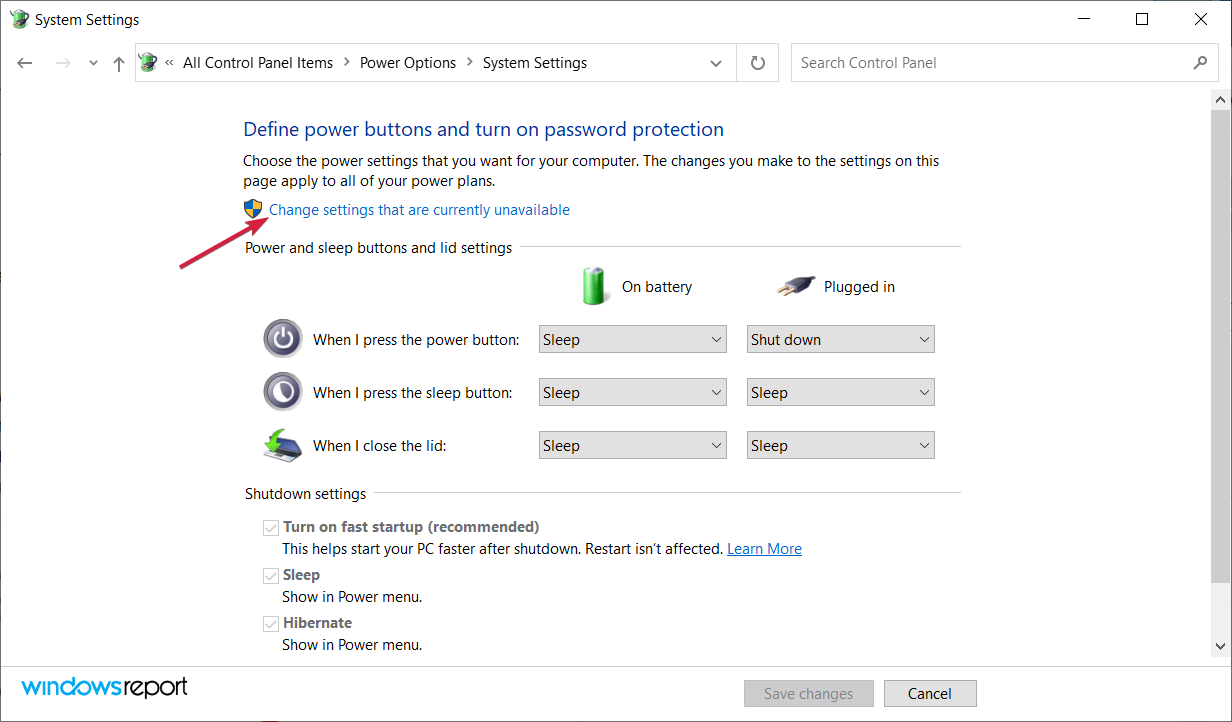
- Uncheck Turn on fast startup, then click on Save changes.
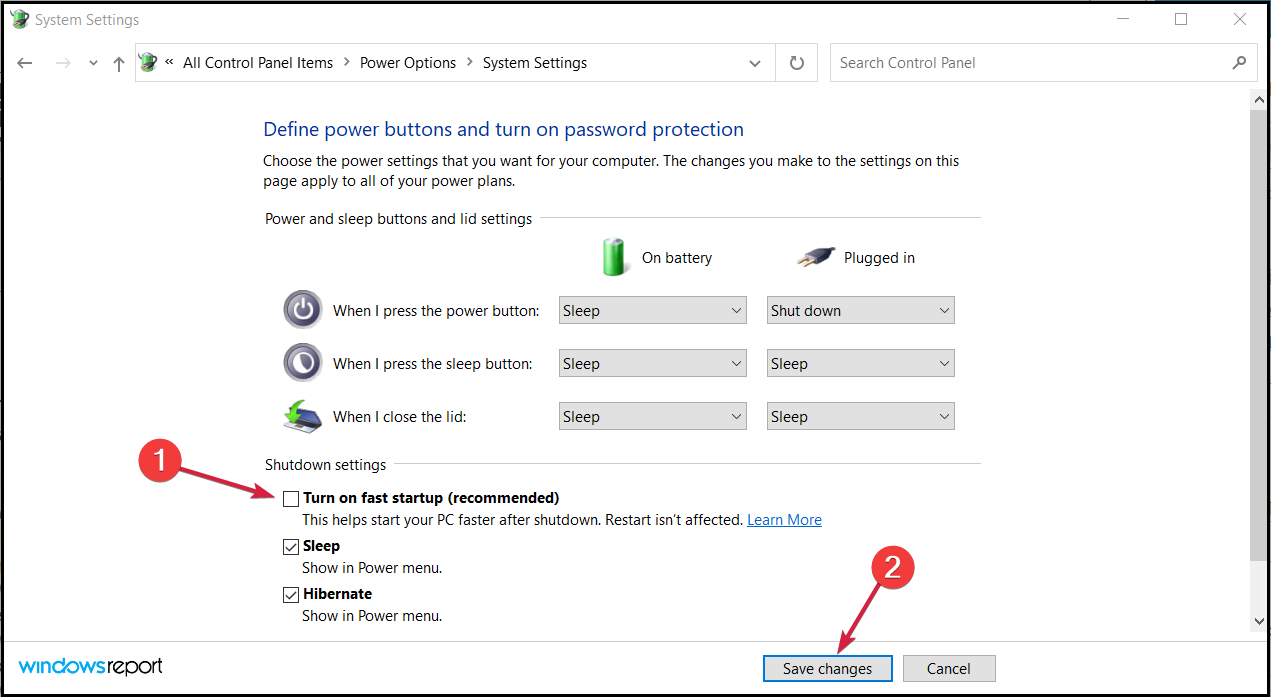
- After doing that, shut down your PC. Wait for 30 seconds and turn it back on again.
Windows 10 uses the Fast Startup feature by default that allows you to boot Windows 10 faster. It’s very useful, but it doesn’t completely shut down your PC, which can lead to certain issues.
To fix the ethernet unidentified network issue on your PC, many users are recommending to temporarily disable this feature.
Users reported that disabling Fast Startup fixed the problem for them, so be sure to try that. In fact, if this solution worked, you could enable it again and check if the issue reappears.
5. Change your DNS servers
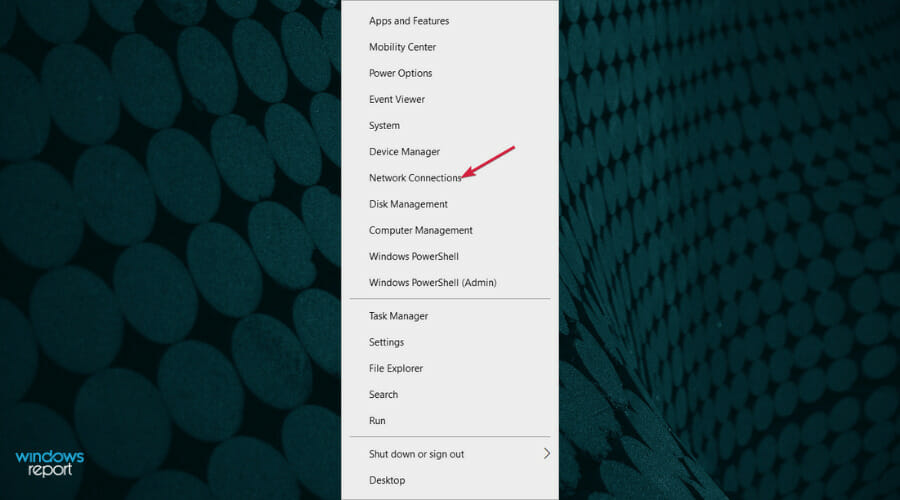
- Press Windows key + X and choose Network Connections from the menu.
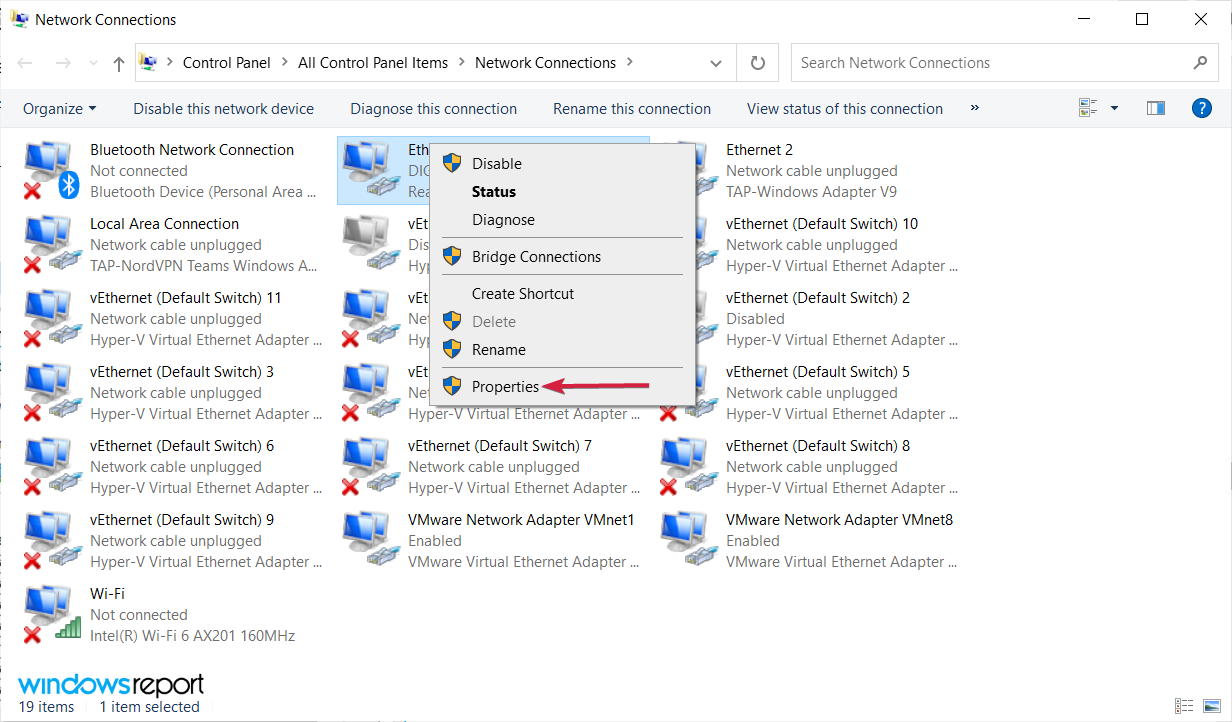
- Locate your network connection, right click it and choose Properties from the menu.
- Select Internet Protocol Version 4 (TCP/IPv4) and click on Properties.

- Select Use the following DNS server addresses option. Enter 8.8.8.8 as Preferred DNS server and 8.8.4.4 as Alternate DNS server. Click OK to save the changes.
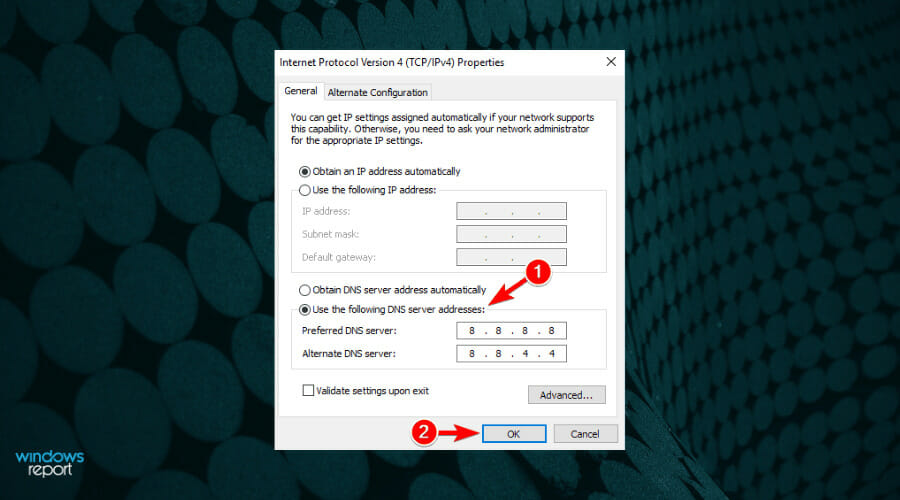
Sometimes Unidentified network error can appear due to problems with your DNS. However, you can easily change your DNS and fix this issue.
Also, check the settings from your ISP and verify it they correspond with the ones from your IPv4 properties.
If this solution doesn’t work, we have a guide on what to do if the DNS server is not responding on Windows 10/11 because it may help you.
6. Install a reliable VPN
Installing a VPN software will help with any errors related to network connections and restrictions most of the time, including the Ethernet unidentified network.
A VPN will redirect the user’s data to another network which will make tracking his real location and other sensitive information impossible. This is a safety measure that can also be used to bypass annoying regional restrictions.
We suggest using a VPN that has lots of servers around the world, thus providing high internet speeds and lots of bandwidth. Access your content things from anywhere in the world, secured and bug-free.
The best VPNs for Windows 10 come with advanced features such as split tunneling, killswitch in case the connection is lost, add blocking, and anti-malware security.
7. Restart your PC
- Press the Start icon, click on the Power button, then select Restart from the menu.

According to users, sometimes you can fix this problem simply by restarting your PC.
It seems that Windows 10 can sometimes hold your personal files, and that can cause Unidentified network message to appear.
8. Reset the Internet settings using Command Prompt
8.1 Use the ipconfig commands
- Press the Start button, type cmd, and select Run as administrator from the results.
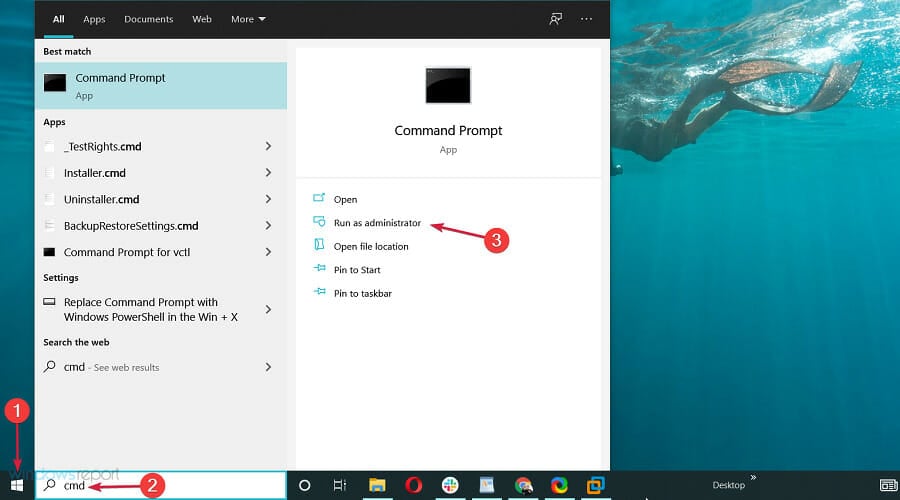
- Type or paste the following commands and press Enter to run them:
ipconfig /release
ipconfig /renew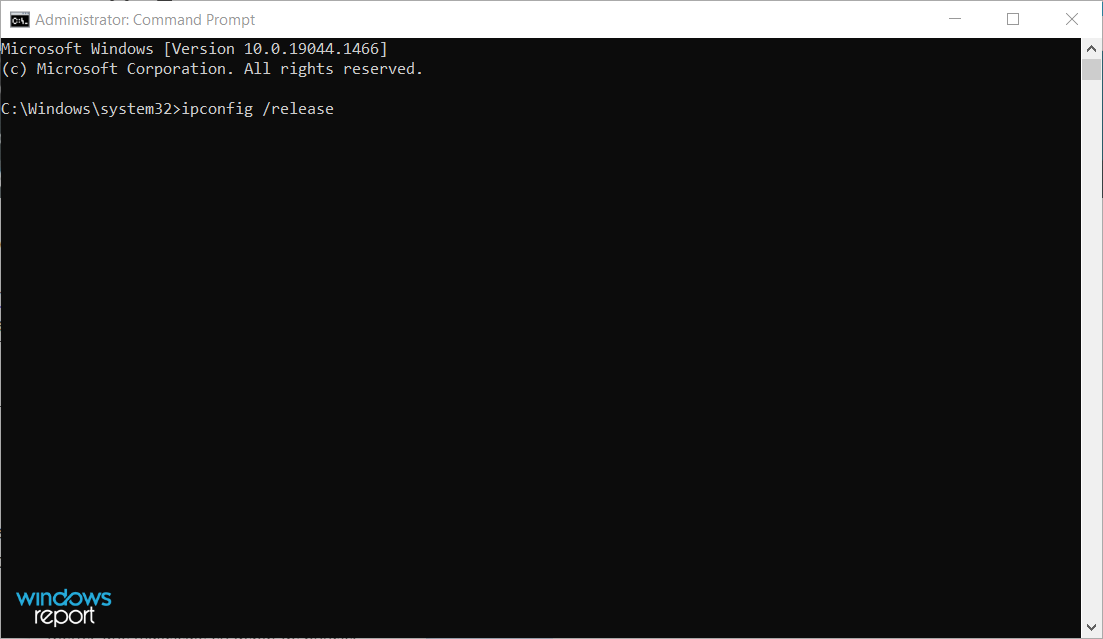
- After the commands are executed, close Command Prompt and check if the issue is resolved.
8.2 Reset winsock
Several readers reported that they fixed the issue using different set of commands. Instead of commands that we used in Step 2, use the following commands:
netsh winsock reset
netsh int ip reset
ipconfig /flushdns
8.2 Use the netsh commands
There’s also another set of commands that might fix the issue. According to our readers, you can fix Unidentified network message simply by running these commands in Command Prompt:
netsh int tcp set heuristics disabled
netsh int tcp set global autotuninglevel=disabled
netsh int tcp set global rss=enabled
netsh int tcp show global
After the commands are executed, restart your PC and check if the issue is resolved.
9. Make sure that DHCP is enabled
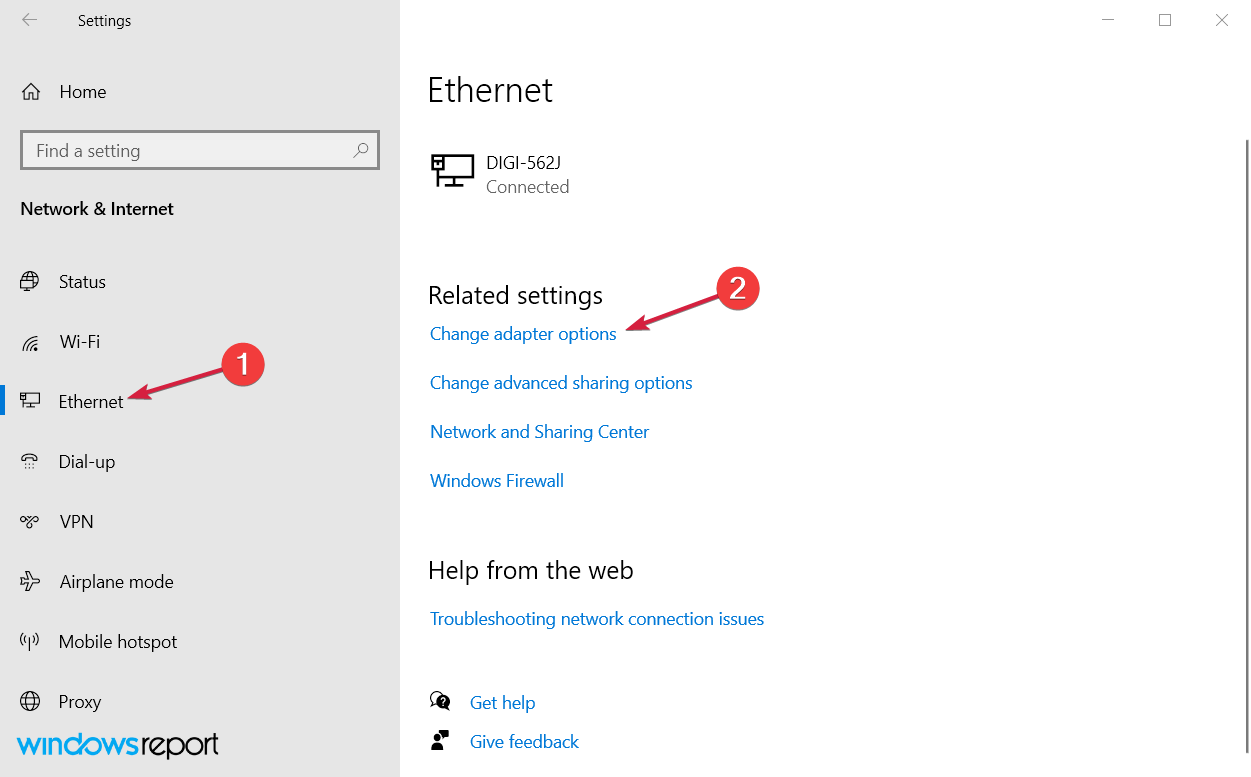
- Right-click the Start icon and select Network Connections.
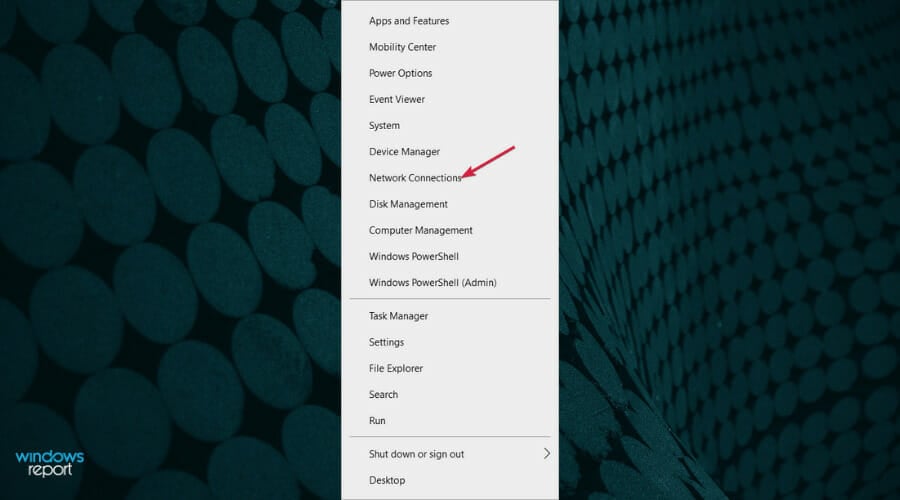
- Choose Ethernet from the left, then click on Change adapter options from the right.
- Locate your network connection, right click it and choose Diagnose from the menu.
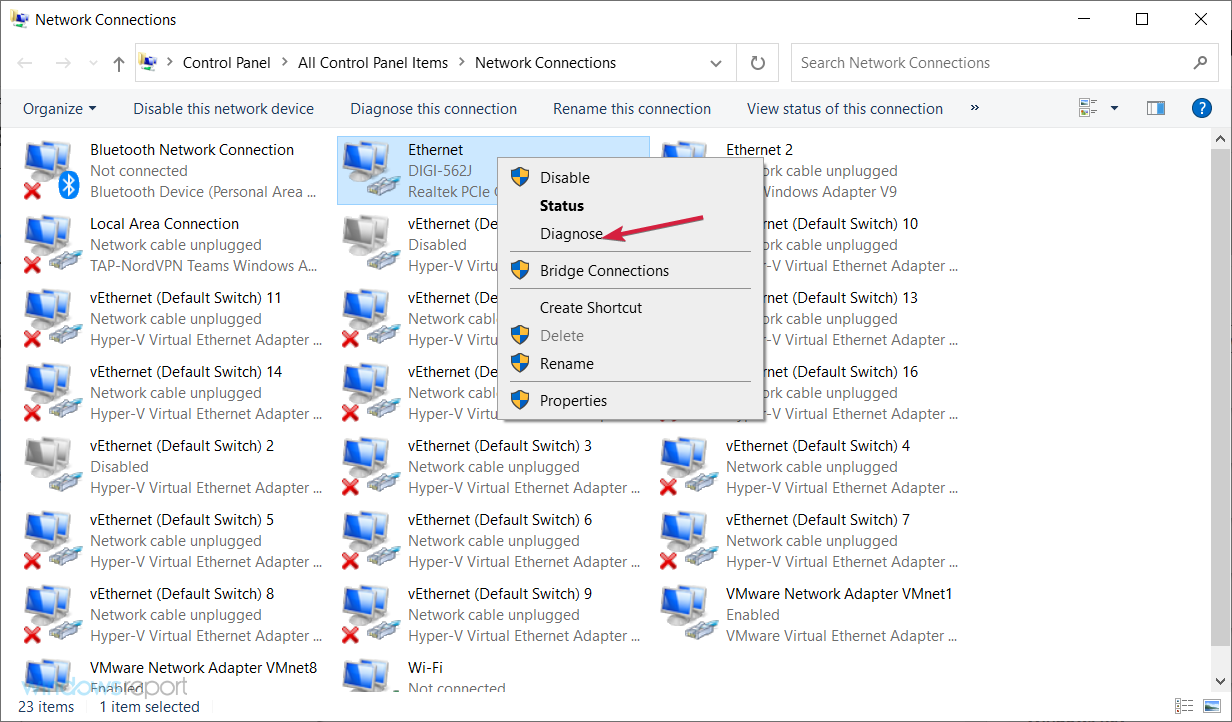
A few of our readers reported that you can fix this problem by diagnosing your network. This is rather simple, and you can do it right from Network Connections window.
However, the Unidentified network message might appear if you don’t have DHCP enabled on your router. To fix the problem you need to open your router settings and enable DHCP again.
If you don’t know how to do that, be sure to check your router’s instruction manual.
10. Disable and enable your network connection
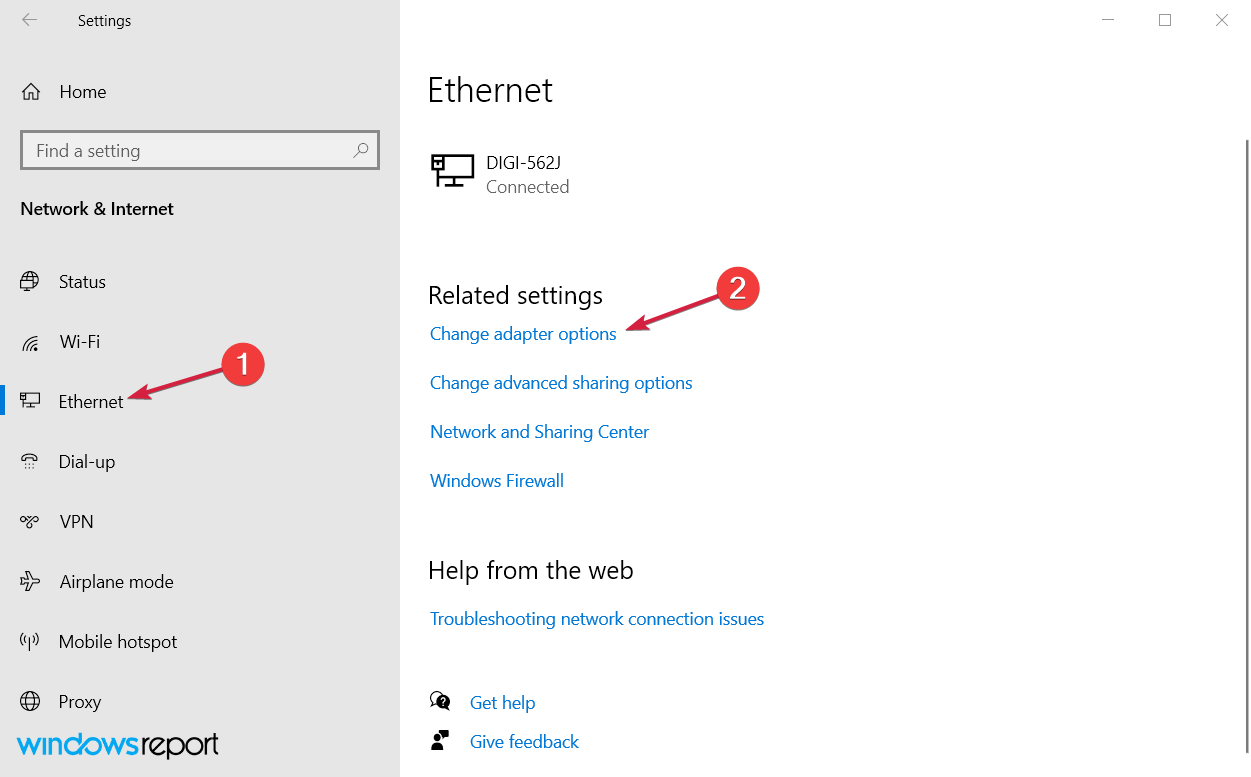
- Right-click the Start icon and select Network Connections.

- Select the Ethernet option from the left pane, then click on Change adapter options from the right.
- Locate your current connection, right click it and choose Disable from the menu.
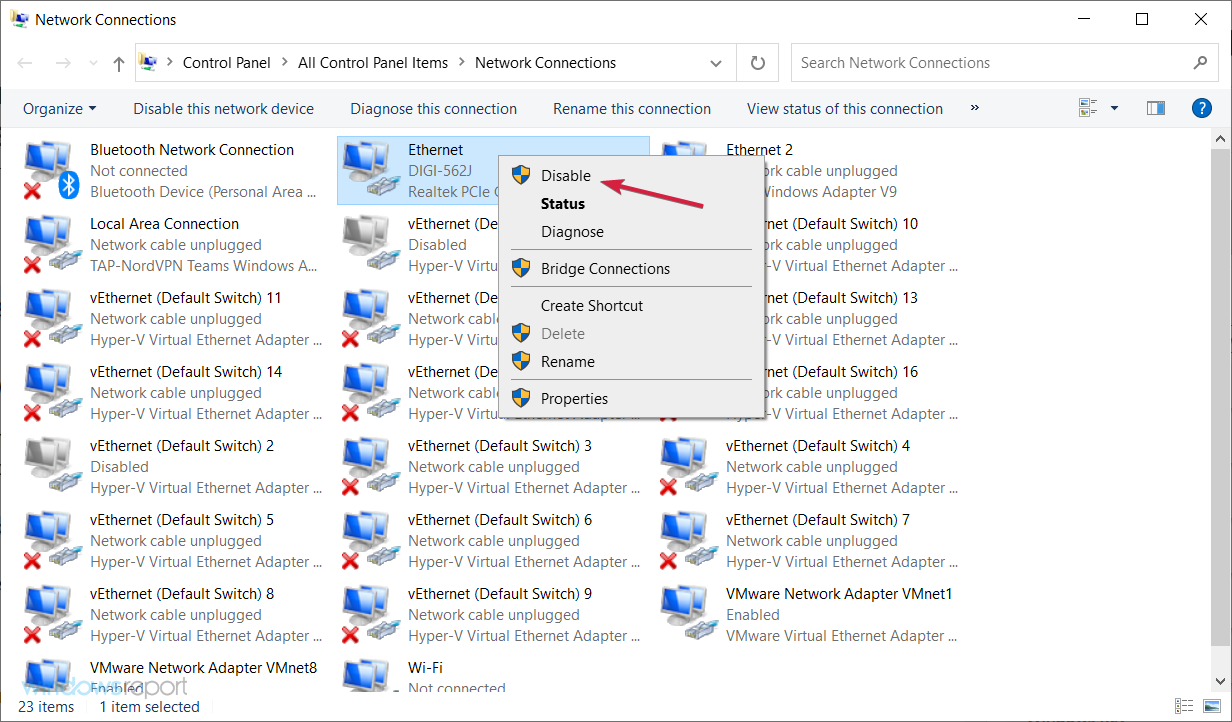
- After disabling the connection, wait for few seconds. Right click your connection and choose Enable from the menu.
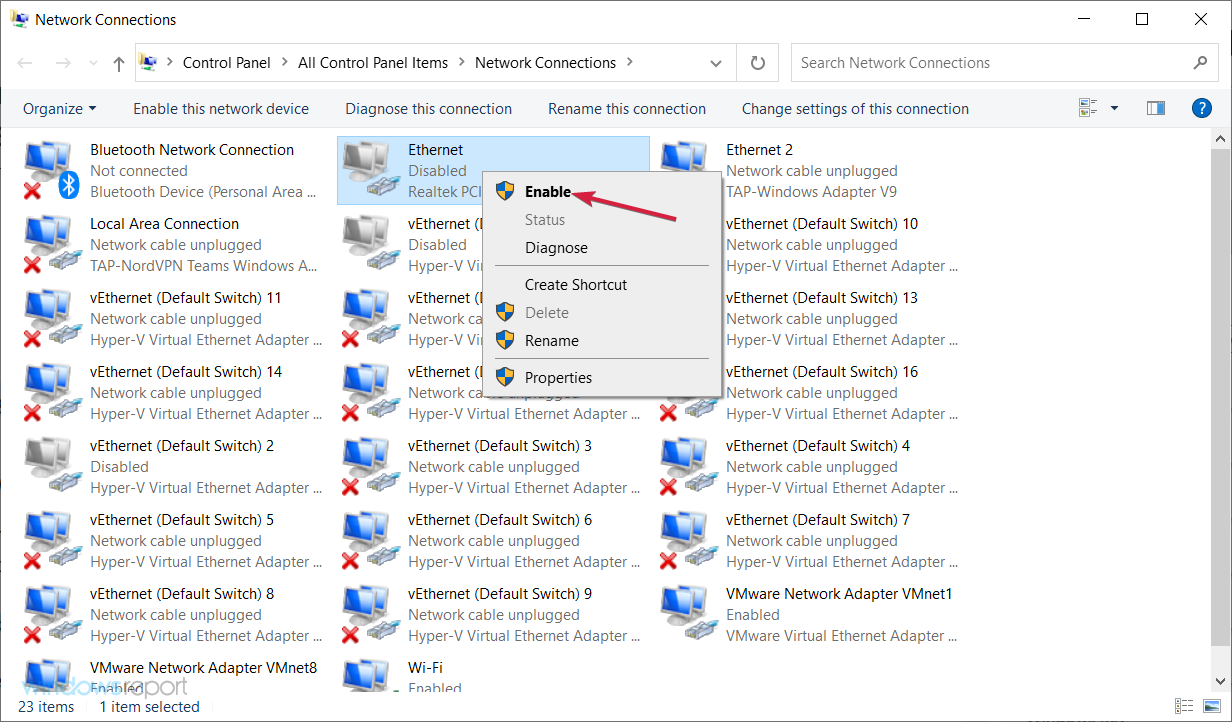
Sometimes you can fix Unidentified error message simply by disabling and reenabling your network connection.
Expert tip:
SPONSORED
Some PC issues are hard to tackle, especially when it comes to corrupted repositories or missing Windows files. If you are having troubles fixing an error, your system may be partially broken.
We recommend installing Restoro, a tool that will scan your machine and identify what the fault is.
Click here to download and start repairing.
If that doesn’t work, you might want to try disabling and enabling your network adapter. We explained briefly how to do that in Solution 13, so be sure to check it out.
11. Set a static IP address
- Right-click the Start icon and select Network Connections.

- Select Ethernet from the left pane andclick on Change adapter options from the right pane menu.

- Locate your network connection, right click it and choose Properties.
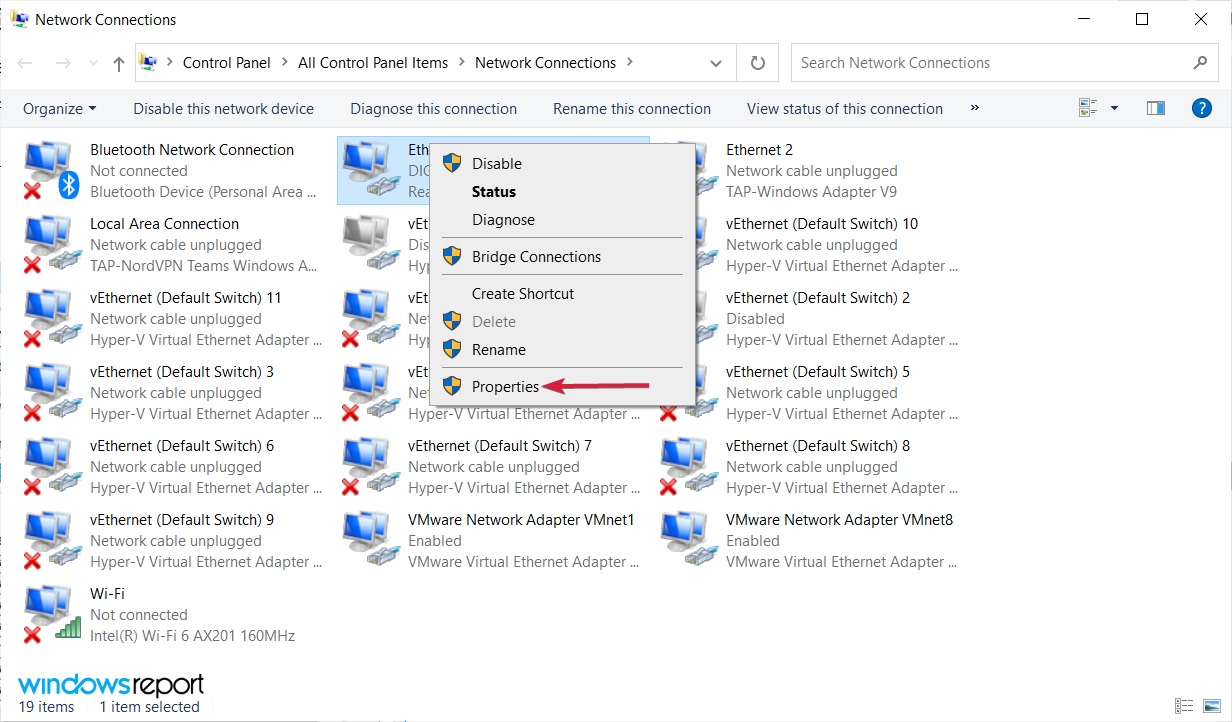
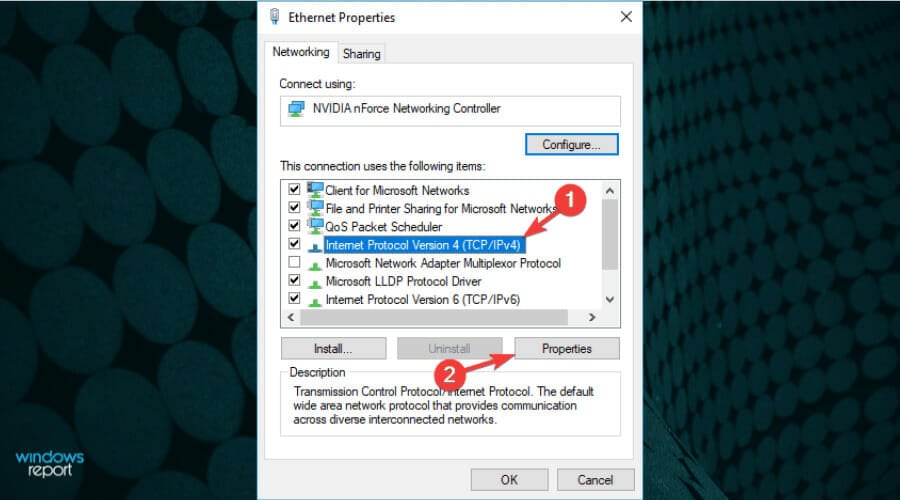
- Select Internet Protocol Version 4 (TCP/IPv4) and click on Properties button.
- Now select the Use the following IP address option and enter the desired IP address as well as additional information. If you’re not sure about other values such as Subnet mask, Default gateway and Preferred DNS server, you can find them with a simple trick. Simply check the properties of the network connection on any device that is connected to your network and copy the necessary values.
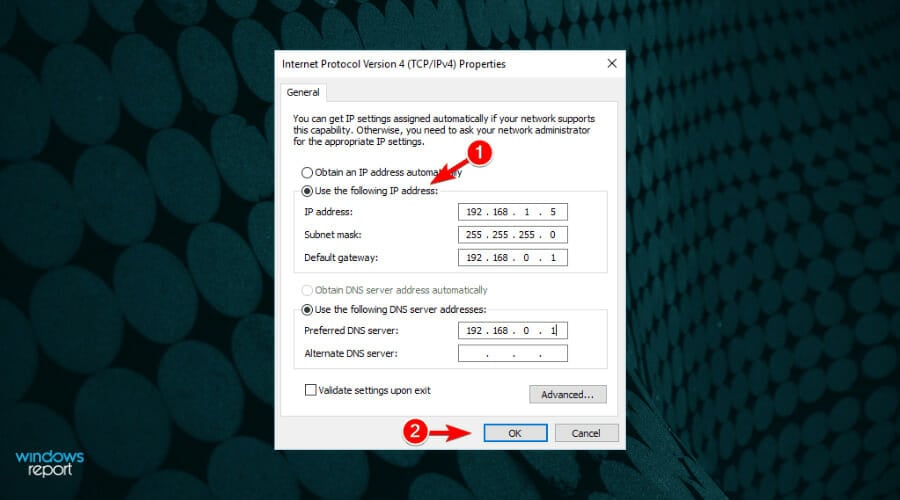
- After you’re done, click OK to save the changes.
According to users, this issue can occur if your IP address isn’t set to static. To fix the problem you need to change your network connection settings and enter the desired IP address manually.
There are several cases in which users fixed the problem simply by using Obtain an IP address automatically option. If you’re using a static IP address, be sure to try this option instead.
12. Use an external adapter
- Press the Start icon, type device manager and select the app from the results.

- Go to the Network adapters section and locate your adapter.
- Right click the adapter and choose Disable device from the menu.
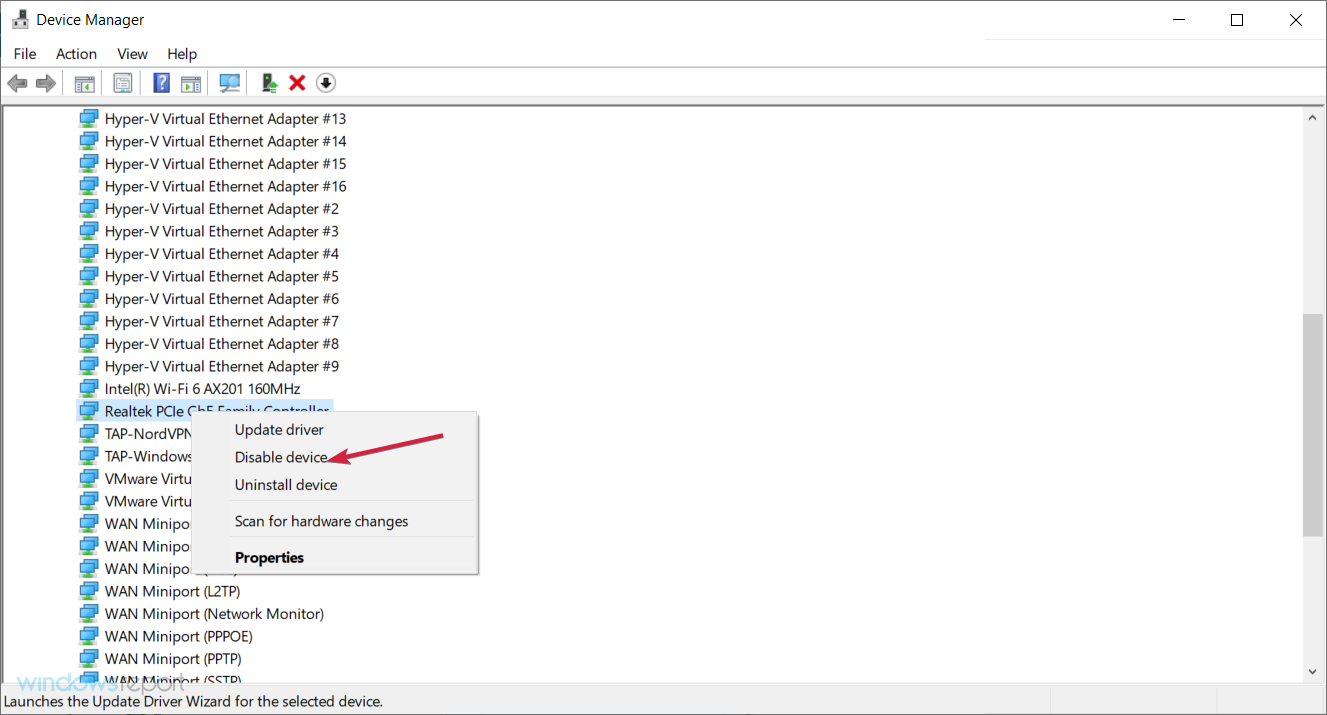
- Restart your PC and the system will detect the correct driver. If this doesn’t work, repeat the process to reenable the device.
If you have problems with your network adapter, you might be able to fix them simply by replacing the adapter.
Several users reported that the issue was caused by an internal adapter that isn’t fully compatible with the router.
If you have the same problem, you might want to get a USB network adapter and try using it instead.
Before you can use an external adapter, we strongly suggest that you disable your internal network adapter by following the steps above.
13. Change your adapter’s duplex
- Right-click the Windows Start button and select Network Connections.

- Select Ethernet from the left pane and click on Change adapter options from the right pane menu.

- Right click on your network connection and click on Properties.

- When Properties window opens, click on Configure.
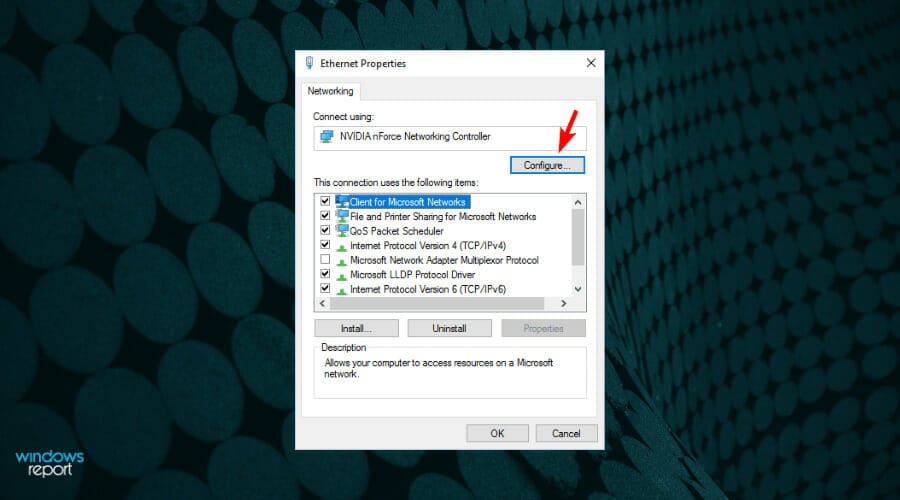
- Go to the Advanced tab. From the Property list select Speed / duplex settings. Now change the Value to Auto Negotiation.
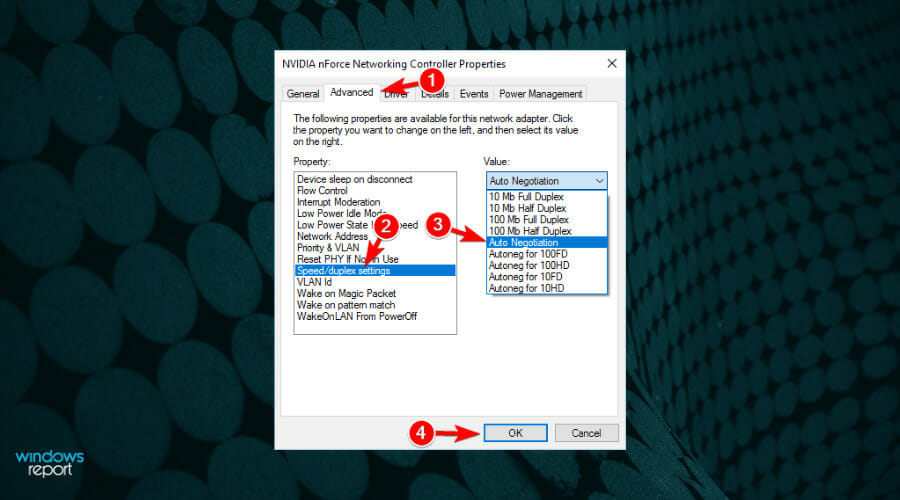
- After you’re done, click OK to save the changes. Depending on your network adapter and router, you might have to use different values sometimes in order to fix the problem.
Sometimes Unidentified network message can appear if your duplex isn’t properly configured. After changing the duplex speed, be sure to check if the problem is resolved.
14. Disable McAfee Network Agent
- Press Windows key + R, type msconfig and press Enter or click OK.
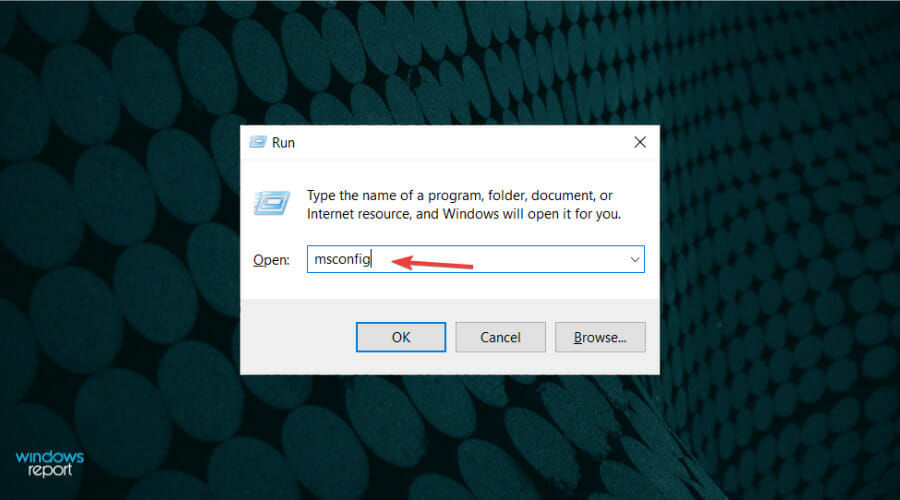
- Go to Services tab, check the box for Hide all Microsoft services. Locate McAfee Network Agent on the list and disable it.

- Now click Apply and OK to save the changes. In addition to McAfee Network Agent, users are also suggesting disabling McAfee Firewall Core.
As we previously mentioned, third-party applications can sometimes interfere with your network connection and cause Unidentified network message to appear.
Several users reported that McAfee Network Agent caused this issue on their PC. In order to fix the problem, you need to disable this service.
After disabling the problematic services, the issue should be resolved completely.
15. Restart your modem and router
The Unidentified network message can prevent you from accessing the Internet, but you can fix it easily by restarting your router and modem.
 You should find the Reset button in the back of your router
Sometimes your network configuration might not be correct, and a quick restart can usually solve that. To restart your modem / router, simply press its reset button and wait for 30 seconds.
After that, turn the device back on again and wait until it starts. If you have both modem and router, be sure to restart both devices.
Sometimes this error appears due to your router’s configuration. A few users reported that they successfully fixed the issue simply by resetting their router.
To do that, find and press the reset button on your router. Alternatively, you can open the router’s configuration page and reset it from there.
Keep in mind that resetting the router will revert all your settings to default, so you’ll have to set up a wireless connection and configure all your settings again.
16. Upgrade router firmware
- Make sure that the router and PC are connected.
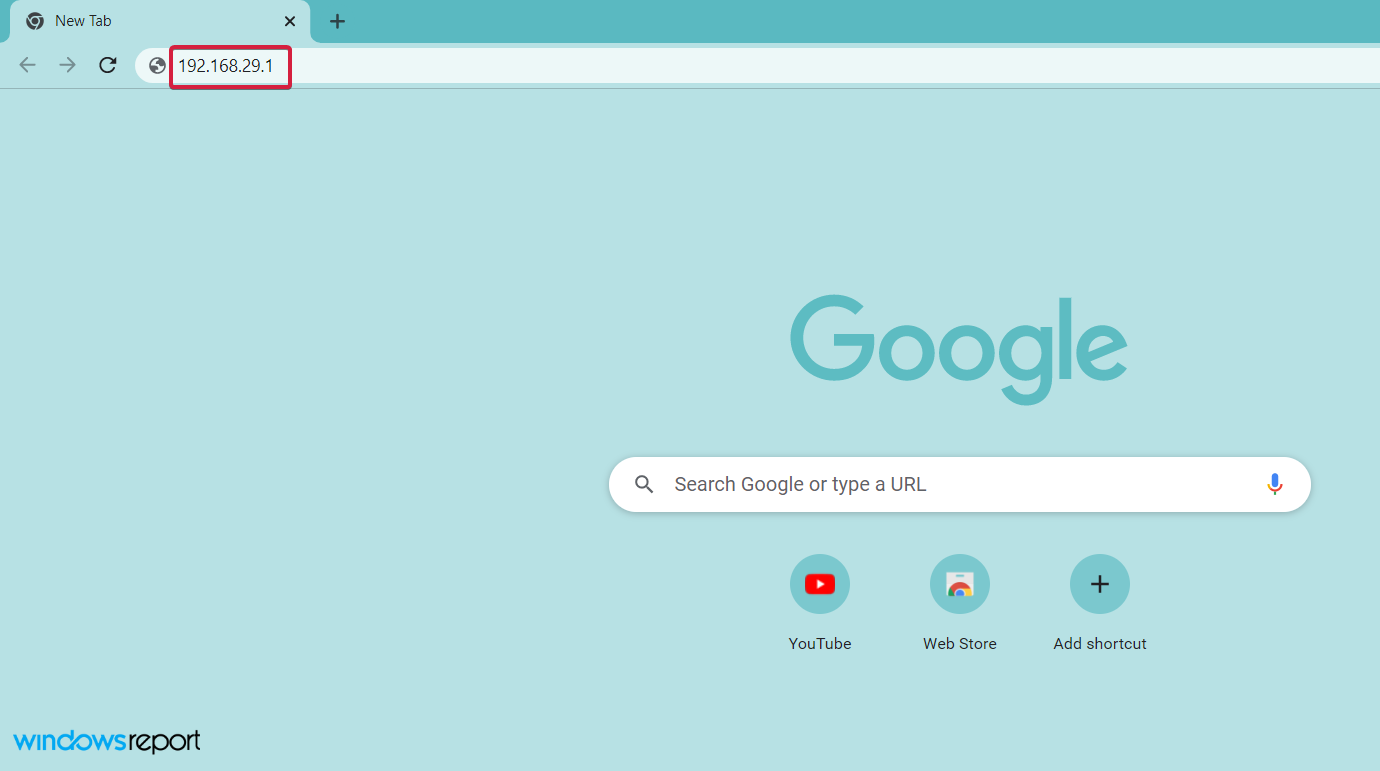
- Open a browser window and enter the address of your router. The one in our screenshot is only an example. You will find that on your router manual or on the device itself.
- Log into the app with the username and password provided.
- Locate the firmware update option and check for updates.

If you’re getting the Unidentified network no internet access Windows 10 or Windows 11 message, you might be able to fix it by upgrading your router firmware. By updating router firmware you can fix many compatibility and security issues with your router.
We have to mention that the firmware upgrade process comes with certain risks, so if you’re not careful you can cause permanent damage to your router.
To avoid any problems be sure to check your instruction manual thoroughly before performing the upgrade.
If you need more information about firmware upgrade, be sure to check our guide on how to upgrade your router firmware for some tips.
17. Use only one network connection
- Right-click the Windows Start icon and select Network Connections from the list.

- Select Ethernet from the left pane and click on Change adapter options from the right pane.

- Now select your wireless and Ethernet connection. Right click them and choose Bridge Connections from the menu.
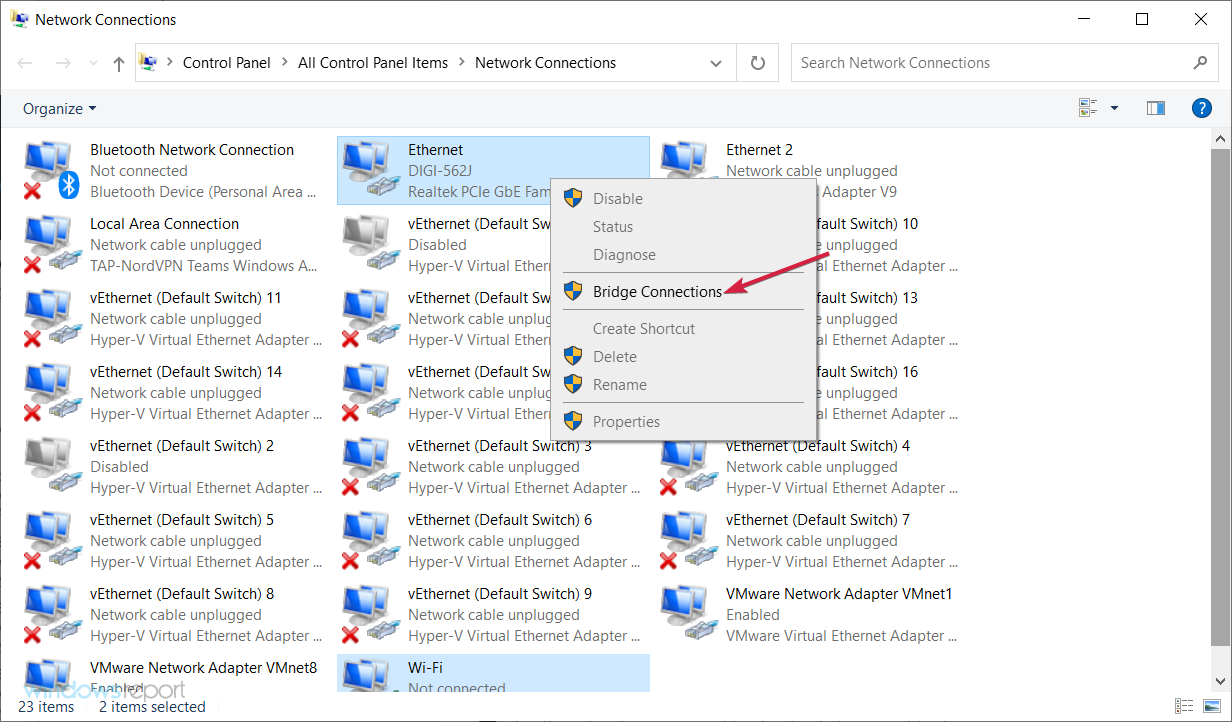
The Unidentified network message can appear if you’re using both Ethernet and wireless connections at the same time. If that’s the case, you’ll need to disable one connection and restart your PC.
For detailed instructions on how to disable your network connection be sure to check Solution 10. After disabling Ethernet or wireless connection, restart your PC and check if that solves the issue.
If that doesn’t work, you’ll need to bridge your connections just as it’s shown in our solution above. After bridging the connections, check if the problem is resolved.
18. Check your network connection properties
- Once again, right-click the Start button and select Network Connections from the list.

- Select Ethernet from the left pane and choose Change adapter options from the right.

- Now select your connection, right-click it and choose Properties from the menu.

- Now, uninstall any options that are related to third-party applications. After you’re done, click OK to save changes.

- Restart your computer and check if the problem is resolved.
Third-party applications can sometimes cause problems with your network connection.
some of our readers reported issues with the Shrewsoft applications, so if you see any Shrewsoft entries on the list, be sure to uninstall them.
It’s worth mentioning that other third-party applications can cause this problem, so you might have to remove them as well.
19. Disable virtual network adapters
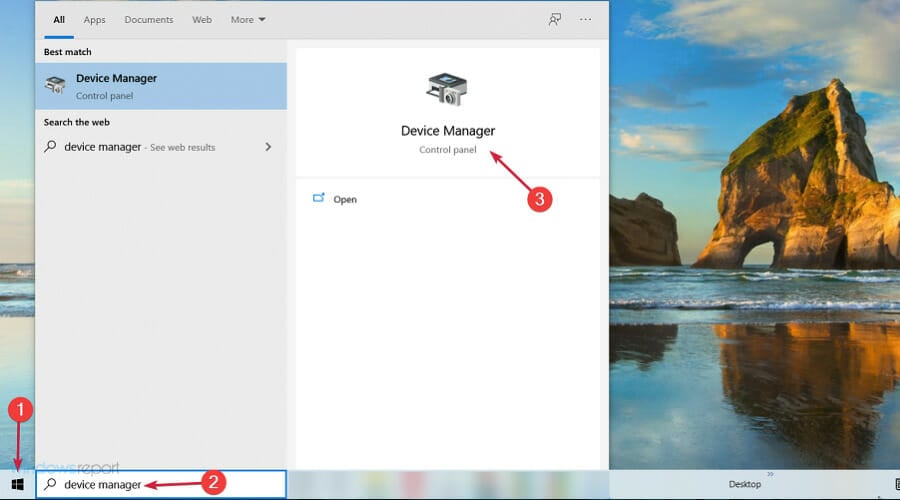
- Press the Start button and type device manager, then click on the app from the results.
- Go to View menu and check Show hidden devices.
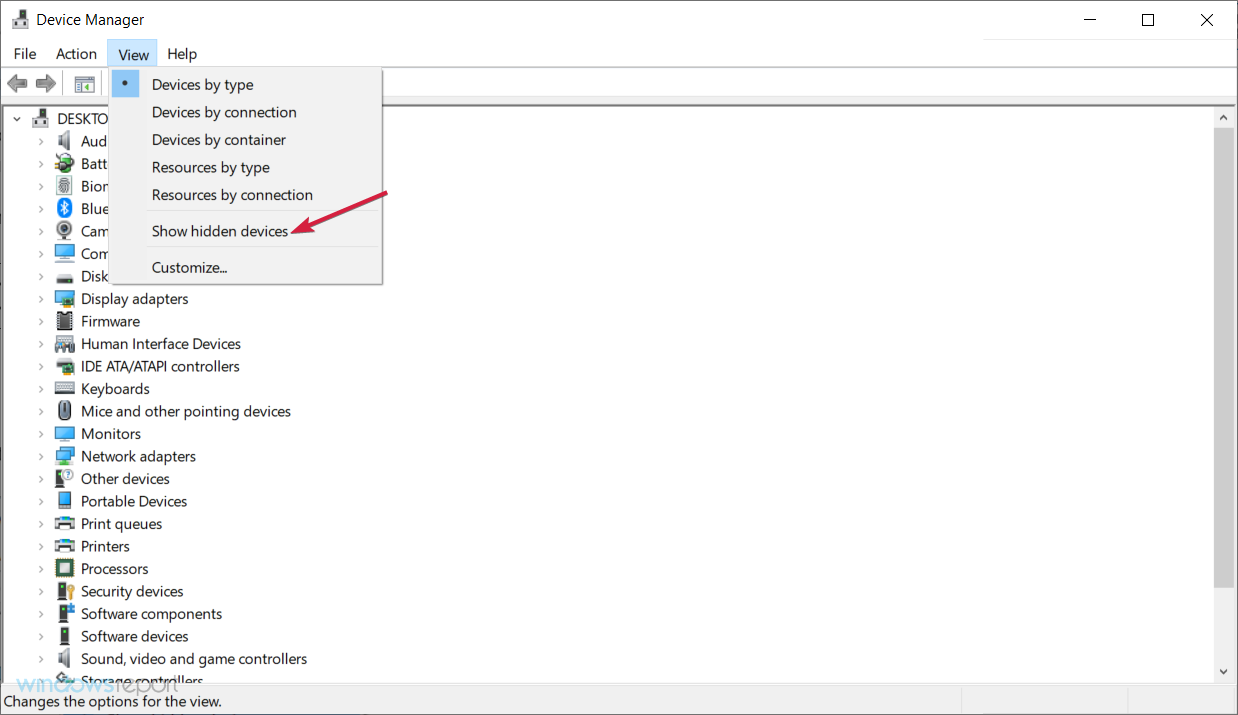
- Now expand the Network adapters section and locate any virtual adapters associated with third-party applications. Disable those adapters and check if that solves the issue.
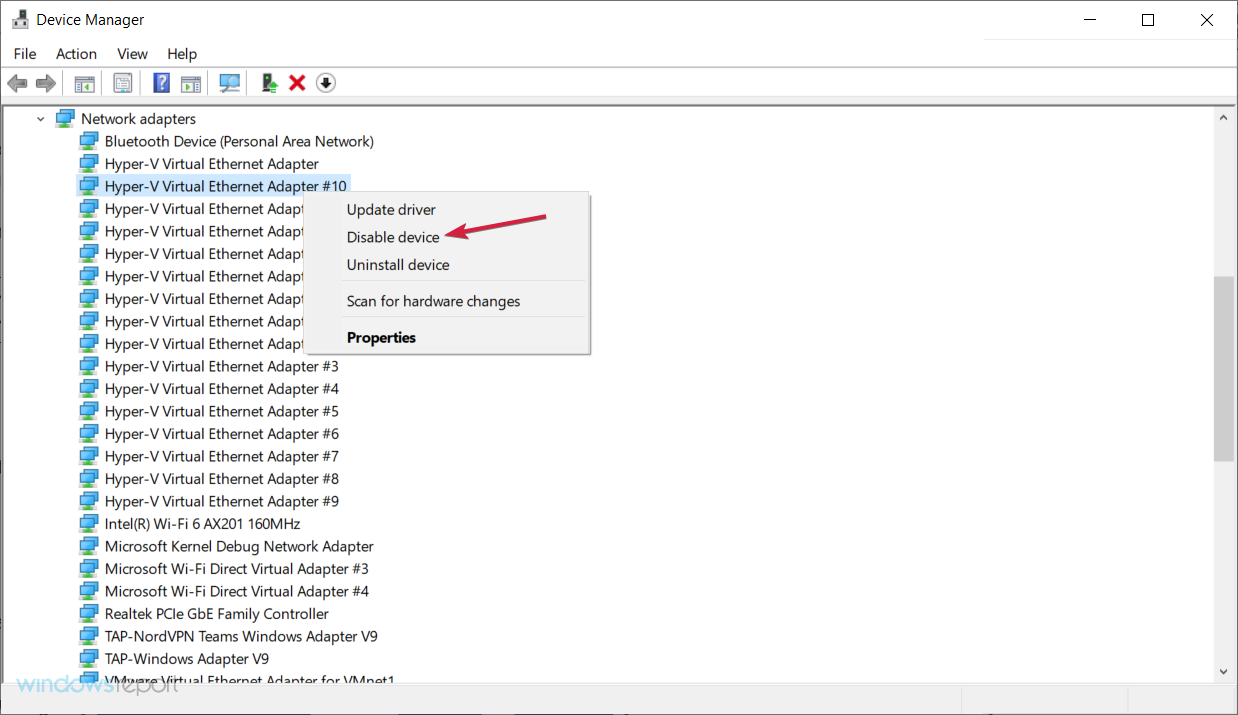
If you’re using any virtualization software, such as VMWare or VirtualBox, you can sometimes cause issues with your network connection.
Users reported that virtual machine software can cause the Unidentified network message by creating virtual network adapters.
To fix the problem, you need to disable virtual adapters from Device Manager. Disabling third-party virtual adapters can affect the Internet connectivity in those apps, so keep that in mind.
20. Change startup type for Bonjour service
- Press Windows key + R and type services.msc, then press Enter or click OK.

- When the Services window opens, locate the Bonjour service on the list and double click it.

- Change the Startup type to Automatic (Delayed Start) and click Apply and OK to save the changes.

According to users, the Bonjour service can cause internet issues and the Unidentified network message to appear.
To fix this problem, you just need to change the startup type of the Bonjour service as shown above.
Several users reported that Id_String2.6844F930_1628_4223_B5CC_5BB94B87 9762 service can also cause this problem.
To fix the problem, simply locate the service, double-click it, and set its Startup Type to Disabled. After doing that, be sure to check if the issue is resolved.
21. Delete the 0.0.0.0 gateway
- Click the Windows Start button, type cmd and select Run as administrator from the results to start Command Prompt with full privileges.
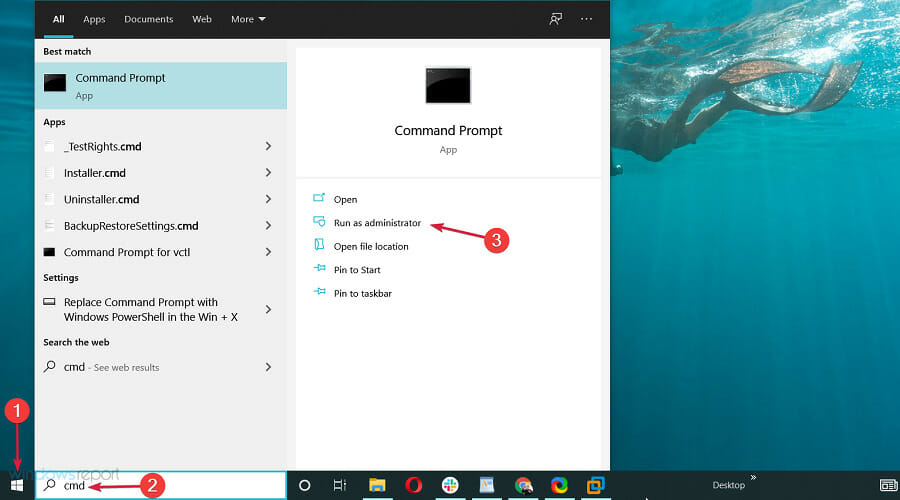
- Now, type or paste the following command and press Enter to run it:
route delete 0.0.0.0
- After the command is executed, restart your PC and check if the problem is resolved.
Several users reported that the issue is caused by the 0.0.0.0 gateway courtesy of Adobe CS3 Bonjour, but you can fix the issue simply by removing the gateway.
22. Change the Power Management settings for your adapter
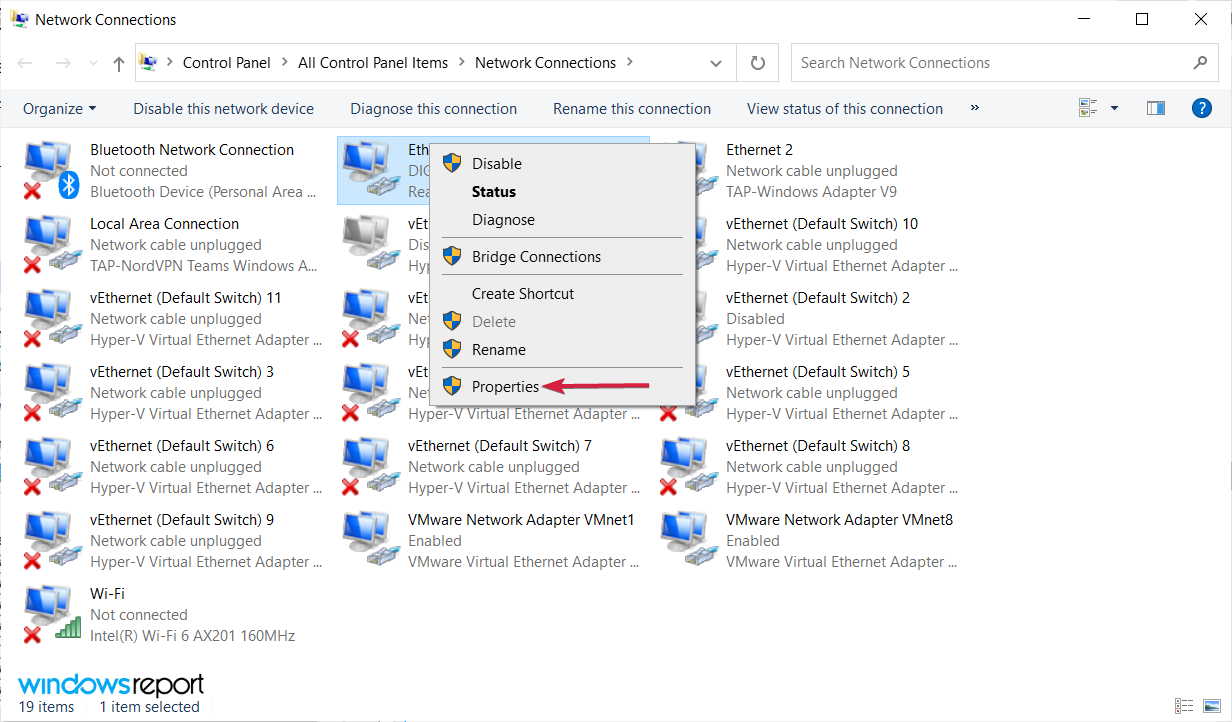
- Open the Network Connections window by right-clicking the Start icon and selecting the option from the menu.
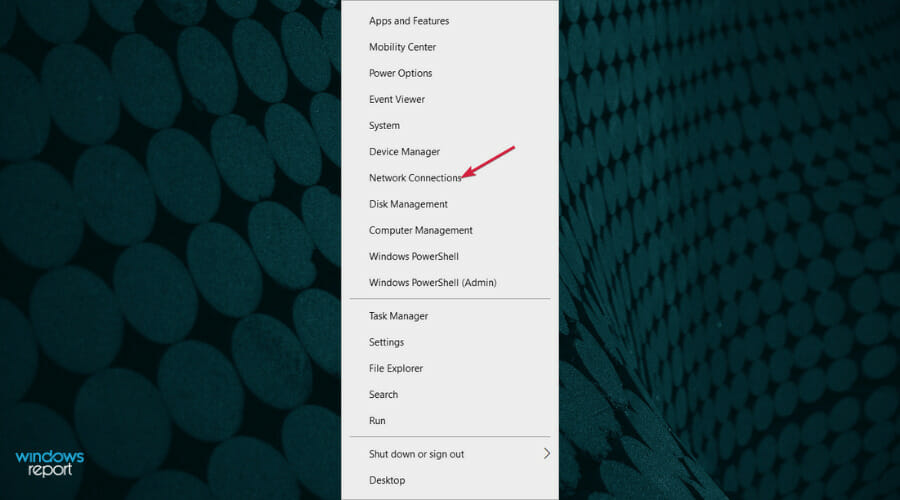
- Click on Wi-Fi from the left, then scroll down on the right and select Change adapter options.
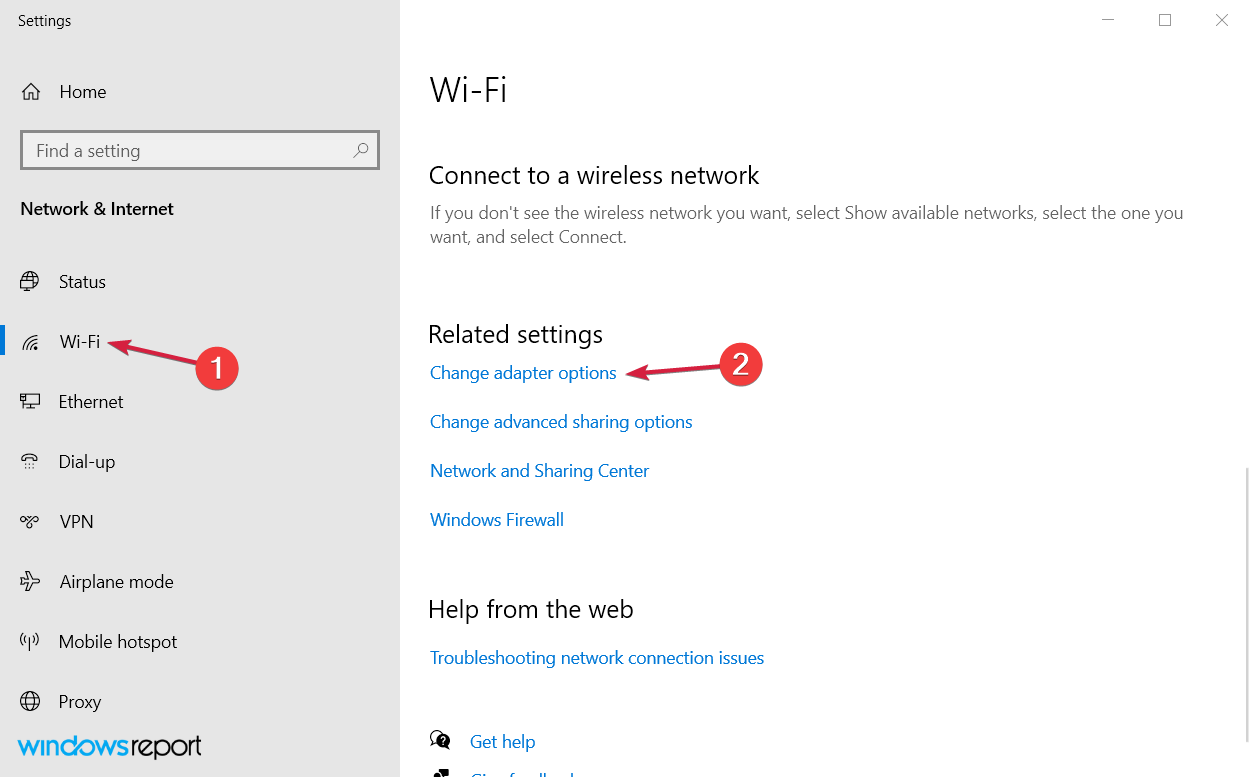
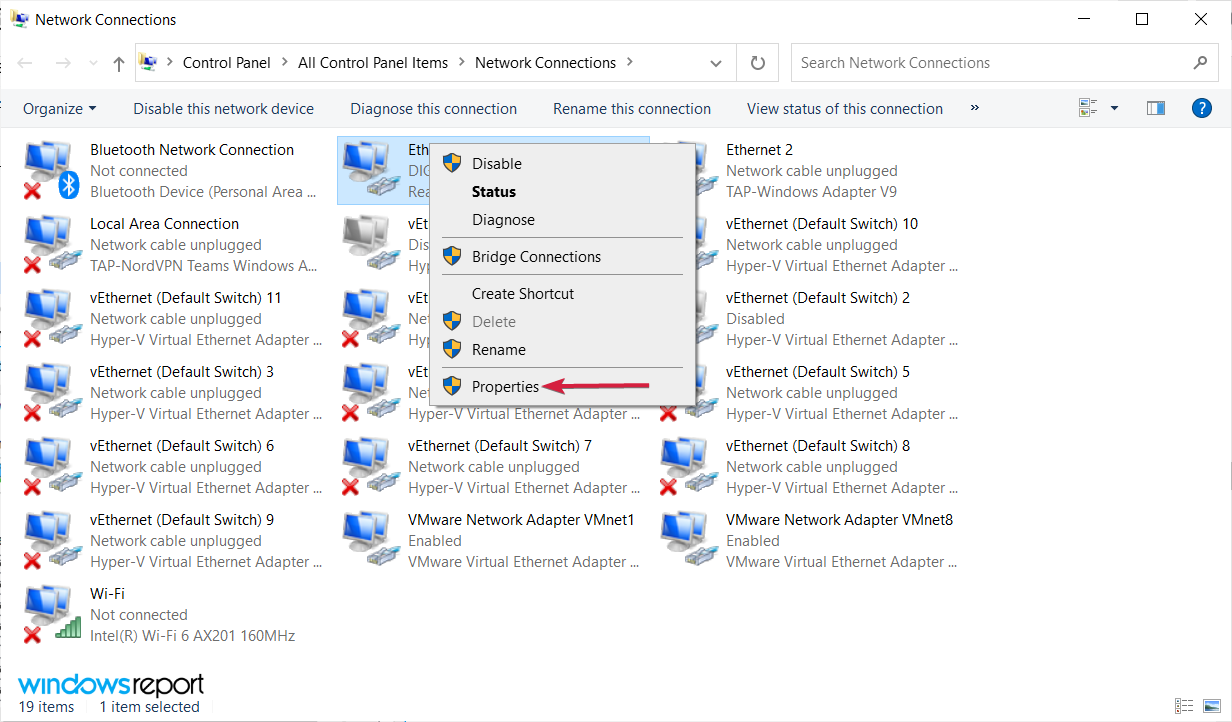
- Locate your wireless connection, right-click it and choose Properties from the menu.
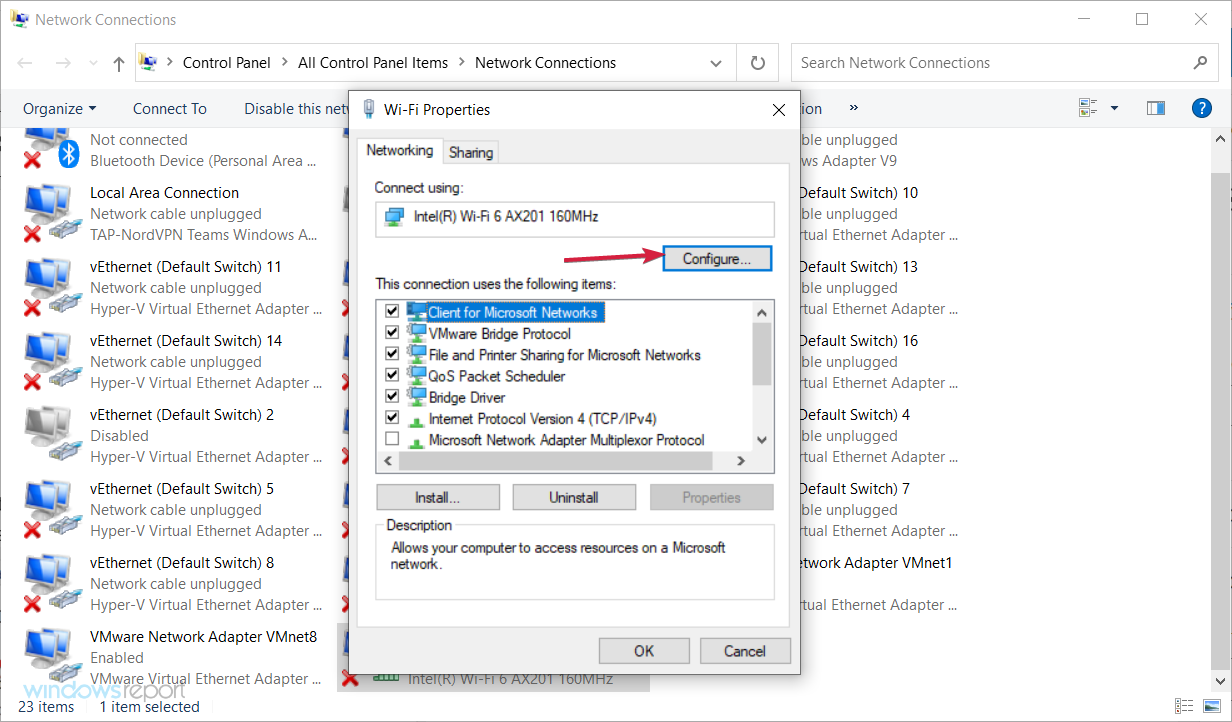
- Click on the Configure button.
- Now navigate to the Power Management tab and uncheck Allow the computer to turn off this device to save power. Click OK to save changes.

- Right click the wireless adapter again and choose Properties.
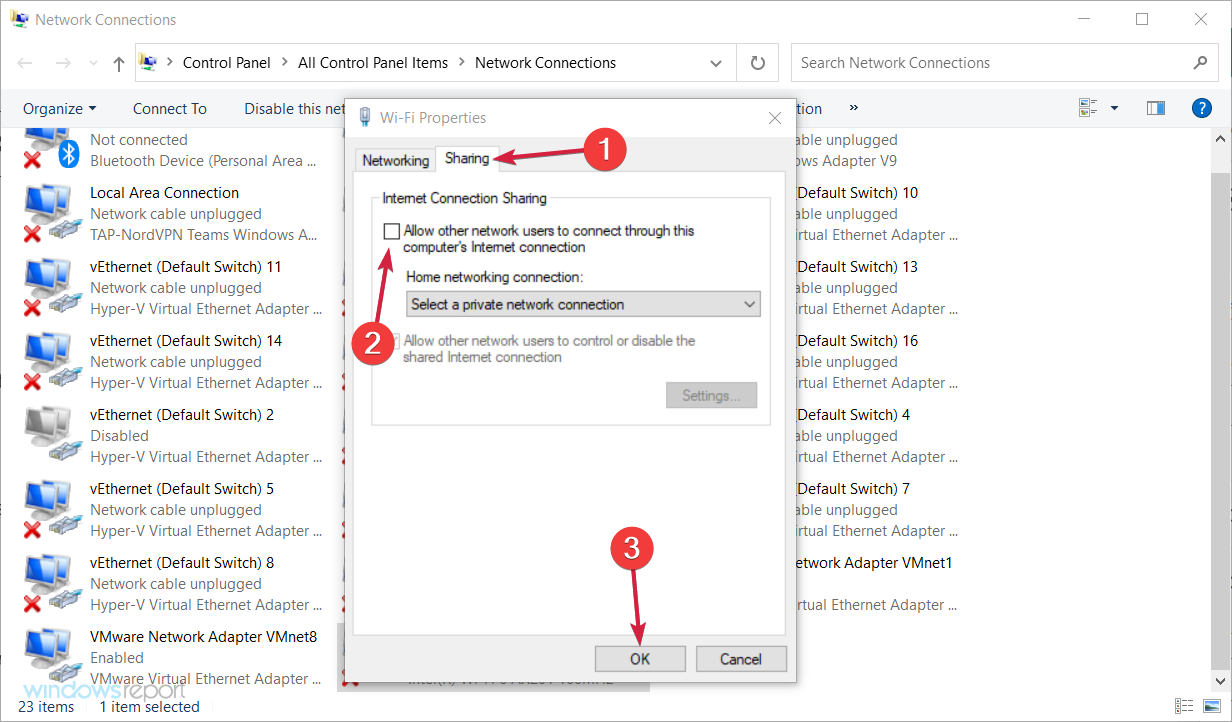
- Go to the Sharing tab and uncheck Allow other network users to connect through this computer’s Internet connection option. Click OK to save changes.
If you’re getting the Unidentified network message while using a Wi-Fi network, you might be able to solve it by using this method.
According to users, you can fix this problem with ease simply by changing Power Management settings of your adapter.
After making the aforementioned changes, the problem should be completely resolved.
23. Change your Roaming Sensitivity
- Right-click the Windows Start button and choose Network Connections from the menu.

- Click on Wi-Fi from the left pane, then scroll down on the right and select Change adapter options from Related settings.

- Find your wireless connection, right-click it and select Properties.

- Hit the Configure button.

- Navigate to the Advanced tab, locate Roaming Sensitivity or Roaming Aggressiveness (depending on your system) on the list and select it, then adjust values until the problem is resolved.
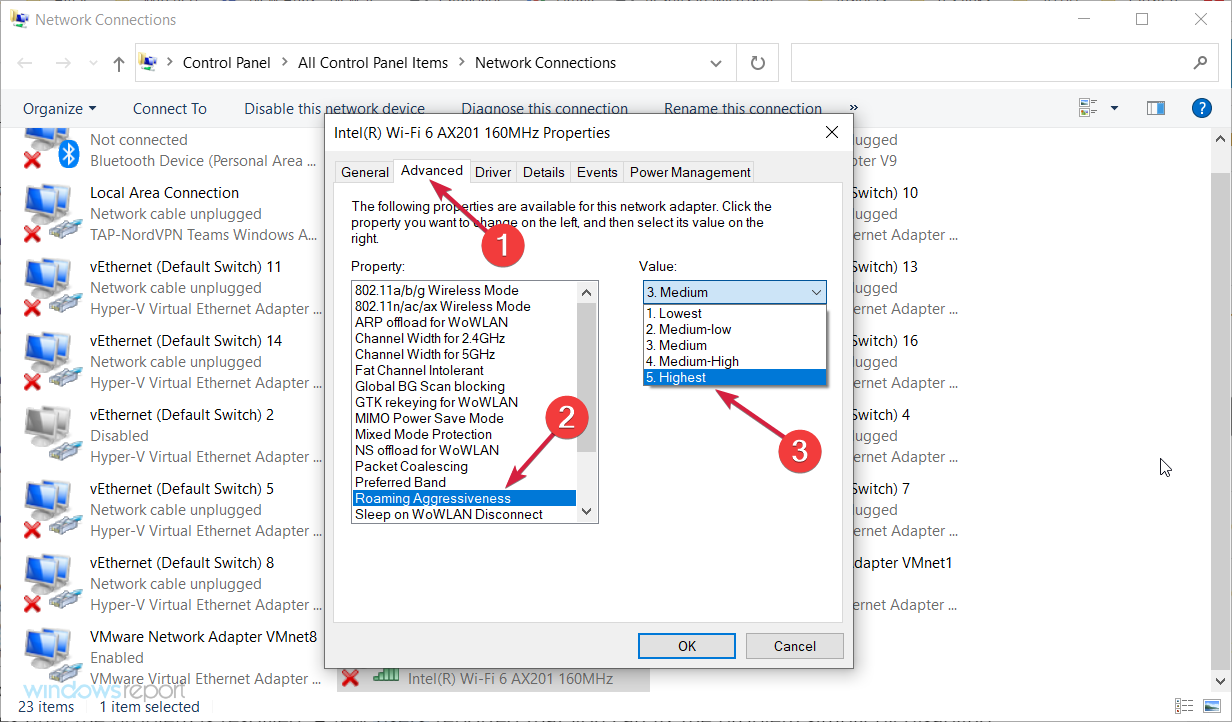
A few users reported that you can fix the problem simply by disabling Roaming Sensitivity, so be sure to try that as well.
24. Change your router’s encryption
Wi-Fi networks usually use encryption in order to prevent unauthorized access. Some of our readers reported that they fixed the problem simply by changing the network encryption on their router.
Users reported issues while using WPA2 encryption, but after changing it to WPA, the issue was resolved. To see how to change the encryption type on your router, we advise you to check its instruction manual.
Usually, you will find the option in the Wi-Fi settings section under the Security section but that depends on your router brand, model, and software.
We also have a Wi-Fi and connectivity issues guide for Windows 10/11 that will further help you fix all kinds of connection problems so make sure to check it out.
25. Enter your MAC address manually
- Click the Start button, type cmd and choose Run as administrator from the results to start Command Prompt with administrator privileges.

- Type or paste the following command and press the Enter key to run it:
ipconfig /all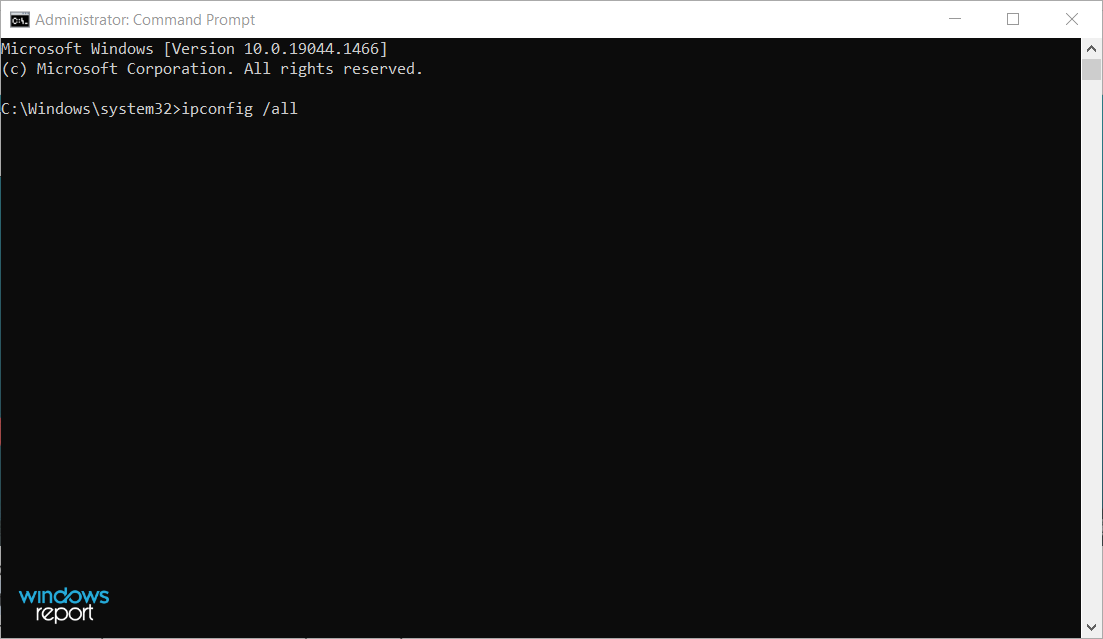
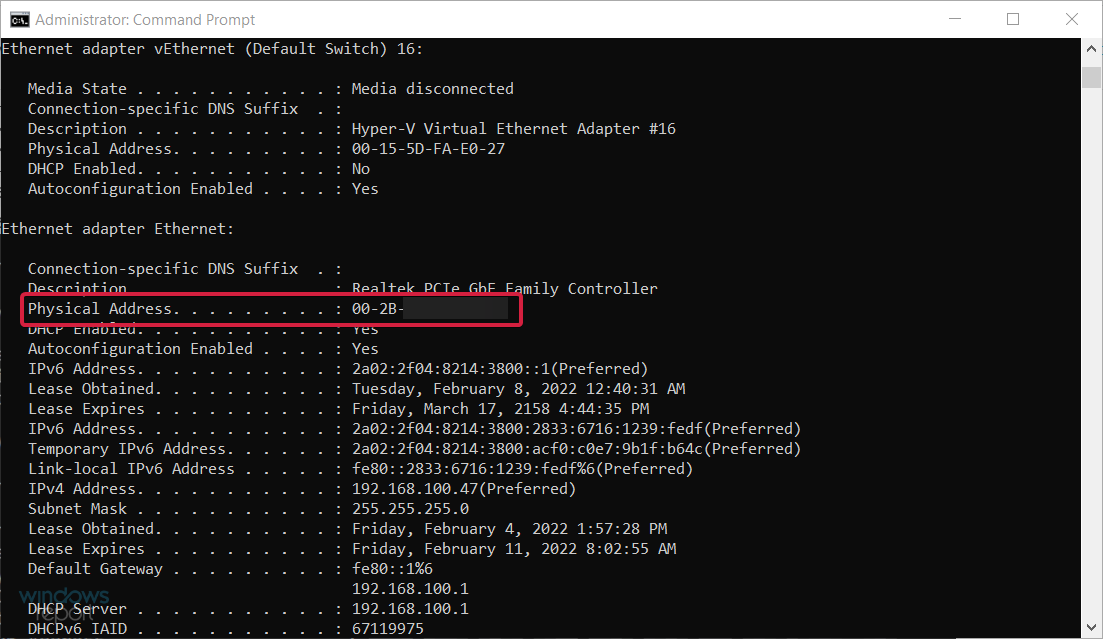
- Locate Physical Address of your adapter and write it down. The address will consist of six pairs of characters separated by dashes.
- Now go to Network Connections window, right click your connection and choose Properties, then click the Configure button as shown in the previous solutions.
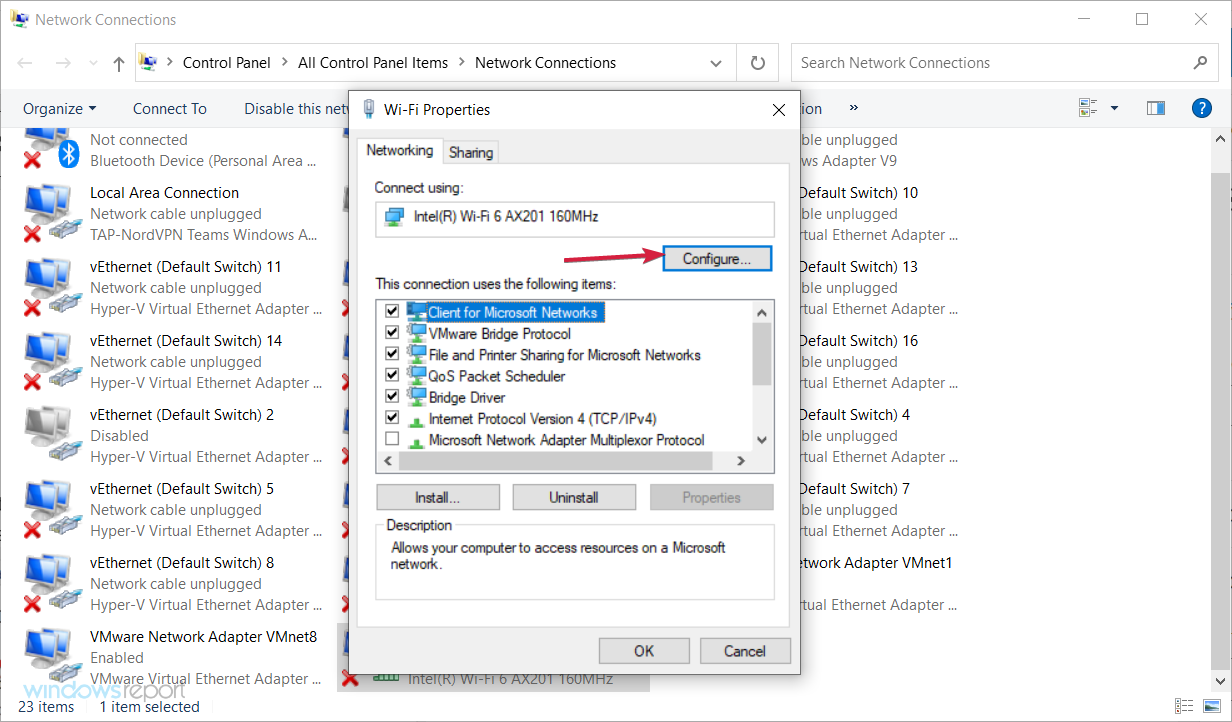
- Go to the Advanced tab and select Network Address option from the list. Enter your MAC address in the Value field without any dashes. After you’re done, click OK button to save the changes.
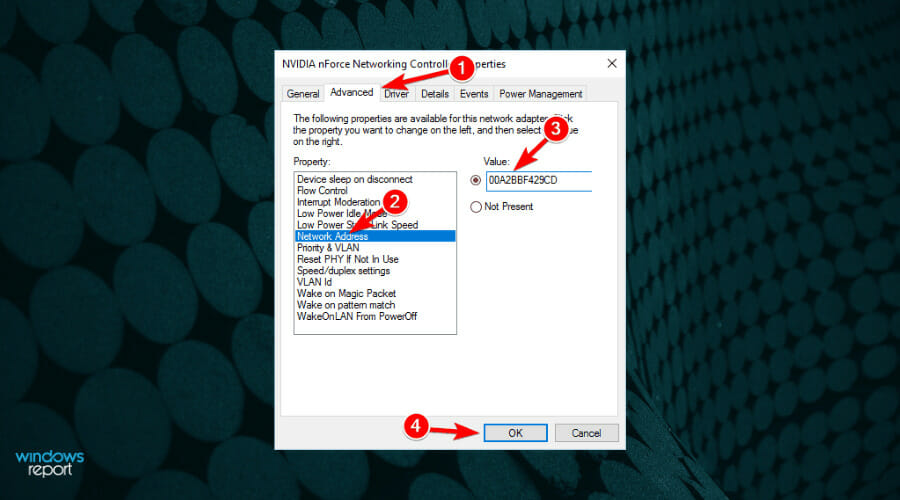
If you’re getting the Unidentified network no Internet message, you might be able to fix it simply by entering your MAC address manually.
How do I fix
Ethernet unidentified network
in Windows 11?
Although it has some new features and design, Windows 11 is not all that different from Windows 10 and our readers have encountered all sorts of Internet connection problems in the new OS.
The Ethernet unidentified network and Unidentified network no Internet errors in Windows 11 are just as common because they are caused by the same problems.
Luckily, the similarities between the two systems will help you solve these problems by applying all the solutions we presented for Windows 10 above on the new OS.
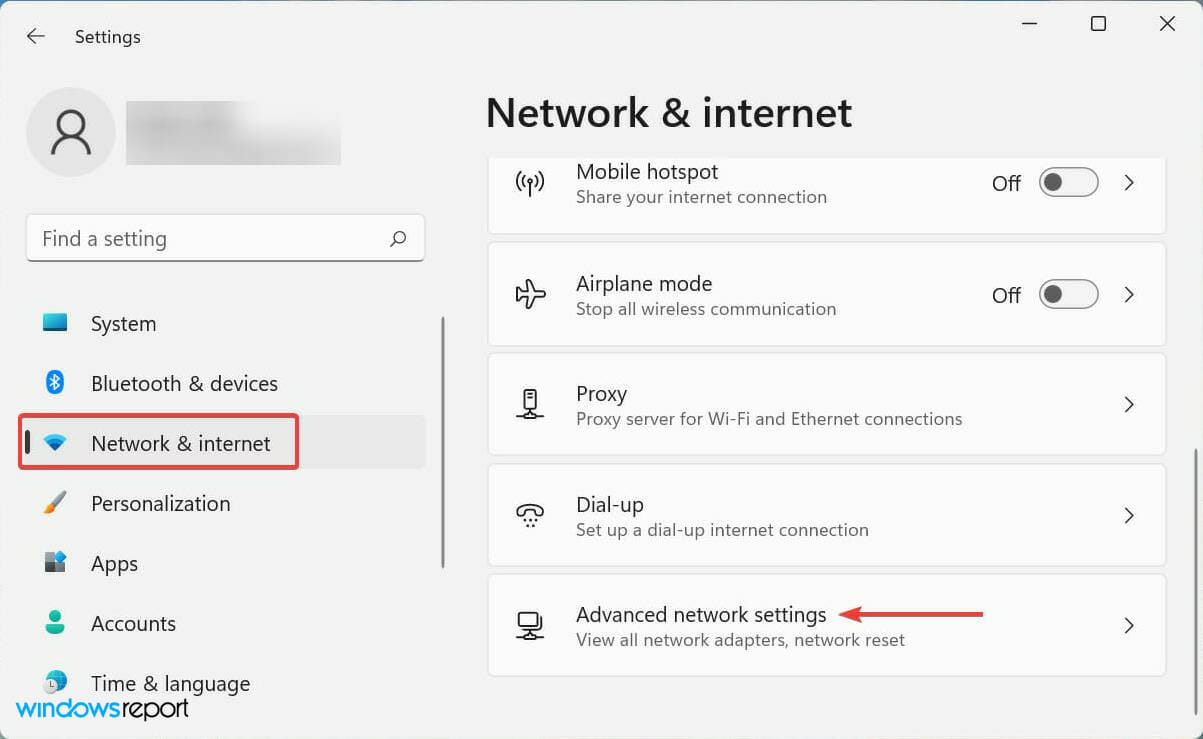 In Windows 11, you can access the Advanced network settings easier
There are, of course, a few differences. For instance, in Windows 11 is a lot easier to access the Advanced network settings from the Network & internet section in Settings.
However, should you require further information, check our guide on what you can do if you can’t connect to the network in Windows 11. It will help with Internet connectivity problems.
The Unidentified network message can prevent you from accessing the Internet, but you should be able to easily fix the problem by using some of our solutions listed above. We hope they helped!
If you switched to the new OS, we can also help you with a fix if the Windows 11 Ethernet is not working that will provide a lot more information.
Should you have more questions or suggestions for additional solutions, don’t hesitate to write us in the comments section below.
Was this page helpful?
x
There are 1 comments


![Toni Kroos là ai? [ sự thật về tiểu sử đầy đủ Toni Kroos ]](https://evbn.org/wp-content/uploads/New-Project-6635-1671934592.jpg)


