Service Host Local System Network Restricted Causing High CPU Usage Fix
Service host: Local system network restricted is a combination of Windows and other related services, for instance the auto-update service by Windows. These type of services usually tend to use up a lot of your system’s memory, CPU and other resources. But, when it’s starts consuming 90% of your system’s hard disk space, that’s when it becomes a concern. Some users complain of coming across the “Service host local system network restricted” causing high CPU usage where multiple svchost.exe processes open at the same time, eating up your system’s power. This is turn makes the device slow and even prone to crashes. It could be due to a glitch in the programs, services, or due to damaged system files. It can also arise due to a malicious software. However, we have found a way to fix this issue, Let’s see how.
ADVERTISEMENT
Solution 1: By Disabling Superfetch / SysMain Service
Although it’s believed that the Superfetch/SysMain service improves the system performance over the time, many users find it working fine only upto a certain time after the Windows OS is freshly installed. After a certain time, it does affect the system performance. Let’s see how to disable the service.
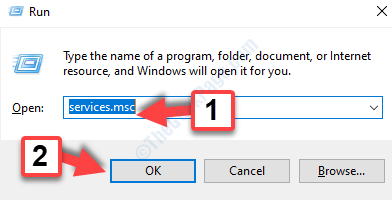
Step 1: Press the Win + R keys together on your keyboard and the Run command opens.
Step 2: Write services.msc in the Run command search box and hit press OK.

Step 3: The Service manager window will open. Go to the Names section on the right and locate Superfetch or SysMain in the list.
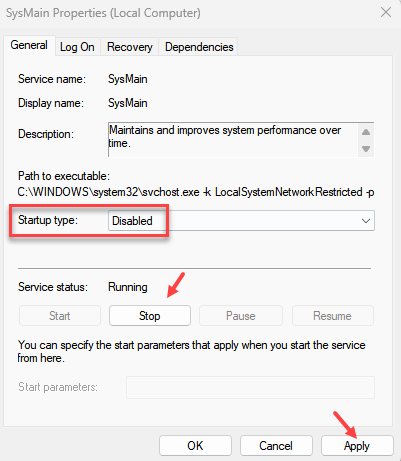
Step 4: Now, Double click on SysMain.
Step 5: Now, select disabled from dropdown in startup type. Click on Stop to stop the service.
ADVERTISEMENT
Click Apply and OK.

Now, exit the Services window and go back to Task Manager. Here you would see that the CPU usage has reduced considerably and your computer is back to normal. You can now work on your computer smoothly.
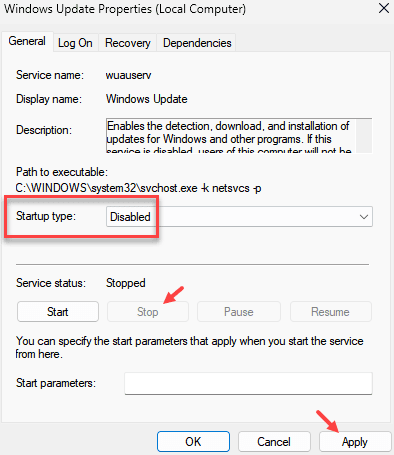
Note: – If this does not work, do the same for the services given below also.
- Windows Update
- Update Orchestrator Service
- Background Transfer Intelligence service
- Windows event Log

Solution 2: Set Your network connection as Metered Connection
1 – Press Windows key and I key together to open settings
2 – Click on Network & Internet
2 – Now, click on WiFi or your Ethernet connection

3 – Click on yout wifi / Ethernet network name

4 – Now, turn On metered Connection

Solution 3: Restore Firewall to default
1- Search Firewall & Network Protection in the search box.
2 -Now, click on it.

3 – Now, click on Restore Firewall settings to default

4 -Now, click on Restore defaults to restore to default settings

Solution 4: Reset Windows Update
1 – Press Windows key and S key together to open search.
2 -Type cmd in it .
3 -Now, right click on the command prompt and choose run as administrator

ADVERTISEMENT
4 -Now, run the commands given below one by one .
net stop bits
net stop wuauserv
net stop appidsvc
net stop cryptsvc
ren %systemroot%\SoftwareDistribution SoftwareDistribution.backed
ren %systemroot%\system32\catroot2 catroot2.backed
net start wuauserv
net start bits
net start appidsvc
net start cryptsvc
5 – Close the cmd window
Solution 5: Running SFC command
1 – Jointly press Windows key and S key to open search.
2 -Write cmd in it .
3 -Now, right click on the command prompt and click run as administrator

4 – Now, run the command shown below and hit enter key
sfc /scannow
5 – Once the commands gets completed after some time , run the command given below also.
dism /Online /Cleanup-Image /RestoreHealth
6 – After the completion of the command , close the cmd window
ADVERTISEMENT


![Toni Kroos là ai? [ sự thật về tiểu sử đầy đủ Toni Kroos ]](https://evbn.org/wp-content/uploads/New-Project-6635-1671934592.jpg)


