
Satin Stitch | SIMPLE Embroidery Tutorial | TREASURIE
Satin stitch – just the sound of the word makes us think of something soft and smooth. Almost silky, it is a luxurious-sounding name. Satin stitch is exactly like the sound of satin. It looks and feels soft and silky and it can transform a simple design into something luxurious as it fills in the spaces on any embroidery design.
 Satin Stitch Embroidery
Mục Lục
Satin Stitch
Satin stitch is a filling stitch used to cover sections of the background fabric. When embroidered with a thin shiny floss, it looks like silk or satin fabric.
The beauty of the satin stitch is just how simple it is. It is sewn in simple straight stitches making it a fast and easy option to fill spaces and shapes.
This stitch is best on small to medium shapes as larger shapes result in long threads that can catch and pull. You can break larger areas into smaller areas of satin stitch to prevent pulled threads.
In this tutorial, I have outlined the hearts with a backstitch at the end. You can also sew the outline first and then satin stitch inside it. An outline is just optional and you can sew it whenever it is easiest for you.

Machine Satin Stitch
Satin stitch is also the name given to a dense zig-zag stitch used for applique fabric designs. Use a short stitch length with a wider setting.
Satin Stitch Supplies
- THREAD – Embroidery floss or cotton. The best results for satin stitch are achieved with using just 1 or 2 strands of embroidery floss. In my samples I used 6 strands so you could clearly see the stitching in the photographs. Less strands will result in smooth, untangled lines.
- NEEDLE – Embroidery or Crewel Needle
- HOOP – Satin stitch is best sewn in an embroidery hoop to prevent you from pulling the stitches too tight and causing puckering.
- If you are new to embroidery, read my article on how to embroider to learn about basic supplies and techniques.
 Satin Stitch
How to do Satin Stitch
Step 1 – Mark Design
Draw your design using something that will not show or bleed into your finished design. Graphite pencil can be used if you are going to sew over the edges. Otherwise use chalk or removable fabric pens.
Step 2 – Starting Stitch
Begin with your needle and thread coming up to the right side of the fabric at a spot on the edge of the design at (1).
WORKING DIRECTION:
- For best results, work from the middle of the shape towards the outer edges. It is easier to control the format of the stitches and the finished effect in this way.
- A leaf satin stitch, for example, would start in the middle and work out to the tip and then start again from the middle to the other end of the leaf.
- While I have worked the satin stitch vertically, you may find that some shapes are better worked with horizontal stitches. The direction you choose it purely personal taste. A leaf or circle for example, could be worked either vertically or horizontally.
 Satin Stitch Embroidery – Start in the Center
Step 3 – Sewing the First Stitch
- Re-insert your needle directly across the pattern to the opposite side at (2).
- Return to the right side of the fabric by inserting your needle from underneath, next to the first stitch at (3).
 Satin Stitch Embroidery – First Stitch
This is how the satin stitch looks when the needle is pulled through.
 Satin Stitch Embroidery – First Stitch
Step 4 – Second Stitch & Repeat
This is the pattern to follow as you fill in the area with satin stitch. Try and get the stitches close together with minimal gaps. Repeat for the opposite side of the shape.
 Satin Stitch Embroidery – Repeat
Satin Stitch – Four Simple Steps
- Up from the back to start
- Down on the opposite side to make a stitch
- Up from the underside coming up next to the original starting point
- Back down again making another stitch and ready to continue in this fashion
When you have finished you can neaten the outline with a backstitch or some cute little French knots.
 Satin Stitch Close Up
Troubleshooting & Satin Stitch Tips
Satin stitch can often end up slanted, uneven, or with rough edges. Because of this, it is one of the harder embroidery stitches to get a smoother finish and straight edges. Here are a few tips for getting beautiful results in your embroidery stitches.
What fabric should I use for satin stitch?
Some embroidery stitches lend themselves to open-weave fabrics however the satin stitch is best suited to tightly woven fabrics with a higher thread count. Tightly woven fabrics will result in cleaner edges particularly for intricate designs.
How many strands should I use for satin stitch?
Thinner threads will give you smoother satin stitches. For stranded floss like the DMC brand, try separating a single strand. The fewer strands of floss, the smother your design will be. Before you start your design, do a test to see how many strands look the best. Usually, this will only be 1-2 strands.
Where should I start stitching for saying stitch?
If you start in the middle of the design it is more likely that you will prevent the stitches from becoming slanted at a certain point. Start in the middle and work outwards on either side.
If you do want to start on one side, consider drawing some guidelines every ¼ inch to keep your stitches straight. Make sure you use a removable pen in case any of the colors show through when the stitches separate.
What do you use satin stitch for?
Satin stitch is best worked on small designs or in small sections. If the stitches are too long they can catch and become uneven. Generally, the length of the satin stitch should be under ½ inch(12mm). Using a padded satin stitch can help support stitch length sizes of slightly larger.
For larger designs break it into smaller sections of satin stitch or switch to a variation of the satin stitch such as the long and short stitch.
Should I outline satin stitch?
Smoother outlines can be achieved by using an outline stitch. This may be underneath the satin stitch (so you satin stitch over it) or visible and outside the satin stitch. Backstitch, chain stitch, or split stitch can be used.
How do I satin stitch a curve?
To stitch small curves, particularly those in embroidery letters, try fanning out your stitches. This will prevent overlapping stitches. For gentle curves, simply change the direction of your stitches around the curve.
How do I stop satin stitch from puckering?
Puckering can occur if you pull the stitches too tight or if you have thin fabric. An embroidery hoop with the fabric pulled tautly is your best option to keep your stitching flat. Conversely, if your stitches are too loose they can also sag and pucker so it is important to keep the stitches flat and even at all times. For thin fabrics, try putting some stabilizer underneath before you start stitching.
Satin Stitch Variations
There are numerous variations of satin stitch if you want to explore its possibilities further. Try long and short satin stitch or padded satin stitch and shadowed satin stitch. The stitch stays the same, but slightly different effects can be used to accentuate this lovely soft, smooth creative stitch – aptly named – satin stitch.
Padded Satin Stitch
By stitching underneath your satin stitch, you can create a 3-dimensional look that elevates the surface of your fabric. The padding underneath your regular satin stitch can be just around the outside or quite dense and fill the entire shape.
- First fill the outline of the shape with an outline stitch such as backstitch, split stitch, or chain stitch.
- For just slight padding, this outline is enough and you can satin stitch over it.
- If you desire more height, then fill in the shape with a filling stitch. Seed stitch is one stitch that is commonly used, as are straight stitch or long split stitches. The denser the filling, the more pronounced the padding.
If you are using an expensive silk thread for your satin stitches, you may want to use a cheaper thread for the filling stitches since these will be hidden.
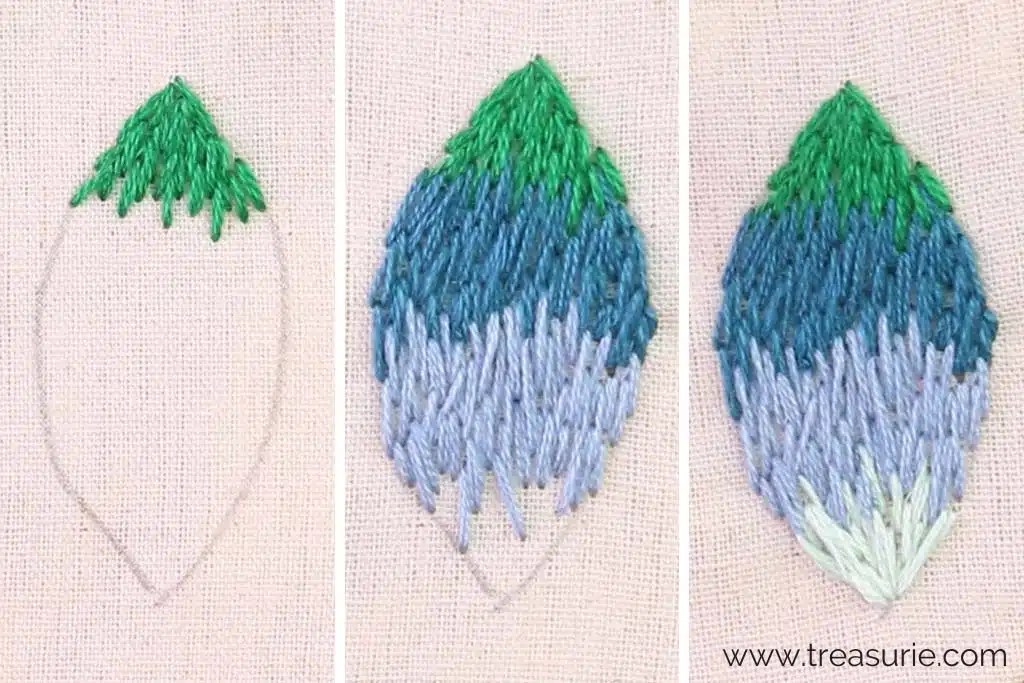
Long and Short Stitch (Brick Stitch)
The long and short stitch is a variation of the regular satin stitch and is great for filling larger areas. This stitch also allows you to change colors and give graduations that are beautiful for flower petals.
- Start at the top of the shape, alternating long and then short straight stitches.
- Fill in the gaps continuing the alternating long and short stitches.
 Long and Short Stitch
Fishbone Stitch
Another variation of the regular satin stitch is the fishbone stitch. It uses varying-sized satin stitches all coming into the center at a slant. This stitch makes beautiful leaves that look like they have a vein down the center.

MORE EMBROIDERY ARTICLES
5/5 – (21 votes)


![Toni Kroos là ai? [ sự thật về tiểu sử đầy đủ Toni Kroos ]](https://evbn.org/wp-content/uploads/New-Project-6635-1671934592.jpg)


