
Python | Uploading images in Django – GeeksforGeeks
Prerequisite – Introduction to Django
In most of the websites, we often deal with media data such as images, files etc. In django we can deal with the images with the help of model field which is ImageField.
In this article, we have created the app image_app in a sample project named image_upload.
The very first step is to add below code in the settings.py file.
MEDIA_ROOT = os.path.join(BASE_DIR, 'media')
MEDIA_URL = '/media/'
MEDIA_ROOT is for server path to store files in the computer.
MEDIA_URL is the reference URL for browser to access the files over Http.
In the urls.py we should edit the configuration like this
from django.conf import settings
from django.conf.urls.static import static
if settings.DEBUG:
        urlpatterns += static(settings.MEDIA_URL,
                              document_root=settings.MEDIA_ROOT)
A sample models.py should be like this, in that we have created a Hotel model which consists of hotel name and its image.
In this project we are taking the hotel name and its image from the user for hotel booking website.
class Hotel(models.Model):
name = models.CharField(max_length=50)
hotel_Main_Img = models.ImageField(upload_to='images/')
Here upload_to will specify, to which directory the images should reside, by default django creates the directory under media directory which will be automatically created when we upload an image. No need of explicit creation of media directory.
We have to create a forms.py file under image_app, here we are dealing with model form to make content easier to understand.
from django import forms
from .models import *
class HotelForm(forms.ModelForm):
class Meta:
model = Hotel
fields = ['name', 'hotel_Main_Img']
Django will implicitly handle the form verification’s with out declaring explicitly in the script, and it will create the analogous form fields in the page according to model fields we specified in the models.py file.
This is the advantage of model form.
Now create a templates directory under image_app in that we have to create a html file for uploading the images. HTML file should look like this.
<!DOCTYPE html>
<html lang="en">
<head>
<meta charset="UTF-8">
<title>Hotel_image</title>
</head>
<body>
<form method = "post" enctype="multipart/form-data">
{% csrf_token %}
{{ form.as_p }}
<button type="submit">Upload</button>
</form>
</body>
</html>
When making a POST request, we have to encode the data that forms the body of the request in some way. So, we have to specify the encoding format in the form tag. multipart/form-data is significantly more complicated but it allows entire files to be included in the data.
The csrf_token is for protection against Cross Site Request Forgeries.
form.as_p simply wraps all the elements in HTML paragraph tags. The advantage is not having to write a loop in the template to explicitly add HTML to surround each title and field.
In the views.py under image_app in that we have to write a view for taking requests from user and gives back some html page.
from django.http import HttpResponse
from django.shortcuts import render, redirect
from .forms import *
def hotel_image_view(request):
if request.method == 'POST':
form = HotelForm(request.POST, request.FILES)
if form.is_valid():
form.save()
return redirect('success')
else:
form = HotelForm()
return render(request, 'hotel_image_form.html', {'form' : form})
def success(request):
return HttpResponse('successfully uploaded')
whenever the hotel_image_view hits and that request is POST, we are creating an instance of model form form = HotelForm(request.POST, request.FILES) image will be stored under request.FILES one. If it is valid save into the database and redirects to success url which indicates successful uploading of the image. If the method is not POST we are rendering with html template created.
urls.py will look like this –
from django.contrib import admin
from django.urls import path
from django.conf import settings
from django.conf.urls.static import static
from .views import *
urlpatterns = [
path('image_upload', hotel_image_view, name = 'image_upload'),
path('success', success, name = 'success'),
]
if settings.DEBUG:
urlpatterns += static(settings.MEDIA_URL,
document_root=settings.MEDIA_ROOT)
Now make the migrations and run the server.
When we hit the URL in the browser, in this way it looks.
After uploading the image it will show success.
Now in the project directory media directory will be created, in that images directory will be created and the image will be stored under it. Here is the final result.

Now we can write a view for accessing those images, for simplicity let’s take example with one image and it is also applicable for many images.
def display_hotel_images(request):
if request.method == 'GET':
Hotels = Hotel.objects.all()
return render((request, 'display_hotel_images.html',
{'hotel_images' : Hotels}))
A sample html file template for displaying images.
<!DOCTYPE html>
<html lang="en">
<head>
<meta charset="UTF-8">
<title>Hotel Images</title>
<meta name="viewport" content="width=device-width, initial-scale=1">
<link rel="stylesheet" href="https://maxcdn.bootstrapcdn.com/bootstrap/3.3.7/css/bootstrap.min.css"> <script src="https://ajax.googleapis.com/ajax/libs/jquery/3.3.1/jquery.min.js">
</script>
<script src="https://maxcdn.bootstrapcdn.com/bootstrap/3.3.7/js/bootstrap.min.js">
</script>
</head>
<body>
{% for hotel in hotel_images %}
<div class="col-md-4">
{{ hotel.name }}
<img src="{{ hotel.hotel_Main_Img.url }}" class="img-responsive" style="width: 100%; float: left; margin-right: 10px;" />
</div>
{% endfor %}
</body>
</html>
Insert the url path in the urls.py file
# urls.py
path('hotel_images', display_hotel_images, name = 'hotel_images'),
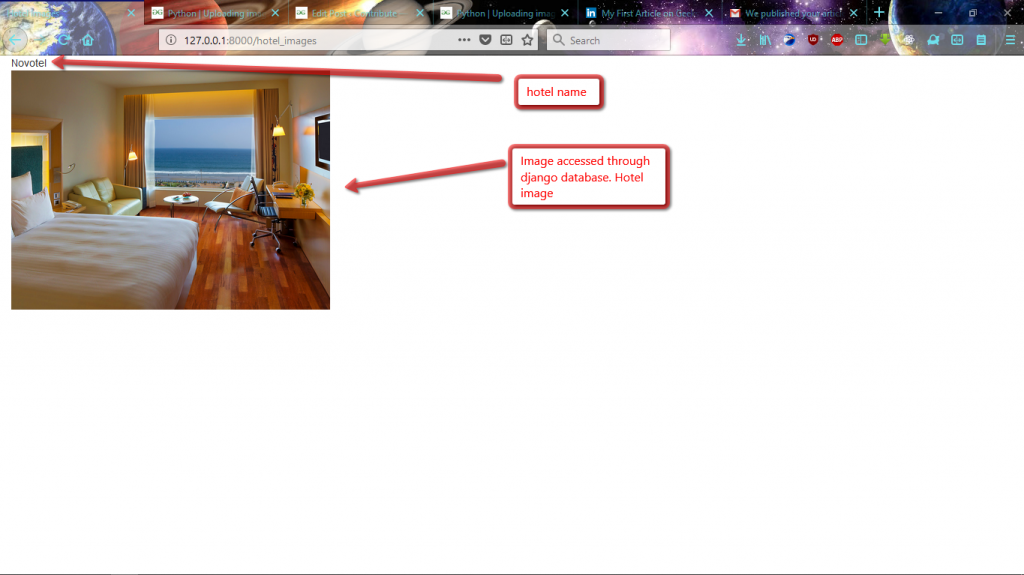
Here is the final view on the browser when we try to access the image.
My Personal Notes
arrow_drop_up


![Toni Kroos là ai? [ sự thật về tiểu sử đầy đủ Toni Kroos ]](https://evbn.org/wp-content/uploads/New-Project-6635-1671934592.jpg)


