Preferred Network Lists in Detail
As devices store a list of previously used hotspots, the preferred network list in a WiFi client device is an intriguing source of private location information. This post will teach you how to perform reconnaissance using preferred network lists.
Hello World! When you deassociate from a WiFi network, keeping your client active will broadcast a probe request from the saved network list and attempt to join the network if the access point or hotspot sends a probe response to a specific SSID. How should the client proceed with network association if there are several probe responses? In this situation, your client will use preferred network list feature. So let’s read more about it in depth below.
What is PNL?
Simply explained, a preferred network list is a collection of saved SSIDs (in a specific order) with the settings that you created when connecting them for the first time.
I’ve seen that users don’t remove the SSID from the list, making it an intriguing source of private location information. For example, a specific hotel or cafe will always serve the network with the SSID name assigned to their establishment.
Performing OSINT through PNL is beyond the scope of this post, but I’ve included a research paper in the resources area below if you’re interested.
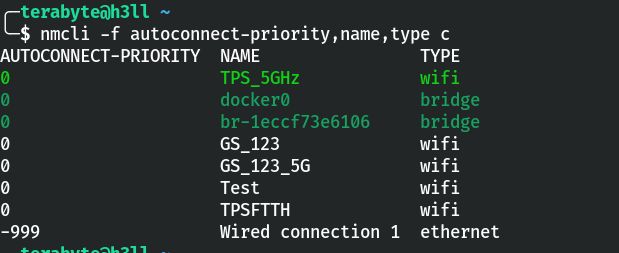
I’m using a Linux computer right now, and I can use the nmcli utility to query NetworkManager for saved network profiles. As you can see that it is currently connected to the TPS_5GHz network and there are 4 other WiFi networks with the same autoconnect priority of 0.
nmcli -f autoconnect-priority,name,type c Get list of saved networks with autoconnect priority
Most WiFi networks have the auto connect setting enabled by default, and very few people try to opt out. So, if the connection is set to autoconnect, connections with higher priority will be preferred. Defaults to 0. The higher number means higher priority.
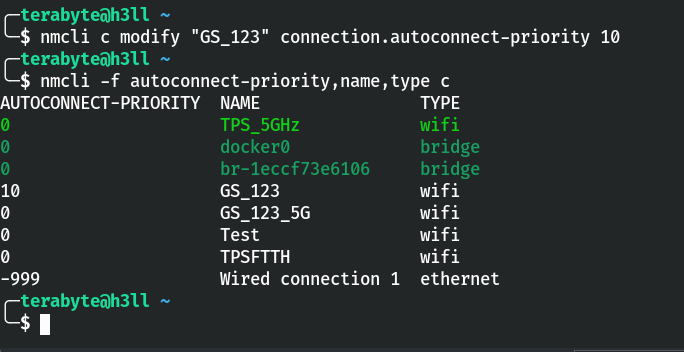
Let’s update the autoconnect priority of the GS_123 network to 10, the highest value in the current list, using the modify command.
nmcli c modify "GS_123" connection.autoconnect-priority 10 Set the highest priority of the GS_123 network
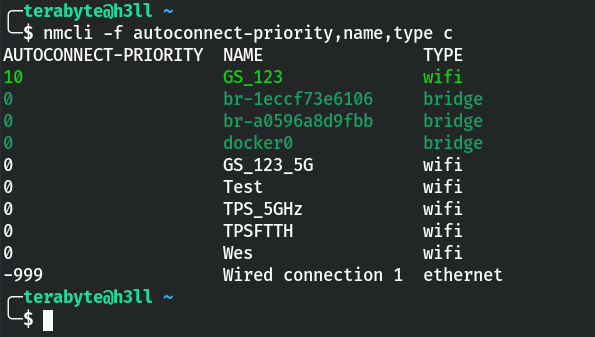
I disconnected from the TPS_5GHz network, and guess what, the connection for “GS_123” is now established.
 Confirm that GS_123 is the preferred network association
Perform Recon for PNLs
Enough theory; let’s get started on the reconnaissance for PNLs in question/answer format. I’ll be using AttackDefense’s lab and recommend that you try it out once – https://attackdefense.com/challengedetails?cid=1264
I’ve already discussed how to set the device to monitor mode in previous posts, so I’ll skip this one. However, the commands I used are as follows:
ifconfig wlan0 down					# set wlan0 status down
iwconfig wlan0 mode monitor			# configure wlan0 in monitor mode
ifconfig wlan0 up					# set wlan0 status back to up
Confiure wlan0 in monitor mode
How many clients are probing?
Using airodump-ng, you can dump the beacon frames from the access points and probe requests from the station devices.
airodump-ng --band abg wlan0The display panel will switch when A key is pressed. Continue pressing the key until “display sta only” appears to get the output shown in the screenshot (here you can see in green box).
 Display probe requests only from airodump-ng
Answer – 2
What is the Preferred Network List (PNL) length of the client with MAC address 02:00:00:00:02:00?
The scan cannot be filtered by station MAC address. You should look for the station’s correspoindin MAC address in the probe request section. As you can see, there are a total of six SSIDs listed in the Probes column.
 SSID list probing from the target client
Answer – 6
The client 02:00:00:00:03:00 connects to which network first if all networks in its PNL are available? Assume that all networks in PNL are WPA2-PSK networks.
There is no WiFi network with the SSID name you can see in the probe requests. Therefore, you are supposed to create WiFi network with the SSIDs probing by the target station mac address.
Hostapd is a user space application that allows you to configure access points and authentication servers. It is simple to configure using a configuration file, and it supports multiple BSS.
Since a single wifi card can support 8 or 16 BSS, we can use it with hostapd to serve both dex-net and dex-network, as shown in the configuration file below.
# interface to use
interface=wlan1
# kernel driver used in linux
driver=nl80211
# SSID used for management frames
ssid=dex-net
# WPA version 2 is used (from question)
wpa=2
# use any password string
wpa_passphrase=123456789
# key management algorithm for current bss
wpa_key_mgmt=WPA-PSK
# encryption used for wpa2
rsn_pairwise=CCMP
# channel number to use
channel=1


## Other BSSIDs can be added by using separator 'bss'
bss=wlan1_1
# SSID for wlan1_1 BSS
ssid=dex-network

# Following details for wlan1_1 is copied from above
wpa=2
wpa_passphrase=123456789
wpa_key_mgmt=WPA-PSK
rsn_pairwise=CCMP
channel=1
Configuration file of hostapd for current task
Run hostapd with the configuration file shown above. You’ll notice that “dex-network” attempted to connect to the wlan1_1 BSS first.
 Association request for dex-network from the client
Answer – dex-network


![Toni Kroos là ai? [ sự thật về tiểu sử đầy đủ Toni Kroos ]](https://evbn.org/wp-content/uploads/New-Project-6635-1671934592.jpg)


