NMAP Tutorial to Scan IP Network Range – Step-By-Step with Examples
Written By

This tutorial marks the beginning of a series of network security and penetration testing articles that I will be posting on this website.
The purpose of this article is to describe how to perform a simple NMAP scan of an IP range/subnet on a network. There are hundreds of scan options with NMAP but I will start with the most useful one which is to scan a range of IP addresses together with some other extra options.
NOTE: For a more comprehensive NMAP Tutorial with all popular and useful commands you can download this Nmap Cheat Sheet PDF here.
One of my responsibilities in the company I work is to perform security assessments and penetration testing on the external and internal systems of the enterprise. The tool that I use in almost all penetration testing engagements is the famous NMAP scanner (short for Network Mapper tool).
Disclaimer: Network Scanning and hacking is illegal unless you have permission.
In a penetration testing project you need first to “map” and identify as much information about your targets so that to plan your next steps. This is the reconnaissance phase of a security test.
NMAP is an excellent utility to help you in the reconnaissance phase since you can collect information such as:
- What IP addresses are live on the network (i.e what IPs have hosts running on them).
- What ports are open on these IP addresses.
- What services are running on the open ports (together with service versions etc).
- What operating systems are running on the identified IP addresses.
- Find well known vulnerabilities on the scanned systems (using NSE scripts).
- Verify firewall rules.
- And much more
Now let’s go ahead and see several nmap options to scan multiple IP addresses in a network.
Simple NMAP scan of IP range
The default scan of nmap is to run the command and specify the IP address(es) without any other options. In this default scan, nmap will run a TCP SYN connection scan to 1000 of the most common ports as well as an icmp echo request to determine if a host is up.
There are four ways to scan multiple IP addresses:
1) Specify IPs one-by-one separated by space
nmap 192.168.10.1 192.168.10.111 192.168.10.222
Starting Nmap 7.12 ( https://nmap.org ) at 2016-04-25 21:55 GTB Daylight Time
Nmap scan report for 192.168.10.1
Host is up (0.0032s latency).
Not shown: 998 closed ports
PORT STATE SERVICE
80/tcp open http
20031/tcp filtered unknown
MAC Address: D8:D4:3C:F2:AA:79 (Sony)
Nmap scan report for 192.168.10.111
Host is up (0.0056s latency).
Not shown: 991 closed ports
PORT STATE SERVICE
21/tcp open ftp
22/tcp open ssh
80/tcp open http
139/tcp open netbios-ssn
443/tcp open https
445/tcp open microsoft-ds
873/tcp open rsync
3493/tcp open nut
8080/tcp open http-proxy
MAC Address: 00:08:9B:8B:F5:EB (ICP Electronics)
Nmap scan report for 192.168.10.222
Host is up (0.0022s latency).
Not shown: 996 filtered ports
PORT STATE SERVICE
135/tcp open msrpc
139/tcp open netbios-ssn
445/tcp open microsoft-ds
5357/tcp open wsdapi
MAC Address: 00:1A:4D:58:1A:06 (Giga-byte Technology)
Nmap done: 3 IP addresses (3 hosts up) scanned in 11.46 seconds
2) Specify IPs in consecutive range
nmap 192.168.10.100-230
Starting Nmap 7.12 ( https://nmap.org ) at 2016-04-25 22:03 GTB Daylight Time
Nmap scan report for 192.168.10.111
Host is up (0.0029s latency).
Not shown: 991 closed ports
PORT STATE SERVICE
21/tcp open ftp
22/tcp open ssh
80/tcp open http
139/tcp open netbios-ssn
443/tcp open https
445/tcp open microsoft-ds
873/tcp open rsync
3493/tcp open nut
8080/tcp open http-proxy
MAC Address: 00:08:9B:8B:F5:EB (ICP Electronics)
Nmap scan report for 192.168.10.222
Host is up (0.0097s latency).
Not shown: 996 filtered ports
PORT STATE SERVICE
135/tcp open msrpc
139/tcp open netbios-ssn
445/tcp open microsoft-ds
5357/tcp open wsdapi
MAC Address: 00:1A:4D:58:1A:06 (Giga-byte Technology)
Nmap done: 131 IP addresses (2 hosts up) scanned in 6.52 seconds
3) Specify a scan range of IPs using a wildcard
nmap 192.168.10.*
4) Specify a scan range of IPs using a subnet notation
nmap 192.168.10.0/24
Scan all ports of an IP range
The simple default scan above will check the 1000 most well known ports for each IP address. What if you want to scan ALL ports of the IP range under scope. Let’s see how to run this:
Assume we want to find all open ports in class C subnet 192.168.10.0/24
1st way
nmap -p- 192.168.10.0/24
2nd way
nmap -p 1-65535 192.168.10.0/24
Discover Live IPs in a subnet
This is a “ping scan” to identify live hosts in the specified range.
This scan option uses a combination of scan techniques to identify live hosts, such as sending an icmp echo request, TCP SYN packets to ports 80 and 443, timestamp requests, arp requests etc.
nmap -sP 192.168.10.0/24
Detect OS and Services Running in a subnet
Now we will see how to scan a range of IPs and detect what Operating System and Services (versions) are running on live hosts.
nmap -A 192.168.10.0/24
There are hundreds of other nmap scan options available which will be covered in future posts, so stay tuned J
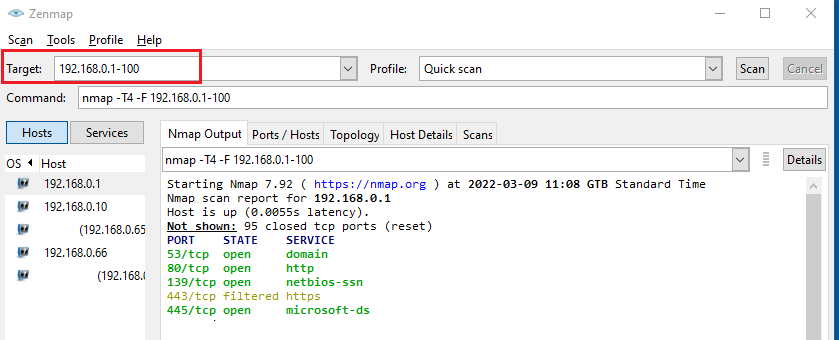
Scan IP Range with Zenmap
As you probably know already, Zenmap is the Graphical Front End (GUI) of nmap command. Here is how to scan an IP range with Zenmap:

As shown above, at the “Target” field just enter the IP address range separated with dash:
For example 192.168.0.1-100.
Then select the scan Profile (e.g quick scan, intense scan, ping scan etc) and hit the “Scan” button.
The scanning output is shown in the middle window.
What is Vertical and Horizontal Port Scanning?
A Vertical Scan is when you scan a single IP address for multiple TCP/UDP port numbers.
On the other hand, a Horizontal Scan is when you scan multiple IP addresses for a single Port number.
We have also Box Scanning which is basically a combination of Vertical and Horizontal scans.


![Toni Kroos là ai? [ sự thật về tiểu sử đầy đủ Toni Kroos ]](https://evbn.org/wp-content/uploads/New-Project-6635-1671934592.jpg)


