
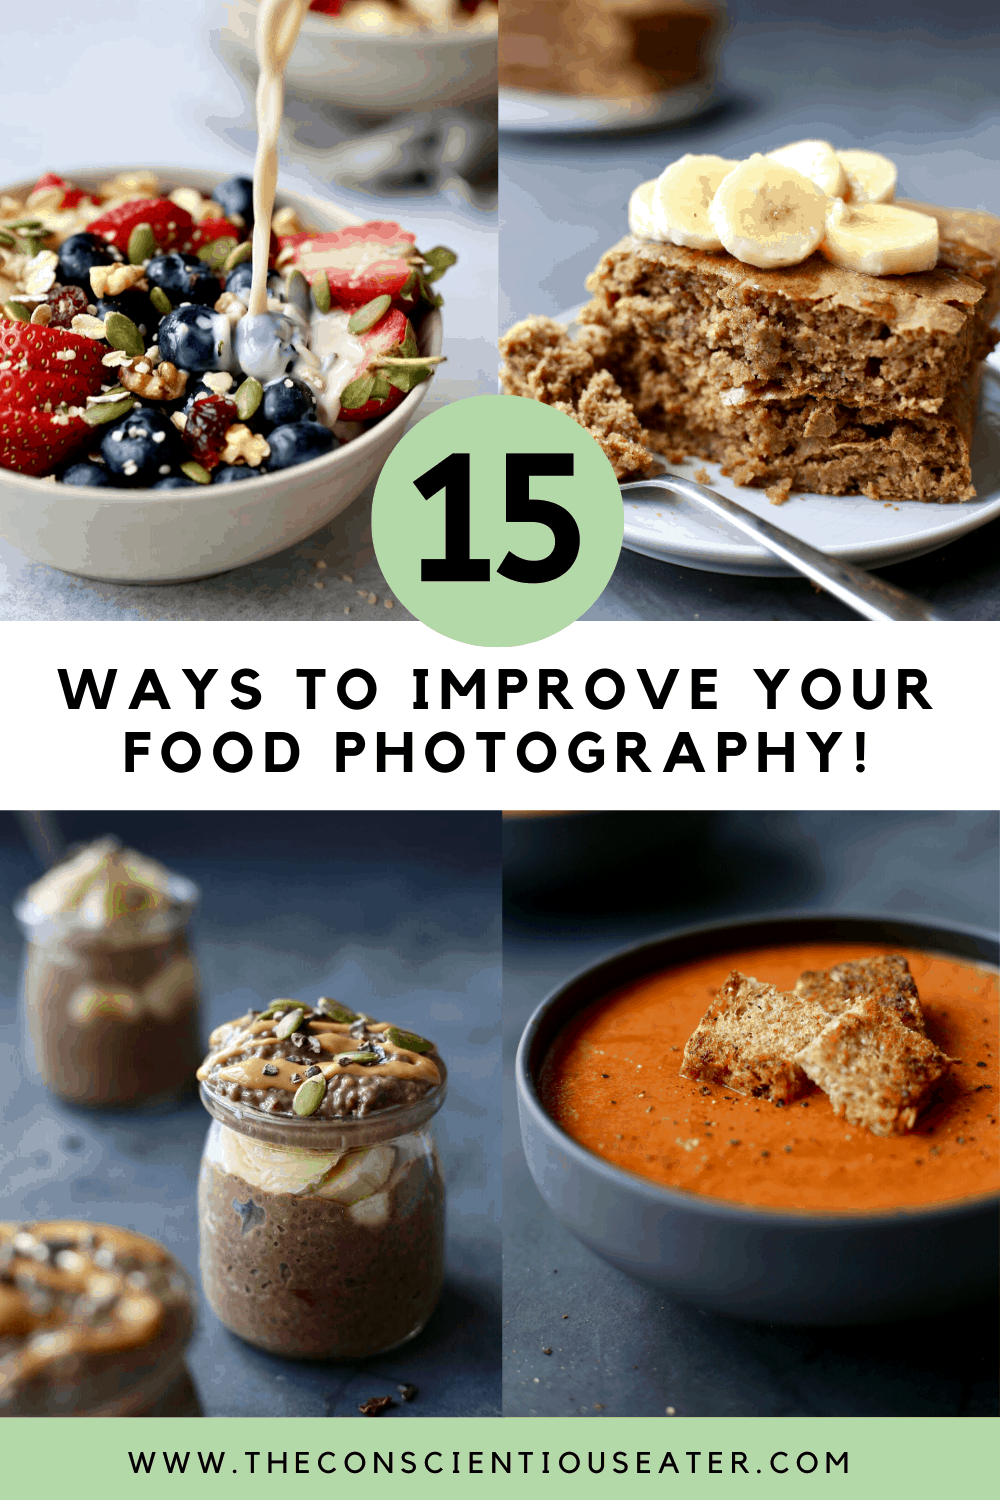
My Top 15 Food Photography Tips & Tricks!
No matter where you are at in your food photography journey, I hope these 15 tips and tricks that I’ve learned over the years will help you see immediate improvement!
Just a few years ago, I never would have thought that I’d be writing a post on how to improve your food photography. I started this blog over 6 years ago and at the time I had no idea what I was doing in all aspects of food blogging. I just wanted to document my new-found love of cooking plant-based food!
While I was having so much fun, my food photos were often blurry, taken at odd angles and un-appetizing. It frustrated me that I couldn’t make my food look as good as it tasted. However, over the years–through lots of trial, error and practice — my food photography has improved immensely!
If you have a passion for food photography, but have no idea where to start, I really hope this post is helpful for you! Know that I too was in the same place just a few years ago! Take your time, be gracious with yourself and enjoy the learning process!
Jump To
- 1. Invest in backdrops
- 2. Buy a tripod and remote trigger
- 3. Use props to highlight the food
- 4. Learn the color wheel
- 5. Learn about lighting
- 6. Learn how to use your camera’s manual mode
- 7. Practice the rule of thirds
- 8. Create lines
- 9. Shoot from the best angles
- 10. Get a decent camera
- 11. Get a decent lens (or two)
- 12. Master photo editing
- 13. Take a class
- 14. Practice!
- 15. Before and after examples
Mục Lục
1. Invest in backdrops
For years I would take my food photos on whatever surface I could find. A glass coffee table, the floor, a dimly lit kitchen counter…you get the picture. And while I’m a firm believer in using what you have, I have also come to see the value in investing in some backdrops when it comes to creating beautiful food photos. By having a few backdrops on hand, you can control how much your food pops and tell more of a story with your photos.
While some backdrops cost an arm and a leg, there are also lots of YouTube videos showing you how to create your own food photography backdrops for a fraction of the price. Additionally, there are now companies that sell affordable, stunning backdrops that are durable, roll up easily and wipe clean for easy clean up. One of my favorite companies is Ink and Elm!
Large tiles from Home Depot, old wooden boards nailed together and cheap vinyl countertop covers also make for great, affordable photography backdrops!
 LEFT: There was no backdrop used in this photo so you can see a messy couch in the background which distracts from the food.
RIGHT: Light colored backdrops make the food pop!
2. Buy a tripod and remote trigger
I don’t know about you, but there have been so many times in the past that I’ve done a photoshoot only to find that–when I go to edit my photos on my laptop — most of my photos are blurry. Ah, so frustrating! That’s why I started using a tripod and remote trigger. By using a tripod, you won’t have to worry about shaky hands when shooting your recipes. A tripod acts as another set of hands, allowing you to shoot crisp, beautiful food photos.
Additionally, a remote trigger not only allows you to take crisp photos by ensuring your shaky hands are no where near the camera, it also allows you to venture into the world of action photos. Imagine sweet maple syrup being poured over a stack of fluffy pancakes. Or vibrant, green cilantro being sprinkled over a pasta salad. I’ve had so much fun improving my food photography with just these two inexpensive items! Below I’ll list the first tripod I bought (super affordable), the tripod I have now and my remote trigger.
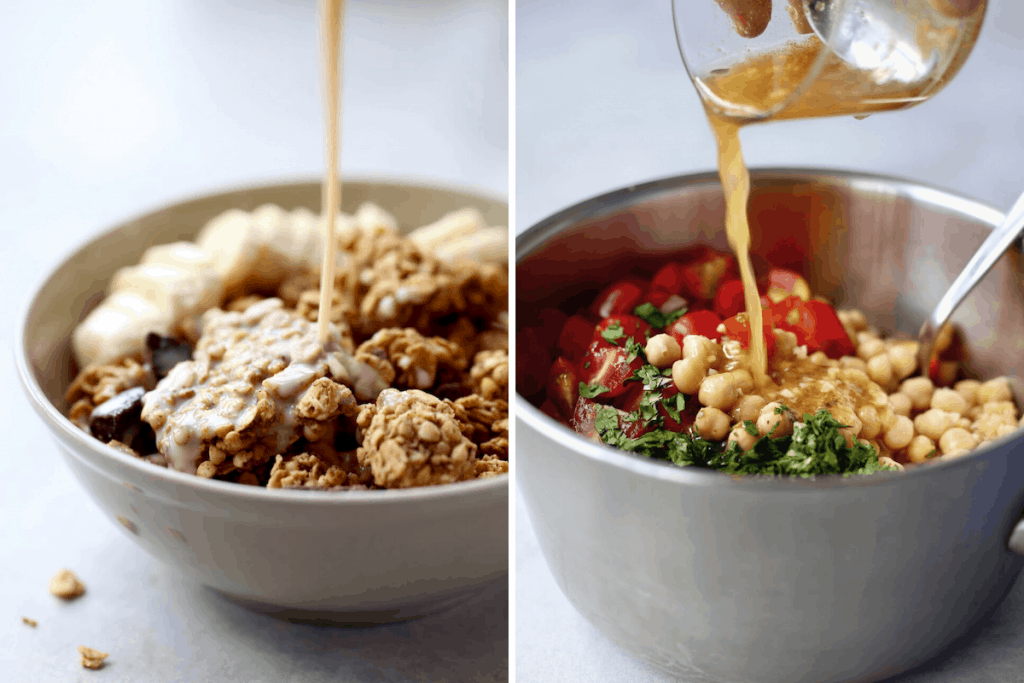 Both of these pour shots were made possible thanks to a tripod and remote trigger! No assistant needed!
3. Use props to highlight the food
Even though I’ve had this food blog for over 6 years, it hasn’t been until recently that I’ve started learning more about food props and purchasing certain dishes, cups, etc. specifically for shooting recipes. For years I would use whatever I had in my house, which was often shiny white, oversized dishes and crazy patterned bowls from my international travels. While I’m all about using what you have and not waiting to get started, I have found that investing in the right food props makes a huge difference in shooting beautiful, mouth-watering photos. Some of the tips I’ve picked up (slooooowly) along the way are listed below:
- Go small! When you use smaller plates, bowls, cups, jars and utensils, your food will look more voluminous and appetizing. So for example, instead of having a small amount of food barely fill up a normal size bowl, use a small bowl so that the food overflows or at least fills up the bowl completely.
- Choose matte. Especially if you’re just getting started with food photography, I highly recommend using dishes that have a matte finish. This means they aren’t glossy or shiny. By using dishes with a matte finish, you won’t have to deal with intense glare or shine on your dishes, which can distract from the food.
- Find your style. The more you study food photos, you’ll notice that certain people use a ton of props and garnishes. Others photos, however, are more simple. If you like more simple styling, that’s great! I personally don’t like to use very many props in my food photos so that the food stands out. But if you like to use props to tell a story, that’s great too. You do you!
- Invest slowly. The more you practice your food photography, the more you’ll realize what food props you actually need and which ones you can pass on. If you’re just getting started, there is no need to go out and buy a bunch of props. You may find you don’t use half of them! Instead, start with what you have and take note of what props, dishes, etc. will help enhance your photos.
 LEFT: A stark white bowl adds glare and distracts from the food. The white bowl is also too big and swallows the food.
RIGHT: A neutral backdrop and a smaller, matte bowl allows the fruit to pop and look more voluminous. Including subtle details in the fallen hemp seeds and towel and second bowl in the background adds visual interest and eye-catching lines.
4. Learn the color wheel
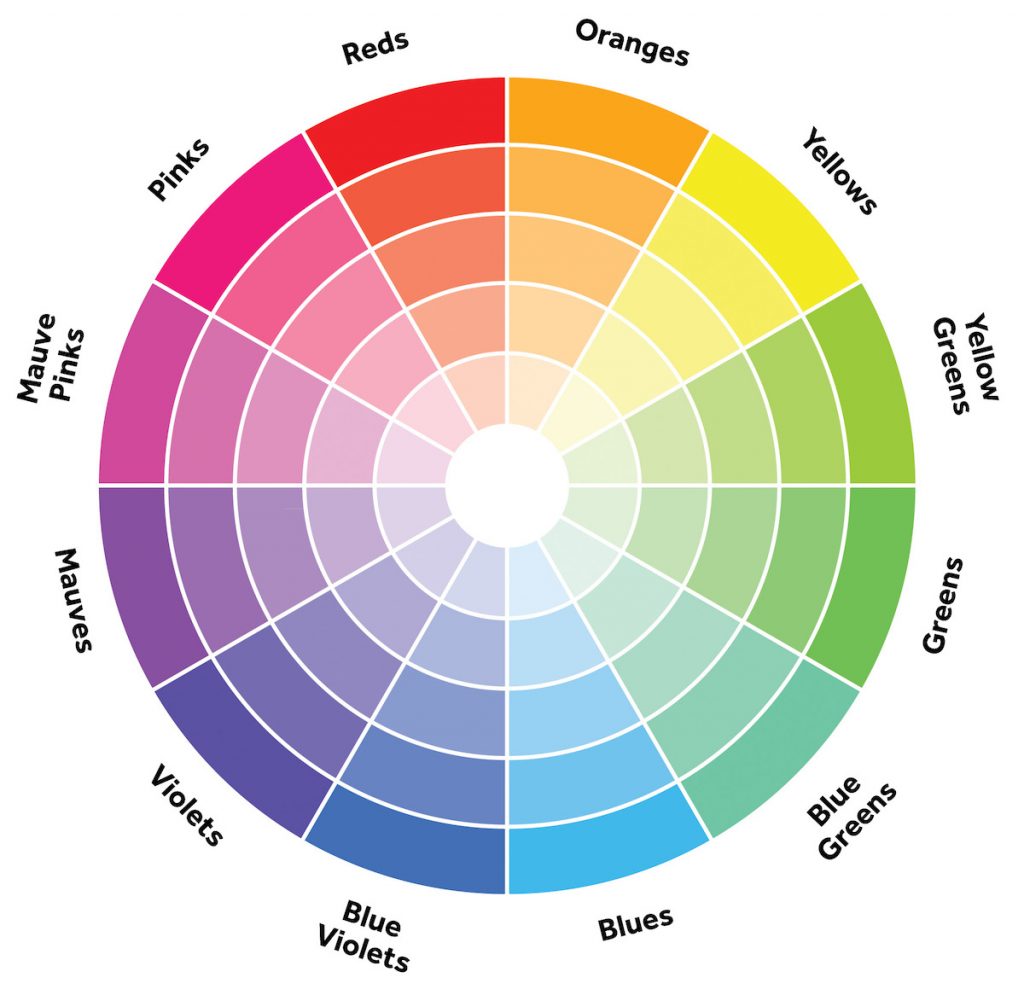
If you want your food to pop and be eye-catching, then consider learning about the color wheel. I had no idea what the color wheel was until I took a food photography class (more on that later). Basically the color wheel shows you which colors are complimentary, which in turn can help you choose the perfect background and props to make your food pop.
To find complimentary colors, simply choose a color (usually the color of the food you are photographing) and see which color is directly across from that color. For example, if you are photographing whole wheat pumpkin muffins which look orange-ish, then blue violets would be the complimenting colors. To make your muffins stand out, you could then use a blue dish cloth or blue plates or a blue backdrop to make them pop!
Have fun experimenting with different color combinations to see what makes the recipe you are photographing look best!
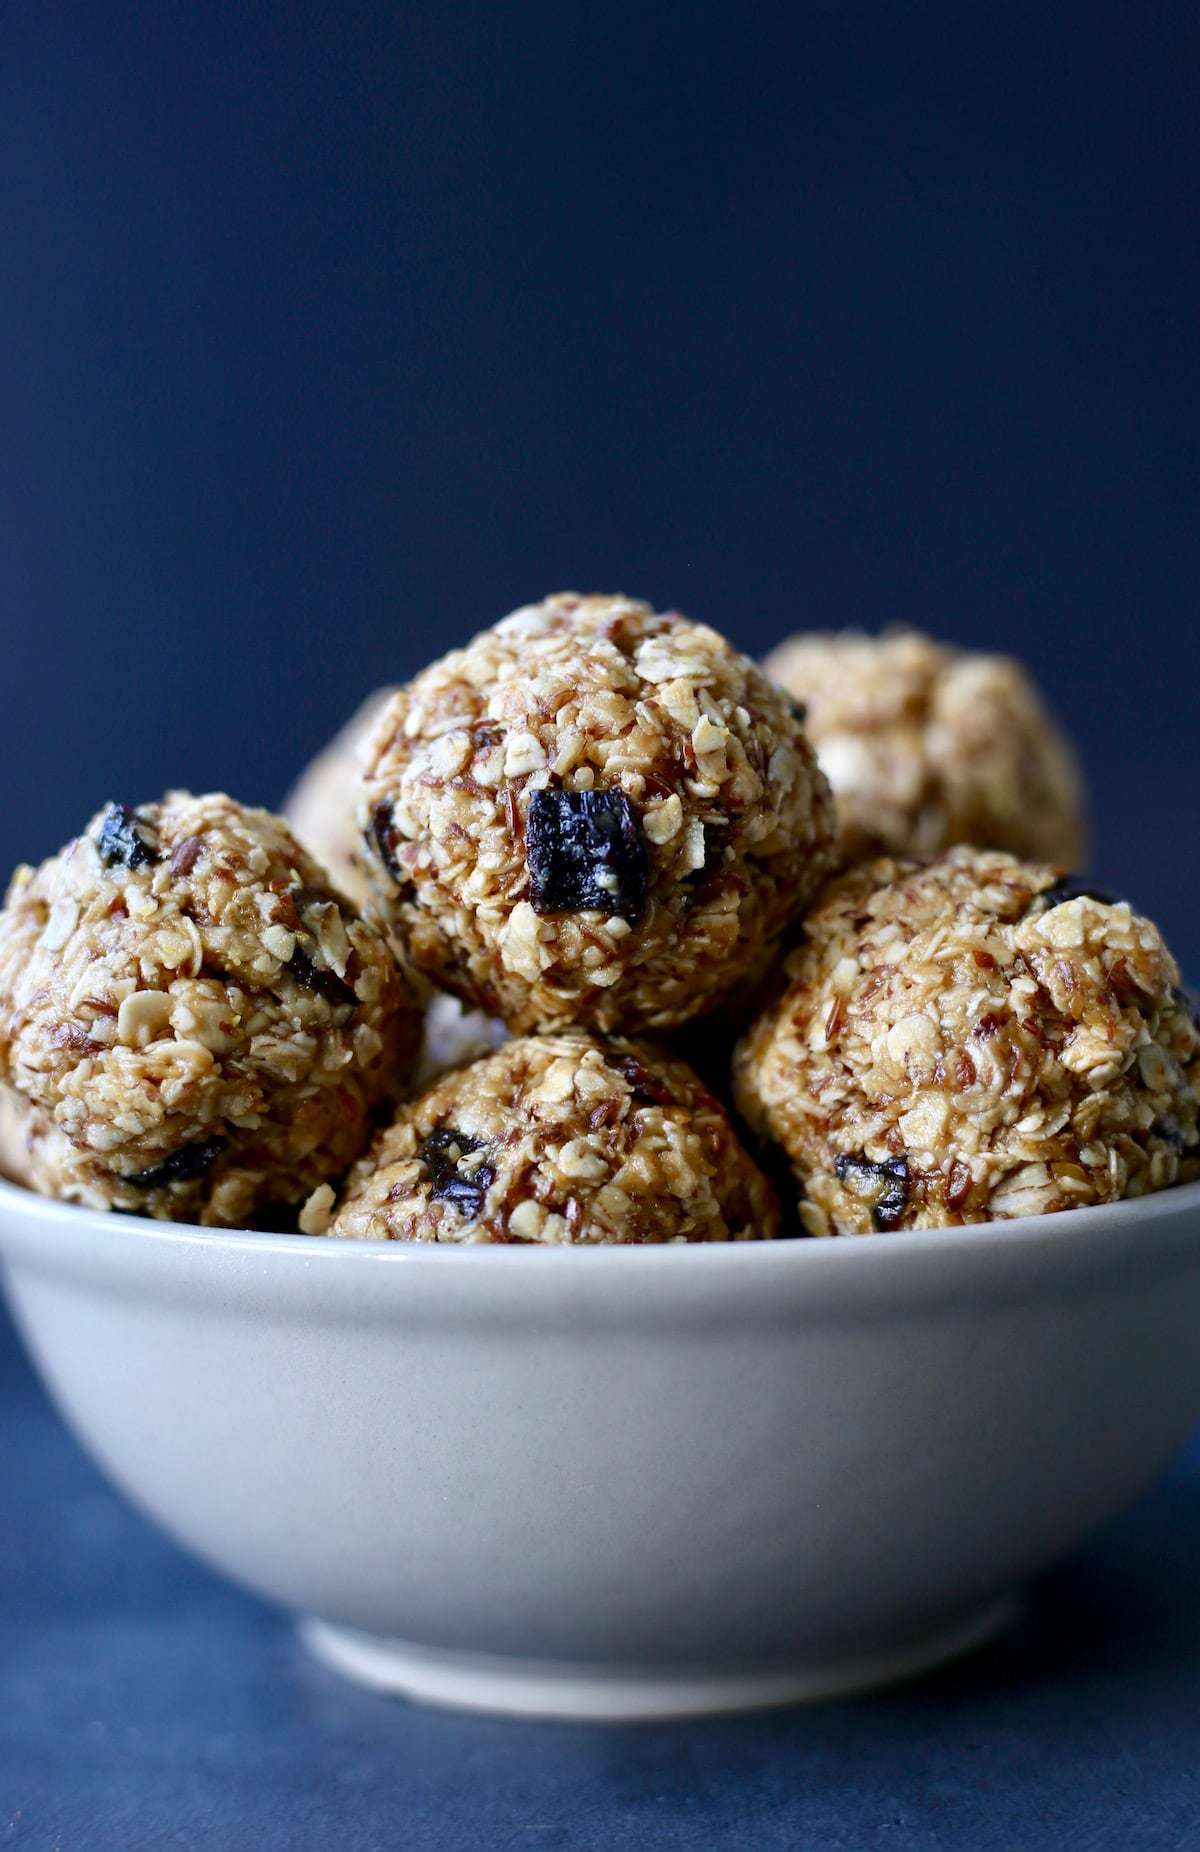 The blue background makes the tan/orange energy bites pop!
5. Learn about lighting
Figuring out lighting is crucial to improving your food photography. You can either use natural lighting (which is what I use) or invest in some equipment in order to use artificial lighting.
If you’re just getting started, definitely start with natural lighting. It’s the cheapest way to learn how to use your camera and improve in other areas like composition and styling. I honestly would recommend watching some YouTube videos that focus on natural lighting and food photography (like Food Photography with Indoor Natural Lighting by The Bite Shot and Food Photography in Natural Lighting by Joanie Simon) OR enrolling in an online course like Food Blogger Pro to have a professional help you.
Some of my top tips when it comes to working with natural light is to…
- Avoid direct sunlight which creates harsh shadows.
- Try out different windows in your house.
- Take photos at different times of day to see which times give you the best photos (but remember the best time of day will change depending on the time of year!)
- Don’t shoot photos straight on (i.e. don’t photograph your food from the same direction that your light is coming from.) Experiment with side and back lighting!
 LEFT: Direct lighting makes the muffin look flat and uninteresting.
RIGHT: Back lighting adds shadow, shine and interest.
6. Learn how to use your camera’s manual mode
For the longest time I used my camera’s automatic mode. While there is no right and wrong when it comes to photography, if you want to improve your photography I definitely recommend learning how to use your camera on manual mode. There are three main settings when using manual mode: ISO, aperture and shutter speed. Once you know what each setting does and how to adjust them, you can remain in control instead of having your camera make the decisions. Let’s chat briefly about the three manual settings below:
ISO:
In short, ISO is the setting that will make your photo lighter or darker. As you increase the ISO number, your photos will get increasingly brighter and vice versa. However, if you raise your ISO number too high, your photo will look more grainy and less crisp. When possible, I like to leave ISO on the lowest setting (100) and only increase it if necessary. Usually the highest ISO setting on a DSLR camera is 6400.
 Image from Photographylife.com.
Adjusting ISO can definitely come in handy when working with natural lighting. Sometimes it’s more cloudy outside or I don’t start my photoshoot until later in the day. That’s when I can increase my ISO to create a brighter image.
To learn more about ISO, I recommend reading this article!
Aperture:
Aperture works similarly to how our eyes work. Specifically, aperture describes the opening in our camera lens that allows light to pass through. The larger the opening, the more light will pass through. On your camera’s manual setting, aperture is usually expressed in f/stops which look like f/ 1.4, f/ 2.8, f/ 8, etc. Something that confuses a lot of people (and confused me at the start) is that a large f-stop represents a small aperture and a small f-stop represents a large aperture.
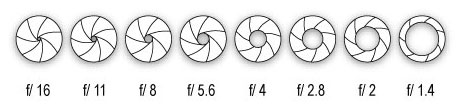
Aperture is also the main setting that controls depth of field and therefore controls how much of our photo is in focus and how much is blurry. The lower the f/stop number, the larger the lens opening will be and the blurrier the background will be. The higher the f/stop number, the smaller the lens opening will be and the sharper the background will be. It seems backwards and confusing, but you’ll get the hang of it!
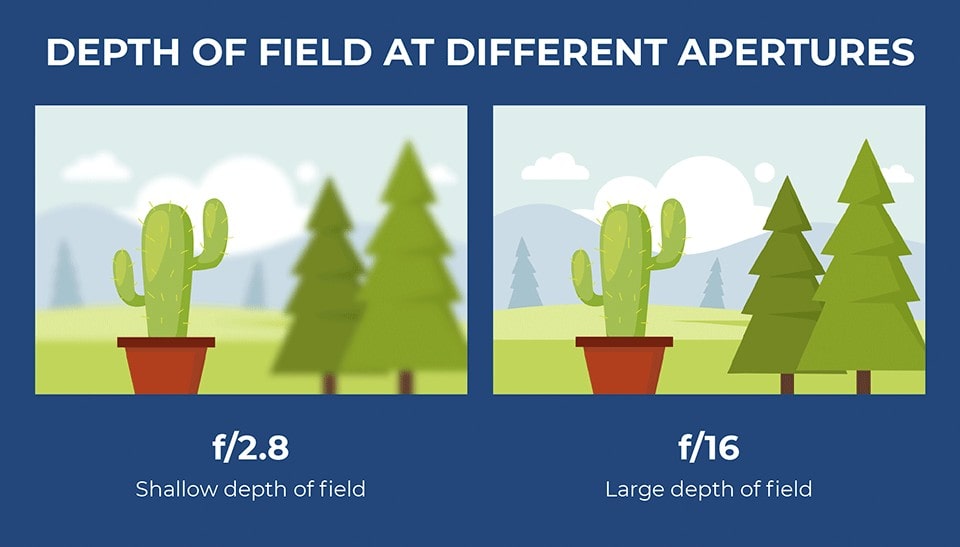 Image from Photographylife.com.
Aperture is definitely my favorite setting to play around with when it comes to food photography. Sometimes I want the main subject to be the only thing in focus, while other times I want the entire tablescape to be on display to tell more of a store. Have fun experimenting with different settings!
To learn more about aperture, I recommend reading this article!
Shutter Speed:
Shutter speed describes the length of time that your camera’s shutter is open and therefore how much light is exposed to the camera’s sensor. In short, shutter speed is how quickly or slowly your camera takes a photo.
When you use a long shutter speed and therefore allow your camera’s shutter to remain open for a long period of time, you can 1.) capture and express motion or 2.) capture dim environments at night.
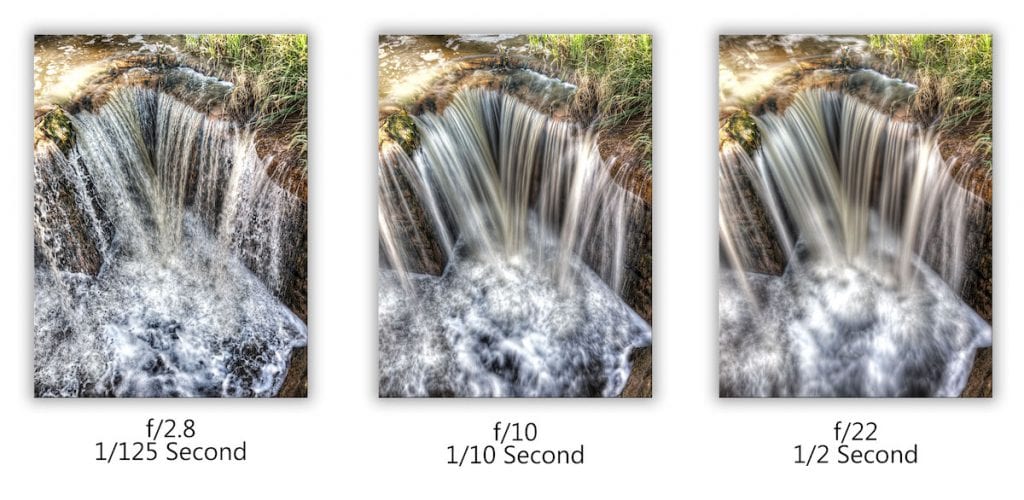
When you use a short shutter speed, you can capture fast moving objects without any blur. Basically, you can freeze the object in motion. This is great when you want to capture fast moving animals, cars or people.
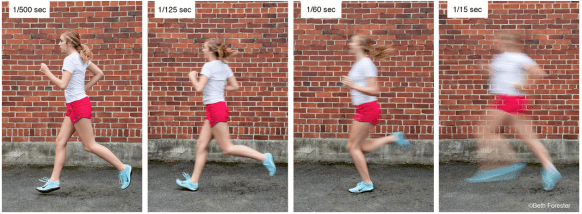 Image from animoto.com.
Shutter speed is a great setting to adjust when trying to capture action in food photography. For example, you may want to capture a smoothie being poured into a glass or some herbs being sprinkled on a dish. Whether you want the moving object to be frozen in time or to capture a feeling of motion, adjusting the shutter speed can help you do that!
To learn more about shutter speed, I recommend reading this article!
If all of this ISO, aperture and shutter speed talk still seems confusing, don’t worry! It took me multiple explanations and years of practice to get to my current understanding, and I still feel like I don’t have a complete grasp on my camera’s manual settings. Try learning about ISO, aperture and shutter speed through multiple different websites, graphs and videos. I promise, soon enough it will start to click!
7. Practice the rule of thirds
What is the “rule of thirds”? In photography, the rule of thirds is a tool that can help you photograph more interesting, balanced shots. In short, the rule of thirds says to imagine dividing the image you’re about to photograph into thirds both horizontally and vertically. This forms a 3×3 grid. Oftentimes when you put the focal point on one of the lines or where two of the lines cross, you’ll get a more interesting, eye catching image.
So next time you go to photograph a recipe, instead of having the food be perfectly centered in the photo, try using the rule of thirds to figure out where the focal point should be.
The rule of thirds obviously doesn’t have to be followed every time you take a photo. Sometimes having an object that is perfectly centered is the best way to go and is eye-catching in its own way. Use the rule of thirds as a guideline, not a strict rule and see where it takes your food photography!
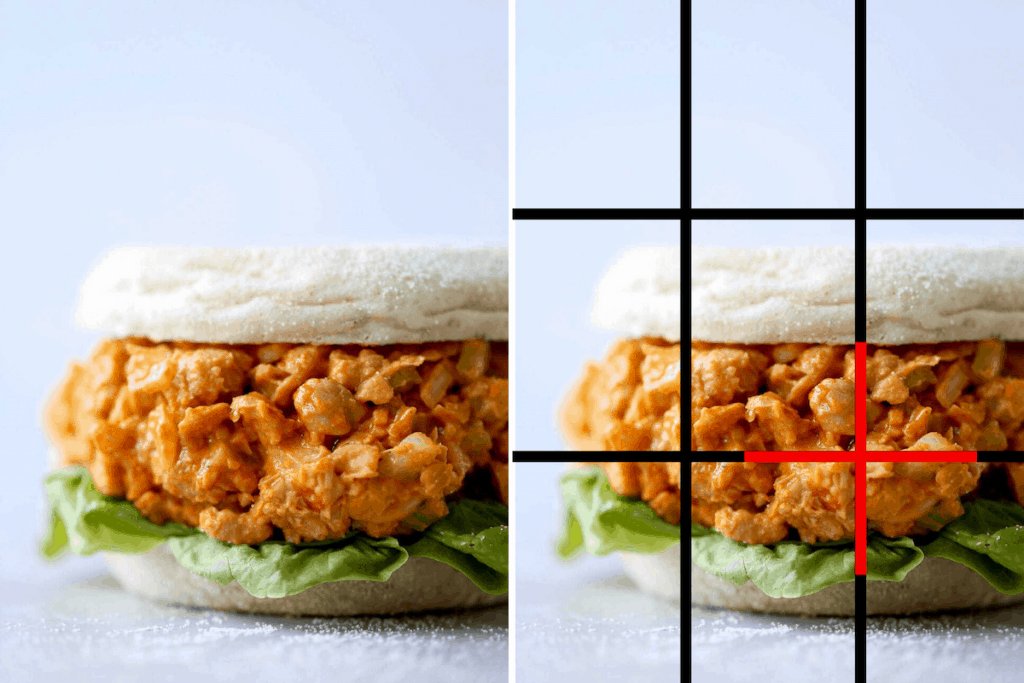 The focal point is on the lower right-hand cross section.
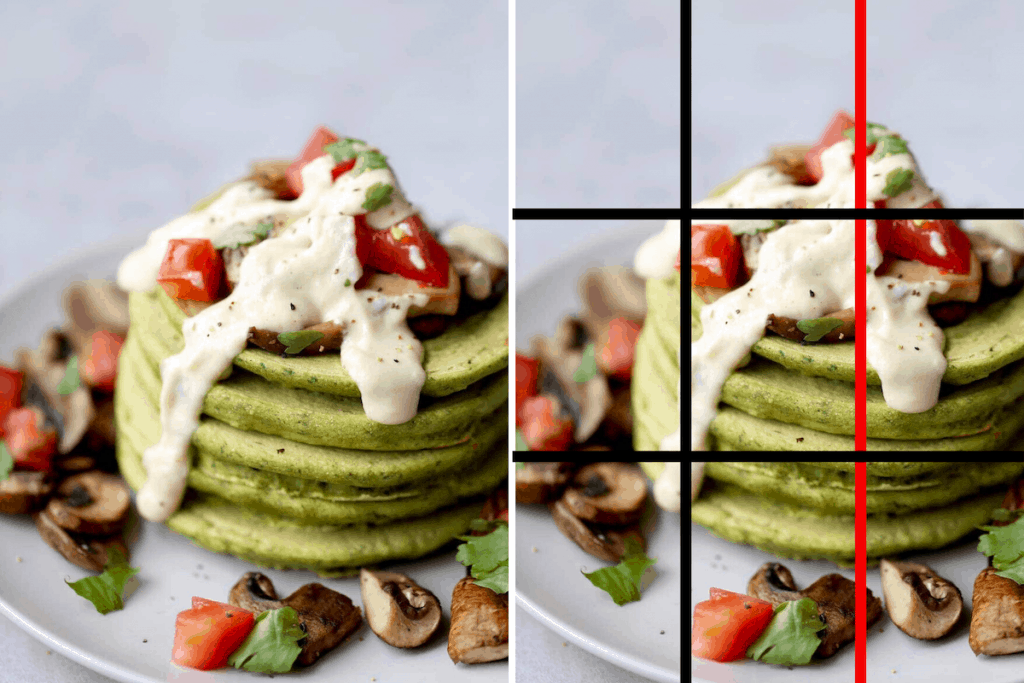 The focal point is along the right hand vertical line.
8. Create lines
I think learning how to “create lines” in my food photography may have been the tip that improved my food photography the most. It also made taking photos of my recipes a lot more fun.
So, what do I mean by “creating lines”? If you are including more than one object in your photo (i.e. two or three plates of food, a few ingredients you used in the recipe, different props etc.) then you want those objects to help point your viewers gaze to your main subject. Instead of having the items in your photo distract from your main subject, you want them to enhance the food and create a path for your viewer’s eyes to follow. You can see more clearly what I mean in the examples below:
 LEFT: The second plate of pancakes in the background distracts from the focal point which is the front stack of pancakes. There are too many “props” surrounding the front stack of pancakes, so the viewer’s eyes get distracted.
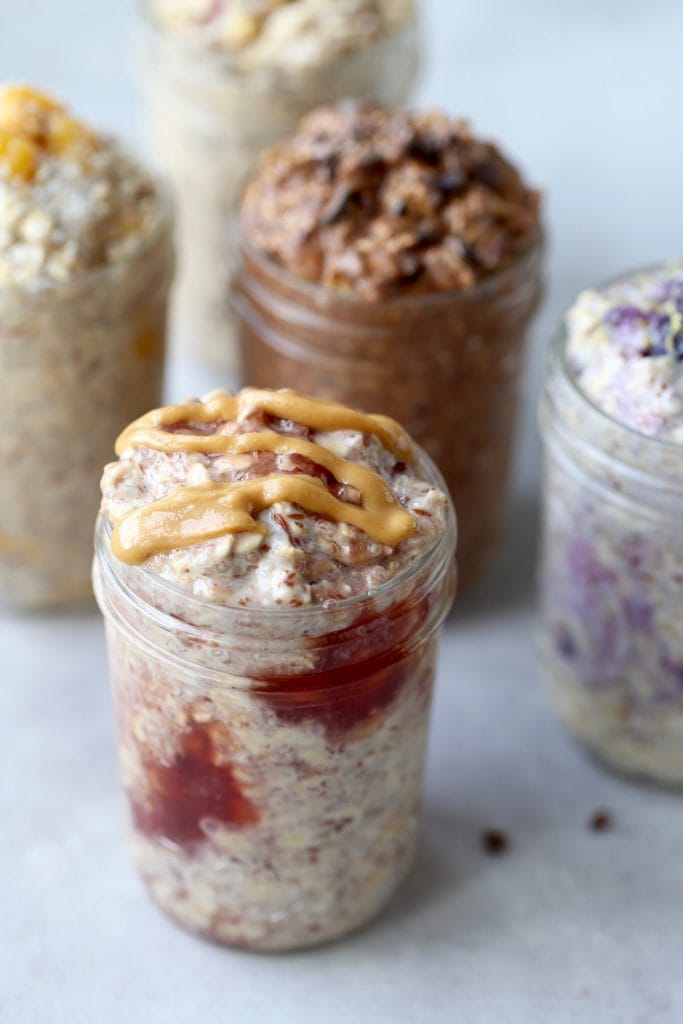
RIGHT: An off-set second plate of pancakes keeps the focal point on the front stack of pancakes and creates a beautiful diagonal line through the photo. 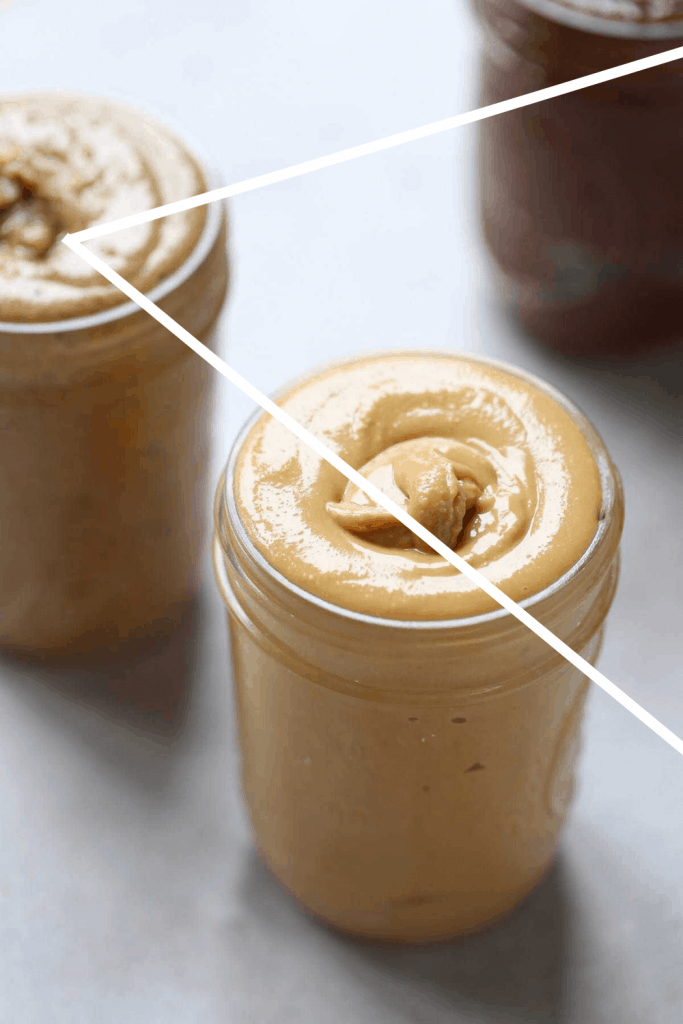 The second and third jars of peanut butter do not distract from the main focal point, but instead point the viewer to see the front jar of peanut butter first. Then the viewer’s eyes can trail off to the second and third jars.
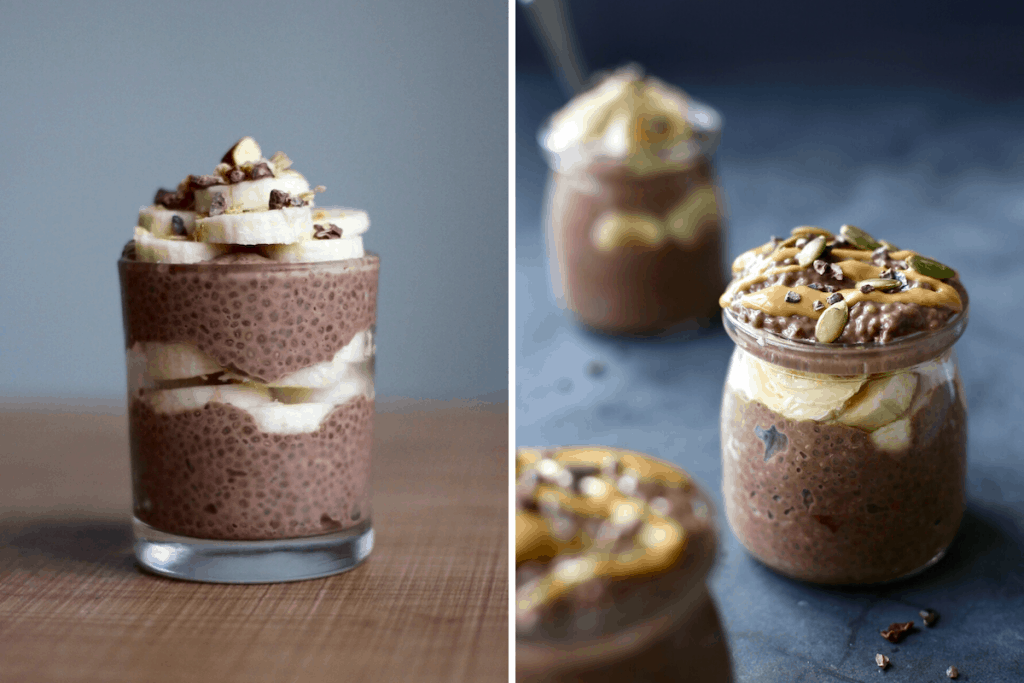
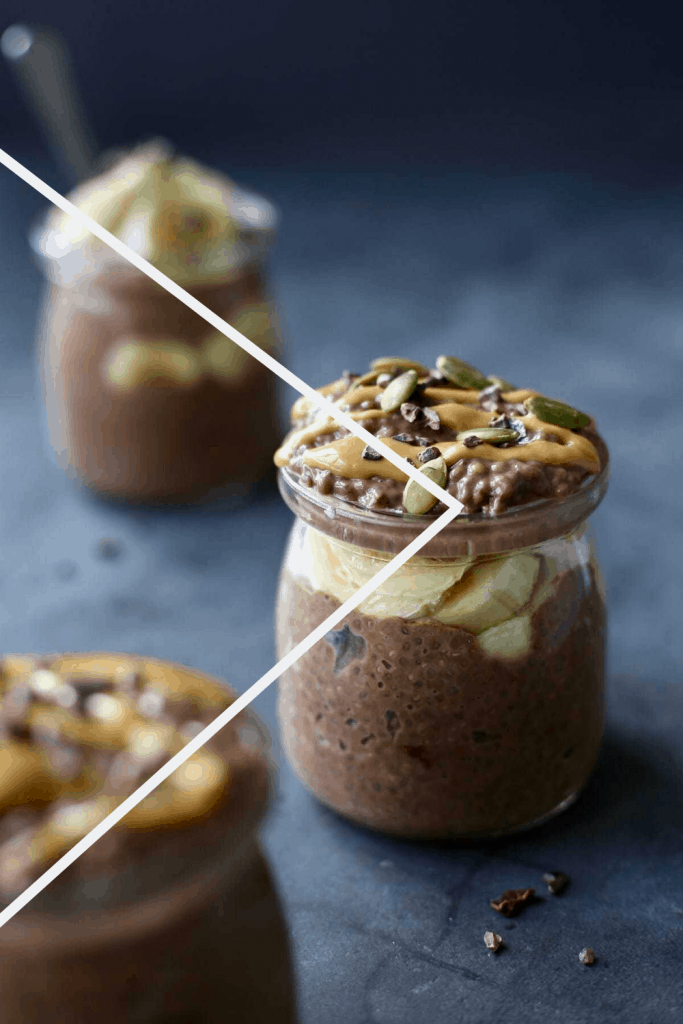 Again, the two other jars of chia seed pudding are not competing with the main focal point which is the middle jar of chia seed pudding.
9. Shoot from the best angles
When it comes to food photography, I find it best to use three main angles to capture my food:
- Straight-on angle: I love using a straight-on angle when trying to capture the height of a dish like a stack of pancakes or a thick, veggie burger. If I were to use an overhead angle (which we’ll talk more about below) then the fluffiness of the pancakes or the burger itself would be completely lost under the hamburger bun. Sometimes you can even style your food in a certain way to make the most of a straight-on angle. For example, you could stack thinner chocolate chip cookies on top of each other to create a small tower or pile energy bites high in a bowl.
- ¾ angle: A ¾ angle is any photo taken from a 25-75 degree angle. This “in-between” angle is great for showing the front of food, while will capturing the sides and some of the back of your food. The lower your camera (i.e. when it’s closer to 25 degrees) the more of the background you’ll be able to see. The higher the angle (i.e. when it’s closer to 75 degrees) the more the food will take center stage.
- Overhead angle: I love using an overhead angle (also called a 90 degree angle) when I want to tell more of a story as it can capture more items in a single photo. If you wanted to show your tablescape or include more ingredients and props in your photo, then an overhead angle is perfect. One thing to consider is that an overhead angle eliminates depth, which can be important to show off when shooting certain foods.
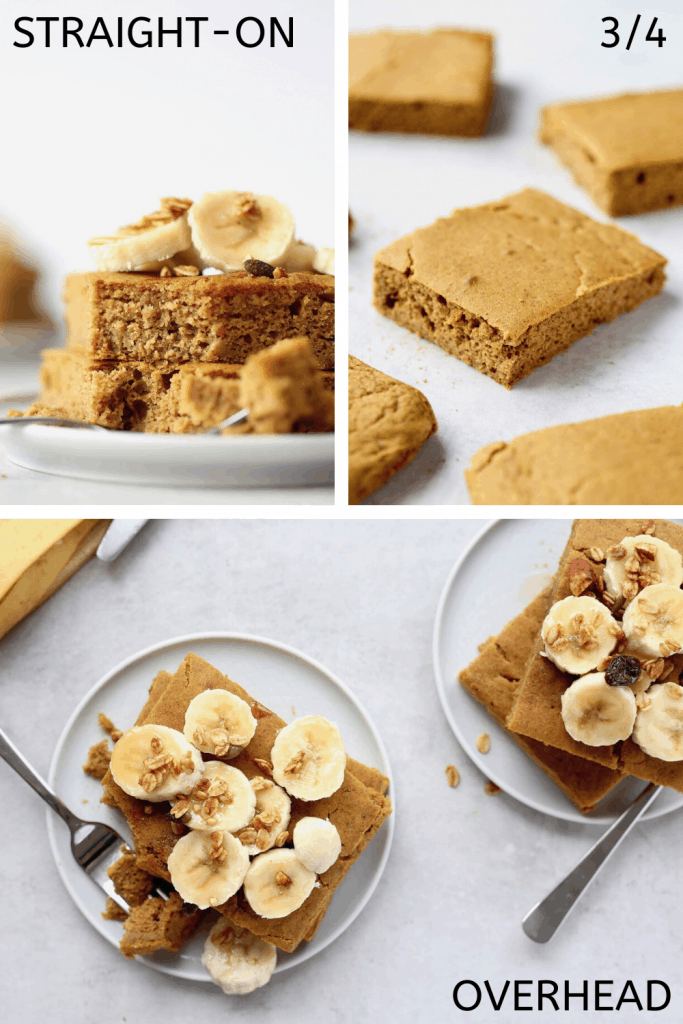
I highly recommend capturing your food from all three of these angles so that you can highlight different aspects of the food. Give yourself enough time to experiment with different ¾ angles and have fun!
10. Get a decent camera
One of the best ways to improve your food photography is to start with what you have and practice! Yet with that said, if you are ready to really commit to improving your food photography, investing in a nice camera can make a world of difference.
My first DSLR was the Canon EOS Rebel SL1 ($700 range) and it was the perfect DSLR camera for getting starting. I’d definitely recommend it if you are ready to make the step up from a smartphone or compact camera to a DSLR. What I liked most about the Rebel SL1 was that I was able to see the image that I was about to photograph on the touch panel. Before I took a photo I could see if it would be too dark, over-exposed, blurry, etc. I could also adjust the settings (the aperture, ISO and shutter speed mentioned above) while looking at the image on the touch panel, which helped me more quickly learn how to use the manual setting.
Just last year, however, I could tell that my Rebel SL1–which isn’t a full-frame DSLR–was holding me back and not giving me the crisp photos I desired. My next step in improving my food photography was to invest in an even nicer DSLR camera. I went with the Canon EOS 6D 20.2 and have been loving it. It takes crisp, full-frame photos and has greatly improved the quality of my food photos, especially when paired with an amazing lens for food photography! Unfortunately, the price of the Canon EOS 6D 20.2 has more than doubled since I purchased it, so I’d recommend going with the Canon 6D Mark II!
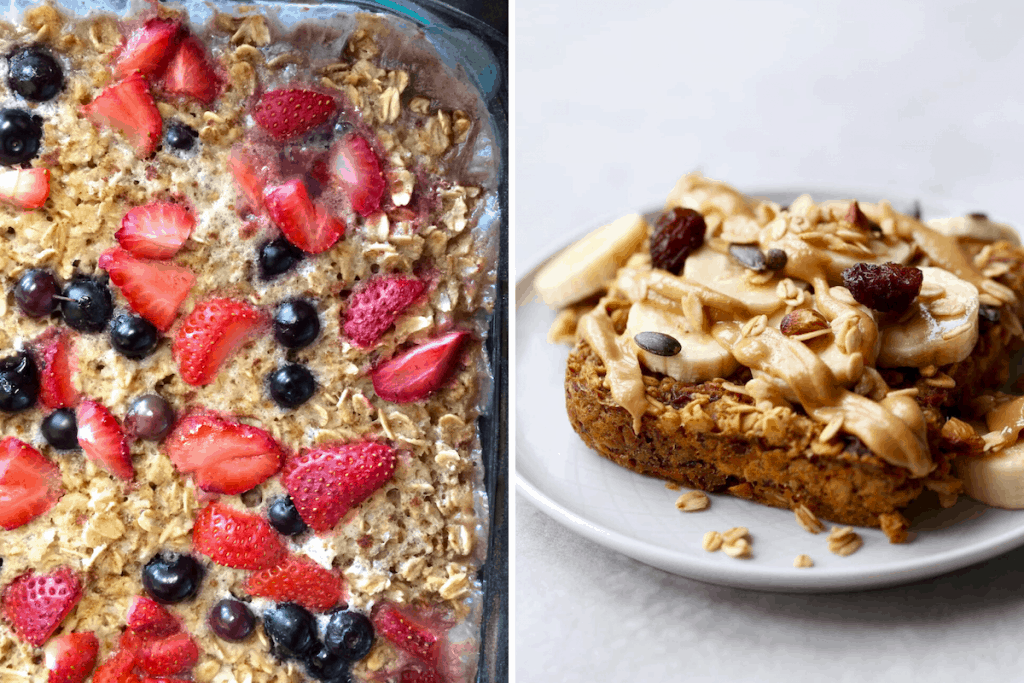 LEFT: Baked oatmeal photographed with a point and shoot camera.
RIGHT: Baked oatmeal photographed with my Canon 6D.
11. Get a decent lens (or two)
Every photographer has their own style and preference when it comes to which lenses they prefer. A lot of that preference stems from what they are photographing. For me, I’ve fallen in love with two lenses that are great for food photography specifically. I’ll explain more about why I love these two lenses below. Also, remember that I’m describing these lenses when they are paired with a full-frame camera!
The Canon 50mm lens was the first lens I purchased specifically for food photography. The one I linked above in only $100 and is a great investment in improving your food photography! The 50mm lens is nice and small, lightweight, yet still gives you super sharp photos. The 50mm lens has a fixed focal range, which is usually a safe choice for food photography and portraits as it’s similar to the range we see with our own eyes. The 50mm lens is also great for capturing overhead, lay-flat images and wider scenes that tell more of a story.
 The 50mm lens gives a beautiful, clear photo while still allowing a story to be told in the background.
The Canon 100mm F2.8 Macro lens was a bigger investment, but was well worth the money. If you want to clearly capture the finer details of your food, this macro lens is the way to go. While this lens is great for capturing your food close-up, it also works great when you back it away from the table a little bit in order to capture more of the scene.
 The 100mm Macro lens focuses on crisply highlighting the details of a flax egg.
12. Master photo editing
Sometimes I don’t like any of the photos I take during a photoshoot, but with a little bit of editing they can turn into something beautiful (or at least useable). Even though I have Lightroom, I personally find that I prefer using Photos on my Mac. It’s just what I’m used to and it works great!
I also LOVE using Canva and Picmonkey, two different editing and collage softwares that can be free depending on what you are hoping to do. These websites are where I create all of my Pinterest images and blog collages. I also created the first version of my Plant Biased cookbook and all of my Meal Prep PDFs for free using Canva! They have tons of amazing, ready-to-use templates to save you money while also giving you a professional look. I highly recommend checking out these two websites!
 Images created with Picmonkey and Canva.
All of these softwares and websites are great resources to use if you want to enhance your food photos. Take time to learn how to use the settings so that you can improve your food photos!
 LEFT: Original photo.
RIGHT: Edited photo.
13. Take a class
One of the best things I did for my food photography and, therefore, my blog, was to enroll in Food Blogger Pro. As its name suggests, Food Blogger Pro is a program specifically designed to help food bloggers start and grow their food blogs. As soon as I enrolled, I started devouring videos. It was so much fun to have knowledgeable people teach me how to improve one of the things I’m most passionate about: food blogging and photography! Not only did I learn how to use the manual setting on my camera, but I also learned about food composition, props and styling. Plus, there are videos on how to take beautiful food photos using both natural and artificial lighting and also how to edit those photos using different kinds of software.
In addition to improving your food photography, Food Blogger Pro also had hundreds of videos to help you grow your food blog, including:
- The best tools for starting a food blog
- How to increase traffic with easy SEO tips
- How to generate income from eBooks
- The best way to use affiliate marketing
- The tools you’ll want to create viral food videos
- Backing up your site so you don’t lose content
- and so much more!
Oh yeah, and Food Blogger Pro was pivotal in helping us 5x our blog’s income in just 3 months!
If you feel stuck in your food photography or are thinking more about turning your food blog into a business, Food Blogger Pro is the best place to start!
I was a new, breastfeeding mom when I signed up and I was able to watch all the videos I needed to watch simply while nursing my baby. As soon as I felt like I had the next steps to improve my food photography and grow my blog, I left the program. It was some of the best money I have ever spent and has paid for itself exponentially in the following years!

 Click the image above to learn more!
14. Practice!
I know no one wants to hear this tip, but lots of practice is honestly key to improving your food photography. Actually, it’s key to improving any hobby or craft that you want to excel in! For every beautiful photo you take, it may take hours of trial, error and frustration beforehand to get that one beautiful shot. While it’s not glamorous, putting time into improving your photography will be one of the key factors in actually getting better!
15. Before and after examples
Below I’ll show some before and after images and explain some of the key aspects that helped improve the original photo greatly!
 LEFT: I didn’t use the rule of thirds so the food looks too centered and neat. There are no other props to add lines and create visual interest.
RIGHT: The focal jar of chia pudding looks voluminous. There is visual interest and eye-catching lines thanks to the other jars and fallen cacao nibs included in the photo. LEFT: I used a cheap point and shoot camera and no tripod to captured a blurry photo of hummus. There is no visual interest in the photo due to lack of garnishes, props and background.
RIGHT: My Canon 6D paired with a tripod and a remote trigger captured a crisp, action-filled photo. A dark backdrop makes the hummus pop. 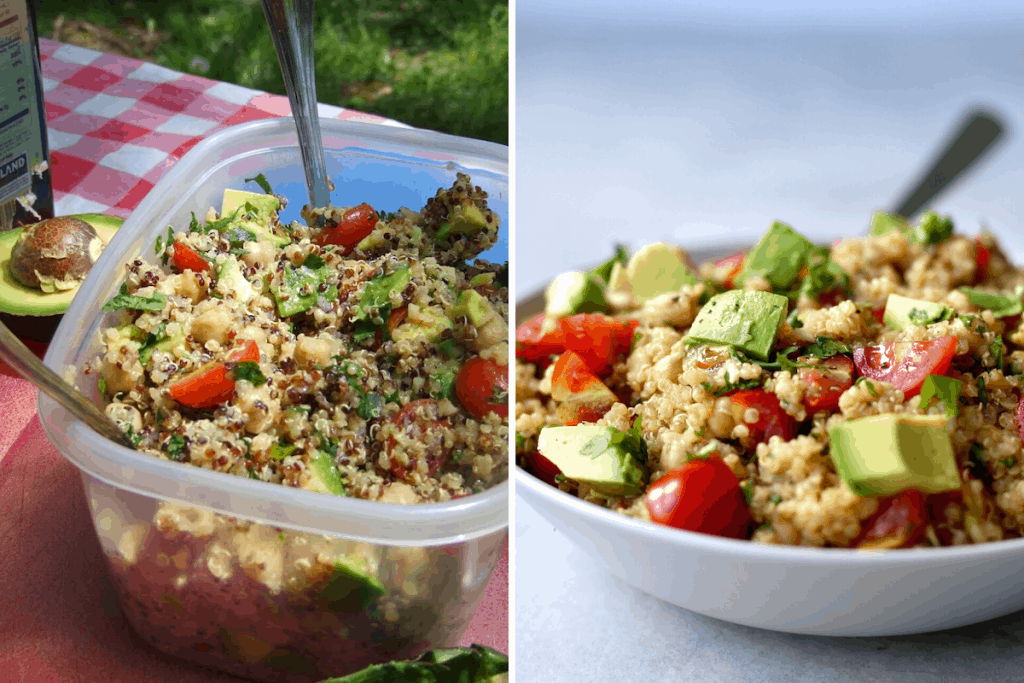 LEFT: There was no effort put into this shot. A large Tupperware paired with a 45 degree angle makes the quinoa salad look lifeless and picked through. I took this photo using a point and shoot camera and no tripod.
RIGHT: The quinoa salad looks plentiful and colorful thanks to a smaller bowl and a more straight-on camera angle. I highlighted some of the star ingredients in the recipe by placing them on top where they would stand out. Simple garnishes like cilantro and black pepper make the salad look more appetizing. 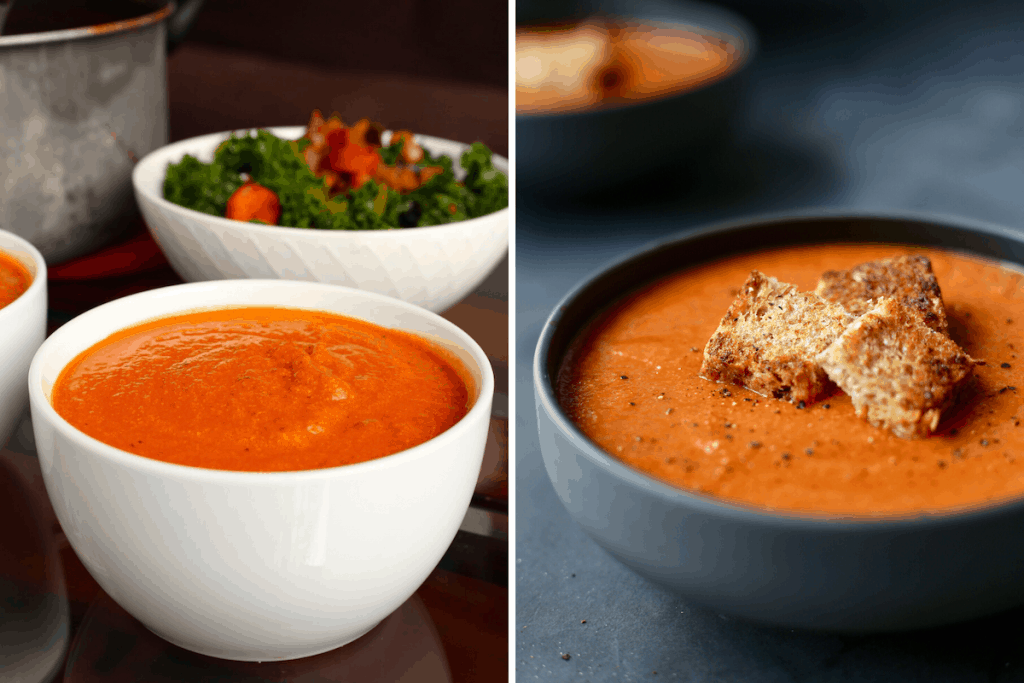 LEFT: A bright, white bowl distracts from the food and there are no garnishes on the soup, making it look boring. The bowl is perfectly centered and the other props take focus away from the main subject instead of creating lines to help highlight the main subject.
RIGHT: Black, matte dishes and backdrops make the orange soup pop. Simple garnishes of toasted bread and black pepper make the soup look more appetizing and realistic. The second bowl in the background doesn’t distract from the main subject, but creates beautiful lines and visual interest.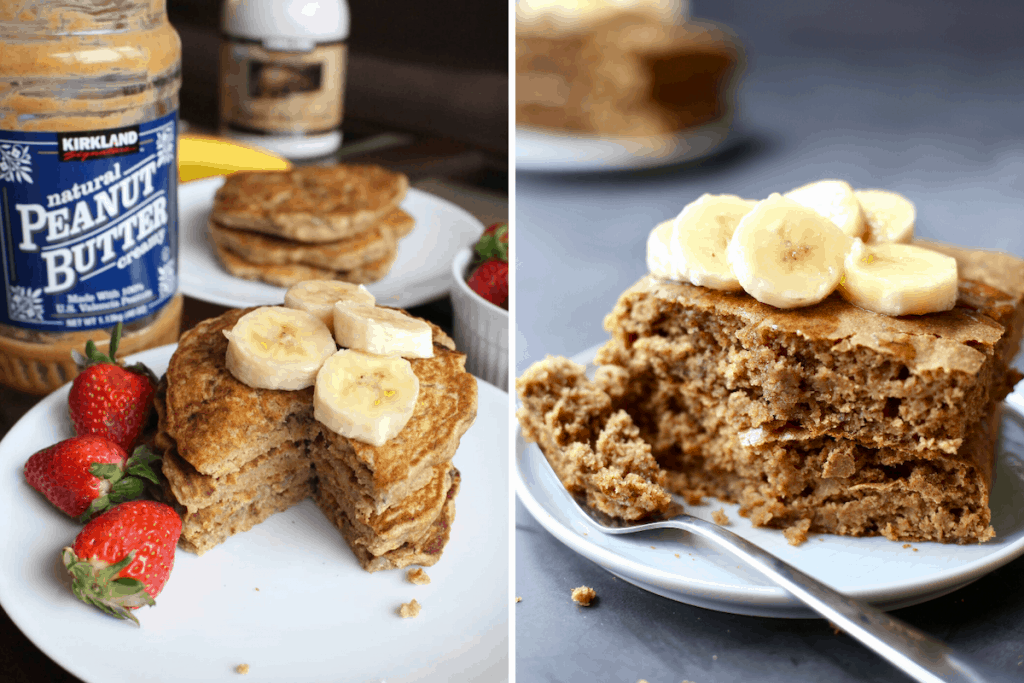 LEFT: An oversize, glossy white plate makes the pancakes look small and unappetizing. There are too many random props in the background which distract from the food.
RIGHT: A smaller plate makes the pancakes look huge and fluffy. Showing a fork with a bite of pancake on it makes the food look more realistic and appetizing. The second plate in the background is off-centered so it doesn’t distract from the focal point, yet instead creates a beautiful line for the viewer. 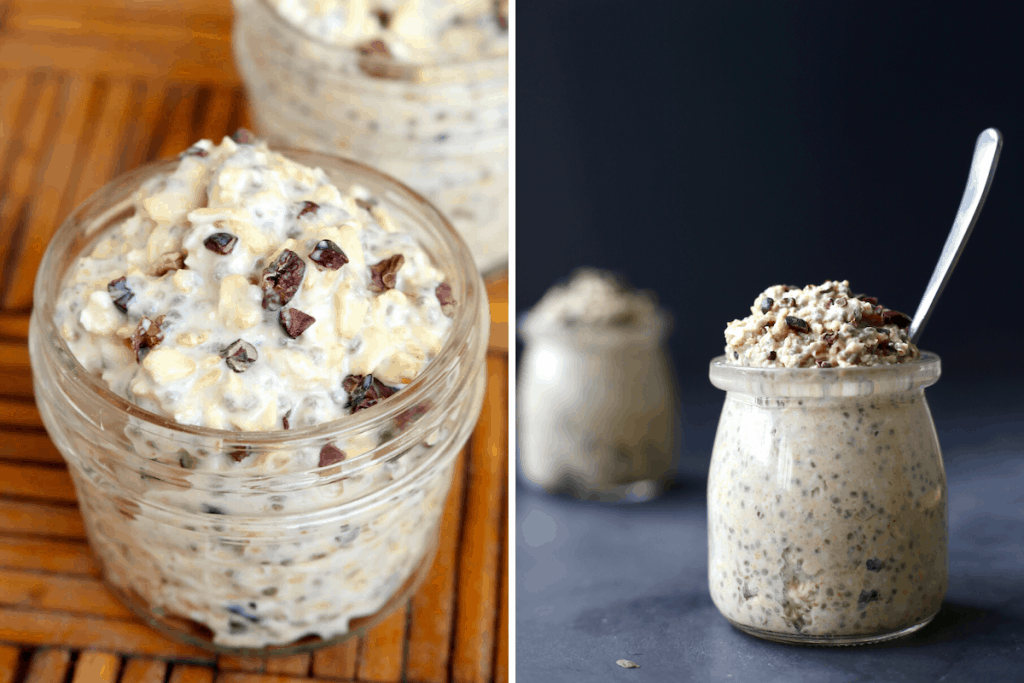 LEFT: Both the food and the background are in a similar color palate which keeps the food from popping. The jar is perfectly centered adding no visual interest. A ¾ angle doesn’t show the volume of oatmeal in the jar.
RIGHT: Using a dark background allows the white/tan oats to pop. Using a small jar and a straight-on angle makes the food look voluminous!
Thank you so much for reading this post! It was written for you, so I hope it was helpful.
Please let me know which tips were most helpful and whether I missed any tips that have been fundamental in helping you improve your food photography in the comments below!
If you have a website and you think your readers will find this post helpful, don’t forget to link them to this page: How To Dramatically Improve Your Food Photography by Faith VanderMolen
Finally, I would love to see some before and after photos, so be sure to tag me on Instagram @theconscientiouseater or send me an email with your before and after photos at theconscientiouseater(at)gmail(dot)com!
Be sure to share this post with your other fellow food photographers!


![Toni Kroos là ai? [ sự thật về tiểu sử đầy đủ Toni Kroos ]](https://evbn.org/wp-content/uploads/New-Project-6635-1671934592.jpg)


