MIG Welding Tips & Tricks | The 10 Essentials
Mục Lục
MIG Welding Tips & Tricks
When it’s time to start MIG welding, nothing beats good training, great welding equipment and constant practise. But you can also add a few professional MIG welding tips and tricks into the mix. Here, based on a quick poll among the experts of the R-Tech welding team, are 10 steps to mastery of ‘MIG tips and tricks’ (and loads of subsidiary tips too) to help you develop – and maintain – professional-level MIG welding skills…
10 expert MIG welding tips and tricks
- Safety, safety, safety!
- Equipment matters
- Get your set-up right
- Cleanliness is everything
- Calling earth
- Starting to weld
- Is this the ‘handiest’ MIG welding tip or trick ever?
- Stagger your welding
- Keep learning about MIG welding
- Read your MIG welder’s user manual
Tip 1. Safety, safety, safety!
You’ve probably heard the welding safety message over and over. We can’t emphasise it enough: safety matters, whether you’re an occasional hobby welder or MIG welding in a busy workshop.
Our first MIG welding tip? Go large on safety
If there’s one thing that sets the scene for safe, professional welding, it’s good safety before and during work. That’s why we’re going large on safety for the first of our MIG welding tips and tricks. R-Tech’s very experienced Mike Gadsby kicks off with typically sage advice based on personal (and painful) experience:
‘It’s so easy to cut corners. We’ve all done it and we know we shouldn’t. So, please, commit to taking safety seriously when you weld. Believe me, burns, agonising arc eye or the potentially horrendous effects of welding fume aren’t worth the risk.’
Whether you call it a MIG welding tip or just good common sense, welding safety equipment comes down to gloves, other protective clothing, a good welding mask and proper protective boots.
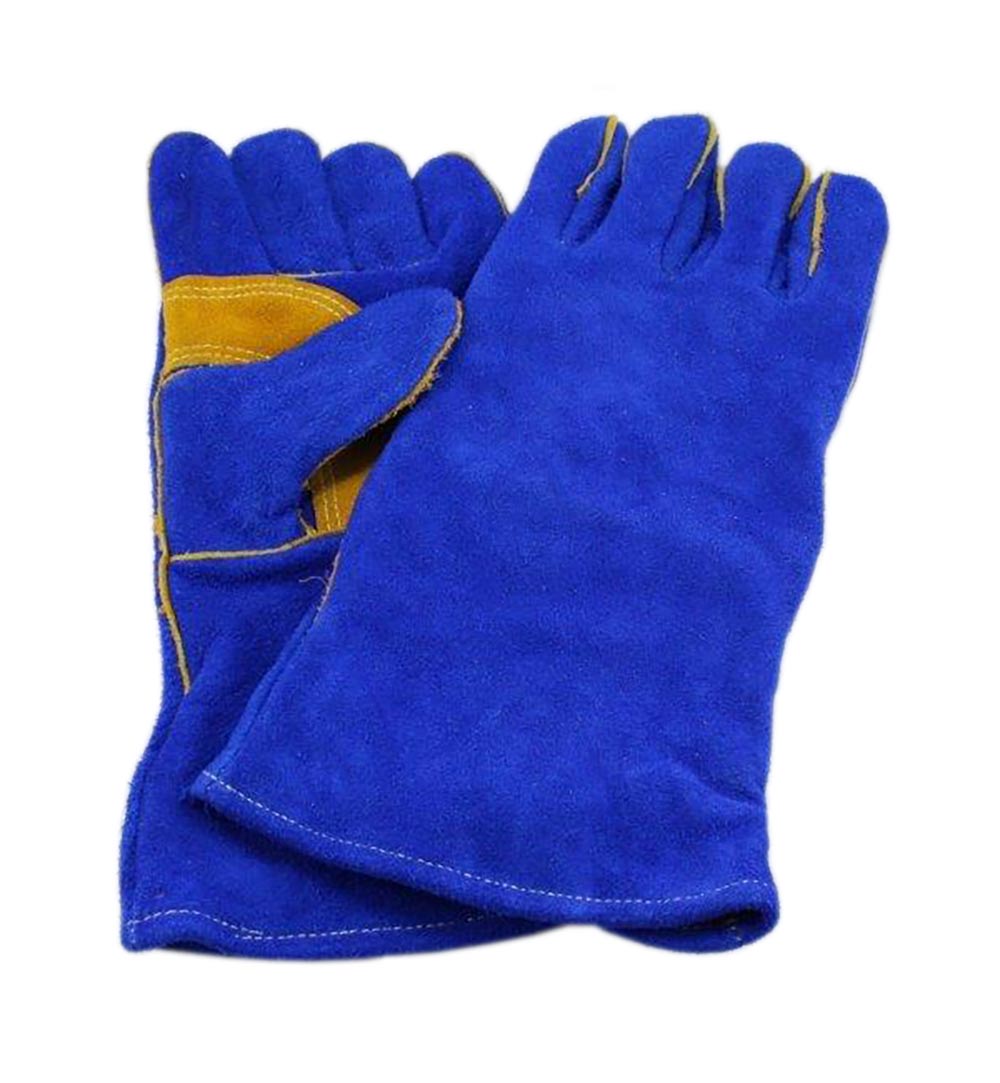
MIG welding gloves
The MIG glove ‘trick’ is to match good protection with gloves that aren’t so thick they become a hindrance as you work. Of course, you’ll need to wear thicker gloves when you weld at higher amperages, but they’re cheap enough to buy different kinds of leather MIG welding gloves – never wear synthetic materials – for different work. Here’s a professional tip from R-Tech welding technician Paige Kightley:
‘For many MIG welding jobs, leather or deerskin TIG welding gloves give perfect balance between protection and “feel” without breaking the bank’

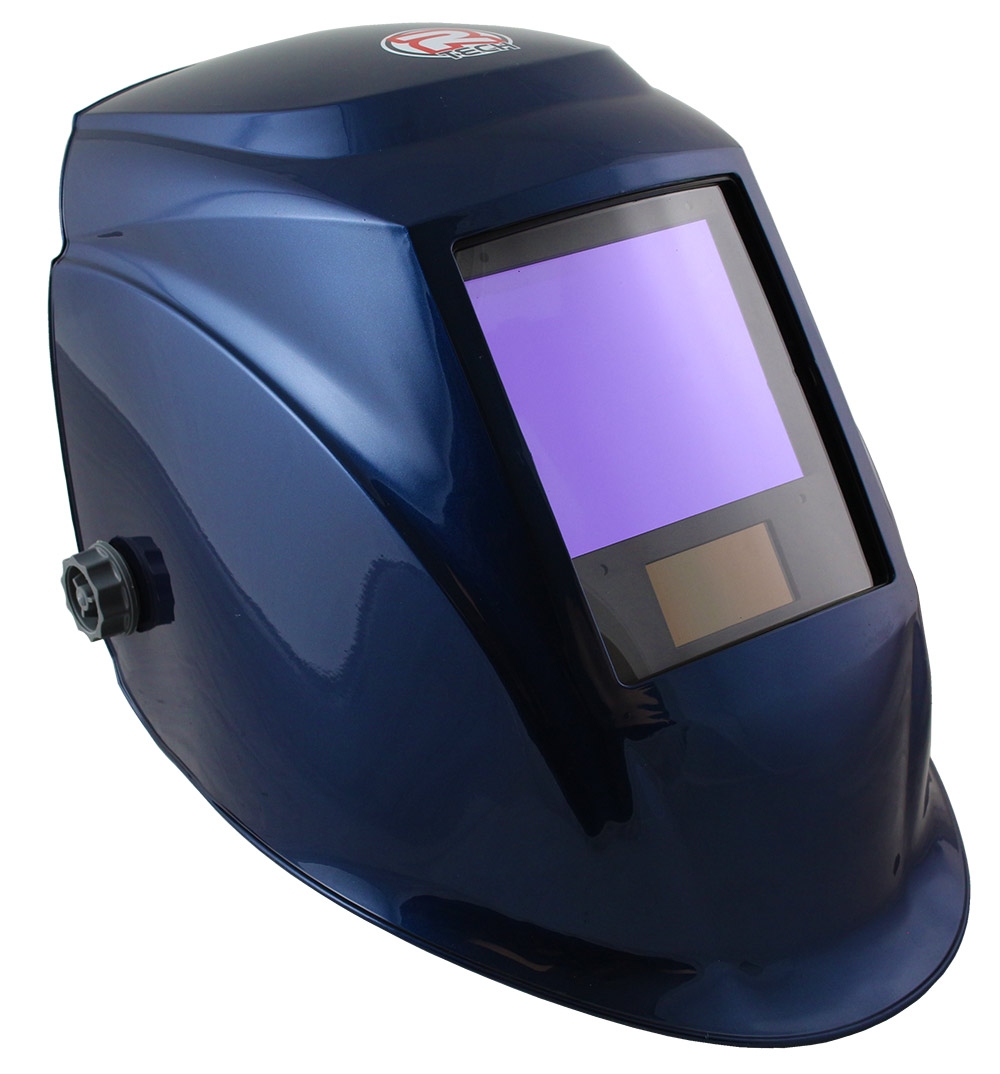
Your MIG welding mask
Just ask anyone who has experienced the agonising ‘grit-in-the-eye pain of arc eye (aka welder’s eye) and they’ll tell you it’s something you don’t want to experience. Here’s sound advice from R-Tech’s workshop engineer Ben Wiltshire:
‘Never, ever, weld MIG, TIG or any other process without a suitable mask. Or with a mask that’s not designed for electric arc welding. Always wear a decent reactive welding mask with an auto-darkening filter (ADF). For most MIG welding, you won’t go wrong with a range setting of 9–13 EW (electric weld). If in doubt, give the guys in the sales office a call. And in the meantime, check out the following chart showing shade settings in relation to the amps you’re using.’
[Shade chart]

Clothing and boots
MIG welding? Fireproof overalls or a thick leather apron are essential for your protection – along with a sleeved shirt and thick trousers in natural materials, never synthetics. Another of our top MIG welding tips is to make sure your boots are proper safety footwear of leather construction – with protective toecaps for the day you knock a piece of plate off your bench…
LEV and RPE welding extractors
We all know welding fumes are nasty, but 2019’s Safety Alert from the UK’s Health and Safety Executive highlighted new scientific evidence about lung cancer risks from exposure to welding fume – including from MIG welding. Because of this, another of our top MIG welding tips is to make sure you use appropriate local exhaust ventilation (LEV) and/or respiratory protective equipment (RPE). Read about the best LEV and RPE welding fume extractors here.
Tip 2. Equipment matters
Call it a MIG welding trick if you like, but something that separates pro MIG welders from amateurs is that they have the knowledge to pick the right equipment for the job.
Understand what you want to MIG weld
Actually, choosing the right MIG welding machine comes down to understanding what you want to weld. In the simplest terms, this will be determined by the metal you work with (aluminium, mild steel or an alloy), its thickness and the available power supply.
Avoid the hassle of cold fusion
As a rough guide, think around 25A/mm for mild steel and, maybe, 35A/mm for aluminium. If you want to avoid the hassle of cold fusion (‘cold weld’) or ‘blow through’, use correctly rated equipment. Another MIG welding tip? Make sure your MIG gun’s duty cycle and power-rating match the planned work.
Comprehensive tables matching material thickness and power are available, but as a guide, here are a couple of examples:
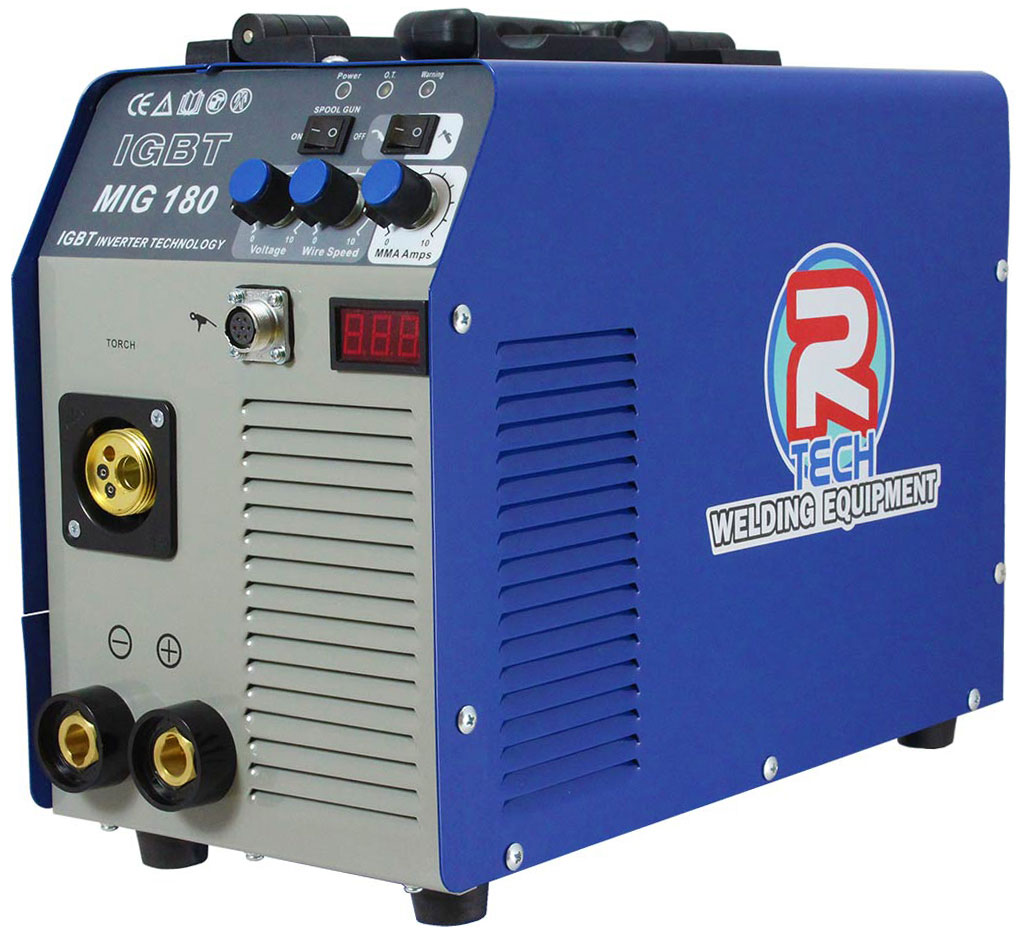
For 3mm mild steel with 240V domestic (UK) power, a machine such as our MIG 180 MIG Welder will be perfect. At the other extreme, for 15mm plate on a 415V three-phase supply, there’s our popular MTS 450 MIG Welder.
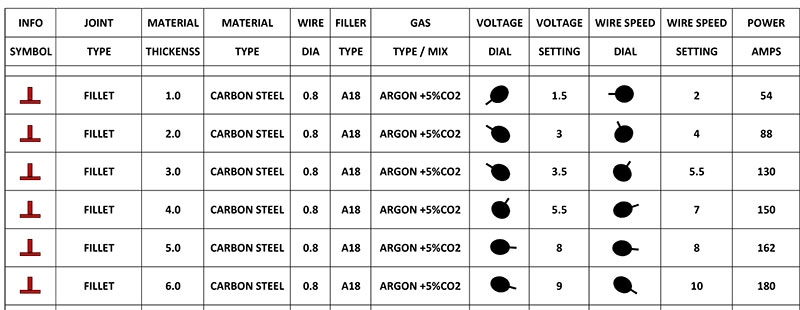
Below is chart showing Fillet Weld settings for our MIG180 on 0.8mm wire, See the full MIG180 welding chart here.


The R-Tech MIG180 MIG Welder is our best selling MIG welder, Ideal for welding thin steel due to low starting amperage of 25A, welds up to 6mm on a single pass.
Equipment tricks for MIG welding?
Again, it’s not so much about clever-clever, black-art ‘MIG tricks’, but good old common sense. In particular, make sure your MIG welding equipment is in good condition: no broken earth clamps; the wire-feed system works correctly; the gas holes in the MIG gun’s nozzle are clear; and the contact tip seating isn’t clogged. Make sure the welding tip hasn’t become worn and ‘ovoid’ either.
More than just squeezing the MIG gun’s trigger
According to R-Tech owner Rob White, there’s more to correct feed-system condition than just making sure it works when you squeeze the trigger:
‘As well as making sure they’re clean and in good condition, it’s vital to ensure that the drive rollers, cable liner and contact tip are working properly and that they’re correctly matched to the wire diameter. I can sell you great machines, but you do need to look after them to make sure they continue to give great performance!’
Tip 3. Get your set-up right
A big part of MIG set-up is about matching the correct electrode wire diameter to the electrical current (amperage) you are using. And of course, that amperage will be determined by the thickness of the material you weld… By the way, make sure your MIG torch has a suitable duty cycle and power capacity to handle the planned work. Not sure about this? Help is at hand; just ask. Contact us here
Talk to the MIG wire manufacturers
Another good MIG welding tip is to talk to us or the wire manufacturers about matching welding tasks and wire diameters. R-Tech’s sales advisor Arran Hale offers a few examples indicating the relationship between different MIG welding and typical wire diameters:
‘For light fabrication or car body welding, 0.6mm–0.8mm wire is often used. For heavier welding of, say, 6–10mm plate, make that 1mm-diameter wire; and once above 10mm, for heavy fabrication with machines like our MTS 450, you could easily run 1.2mm wire.’
Maintain the correct arc length
By the way, whatever the wire diameter, it’s good practice to keep the correct arc length. A good MIG welding trick is to aim for an arc length between 6mm and 12mm depending on the amperage you’re welding at. According to some pros, it’s one of the simplest ‘MIG tricks’ for improving your welding results.
Drive rollers are also critical to MIG welding performance, as is matching the roller mechanism to the wire diameter and setting the tension correctly. Always begin with the drive rollers released. Then gradually increase tension until it’s just past the wire’s ‘slip’ point. This will ensure a good feed of wire going through the MIG torch.
Correct liner length
Make sure your supply-line liner is the correct length too. If it’s wrong, it’s easily deformed by the drive rollers’ ‘push’. The result? Unhelpful ‘chattering’ or vibration in the MIG torch. Our top tip for getting liner length right is to cut it slightly longer so the diffuser/tip holder has to be slightly pushed on to tighten onto the swan neck.
It’s a (MIG) gas, gas, gas…
By the way, while setting everything up, make sure your gas settings are correctly matched to material type and thickness.
In general when welding mild steel our invertor machines like to run on a 5% CO2 to Argon mix, higher amperages might require more CO2 – maybe 15% or 20%. Your gas supplier can give you all the information you need about gases and gas mixes.
Tip 4. Cleanliness is everything
If there’s another mantra that should be drummed into every MIG welder it’s surely ‘clean, clean, clean’. No matter what size your workpiece is, one of the most important MIG welding tricks is to clean the metal properly first.
Cleanliness and MIG weld porosity
That workpiece must be paint- and rust-free, dry, and cleaned of oil and other contaminants if you want to avoid porous welds that ruin work, waste time and cost money. If thicker plates have mill scale, you might want to grind the scale off for better results. Here’s what Ben Steger, R-Tech’s service and warehouse manager says about weld porosity:
‘Porous welds are probably the top reason for MIG weld failures. The usual suspects for porous welds are dirt, oil, paint or rust left on the metal. If you leave even the tiniest amount of contaminants in the weld you’re heading for disaster. It’s not just the contamination that you can see that does harm; when you grind out cracks, make sure to remove any contamination that isn’t immediately visible.’
Tip 5. Calling earth
And while we’re on set-up, here’s another good MIG tip if you want to avoid problems when you start welding.
Your welding arc relies on a smooth, strong flow of electricity at suitable amperage. To achieve this, make sure your earth lead (ground lead) and its clamp are in good condition, that (no frayed or corroded wires) and properly connected.
Make sure your earth is as close as possible to the MIG electrode wire too. Trust us: little tips like this add up to great MIG welds.
Tip 6. Starting to weld
What about some MIG welding tips and tricks for when you start working metal?
With your material clean and your MIG equipment set-up, always tack weld or clamp your workpiece (with one or more temporary welds) to stop it moving around during welding. Learning how to make fast, secure tack welds is a great tip for novices. Being able to do so fast and fluently during challenging projects is another MIG welding trick that looks like magic to the uninitiated.
As you weld, as a general rule, aim to keep the MIG welding arc at the front (the ‘leading edge’) of the weld puddle.
MIG welding tips? Push vs. Pull
And then there’s the debate between push welding and push-pull when MIG welding. Generally, you’ll use a ‘forehand’ push method. But occasionally, perhaps when you need a deeply-penetrating weld, combining push welding and pull (backhand) welding) may give the best result.
Have you heard about good welding sounding like frying bacon? It’s true; a proven MIG welding tip for identifying a good weld-in-progress is that, in dip transfer mode, it sounds just like the frying of that oh-so-popular British breakfast delicacy. Feeling hungry?
Another good MIG welding tip
During welding, try to keep the MIG torch and its co-axial cable as straight as possible. By keeping the MIG gun and co-axial supply line as straight as possible you’ll minimise the possibility of a kinked cable and poor wire feed.
You’d never do this would you?
Of course, you’d never pull your MIG welding machine around by the co-axial supply line. Or drape the supply cable and a ‘hot gun’ over anything when they’re not in use. That’s bad practice that can cause misshapen liners and poor welding performance later…
Tip 7. The ‘handiest’ MIG welding tip ever?
Don’t be shy! As R-Tech workshop engineer Ben Kightley explains, it makes sense to use both hands for maximum control when MIG welding:
‘Why use one hand when two gives better control? Set up your weld and do a dry run to understand how your body will move in relation to the work. Then use both hands while you weld. A good tip is to position the angle of the MIG gun’s neck in one hand, then hold the trigger grip with the other. Keep the hand supporting the MIG gun close to the weld too – those heat resistant leather MIG welding gloves will really come into their own.’
Tip 8. Stagger your welding
Seriously, we don’t mean you should ever weld after drinking! However, if you’re MIG welding thin panels, or stainless steel, there’s a risk of heat distortion causing the material to bend and buckle. Faced with this, one of the most important MIG welding tips is to stagger your welds to spread the thermal effect throughout the work. This means welding in different places around the work to limit any heat distortion.
Tip 9. Keep learning about MIG welding
Whether you browse this site, talk to Daz Higgs (R-Tech’s technical and service manager), consult the rest of the team, speak to gas manufacturers such as Air Products or BOC, or ask professional bodies such as The Welding Institute, it’s good to know a wealth of valuable welding information is there for the asking.
Looking to build a solid MIG welding career?
R-Tech sales advisor Graham Church epitomises broad experience, in-depth knowledge and years of valuable training. Here’s a tip for MIG welders (or any welders, for that matter) looking to build a solid career:
‘Balance good practice and training with advice from trusted sources and experienced welders who’ve trodden the same route as you – but beware of bad advice from “a mate of a mate”. As in any industry, anecdotal tips and tricks often lead to poor – dangerous even – practices. Pick your sources of help and training wisely and listen carefully. That’s got to be one of the best tips I can offer any aspiring MIG welder.’
Tip 10. Read your MIG welder’s user manual
Professional welding equipment manufacturers put lots of work into the product documentation that helps you stay safe and get the most from your MIG welding machine.
Please don’t throw away your user guide
When time’s tight on projects, or you’re just excited to try your new MIG welder, it’s tempting to plug it in, start work and toss that user guide into the nearest drawer.
Please don’t! Another MIG welding tip that will help you get the most from your machine, and become a better welder, is to read the owners manual and refer back regularly. Rob White, founder and managing director of R-Tech Welding Equipment says:
‘We put a lot into giving you a properly written user guide. Remember that as well as this, the best MIG welding machines are backed by great teams. Try calling ours for help or advice. It’s just a phone call or email away, it’s free and you’ll be amazed what we have to offer.’
MIG welding tips and tricks – conclusions
So there you have it, a selection of the top MIG welding tips and tricks, backed by insights from the experienced R-Tech team. And because they’re so important, here they are again:
- Safety, safety, safety!
- Equipment matters
- Get your set-up right
- Cleanliness is everything
- Calling earth
- Starting to weld
- Is this the ‘handiest’ MIG welding tip or trick ever?
- Stagger your welding
- Keep learning about MIG welding
- Read your MIG welder’s user manual
Follow these MIG welding tips, always keep your eyes and ears open for more good advice, and look forward to less downtime, more productivity and more satisfaction from your professional or hobby MIG welding.


![Toni Kroos là ai? [ sự thật về tiểu sử đầy đủ Toni Kroos ]](https://evbn.org/wp-content/uploads/New-Project-6635-1671934592.jpg)


