How to Photograph Corporate Portraits
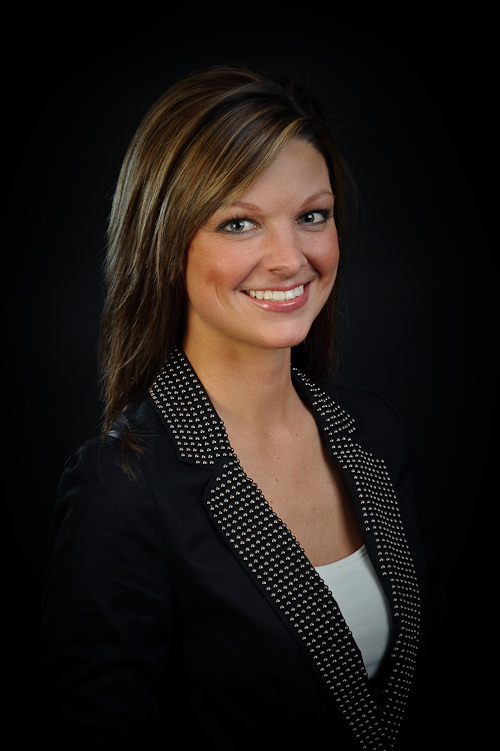
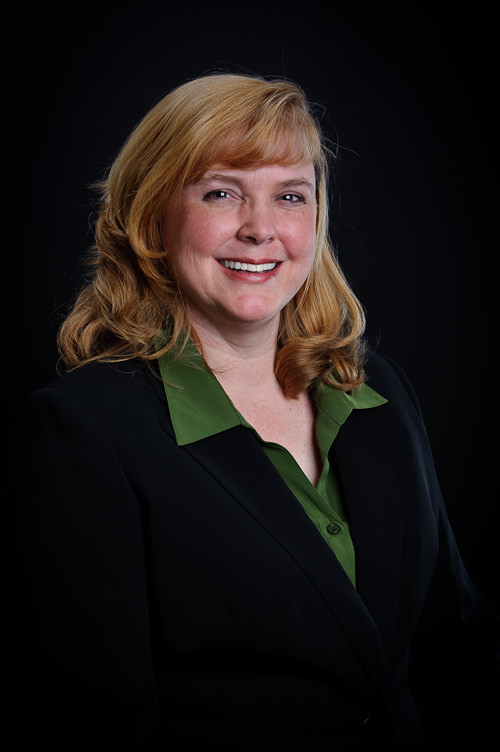
I have been getting many requests lately to write an article on corporate portrait photography, after my last corporate event photography tips article that I wrote a few weeks ago. Photographing employees for corporate websites and magazine articles is very different from corporate event photography – it is similar to photographing a portrait in a professional studio. Obviously, the atmosphere is different, lighting is different and the gear you use is also very different. You must be equipped with portable lighting equipment that you can assemble and disassemble in minutes. In this article, I will go through the different types of corporate portrait photography and what you can do to get the best possible results with the least amount of money spent on gear and lighting equipment.

1) Indoors Corporate Portrait Photography
Indoors corporate portraiture can be a challenging experience, especially when the task is to photograph people in their work environments. When presented with a glassy room with white walls and dim light, many photographers get lost, because they do not know how to deal with light spills, reflections and outside light. It can also be challenging to photograph a simple business portrait for a company profile or for a magazine/newspaper article. How many light sources do you need? How do you position the light? What kind of background do you use? What type of flash should you be using? What is the ultimate portrait setup? We will answer these questions by looking at two case scenarios – one in a regular office environment and one in a studio-like environment.
But before I jump to the photography side, let me go over the business side first. I won’t talk about how much you should be charging your clients, since there are too many factors to consider just like with any other type of photography, but I would like to concentrate on what you should be doing before the photo shoot. Here is a quick compilation of general tips for corporate photography:
- Create a relationship – your first objective is to establish a good relationship with the client and convince them that you are the right person/company to work with. Meet with the client face-to-face and start building a relationship by showing your interest in their company, showcasing your work and asking the right questions. Think of it as an interview process – you will only get hired if the company likes you and finds you competent for the job. You must present yourself as a reliable businessman and partner, who is looking for a long-term relationship with the company. Keep in mind that if you get hired once and prove yourself worthy, the company will most likely come back for your services in the future.
- Find out exactly what the client needs – most of the time, companies know what they need when they call a photographer, whether it is a simple business portrait for their website or pictures for their marketing material. In some cases, however, you might get people who are clueless and just want some pictures of their employees. No matter what the situation is, you should find out exactly what the company is looking for. During your first meeting with the client, find out what they are looking for and show samples of your work to see if they might be interested in other opportunities. Do not forget to ask if the photo shoot will be indoors or outdoors (or perhaps both). When you leave the meeting, you should have a clearly defined list of objectives for your upcoming photo shoot.
- Scout the location – if the client does not mind, scout the location and take some sample shots to see what challenges you might have later. Pay close attention to windows and glassy surfaces, in addition to walls and ceilings. Also note the size of the facility and find out how much space you will be given at the time of the photo shoot. For office environments, ask if the outside scenery should be included in the photograph.
- Provide a quote based on the needs – once you know exactly what needs to be done, you can evaluate your time/labor/equipment and provide an accurate quote for your upcoming work.
- No contract, no work – if you do not already have a contract, work on creating one. If you do not know where to start, there are plenty of contract samples on the Internet that you can download and modify for your needs. If you can afford hiring good legal advice, look into that option first, preferably with someone who has already worked on contracts for photographers. Contracts are needed for a reason – they are there to protect you and your work from potential lawsuits.
- Guarantee satisfaction – companies love when you guarantee satisfaction. Why should they pay you if you suck and cannot get the work done? Guaranteeing your work and having a 100% money back policy would give an additional boost of confidence to your client.
- Schedule early photo sessions – always try to plan for early morning photo shoots, about one hour after start of the business day. Late afternoon sessions are never fun, because people look too tired and you might not get much cooperation from them.
1.1) Office Environment – Ambient Light
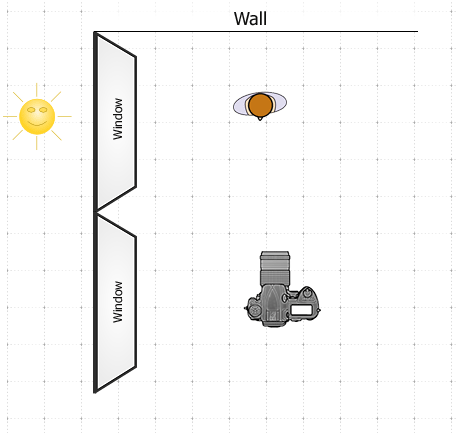
As I have pointed out above, when you go through the location with your client, you need to pay very close attention to the environment and how it is illuminated. If there are large windows on the sides and you can see plenty of light entering the room, you might be able to use that available light for your photographs without the need to use flash. You will have to turn off the indoor lights and fully rely on the light coming from the window, so you need to make sure that there is enough of it reaching your subject. If you are shooting in ambient light without flash, you need to make sure that your camera can deal with noise in case you increase camera ISO. For corporate photography, high level of noise in images is unacceptable and you need to make sure that your images are crisp and beautiful, without any color casts and heavily overexposed/underexposed areas.
The diagram for shooting with window light is very simple – you just need to make sure that the light source is coming from the side or front of your subject:

Obviously, you need to make sure that your subject does not get hit with direct sunlight, or you will end up having nasty shadows all over the place.
1.2) Office Environment – Flash
If the windows are directly behind your subject, using ambient light with no flash will result in a completely over-exposed background, due to the fact that it is brighter outside. If you want to retain the outside scenery, you will have to use flash. When it comes to flash, there are many different ways to light up the environment. You can either use expensive professional lighting gear with high-powered lights or a simple strobe with a light diffuser such as softbox. I personally use the latter and the setup works quite well in almost all cases. Here is my off-camera lighting kit that I use for corporate photography:
- I use the Westcott 28×28″ Apollo Mono Softbox with Recessed Front for most of my corporate portrait photography and I’m in love with this softbox. It is very compact and I carry it with me all the time. If you want a bigger light source, you can also get the 50×50″ version.
- A set of trusty PocketWizard Plus Transceivers. You will need two of these babies – one will go on your camera hotshoe and the second will be used as a “slave” in your off-camera flash.
- A good camera flash that accepts PC sync cords. I am currently using the Nikon SB-5000, but you could also use other cheaper speedlights. If you shoot Canon, I recommend the Canon 600 EX II flash units (if you are shooting with PocketWizard transceivers, the brand actually does not matter).
- Manfrotto 5001B Light Stand – I have a couple of these and they are very compact and sturdy light stands. There is also a much cheaper alternative by “Impact” that I have used in the past and they also work very well.
- Manfrotto 026 Swivel Umbrella Adapter to connect the Apollo softbox.
- Stroboframe Shoe to connect the umbrella adapter with an external flash.
The nice thing about the above setup is how compact it is. I can fit the whole kit into one bag and assembling/disassembling literally takes minutes. I do not have to worry about plugging my lights into a wall outlet, because everything is battery-operated (which also means that I can easily move the setup around the room). Once you get everything assembled and ready to go, put one of the pocket wizards on your camera and connect the second one with the flash inside the softbox via a PC cord. Set both pocket wizards to the same channel and fire a test shot on your camera to see if the flash is getting triggered.
So, what is the best way to photograph a person in an office without over-exposing the background window?
- To decrease the amount of reflections on the surrounding objects and windows, use a minimum number of flashes (preferably just one).
- Using a softbox instead of an umbrella is better, because you can easily direct the light and control it without much spill.
- Angle the softbox so that the light just reaches your subject and does not spill around the room (especially on windows).
- Position the softbox on the side, so that it does not stand directly across the windows and make sure that it is not visible in the window reflection. Another thing you can do is position the light higher, pointing it down at a 45-60 degree angle and shoot with your camera down on the subject. That way, the flash won’t show up on the window.
- Place it several feet away from your subject – the closer, the better.
- Set your camera to Manual mode.
- Meter for the window light and take a sample picture. Make sure that the outside scene is correctly exposed.
- Start with 1/4th of power on your flash inside the softbox and see what you get. Are you getting your subject correctly exposed? Is the room properly illuminated? If your subject is properly exposed but the room is too dark, decrease the shutter speed to a lower value to let more ambient light in and either decrease the flash power on your flash or move the lightbox a little further away from your subject.
- Experiment with an assistant and see how well the subject and backgrounds are lit.
Here are a couple of lighting diagram examples for different setups:
1.3) Studio Environment
Photographing portraits in a studio environment with a background requires more lighting equipment for best results. There is really no magic formula for setting up the lights and everybody does it differently. Let me show you a couple of common examples and what works for me. I encourage you to experiment and try out different things to get a real feel on what works and what doesn’t. This part will be easy for you if you already have experience in a studio environment, except you will have to work with a small number of lightweight portable equipment. Let’s first start with the equipment:
Some quick definitions:
- Key Light – your main light with the most power that you place to the side of the subject.
- Fill Light – typically placed on the other side of the subject at lower power to lighten up the dark shadows on the opposite side of the subject.
- Rim Light/Back Light – placed behind the subject to separate the subject from the background.
And here are just some of the ways you can set up the studio with just two lights:
The first setup only uses two lights – key light (softbox) on the front of the subject with a back light that stands high above the background, pointing down on the hair and shoulders of the subject. Since there is no fill light to the left side, you have to place the softbox just a little to the side or you will end up with shadows on the other side of the face. If you do not have another flash and you are getting nasty shadows, simply use a white reflector to bounce some of the light coming from the softbox to the other side of the face.
The second setup on the right is what I use the majority of the time. The key light illuminates one side of the face, while a less powerful fill light removes the shadows on the other side and the backlight separates the head from the background and adds a touch of light on the shoulders.
You can also use umbrellas to get some nice results when using a white background. If you try this with a black background, some of the light from the umbrellas might spill on the background and lighten it up. If you see that your background is not completely back, move your subject away from the background, which should help with reducing light spill and keeping the background black. If you need to make the white background whiter, set up an additional light right behind your subject and point it at the background. In this setup, one of the lights should have more power (key light) than the other (fill light).
The example on the right is with four flashes. You can get some nice images with this kind of setup, but it is an overkill, in my opinion.
Again, the best thing is to experiment and see what you and your client like the most.

2) Outdoors Corporate Portrait Photography
Outdoors corporate portrait photography is no different than regular portrait photography in terms of lighting and composition. While you can always utilize the available light without flash and perhaps add some light reflectors to eliminate the shadows, using off-camera flash as fill-light during the day can actually add a nice punch to your images and highlight your subject(s).
Start off in a shady area and set up your main light just like you would in a studio. Because of abundance of ambient light, you should not worry about setting up side lights or rim lights in most cases, so a single light should work great. Leave your camera in manual mode and meter your exposure off the background rather than the subject. Your subject is going to be lit up with flash, so you only need to worry about underexposing/overexposing the background area instead. In some cases, the amount of ambient light might be intense and you might need to add much more flash power to even see the effect of your flash on the subject. You should also move your light source as close to the subject as possible.
3) Camera Body and Lenses
If you are shooting strictly with flashes, any DSLR should do the job. If you are shooting in available/low light, you might need a camera that can handle noise fairly well, since you will most likely be shooting at higher than normal ISO values. I have used the Nikon D90/D300/D700/D3 cameras for corporate portrait photography in the past and they all work extremely well.
When it comes to lenses, my personal favorites are:
- Nikon 70-200mm f/2.8E FL – one of Nikon’s best for portraiture/headshots.
- Nikon 24-70mm f/2.8 VR – when wider angles and full body shots are needed.
- Nikon 50mm f/1.4G – if you cannot afford the above.
Canon has a similar selection of lenses:
- Canon 70-200mm f/2.8L IS USM
- Canon 24-70mm f/2.8L USM
- Canon 50mm f/1.4 USM
If you are shooting in available light, the Nikon 70-200mm VR II and Nikon 50mm f/1.4G will produce beautiful, creamy bokeh.
4) Camera/Flash Settings
What camera settings should you use and why? Here are some generic settings that I suggest you set on your camera:
- Image Quality: RAW. Read why you should use RAW.
- White Balance: Auto. I do not mess with White Balance and deal with it during post-processing.
- Auto ISO: Off. Set it to camera’s base ISO (200 on Nikon and 100 on Canon).
- Focus Mode: AF-S “Single” mode.
- Camera Mode: Manual, for consistency reasons when using flash. Start at 1/100-1/200 shutter speed and f/4.0 and go from there.
- Metering: Doesn’t matter, since you are shooting in Manual mode.
- Active D-Lighting: Off (Nikon only). If you are shooting RAW, there is no need to have it turned on.
- Key Light Flash Power: 1/4 Power. Turn other flashes off, start at a quarter of power and adjust as needed.
- Fill Light Flash Power: 1/32 Power. After key light is set and configured, add fill light and set between 1/32-1/64 and see how you like the results.
- Back Light Flash Power: 1/16 Power. Adjust to your liking.
Watch your flashes and let them recycle and cool off before firing again. If you are shooting at full power for whatever reason, make sure that you are giving enough time for your flashes, as recommended in the manual. Many photographers end up burning their flashes, because they do not pay attention to this. I highly recommend not to shoot your flashes at full power and decrease aperture or increase the camera ISO instead.
5) Group Shots
Group shots are tougher to photograph, since you need more/bigger lights. If you have a small group of three to four people, you might be able to get a good exposure with just a single softbox or umbrella (you will just need to make sure that they stand close to each other and you might need a bigger background). If you have a large group, plan on adding more lights or using much larger and more powerful light sources. The best thing to do is to shoot groups outside in a shady area, because you will not have to worry about setting up the light and making sure that it is distributed evenly. If you are taking a picture of a group outside, then your biggest issue is going to be putting the group together and making them all look good for your pictures. Talk to your group, come up with a nice joke or two to make the group laugh naturally. Do not just ask for a “cheese” moment, since you will end up with fake smiles and stupid faces. Take lots of pictures and shoot in bursts. That way, if some of the group members blink, you will still have something to work with.
If you are shooting a group in an office environment, the best thing to do might be to bounce the light off the dropped ceilings. If you have a small or medium-sized group with 8-10 people standing close to each other, you might get away with a single flash, as long as you can bounce it off a white ceiling. Try to keep the group as tight as possible, which means asking the group to stand in multiple rows and close to each other.
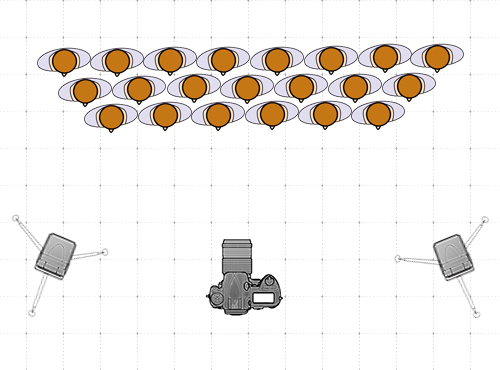
If you have a relatively large group of people in three rows, you could set up two or three light stands with external flashes, put them in manual mode to quarter or half power and point them at a 30-45 degree angle towards the group. The flash power will obviously depend on the amount of ambient light in the room, so you will have to play with that beforehand and make sure that you are providing sufficient amount of light to bounce off the ceiling onto your subjects. If you are not getting enough power from your flashes, try increasing the camera ISO. Make sure that the light bounces off and hits the center of the group (middle row), not the front or the rear row. That way, the light will spread evenly across the group and illuminate everyone. If the room is lit with florescent light, you might need to use some gels with your flashes to match the light.
Here is a simple lighting diagram that you can use for group shots:

The above diagram is for rooms with dropped ceilings. The flashes are pointed up at a 30-45 degree angle to land on the center row.
In terms of lenses, this is when you need to switch to your wide-angle lens, because you need to fit the group into the frame and need the most depth of field. I personally use the 24-70mm f/2.8 lens for these kinds of shots and I really like the results.
Please let me know if you have any questions in the comments section below.


![Toni Kroos là ai? [ sự thật về tiểu sử đầy đủ Toni Kroos ]](https://evbn.org/wp-content/uploads/New-Project-6635-1671934592.jpg)


