How to install NOOBS on the Raspberry Pi – The Pi
The Raspberry Pi is an incredible device, but it won’t do much of anything without an operating system. Luckily, choosing and installing an appropriate operating system on your Raspberry Pi has never been easier. One simple method is to use NOOBS, or “New Out of Box Software.” As the name suggests, NOOBS is perfect for Pi newbies. It lets you choose your preferred operating system and install it right then and there. But how do you load NOOBS itself? Here’s our complete guide on how to install NOOBS on the Raspberry Pi.
Luckily for us, the process is extremely simple. All you’ll need is a Raspberry Pi, a computer, and an SD or microSD card. Check out the complete instruction below.
Mục Lục
How to install NOOBS on the Raspberry Pi
We’ve called our article “How to install NOOBS on the Raspberry Pi,” but what we’re technically doing is installing it on a flash drive, booting to the drive on the Raspberry Pi, and then using NOOBS to choose and install an operating system.
NOOBS has plenty of operating systems for us to choose from when we reach that step – the most notable of which is Raspbian. For now, though let’s concentrate on how to install NOOBS on the Raspberry Pi. We will briefly discuss the operating system installations later, in our final step.
The optional easy route: buy a NOOBS SD card.
Installing NOOBS on an SD card isn’t hard, but it also isn’t necessary. If you’d like, you can choose to buy an SD card that comes pre-loaded with NOOBS. If you go that route, you can skip all the way to the final step!
If you want to do things yourself, though, just read on.
What you’ll need to install NOOBS on the Raspberry Pi
This project is pretty simple. Besides your Raspberry Pi and essential peripherals, here’s all you’ll need:
- A computer with an SD card slot
- An SD or microSD card of at least 8 GB
Step 1: Download NOOBS and extract it

You’re going to use your computer to put NOOBS on an SD card – so step one is to get NOOBS onto your computer!
Click here to head to the NOOBS download page.
The NOOBS download page will let you choose between NOOBS and “NOOBS Lite.” NOOBS includes a full version of Raspbian, so you can install that particular operating system without using the internet at all. With NOOBS Lite, on the other hand, you’ll need a network connection to install any of the operating systems NOOBS makes available – even Raspbian.
Go ahead and choose whichever version you would like. NOOBS will download as a .zip file, so before you do anything else, go ahead and extract it.
Step 2: Format an SD card
Now you’re going to want to go ahead and stick your SD card into the corresponding slot on your computer. You’re going to want to format it as FAT. There are a few ways to do this:
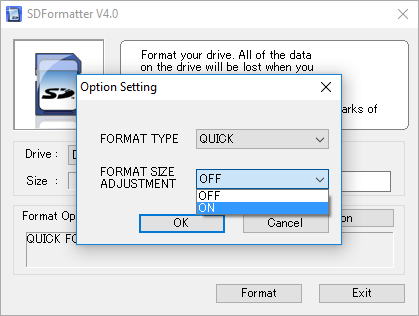
On Mac or Windows, use the SD Association’s Formatting Tool (Mac users can also just use the disk utility). Make sure the “Format size adjustment” option is set to “on.” Then erase it in FAT (or MS-DOS) format.

Step 3: Put the NOOBS files on the SD card
Now, just drag and drop the NOOBS files into your newly formatted SD card. You want the files only, so if your .zip extracted to a folder, open that folder up and select only the stuff inside of it.
Step 4: Put your SD card into your Raspberry Pi and boot it up

Once you have NOOBS on your SD card, using it is incredibly easy. Just put the SD card into your Raspberry Pi and start that sucker up. As we said before, while this guide is called “How to install NOOBS on the Raspberry Pi,” the endgame here is actually to install an operating system like Raspbian, LibreELEC, OSMC, or any of the others NOOBS gives you access to.
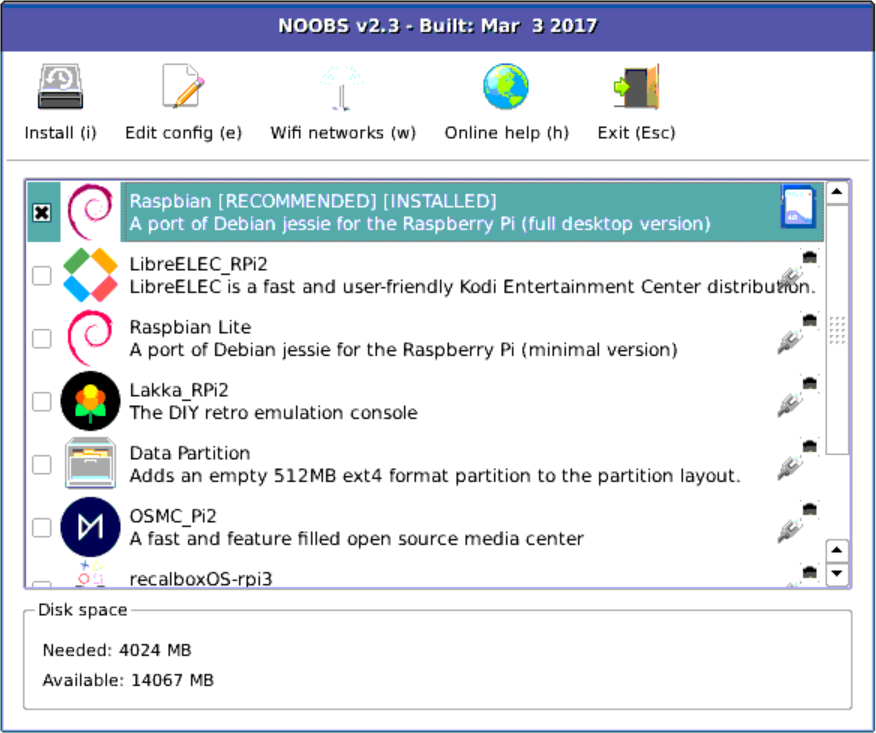
This is the step in which that happens. After booting to NOOBS, you’ll be greeted with a menu that will let you choose which operating system you’d like to install on your Pi. Your menu may look a little bit different than the one in the screenshot above, because NOOBS ingeniously adapts to your generation and model of Raspberry Pi.
Which OS should you choose? Well, that’s up to you. Raspbian is probably the most frequently used, and you’ll find plenty of projects here on our site that utilize it. OSMC acts as a media center, and LibreELEC boots directly to the popular media center app Kodi. Ultimately, it’s all a matter of personal preference!
Once you’ve decided, just hit “Install” and sit back. From now on, your Pi will boot directly to that operating system. Easy, right?
And if you’re not happy with the operating system you pick, you’re not stuck. Just hold down the SHIFT key while booting up, and you’ll be back in the NOOBS menu ready to try out a different option.


![Toni Kroos là ai? [ sự thật về tiểu sử đầy đủ Toni Kroos ]](https://evbn.org/wp-content/uploads/New-Project-6635-1671934592.jpg)


