
How To Find the Network Security Keys of a WiFi Router?
Did you forget the network security keys of your wireless router? Well, you’re not alone. In research conducted by me, it was found that 64% of users end up resetting the key while adding a new device because they forget the old security keys.
You can’t add a new device to your current network without knowing the security key. You can indeed reset your wireless router and set a new key, but I don’t recommend that because that’d create another mess by disconnecting all the connected devices.
As you are here, you indeed must be looking for a way to find the security keys of your WiFi network. Don’t worry; the sole purpose of this guide is to help you find the same.

Where To Find Network Security Key on a Router?
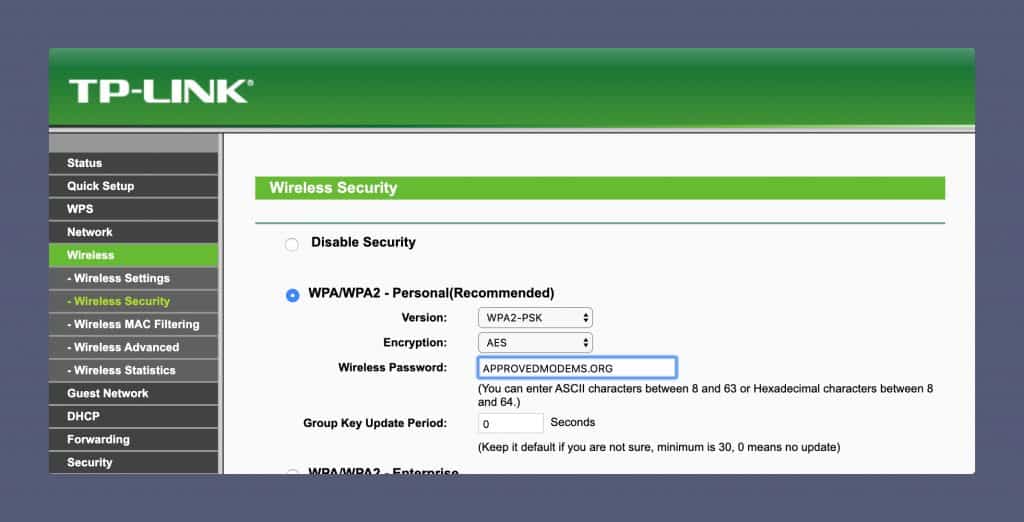
- Open a browser such as Google Chrome, Mozilla Firefox, or Safari.
- Type the IP address that’s behind your WiFi router (e.g. 192.168.X.X ) last two digits may vary for different router manufacturers.
- Enter the username and password (By default, the username is: admin password is: admin, If your router doesn’t have the username option, type the password)
- Since different router manufacturers use different terminologies and designs for the control panel, you’ll have to look for a menu or option closely related to “Wireless Security,” and you’ll be able to see your password!
The web interface and security settings should look like this:
Finding the Network Security Keys From Connected Devices
Although finding the key using the wireless router’s control panel is much easier and saves huge time, if for some reason your router manufacturer doesn’t show the security key in the panel or if it’s encrypted there, then you’ll need to find it using your computer’s operating system.
My guide includes the steps for the popular operating systems listed below (they all account for 97% of the consumer PC OS market.)
- Windows
- Linux (Ubuntu)
- MacOS
1. Windows OS
Follow the below-listed steps to be able to find your router’s security key from Windows OS. However, you’ll need to perform the steps using a device that’s connected to the router.
- Go to the Control Panel > Network & Internet > View Network Status & Tasks
- Find “Manage Wireless Networks” (you’ll see all the networks that your device has been connected to.)
- Look for the network whose key you are finding, once you find it.
- Right-click on the network and click on “properties”
- You’ll see a security tab which will have the password, just click on “Show characters” and you’ll see the password. You can use it to add other devices.
The Windows OS is regularly updated, and there are chances that the options or the terminologies we’ve used to address them would change, that’s why, if it changes and if you’re unable to find them, then consider following the below steps where we’ve seen the network key using command prompt in Windows.
- Click on the Windows button on the keyboard and search “CMD”
- Right click on the search result and click on “Run as Administrator” and click on “Allow” when prompted with the message “Allow this program to make changes to the computer”
- In the command prompt, type the command “netsh wlan show profile” (without quotes) and it’ll display all the networks your device has connected to till date.
- Look for the name of the network you’re planning to reset.
- Type the command “netsh wlan show profile ApprovedModems key=clear“, replace ApprovedModems with the name of your network.
- It will now show you all the details of that particular WiFi network, here under security settings you will get one key-value pair as “Key Content:” and the passphrase written after this will be your password, VOILA !!!
2. Linux (Ubuntu)
- Open terminal and switch your user to see if you’re not already a superuser (command for that is sudo su, press enter and provide a password which will not be visible so don’t worry)
- Change your directory to system connections which is by default location with command cd /etc/NetworkManager/system-connections/
- This location will have files of your WiFi connections saved with the SSID (name of WiFi), to verify you can type “ls” command and check if your WiFi file is present or not
- If the file is present go for next command to see the contents of file “cat FILE_NAME“, here replace FILE_NAME with the name of WiFi.
- This will display all the details about that network, at psk=ABCDEF you will get your password instead of ABCDEF.
3. MacOS [All Versions]
Follow the steps below to find your Wireless Router’s password on MacOS. The steps work for all versions of macOS and also work with Hackintosh Setups.
 Finding the network security key on MacOS
- Click on Launchpad and search for “Keychain access” (Alternatively, press command+space and make a spotlight search for “keychain access“)
- In the search option located at the top-right hand corner of the Keychain access utility, search for your network or enter the first few letters of the name.
- The utility will scan for your search query in real time and show results. If you’ve entered the network’s name correctly, you’ll find it listed.
- Found your network? Right click on the network whose key you’re looking for. You’ll see “Copy password to clipboard” option.
- Open any text editor where you can paste text (I prefer using Notes.) and now “press command+v” or “right click + paste” and your security key will be pasted.
- Use the key to add a new device to your current network.
Conclusion
I hope you were able to find the security key of your network! The steps we’ve listed work on Windows, Linux (Ubuntu), and macOS.
The first section of the post includes a way to find the key using the router’s control panel using their IP (We’ll soon add standalone steps for different wireless router brands) so that you won’t have to look behind the router.
The second section of the post includes steps for various operating systems. We’ve added steps for Windows, Linux (Ubuntu), and macOS in our current version. We’re also working on a tutorial for Android and iOS.


![Toni Kroos là ai? [ sự thật về tiểu sử đầy đủ Toni Kroos ]](https://evbn.org/wp-content/uploads/New-Project-6635-1671934592.jpg)


