
How to Enroll Android Devices in Android Enterprise? – AirDroid
Android enterprise is about managing devices in a way that allows you to impose security policies and controls, manage settings on every device, and provide local controls through the use of cellular connectivity. Let’s talk about how to perform android enterprise enrollment on your Android devices.
Mục Lục
Part 1: Enroll your Android Enterprise Dedicated
You can enroll your Android Enterprise specialized devices, fully managed devices, or business-owned work profile devices in Intune after you’ve configured them. Enrollment in Intune for dedicated devices, completely managed devices, and corporate-owned devices with a work profile begins with a factory reset. The android enterprise enrollment methods are determined by the operating system.
Part 2: Enroll by using Near Field Communication (NFC)
To provision NFC-enabled devices running Android 8.0 or later, create a specially formatted NFC tag. You can use your own app or any NFC tag-generating tool. See C-based Android Enterprise device enrollment with Microsoft Intune and Google’s Android Management API documentation for more information.
The NFC enrollment method is only supported for corporate-owned work profile (COPE) devices running Android versions 8.0 to 10.0. It is not compatible with Android 11.0 or later.
Part 3: Enroll by using a token
For Android 8.0 and later devices, you can enroll the device using the token value, such as 12345.
When using the afw#setup enrollment method to enroll devices running Android 8.0 and later, you can use QR code scanning.
The afw#setup enrollment method is only supported for corporate-owned work profile (COPE) devices running Android versions 8.0 to 10.0. It is not compatible with Android 11.0 or later. See the Google developer documentation for more information.
Steps to enroll by using a token
- Start your wiped device.
- Choose your language from the Welcome screen.
- Connect to your Wi-Fi, then select NEXT.
- Accept the Google Terms of Service and then click NEXT.
- Enter afw#setup instead of a Gmail account on the Google sign-in screen, and then click NEXT.
- For the Android Device Policy app, select INSTALL.
- Continue to install this policy. Some devices may necessitate the acceptance of additional terms.
- Allow your device to scan the QR code on the Enroll this device screen. Alternatively, you can manually enter the token.
- To complete enrollment, follow the on-screen prompts.
Part 4: Enroll by using a QR code
To perform android enterprise QR code enrollment on devices running Android 8.0 and later, scan the QR code from the enrollment profile
- After wiping the device, repeatedly tap the first screen you see to launch the QR reader.
- On Android 8.0 devices, you’ll be asked to install a QR reader. A QR reader is pre-installed on devices running Android 9 and later.
- Scan the enrollment profile QR code with the QR reader, then follow the on-screen prompts to enroll.
Part 5: Enroll by using Google Zero Touch
To use this method, devices must support zero-touch enrollment and be affiliated with a supplier that supports a part of the Android zero-touch enrollment service. See Zero-touch enrollment for IT admins for more information, including prerequisites, where to purchase devices, and how to link a Google Account to your corporate email (opens Android Enterprise Help docs). Below we describe how to perform Android enterprise zero-touch enrollment:
Create zero-touch configuration in admin center
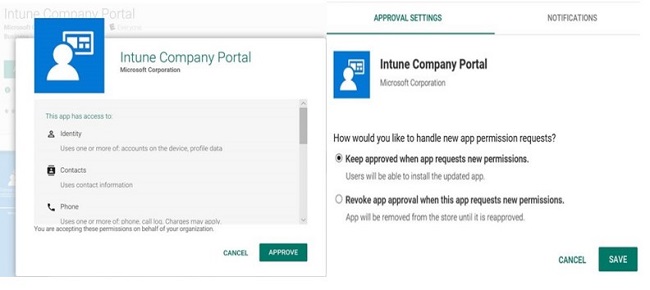
Step1: Add required permission, add the app sync update permission.
- Access the Microsoft Endpoint Manager Admin center.
- Tenant administration > Roles should be chosen next.
- Choose your role from the drop-down menu.
- Click on “Properties”.
- Select Edit from the Permissions menu
- Click on “Android for Work”.
- Select “Yes” next to Update app sync.
- To review your changes, select Review + Save.
- Click on “Save”.
Step2: Enable enrollment for corporate-owned devices
Check that enrollment for corporate-owned, fully managed devices is enabled.
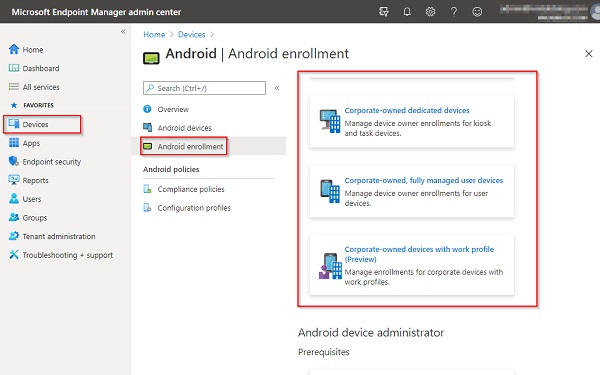
- Navigate to Devices > Enroll devices in the admin center.
- Click on “Android enrollment”.
- Select Corporate-owned, fully managed user devices from the Enrollment profiles drop-down menu.
- Check that the Allow user to enroll corporate-owned user devices setting is set to Yes.

Step 3: Link zero-touch account to Intune
Connect your Microsoft Intune account to a zero-touch account. Intune creates a default zero-touch configuration after linking the account.
- Navigate to Devices > Enroll devices in the admin center.
- Click on “Android enrollment”.
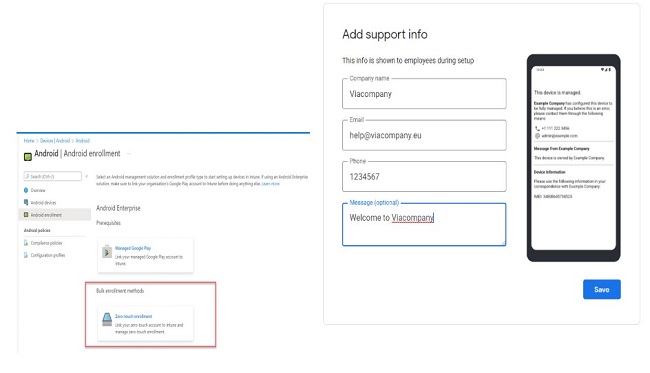
- Click on “Zero-touch” enrollment under Bulk enrollment methods.
- The iframe appears. To begin the setup process, click on “Next”.
- Sign in using the Google account you gave your reseller.
- Choose the zero-touch account you want to link, and then click on “Link”.
- A default configuration is established. A screen with basic configuration information appears. Intune will apply the default configuration to any zero-touch-enabled device that does not already have one.
- To proceed, click on “Next”.
- Add help documentation to assist device users during setup.
- End up by clicking on “Save”.
When you connect your account to Intune, the default configuration is implemented to zero-touch enabled devices that do not already have one. In the admin center, you can see the existing zero-touch configurations, edit and customize support information, unlink the account, and link other accounts.
Create configuration in zero-touch enrollment portal
In the zero-touch enrollment portal, add a zero-touch configuration. You can use the portal to manage configurations on its own or in conjunction with the zero-touch iframe. Configurations for fully managed and dedicated devices, as well as corporate-owned devices with a work profile, are supported by the portal.
- Sign in with your Google account to the zero-touch enrollment portal.
- Click the option to create a new configuration.
- Fill in the information asked in the configuration panel.
- As the EMM DPC app, select Microsoft Intune.
- Copy and paste the JSON text below into the DPC extras field. YourEnrollmentToken should be replaced with the enrollment token you created as part of your enrollment profile. Make sure to use double quotes around the enrollment token.
- Include your organization’s name and support information, which will be displayed on the screen as users configure their devices.
{
“android.app.extra.PROVISIONING_DEVICE_ADMIN_COMPONENT_NAME”: “com.google.android.apps.work.clouddpc/.receivers.CloudDeviceAdminReceiver”,
“android.app.extra.PROVISIONING_DEVICE_ADMIN_SIGNATURE_CHECKSUM”: “I5YvS0O5hXY46mb01BlRjq4oJJGs2kuUcHvVkAPEXlg”,
“android.app.extra.PROVISIONING_DEVICE_ADMIN_PACKAGE_DOWNLOAD_LOCATION”: “https://play.google.com/managed/downloadManagingApp?identifier=setup”,
“android.app.extra.PROVISIONING_ADMIN_EXTRAS_BUNDLE”: {
“com.google.android.apps.work.clouddpc.EXTRA_ENROLLMENT_TOKEN”: “YourEnrollmentToken”
}
See Zero-touch enrollment for IT admins for more information on assigning a default configuration or applying a configuration in the zero-touch portal (opens Android Enterprise Help docs).
Part 6: Enroll by using Knox mobile enrollment
To use Samsung Knox Mobile Enrollment, the device must be running Android 8.0 or later, as well as Samsung Knox 2.8 or higher. To enable Android enterprise enrollment itune via Samsung KME, use the Intune and Samsung Knox portals in the following order:
- In the Knox portal:
- Create an MDM profile
- Add devices
- Assign an MDM profile to your devices
- Configure end-user sign-in within the Knox portal.
- Distribute the devices.
When purchasing devices from authorized resellers participating in the Knox Deployment Program, a list of device identifiers (serial numbers and IMEIs) is automatically added to the Knox Portal.
Part 7: Enroll devices in Android enterprise using G suite
You can enroll your devices in the Android Enterprise program in either device owner or profile owner mode. A device owner can only be assigned during the device’s initial setup. This means that if the device is brand new, you can continue with the initial setup, whereas if it is already in use, you must wipe the device.
To enroll in profile owner mode, unlike device owner mode, you do not need to reset the devices to factory settings. When the device is enrolled, a separate work container is created on the device, preventing the mixing of personal and corporate data.
Enable third-party Android mobile management to be enforced
To enroll in profile owner mode
- Select Accounts from the Settings menu on your Android device (This option may vary depending on the type of device you are using).
- Select Google accounts by clicking +Add account.
- Enter your G Suite account’s username and password.
- Select I agree.
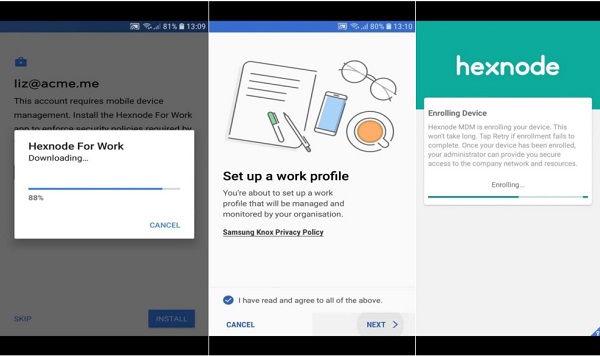
- A prompt will appear to install the Hexnode for Work app.
- Select Install.
- The app will get downloaded and installed. Set up the work profile by following the on-screen instructions.
- Enter the name of the portal where the device should be enrolled.
- Your device will now get enrolled.
To enroll in device owner mode
- Restore the device to its original factory settings.
- When prompted to add a Google account on the initial device setup screen, enter your G Suite account credentials.
- A prompt will appear to install the Hexnode for Work app. Select “install”
- The app will get downloaded and installed. Set up the work profile by following the on-screen instructions.
- Enter the name of the portal where the device should be enrolled.
- Your device will now get enrolled.
Enable third party Android mobile management is disabled
To enroll in profile owner mode
- Install the Hexnode for Work app after downloading it from the Google Play Store.
- Open the app and enter the name of the portal into which the device must be enrolled.
- Select Agree.
- When the Setup Work Profile screen appears on the setup screen, click Continue.
- To create a work profile, follow the on-screen instructions. The Hexnode for Work app may be minimized during the process, but it will relaunch in a matter of seconds.
- When prompted to configure your G Suite Email Account, click Continue and enter your G Suite account username and password.
- Your device will now get enrolled.
To enroll in device owner mode
- Enroll the required device in Device Owner mode.
- When prompted to configure your G Suite Email Account, click Continue and enter your G Suite account username and password.
- Your device will now get enrolled.
Part 8: Configure Android enterprise device enrollment
To configure device enrollment for Android enterprise, follow the steps below.
- Create an Android enterprise device policy for device owner mode.
- Create a policy of type for profile owner mode. Work profile policy for Android Enterprise
- For the policy you created earlier, the task bundle must include at least an Enroll task and an Install profile or assign policy task.
- Different packages can be configured for corporate and personal devices. Device owner enrollment, for example, can be used for corporate devices, and profile owner enrollment for personalized devices.
1. Make a policy for each Android enterprise enrollment mode that you intend to support.
2. Make a task bundle for each Android enterprise enrollment mode that you need to support.
3. Select the task bundle you created as the initial package in the Self-Service Portal group settings.
Part 9: Tips to apply a policy to newly enrolled devices
It’s up to you and what your customers require as to how you apply policies to newly enrolled devices. Here, we outline three different options:
- The policy name (policy name) that will be at first linked to the device can be specified when creating an enrollment token. The policy is automatically applied to the device once you enroll it with the token.
- Specify a policy as the enterprise’s default policy. Each new device is immediately connected to the default policy at the time of enrollment if no policy name is specified in the enrollment token and there is a policy with the name enterprises/enterprise id>/policies/default.
Enroll a device without a policy
When a device is enrolled without a valid policy, the device is kept in quarantine. Quarantined devices are prevented from performing any device functions until they are linked to a policy.
Device enrollment fails if a device is not linked to a policy within five minutes, and the device gets factory reset. The quarantine device state allows you to include licensing checks or other enrollment validation processes in your solution.
Part 10: Enroll Android devices with AirDroid MDM
AirDroid Business MDM includes a number of alert functions, such as data usage, device offline, and so on. Once triggered, IT administrators will receive a notification and will be able to take preventative measures to resolve the issue.
Owner and Admin accounts can view device and user activity logs to monitor device and user activities such as device enrollment, remote access usage, app publication, Admin Console login, and more. Break down silos and use modern log monitoring tools to improve operations and security while also gaining critical business insights. If you need MDM for Android devices, AirDroid MDM is the best solution.
Part 11: FAQs about Android Enterprise Enrollment
How do I enroll in Android enterprise?
- Near-field communication- Bump an NFC tag to enroll a new device.
- EMM token- Fill in the unique code given by your EMM provider.
- QR code- Scan a QR code to enroll your device from the setup wizard
- Enterprise Google Account- Sign in to enroll your device with a work email address on G Suite.
What is an Android enterprise device?
Android Enterprise is a Google-led initiative that makes it possible to use Android phones, tablets, and apps at work. Developers can incorporate support for Android into their enterprise mobility management (EMM) solutions using the program’s APIs and other tools.
How do I know if Android enterprise is installed?
The following steps will show you whether a device is capable of running Android Enterprise:
- Open the Mobile@Work app on the device.
- Select Settings > About > Product Details from the menu.
- Confirm if Android Enterprise (AFW) Support has a value of Yes in it.
What is Android enterprise recommended?
Android Enterprise Recommended makes it easier for businesses to confidently choose, deploy, and manage Android devices and services that fulfill elevated enterprise requirements verified by Google
What is MDM enrollment?
Mobile device enrollment (MDM) is the first step in enterprise management. During the enrollment process, the device is set up to communicate with the MDM server using security precautions. The enrollment service confirms that their enterprise can manage only authenticated and authorized devices.
Is Android for work the same as Android enterprise?
Unlike Google TV, Android Auto, Android Automotive, WearOS, or other Android editions, Android for work and Android Enterprise are integrated solutions rather than separate products. Furthermore, managing Android Enterprise requires a contemporary EMM because it is a set of APIs rather than Android management in and of itself.
What is Android enterprise Intune?
Intune assists you to deploy apps and settings to corporate-owned, Android Enterprise devices with work profiles. Check Android enterprise requirements for details on Android Enterprise.
How do I register a device on MDM?
If the devices are already in use, the system administrator and employees can quickly enroll the devices. If the employees have the devices, you can create an enrollment invite that is mailed to the staff, who then use it to enroll the devices if they have them. These invites can be delivered in bulk or individually
Conclusion
Android Enterprise is a Google-led initiative that allows Android devices and apps to be used in the workplace. The program provides APIs and other tools to developers so that they can integrate Android support into their enterprise mobility management (EMM) solutions. Android Enterprise Recommended enables businesses to confidently select, deploy, and manage Android devices and services that fulfill elevated enterprise requirements validated by Google.


![Toni Kroos là ai? [ sự thật về tiểu sử đầy đủ Toni Kroos ]](https://evbn.org/wp-content/uploads/New-Project-6635-1671934592.jpg)


