
How To Curl Your Hair – 6 Different Ways To Do It | Sam Villa
By the end of this tutorial, you will understand how to create different types
of curls–spiral curls, barrel curls, and everything in-between.
Mục Lục
Before we begin we want to offer some curling hair tips:
-
We recommend practicing with the your
curling iron or
flat iron in the
OFF position. I know, it seems silly. But this will allow
you to practice these curling hair techniques without burning yourself.
After you feel confident then turn on the heat and curl your hair. -
Always use a heat protectant spray when you curl hair.
Working with heat protection is vital to the health of your hair. Heat
doesn’t just dry hair out, it can destroy the integrity of the inner
structure of the hair, and even decrease the longevity of that beautiful
color that you invested in at the salon. -
392° F. That is the maximum
temperature to use to keep hair color safe from dulling and
fading. So turn your irons down and be more deliberate with your speed
(slowing down) to create better curls with less damage to your hair.
These are the hair curling tools and products we will be using in our
tutorials:
How to Curl Your Hair With a Curling Iron
These first four hair curling techniques are designed to
teach you how to create different types of curls using your
curling iron.
We will show you how to create loose curls by wrapping the hair around the
barrel of the iron and then changing directions.
Tight curls by wrapping the hair around the barrel in a flat motion or
twisting the hair before wrapping it around the barrel.
Then we will teach you an elegant wave by combining two of
these four techniques. Here we go…
Flat Wrap Hair With a Curling Iron
Our hair curling tool of choice for this technique is a 1” inch curling iron.
Remember to use a heat protectant spray before using your curling iron!
This flat wrapped technique creates a wide curl with lots of
volume.
The final result will resemble a however the tightness of the curl depends on
the width and thickness of your sections.
For this technique we recommend using wider sections – about 1-½” – 2”.
The secret to this curl is keeping the
hair wrapped flat against the curling iron barrel without twisting.
To keep the hair flat against the curling iron you’ll need to
adjust your hands each time you go around the iron, otherwise the hair will naturally want to twist around the barrel.
If you have fine hair and desire more volume, this curl type is for you!
Scroll down to see how it’s done.

-
Take a vertical section and mist with a thermal heat spray to protect your
hair from the heat then use a wide tooth comb to evenly distribute the
product. Choose the direction you want the hair to curl, either toward your
face or away from your face. -
Focus on keeping the section flat while wrapping it around your
curling iron. Remember, don’t twist
the hair around the iron. -
Continue to wrap the hair around the iron until you get to the ends. To
create more natural looking curls, don’t curl the last 2” or so.
HOT TIP: Taking smaller sections will create a tighter curl
pattern and larger sections will create a looser curl pattern.
Experiment with the size of your sections until you find the perfect curl size
for you!

Lazy Curl with a Curling Iron
Using your 1” curling iron, this
technique creates a loose wave.
Take your iron and wrap the hair around the iron, but only half way down and
then switching wrapping directions for the remainder of the
section.
By changing the direction of the curl and leaving the ends out, this will give
the effect of a more relaxed wave.

-
Begin with your first section and mist with a thermal heat spray from at
least 6” away to protect the hair. Gather the section, elevate to 90 degrees
with thumb and index finger. -
Place the curling iron in front of
the section with the barrel of the iron behind the section. Holding the
section, face thumbnail up and flat wrap around the iron (do not twist the
hair around the barrel when doing a flat wrap). After you complete the flat
wrap, hold the section and roll the iron and close near the scalp and allow
the section to heat completely before moving on. -
Holding the section, remove the barrel from the hair and turn it so the
barrel is not in front of the section. Place the iron in the spot where your
last curl was made and repeat the process, flat wrap, roll the iron and
close. -
Once to the end of the section, comb through with your hand and finger
through the section to separate the curls.
End result will be a lazy curl that looks very natural. Finish with a flexible
hold hairspray.
HOT TIP: Check the temperature by placing your finger over
the hair that is in the iron. Once your fingers are hot, release the
section.
Spiral Curls with a Curling Iron
Again, picking up your 1” curling iron and heat protectant, we’re going to
create a spiral-like curl. Working in smaller sections like the flat wrap
curl, the hair is first twisted from the top to the ends, then wrapping that
twisted section around the curling iron to create that spiral effect.
The end result will be a tight spiral curl with added texture.

-
Begin by taking a small section and mist with a thermal heat spray from at
least 6” away to protect the hair. Twist the entire section from base to
ends. Instead of twisting you can also braid the section of hair. -
The key here is to twist the section and wrap it around the curling iron all
in the same direction. If you want to curl away from the face, twist and
wrap in the outwards direction from your face. - Wrap the entire twisted section around your curling iron and let it heat up.
-
Remove your curling iron and allow the curl to cool. Once your entire head
is curled, shake the curls out with your fingers to loosen and add more
volume.
HOT TIP: Allow your spiral curls to really cook! Spiral curls
collapse because they either didn’t get enough heat or they didn’t cool long
enough to set the style!
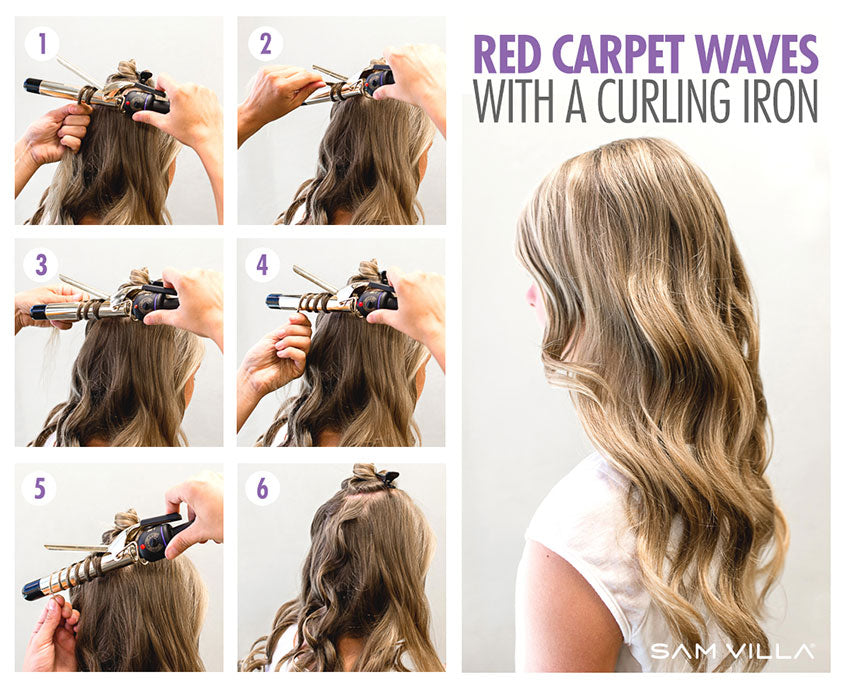
Red Carpet Waves with a Curling Iron
A wand or curling iron can be used for this technique. Begin like you would
with the Flat Wrap technique but as you wrap the hair around the iron, you
then twist the section like you do in with Spiral Curl technique.
This curling iron technique is more difficult but the end result is a soft yet
very dramatic beautiful wave.
-
Begin with your first section and mist with a thermal heat spray from at
least 6” away to protect the hair. Gather the section, elevate to 90 degrees
with thumb and index finger and over direct to the corner of the client’s
eye. Place the curling iron in front of the section with the barrel of the
iron behind the section. -
(Be sure to keep the hair in fingers close to the barrel at all times).
Holding the section, face thumbnail up and then twist the hair so thumbnail
is facing the floor, slide down and wrap. Slide the hair up the barrel
making sure to keep thumbnail close to the barrel without closing the blade.
(Closing the blades of the barrel will produce lines of demarcation inside
the crest). -
Repeat the motions until the end of the section: Wrap, twist – thumbnail up,
thumbnail down, wrap, twist, thumbnail up, thumbnail, down, wrap. Once to
the end of the section, drop the elbow of the arm that is holding the
curling iron, keeping hold of the section. While holding the end of the
section with the thumbnail turn the curling iron in the opposite direction
for more tension, allowing the heat to do its job. (This creates the tension
in the twists – the twist is the crest and the flat wrap is the valley). -
Release thumb and place the palm of hand underneath the barrel of the
curling iron. Catch the hair in palm when released from the barrel. (If hair
is just dropped without catching it, the section will stretch and become
loose). With the section in palm, spray two shots of a firm hold hairspray.
Pancake and compress the section in both palms (The hair will be very hot!).
Allow the hair to cool and be patient. Release the section from palm. -
Take your Sam Villa Styling Brush and comb through the section to the ends,
holding the hair at the bottom for a few seconds to relax the waves. -
Release the section and your loose waves appear. Add some light oil serum to
help tame any frizz and for extra shine, we suggest using Redken Diamond
Oil.
How to Curl Your Hair With a Flat Iron
In the next two techniques we are going to introduce two different ways to
curl your hair with a. The ribbon curl is a tight flat iron
curl that is created from tension and just one small twist motion at the
beginning. The push wave creates a loose and organic finish by creating an
s-shape with the hair and only tapping the flat iron down the section. Are you
ready!
Ribbon Curl With a Flat Iron
Using your again, the
ribbon curl is a tight curl with more bounce and similar to a ringlet curl
created with your curling iron.
Place the iron diagonally into the section and as you pinch the iron close you
will slowly rotate half a turn and slide the flat iron down the section of the
hair. The half turn and tension is what creates the tight ribbon curl.
The ribbon curl lasts for days and gradually turns into a beach wave type curl
as the days pass by.

-
Take a medium size section 1 in length and ½ in width and prep with a
thermal heat spray. Hold the section in one hand and your flat iron in the
other with the iron vertical and your palm facing the head. -
Pinch section at base, as you pinch, fold hand so palm faces you (still
holding the section with left hand). Slowly slide flat iron down to the end
of the hair shaft and release hair, this will allow the hair to spring into
a ribbon curl. -
Using your hands to shake the curls out and finishing with a flexible hold
hairspray to keep the curls in place. -
Take your Sam Villa Styling Brush and comb through the section to the ends,
holding the hair at the bottom for a few seconds to relax the waves. -
Release the section and your loose waves appear. Add some light oil serum to
help tame any frizz and for extra shine, we suggest using Redken Diamond
Oil.
Push Waves With a Flat Iron (also called an S Wave)
For this curling technique we are going to
switch to our
flat iron. The push wave is an organic type of finish.
By creating an S type figure with the hair and using your flat iron to tap
over the waves, this creates what we call the push wave.

-
Working with your
flat Iron, take horizontal sections, making sure you spray first with a thermal heat
protectant. - Begin near the scalp, pinching the section with your index finger and thumb.
-
Insert the iron above your pinch and begin to tap over the section, pushing
the hair in the same direction until the section is completely heated. -
Move your “pinch” down and tap, tap, tap the section again, this time
pulling the hair in the opposite direction from the previous section. - Focus on creating an ‘S’ pattern.
- Repeat this push and pull pattern until you reach the ends of your hair.
-
The end result is beautiful! Loose, organic waves that have a different
texture than you can create with a curling iron.
Remember to work with small sections and just like anything you want to be
great at… practice is necessary!
Don’t rush these curling iron and flat iron techniques, take your time
learning them before attempting on yourself.
Most important, don’t forget your thermal spray! You don’t want to end up like
the little girl on YouTube 🙂
Once you get the hang of these curling iron and flat iron techniques, get
creative and combine different techniques! It’s time to get curling!
Want more Flat Iron tips? Check out how to create perfect
beach waves using your flat iron!


![Toni Kroos là ai? [ sự thật về tiểu sử đầy đủ Toni Kroos ]](https://evbn.org/wp-content/uploads/New-Project-6635-1671934592.jpg)


