How to Create a New Branch in Git {7 Methods Explained}
Create New Git Branch From a Different Branch
Introduction
Git is an open-source version-control system for tracking changes during the software development life cycle.
It’s mutually independent branching model makes it stand out. Branches can be based on previous versions of the software to maintain the integrity of current progress while working on a bug fix or new feature.
This guide will detail multiple options to create a new branch in Git.


Prerequisites
- An existing Git installation on CentOS or Git for Ubuntu.
- Access to a terminal window/command-line.
- A local or remote repository to work with.
Note: This guide uses a Linux environment. Git is also available on Windows and macOS.
Mục Lục
Create a New Git Branch
There are many ways to create a new Git branch. In most cases it comes down to whether you are creating a branch from the main branch or, for example, a new commit or tag.
One common method of creating a new branch is with the command:
git branch <new_branch_name>This doesn’t automatically switch to that branch. To switch Git branches, enter the following command:
git checkout <new_branch_name>
Note: Instead of <new_branch_name> type the name for the new branch.
Create New Git Branch From Current Branch
The easiest and most popular way of creating a Git branch is:
git checkout -b <new_branch_name>
This creates a new branch from the current branch. It also automatically switches to the new branch.
Create New Git Branch From a Different Branch
To create a new branch from a different branch, run the following command:
git checkout -b <new_branch_name> <specific_different_branch>
Instead of <new_branch_name> type the name for the new branch, and instead of <specific_different_branch> type the name of the existing branch from which the new one shall be created.
Create a Branch from a Commit
A commit is a command that saves the changes made in the code. A project may have multiple commits as it’s revised and improved.
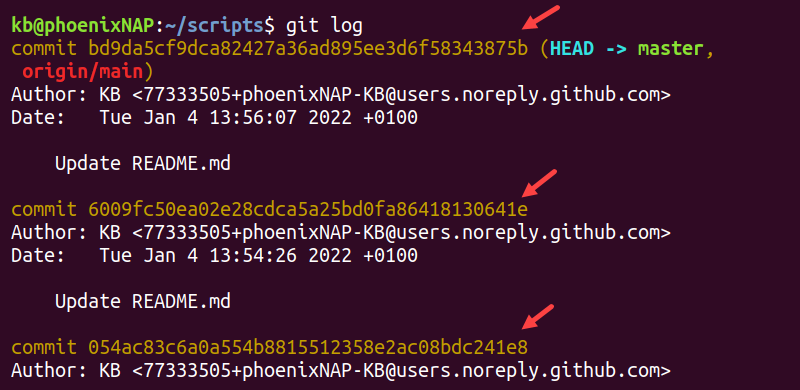
Find the hash key for a specific commit:
git logThe log contains the hash key.

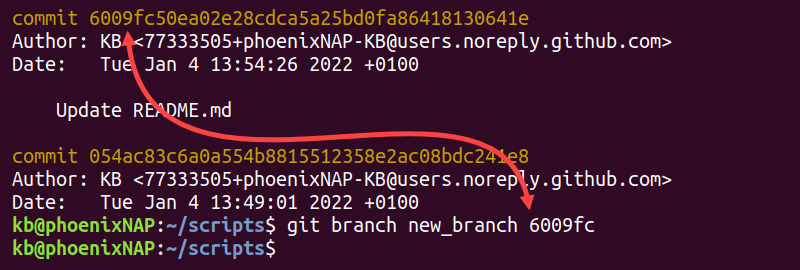
Create a branch from an older commit:
git branch <new_branch_name> 6009fc
Note: 6009fc in the example above represents the hash. Replace this with the actual hash from your git log command.
No need to enter the whole hash key, just the first few characters. View the git log again, and you’ll see the new branch listed.
This method is especially helpful if you need to go back to a previous version of the software to fix a bug without removing any existing features.
Use git checkout to switch to the newly created branch.
Create a Branch from a Tag
A tag is a final, unchangeable version of a commit. Where a commit can be edited, tagged versions are usually permanent.
To create a branch from this tag, use the command:
git branch <new_branch_name> <tag_name>To switch to this branch:
git checkout <new_branch_from_tag>
For more details, check our in-depth Git checkout tag guide.
Create a Branch Using Detached HEAD State
Detached HEAD state happens when you check out a commit that’s not formally part of a branch.
To test, use git log to get the hash of a commit, then enter:
git checkout 6009fc
Replace 6009fc with the actual hash value from the system. The system prints the following output:
You are in 'detached HEAD' state. You can look around, make experimental
changes and commit them, and you can discard any commits you make in this
state without impacting any branches by performing another checkout.
Just like the warning outlines, you can make changes based on the commit. Changes are lost if you don’t save them.
To save any changes, stage it and then enter the following:
git commit -m "test_case"

git branch <test_case>

git checkout <test_case>
To add the changes into the master, use the following:
git checkout master

git merge <test_case>
Create a Branch from a Remote Branch
To create a new branch locally based on an existing remote branch, use the –track option:
git branch --track <new_branch> origin/<remote_branch>![]()
Alternatively, use the git checkout command to keep the original remote branch name:
git checkout --track origin/<remote_branch>The git checkout command automatically creates the remote branch locally with the original name.
Create a Branch in a Remote Repository
Use the git push command to create a new branch in a remote repository based on a local branch:
git push -u origin <local_branch>The command automatically creates the branch in a remote repository. The -u option ensures a tracking connection.
How to Delete a Git Branch
To delete a git branch use the command:
git checkout master

git branch -d <branch_name>
The output confirms that the branch has been deleted.
Conclusion
You now know how to create branches in Git. Branches can be used to test-optional features before integrating them. Use small, short-term branches, so that the branch doesn’t stray too far from the central project.


![Toni Kroos là ai? [ sự thật về tiểu sử đầy đủ Toni Kroos ]](https://evbn.org/wp-content/uploads/New-Project-6635-1671934592.jpg)


