
How to build a gorgeous DIY murphy bed using hardware kit plans!
This post will show you the start-to-finish process for making our modern DIY Murphy bed. We followed DIY murphy bed plans from a top-notch hardware kit and are sharing our tips for you to do the same. This project is featured in 30 Builds to Put Your KregJig to Work.
Mục Lục
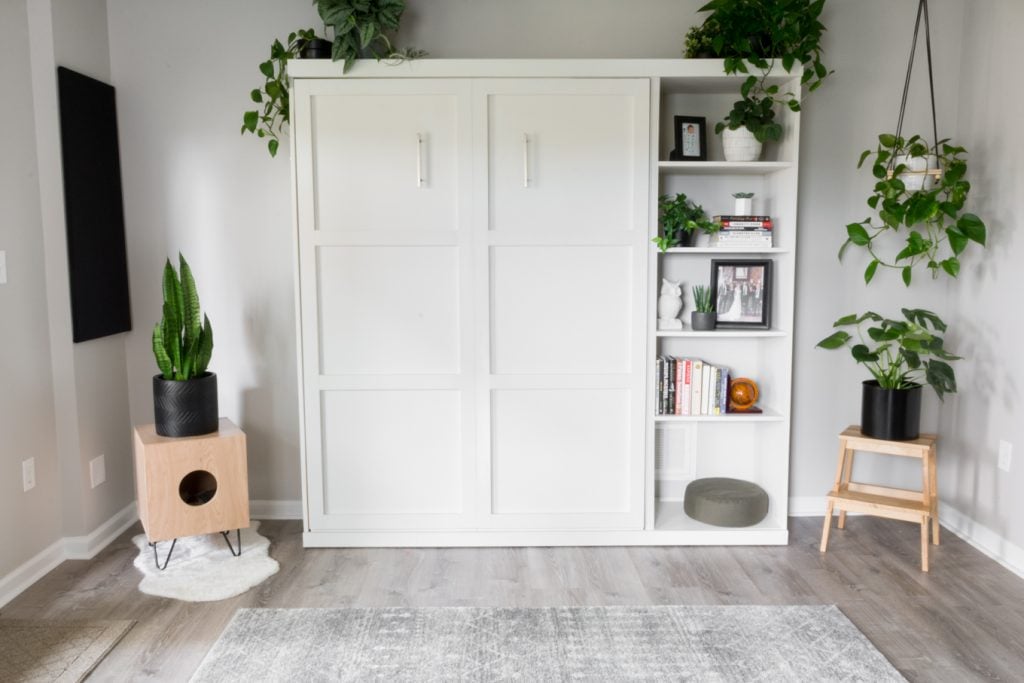
DIY murphy bed plans, our modern murphy bed made using a hardware kit!
I am AMPED to share this project with you guys! I’ve been dreaming of having a Murphy bed for a long time, and that dream has finally come true. While we have a two-bedroom home, we do have another “bonus” space marketed as a den.
Mike uses it for an office, and for a while we had a single bed and a recliner down there. Mostly for when I was pregnant. But with Ramona here now, we’ve found ourselves wishing we had a guest bedroom. So the den is turning into an office/guest bedroom/playroom all in one.
And our DIY Murphy bed is the first step! What do you think?

Okay. Wow. I am quite pleased with us.
While this is a DIY Murphy bed, I’m not going to be sharing step-by-step original DIY murphy bed plans with you today. Honestly, we really didn’t want to bite off more than we could chew coming up with original plans ourselves. Plus we didn’t want to reinvent the wheel when we already felt this would be a big project to take on.
(Especially with a 7-month-old baby who still very much needs our dedicated attention…so shout out to naps and the grandparents for the help with her while we built!).
Mike took the lead on researching how we’d approach this task and ultimately settled on this DIY Murphy bed plans and hardware kit. For safety reasons, it was important to us that we had a piston system on our bed, so we were willing to pay more for that hardware. This whole apparatus is heavy, and we didn’t want to have any chance of the bed part falling.
While the DIY murphy bed hardware kit may look pricey at first glance, you’re actually getting a lot from it: all of the hardware you need to make the bed functional, as well as extremely detailed plans for how to build your bed. And it’s all out of plywood.
I also liked how the bed gave you the basic plans, but you could let your creativity run wild with the finishing touches. This is the exact bed we used as a model for our DIY Murphy bed. So I drew up some plans to get there, and then it was time to get started.
Here’s what we used for our murphy bed:
Here are the steps we took while following the DIY murphy bed plans!
1. Sketching out the plans for the murphy bed
Once we had our DIY murphy bed plans and the hardware kit in hand, I read through everything and got to work. I used the Overstock unit as my model and got to sketching.
First I sketched out a basic idea of what I wanted the bed to look like before adding molding. I definitely wanted to add the shelving so it would look like the unit we loved from Overstock. This was good for two reasons.
First, it looked awesome and makes the whole unit look more intentional. Second, there is a vent on the wall that we would have had to cover if we wanted to center the bed on the wall.

This was obviously not an option, so we just opted to keep the shelves backless to let the painted accent wall behind show through. This allowed the vent to remain completely unobstructed. Yay!
Next I added some rough measurements based on the kit’s measurements and our wall measurements. Finally, I “layered” the molding I wanted to add on top to totally visualize what I wanted the finished product to look like.

2. Cutting the pieces and getting the major parts of the bed assembled
The Murphy bed kit we used came with an incredibly detailed plan complete with painfully detailed (but not difficult to follow) instructions and a cut list. We started off by cutting, sanding (and more sanding because plywood sucks), and assembling the major parts of the bed.
Mike took the lead on assembling the pieces, focusing on the base that the mattress would go on first. (This is the part that gets pulled down.) We finally got a chalk straight line reel marker, and it really came in handy. The pieces of plywood are so large—it saved us a ton of time.
When I say the plans are incredibly detailed, I’m not kidding. They are excellent. You can see some hardware already installed in the pic below—the plans include precise measurements for where to install the hardware pieces as you progress through the build.

At this point, I also began adhering some of the iron-on veneer. (More on that at the tips section at the end of this post.) Painter’s tape is super helpful during this process. Just pop some on and iron over it to keep things in place.
I have actually never worked with plywood in a project where I needed the edges to look finished, so this was my first time working with iron-on veneer. OMG. It’s amazing! What a difference it makes in cleaning up the rough edges.


3. Moving inside, setting up the sides and top
Once the base was complete, we moved it inside to begin constructing the sides and top in place. (Complete with feline assistants.) We also had to cut out grooves for the baseboards so the entire bed system would sit flush on the wall. I can’t remember if Mike used our Jigsaw or just the circular saw for this.


Here it is constructed. Oh man, I was so happy at this point. Little did I know we had a long road ahead of us to complete this project. But I’m getting ahead of myself. ARE YOU GETTING EXCITED YET?
We tested all of the mechanisms to make sure they functioned properly before installing the pistons. Those are what make the bed easy to open and close—and keep the apparatus closed when not in use.


4. A little painting and securing the bed in place.
Fantastic! It works. Now on to painting and mounting this bad boy in place. I did two coats of oil-based primer on the entire bed. This stuff covers great but did require two coats. You can see the difference between one and two coats in the first pic below.
Once the primer was done drying, we mounted the bed as instructed in the plans. I felt a lot better once this beast was securely mounted to the wall. You do NOT want an unsecured bajillion pound murphy bed hanging out in your house.


5. Shelving plans…
Because of a wall vent, we couldn’t center the bed on the wall. Therefore, we decided to build a backless shelving unit and attach it to the side of the bed. The goal was to make it all look like one unit and give it a built-in look. Here’s some tape on the wall as I tried to visualize how it would look.
I built the shelves using a similar approach to the bed. We used leftover plywood for each shelf, but we did have to buy a new 4×8 sheet of plywood for the sides.
Lots of patching knots and rough marks (I just used this stuff since I knew I’d be painting over it and I like how it turns white when it’s dry), sanding, ironing on even more veneer tape, and more priming on the shelves.


6. Painting the finish coat on the bed and shelving
We used Sherwin-Williams Basalt Powder in eggshell. Below on the left you can see how the color looks compared to the primed piece on the right. Basalt Powder actually looks pretty light by itself, but you can really see the difference between it and white when you compare it to the primed piece.
I also used my Kreg Jig to drill pocket holes in each of the shelves so I could hide the screws. (And where I couldn’t hide them, I patched and painted.)


Somewhere during this painting process, the mattress came! I have raved about our king-sized bed-in-a-box mattress that we’ve had since 2013. My parents (see their lil bedroom makeover here) and my brother even got the same one.
We decided to get a similar 8″ thick box mattress for this setup. And it is just as comfy as our master bedroom’s mattress. Seriously, I will get on my soapbox about mattresses all day long. Don’t overpay for one in a store!


7. Joining the shelves and the bed
So once I finished constructing the shelves and got them inside, I had a minor moment of panic. They looked slightly taller and they made the bow on the bed’s side piece of plywood suuuuper obvious.
We brainstormed and realized that once we pulled the plywood sides together, the top leveled off. So we grabbed some clamps and clamped these puppies together.
And while we had them clamped together, we drilled screws through the inside of the side of the shelves into the side of the bed. LOOK HOW MUCH BETTER IT LOOKS! It evened out the top and made it look way less janky.


8. Adding the murphy bed molding and finishing up
I was still a bit worried about how my molding would look on the bed, though. The bed I was modeling this after had really lovely molding on it, and I wasn’t ready to compromise on it. What’s a modern DIY Murphy bed without some sleek craftsman-style molding?
I just knew it would take this setup from “meh, functional and doesn’t look like total garbage” to “looks like a freakin million bucks Brittany and Mike, nice work.” So here it is without any molding…

And with the top and bottom molding attached! WOW. What an amazing difference, right off the bat. Of course we couldn’t adhere the molding to the bed frame part because it needed clearance to open.
So with every piece of molding we nailed up, we opened and closed the whole apparatus to make sure all still functioned like a well-oiled machine. I was not prepared for how complicated this part would be.
Every piece was individually measured and cut as we mounted the molding, because even 1/16″ of an inch difference made a big deal. Moving parts make things infinitely more difficult.

Then the vertical molding pieces went up…you’ll notice they don’t go all the way to the top or the bottom. Again, this is because the bed frame needed clearance to open and close.
And then I measured and mounted the horizontal pieces. At this point I was losing my mind with excitement. I think I called Mike down like five times.
(By the way, I painted each piece with one coat of paint before we nailed them up. This was a good idea because it meant less intricate painting when everything was assembled.)


Done!
After filling the nail holes and cracks and rolling a quick finish coat over the trim, we added the handles (which Mike had to remove the mattress for) and we were DONE.


Our Tips for This DIY Murphy Bed Hardware Kit Instructions:
We love how our DIY Murphy bed turned out, and we think our guests will love having a nice comfy place to sleep that isn’t an airbed or a couch! But we would definitely do some things differently the second time around to make life a bit easier on ourselves.
1. Read and follow all directions.
Read the directions that come with the DIY murphy bed plans and hardware kit thoroughly. I mean it! Do not skim them. Read them thoroughly and map out your plan. Mike took point on this and strategized for a while before actually beginning his cuts.
The instructions are extremely detailed and tell you everything you need to know, from a detailed cut list to labeling the pieces and assembling them step by step. Seriously—read. the. directions.
2. Plan it all out.
Work in the following order: cut, sand, patch knots or major ridges, sand, iron on the veneer edging, prime, lightly sand, prime, lightly sand, paint, lightly sand, paint. The detailed instructions show you exactly where you’ll need to apply the iron-on veneer.
If you’re painting the bed, it doesn’t matter what veneer you use—we used a mixture of birch and oak. The goal is to cover up the rough plywood edging to prep it for paint. I ironed on some of the veneer before we assembling the bed and finished ironing it on after we had completely assembled and mounted the bed.
Ironing on veneer over your head is not fun, my friends. We were also impatient and waited until after we’d assembled the bed and mounted it to prime. This made things more difficult given I had to paint around the hardware.
Priming, sanding, and painting individual pieces means you can do a thorough job while not having to work around hardware. You also won’t have to paint up against a wall, which is very annoying. If any spots are damaged while you are assembling and mounting the bed, you can just fix those spots.

3. Choose primer wisely.
Use an oil-based primer. A water-based primer will raise the grain of your plywood, so unless you don’t care about that, oil-based primer is the way to go. Beware, though—if you don’t work with oil-based products often, the smell is nasty!
You’ll need to work in an appropriately ventilated area (preferably an open garage with a fan or outdoors in an open-air environment), wear the right mask, and take breaks.
4. Prep for molding.
If you’re attaching molding to decorate the front, buy pre-primed molding to save some time and paint it before attaching it. Then, fill any nail holes and touch up the paint. It’s easier to paint long strips of molding and a large rectangular-shaped surface than it is to get in to the nooks and crannies of cut and mounted molding.
5. Secure the bed immediately.
Mount the bed immediately after assembling it. It’s front heavy, and you don’t want that sitting in a room unsecured, especially if you have kids of pets. Follow the instructions closely to ensure you are taking all recommended safety precautions, especially those concerning anchoring the bed.
This thing is heavy when it’s finished—even without a mattress. Anchor, anchor, anchor! Don’t take any chances and think you’ll be fine. Don’t try to open the bed without anchoring it.
What do you think?
Would you take on this project or put a Murphy bed in your home? We love how it’s turned this room into a multi-purpose room…and it looks beautiful!
We’ve been hard at work finishing up this space over the last year. We recently replaced the flooring; check out my post with tips for installing LifeProof Luxury Vinyl Plank flooring. Other DIYs I’ve done for this space: the cat house side table build plans, the plywood planter with hairpin legs, the DIY photo ledge shelving, and the toy box bench!
I also grabbed a bunch of updated pictures so you can see the updated murphy bed, which is still working like a charm, in a totally redone room. (Btw: Finish your room before building the murphy bed. Moving that thing in and out was a B!)


Pin my DIY Murphy Bed project!


![Toni Kroos là ai? [ sự thật về tiểu sử đầy đủ Toni Kroos ]](https://evbn.org/wp-content/uploads/New-Project-6635-1671934592.jpg)


