
HAND STITCHING – Best Stitches and Methods
Hand stitching is an easy method of stitching hems, small sewing projects and mending clothing and other items. There are times when you may not have access to a sewing machine or the job is simply better done by hand. Couture fashion is almost synonymous with hand stitching as it gives more precision and sometimes you can only achieve a particular result by hand. Delicate fabrics don’t always agree with the sewing machine and so must be hand-stitched.
 Hand Stitching
Mục Lục
Hand Stitching – Before you Start
Best Needles
The best needle for your hand stitching job will depend on the fabric you are stitching and the thickness of the thread. Get an assorted packet of needles in your required type.
If in doubt, just buy yourself a packet of “sharps” in assorted sizes. These are readily available and cheap to buy. Most hand stitching can be done with these versatile needles.
Here are some basic needle types and uses to help you make a decision.
Full Article: Types of Hand Sewing Needles.
TYPEUses of NeedleSharpsAll purposeLeatherLeather, vinylEmbroidery (Crewel)Linen, cotton and open weave fabric. Use for thicker threads.UpholsteryCanvas and thicker fabricsBeadingSewing beads and sequins
Best Threads
Most projects can be hand-stitched with an all-purpose polyester or polyester/cotton blend thread.
For beginners, I always recommend using a matching color to your fabric as it will be forgiving of any crooked stitches and from a distance will look great.
Full Article: Thread Types for Sewing.
Here are some more common threads for hand stitching.
- Cotton thread is useful for all kinds of projects but is often not as strong as polyester thread.
- Embroidery thread is also called embroidery floss and typically has 6 strands twisted together. You can use all 6 strands or divide it for finer stitching. (Read How to embroider)
- Tatting Cotton is a specialized thread and suited to sewing fine linen.
- Quilting thread is covered with a waxy finish allowing it to pass through thick quilting and batting.
- Polyester/Cotton is a multi-purpose thread that is suitable for many types of fabric including Lycra and stretch.
- Heavy-duty thread for soft furnishings is a mixture of cotton and polyester.
- Nylon is a strong thread useful for light to medium weight fabric.
- Invisible thread is a clear thread similar to a fishing line and is used for an invisible finish.
Use a Needle Threader
Putting thread through the eye of the needle is sometimes straight forward and other times can make you feel like you are going crazy. I find threading dark colors and black particularly frustrating. A needle threader is a simple device that comes with most packs of assorted needles and can make the job considerably easier.
Put the triangular point of the needle threader through the eye of the needle. Push the end of the thread through the triangle and pull back.
It really is so easy and faster than spending multiple times trying to put a thick thread through a small eye.
Full Article: How to Use a Needle Threader
 Needle Threader
Thread a Needle
Once you have the thread pulled through the eye of the needle what do you do? Well, you need to decide if you are going to leave the thread single or double it over.
Doubling the thread over for seams is most common and will result in stronger sewing. Embroidery is often sewn with the thread single.
Here you can see the difference between single-threaded and double-threaded needles.
Full Article: How to Thread a Needle
 Hand Stitching Needles
HAND STITCHING – Best Stitches
The best stitches depend on your project and what your purpose is. This designer is hand stitching as part of the creative process. When draping a new design on a mannequin you don’t necessarily want to take the clothing on and off to sew seams with a machine.
 Hand Stitching Used in Fashion Design
There are endless methods you can use to do hand stitching but here are the most common ones and their purposes.
- Running Stitch – best for simple seams, basting and gathering
- Backstitch – best for strong seams
- Whipstitch – best for felt seams
- Ladder Stitch (Invisible stitch) – best for mending split seams or closing gaps
- Embroidery Stitches – best for decorative stitches
You will actually find that once you can do a basic running stitch and backstitch, you can master most of the other stitches quite easily.
Running Stitch
Running stitch is a simple up and down stitch and is the fastest and easiest way to baste, gather and sew a seam with hand stitching.
For seams is best sewn with a double threaded needle with a knot in the end. Embroidery may be stitched with a single-threaded needle.
If you are sewing large pieces of fabric you can take several up and down stitches at once to save time. You can see this in the last square of the photo.
Running stitches don’t need to be evenly spaced. They can be small, large or uneven. Smaller stitches will result in a stronger seam and larger stitches will hold a seam loosely.
Full Article: How to do Running Stitch
 Running Stitch
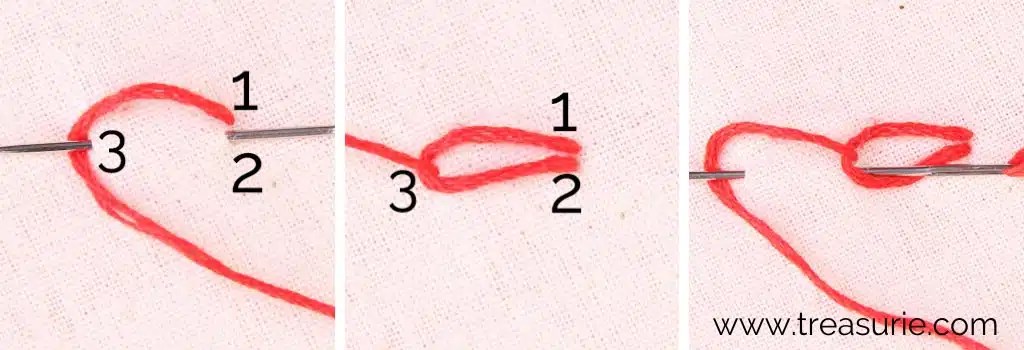
Backstitch
Backstitch is the strongest hand stitch for seams and only takes a little longer to do than the running stitch. It can also be used for solid borders for embroidery.
Backstitch starts in a similar way to the running stitch. Stitch up down up as shown in steps (1), (2) and (3).
Next put the needle back into the last stitch at (2). Come up an equal distance away at 5 and repeat to keep going.
This back and forth motion is what makes it so strong.
The only disadvantage of backstitch is that it looks a little messy on the back of the fabric but this is not of concern for most projects.
Full Article: How to Backstitch
 Backstitch
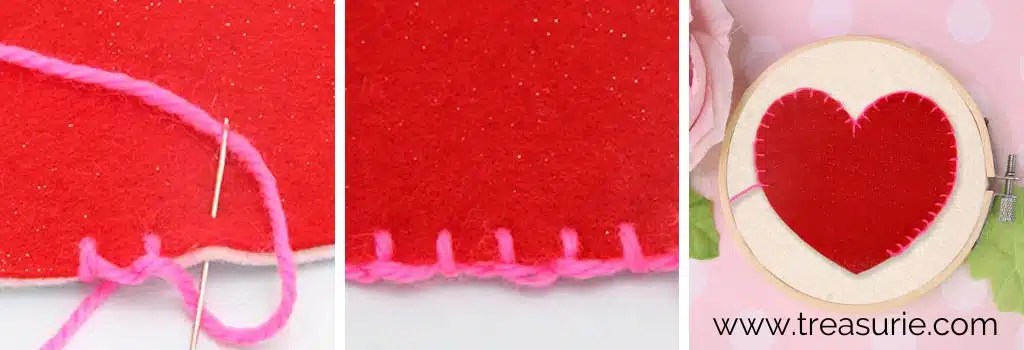
Whipstitch
Whipstitch is an over the edge type of hand stitching which is great to use on felt and other fabrics that are thicker and don’t fray.
It will join pieces of fabric together and seal the edges and can be used for felt applique.
As you can see from the photo you are basically going over and over about ⅛ inch (3mm) or less from the edge.
Full Article: How to Whipstitch
 Whipstitch
Ladder Stitch (Invisible Stitch)
Ladder stitch is popular for mending holes in seams and closing gaps in your sewing projects where you have turned the item right way out.
When done in matching color thread the final result will disguise your stitching and look invisible from a distance. You can see from the photo that the stitching is done in the crease of the seam.
Full Article: How to do Ladder Stitch
 Ladder Stitch
Embroidery Stitches
The list of embroidery stitches is quite a long one. Some of the most common ones are cross stitch, chain stitch, blanket stitch and fern stitch. Backstitch and running stitch are also useful for embroidery but I have covered those in the sections above.
If you are new to embroidery and want to know the best tools, supplies and easiest stitches have a read of the following articles.
 Common Hand Stitching
Chain Stitch
Chain stitch is useful for outlining larger shapes and for creating flowers, stems and leaves. It is created in a series of loops. Bring the needle up from underneath and reinsert it right next to the original hole.
Come up a short distance away at (3) and loop the thread underneath the needle. Repeat to form a line of chain stitches.
 Chain Stitch
Blanket Stitch
Everybody loves blanket stitch. As the name suggests, it can be used on the edges of blankets but it is also great for applique and embroidery.
You will quickly get the hang of the stitch if you just remember to always point the needle towards the edge of the item.
Full Article: How to do Blanket Stitch
 Blanket Stitch
More Embroidery Stitches
Here are more embroidery stitches and articles –
 Web Stitch
 Buttonhole
 Feather
 Cross Stitch
Hand Stitching – Starting and Ending
STARTING – For most projects, it is easiest to knot the end of the thread. This will prevent the end from pulling through and undoing your stitches. The alternative to knotting the end is to leave it and then do a small backstitch in your project at the beginning. Most of you reading this article will be beginners and should take the easiest method which is the humble knot.

 Hand Stitching Knot
ENDING – The easiest way to end your hand stitching is to take a small backstitch and then put the needle through the loop before it is pulled tight. This creates a small knot that won’t come undone. For a really secure ending, you can do this twice.
 How to Stop a Hand Stitch
Full Article: How to Sew a Seam
Hand Stitching – Buttons
A common reason you might be researching hand stitching is that you need to sew a button back on. This simple mending task needs to be done many times even by non-sewers.
Slightly different methods are needed for shank buttons (red example), 4 hole buttons (brass example) and 2 hole buttons (white example)
Full Article: How to Sew a Button
 Hand Stitching Buttons
Hand Stitching – Sequins
Sequins often need to be hand sewn to hold them in place. You will use a method similar to backstitch to secure either side of the sequin. You can use this method to sew individual sequins or a sparkling row.
Full Article: How to Sew Sequins
 Hand Stitching Sequins
Hand Stitching – Gathering
Hand stitching can be used to create fine and controlled gathers in difficult fabrics for projects that you don’t want to machine sew.
Use a small up and down running stitch and pull the ends to gently gather. The best control can be achieved by using 2 or 3 rows of small stitches. See in the photo below the difference between the gathers with the running stitch ¼ inch (6mm) apart vs ⅛ inch (3mm) apart.
Full Article: Gathering by Hand

Hand Stitching – Unpicking
Every now and again we all make mistakes and need to remove the hand stitching we have just painstakingly sewed. Don’t tear your hair out or shed a tear, just grab your seam ripper. Use the sharp blade in the U shape to cut through a few stitches and the rest should pull out easily. Take your time and be careful not to pull or rip the fabric.
Full Article: How to Use a Seam Ripper
Hand Stitching – Projects
Virtually anything that can be sewn with a machine can be done with hand stitching however due to our modern busy lives, smaller projects are generally best.
You can make pretty fabric flowers, bows and small purses and scrunchies. For the majority of these projects, seams are best sewn with running or backstitch.
 Zipper Pouch
 DIY Fabric Flowers
 Yo-yo flowers
 Cloth Flower Making
 How to Make Fabric Bows
If you would like to try hand stitching felt I have a free tutorial and pattern for you. This felt pin cushion uses running stitch, backstitch and whip stitch and makes a beautiful present for yourself or someone that loves to sew.
Further Reading: Felt Pin Cushion Pattern
 Felt Pin Cushion
Hand Stitching – In Conclusion
So there you have a basic hand stitching tutorial. Good luck learning to sew and have fun with your new skills.
More Beginner Articles
4.8/5 – (24 votes)


![Toni Kroos là ai? [ sự thật về tiểu sử đầy đủ Toni Kroos ]](https://evbn.org/wp-content/uploads/New-Project-6635-1671934592.jpg)


