
Full Guide | Upgrade Windows Server 2012 R2 to 2019 Securely
Mục Lục
Why upgrade to Windows Server 2019
If you are still running older system like Windows Server 2012 or 2012 r2, maybe it’s time to move on and upgrade to a newer version – Windows Server 2019 for example. Here are some of the significant reasons:
◇ Newer system has better compatibility with new services and applications.
◆ Windows Server 2019 makes it easier to integrate Linux with the new features like Linux Containers on Windows, Windows Subsystem for Linux (WSL), and the new Windows Server 2019 application platform.
◇ Windows Server 2019 builds on its strong foundation of security. Now it can not only block threats, but also monitor and reacts to perceived threats.
◆ Windows Server 2019 has been designed to work with or in the Cloud. It’s easier for users to connect their existing local environments to Microsoft Azure…
✎Is Windows Server 2012 R2 end of life?
Windows Server 2012 R2 has ended mainstream support in 2018, and the end of extended support is in 2023. It means Microsoft will focus on newer OS, and an upgrade can bring you better follow-up support.
✎Is Windows Server 2019 still supported?
By May 11, 2021, all editions of Windows Server 2019, except the LTSC editions, are out of service. Devices running these editions will no longer receive monthly security and quality updates that include protection against updated. In addition, Server 2019 has a mainstream end date of January 9, 2024 and an extended end date of January 9, 2029.
Can Windows Server 2012 r2 be upgraded to 2019?
First of all, the answer is yes. In-place upgrade enables you to upgrade older system to the newer one directly while keeping the same hardware and all the settings, server roles, data intact without flattening the server.
As shown in the figure below, in-place upgrade is supported between any two operating systems that are linearly connected, so you are allowed to upgrade Windows Server 2012 r2 to 2019, indeed.
However, if you want to upgrade Windows Server 2012 to 2019, you’ll need to in-place upgrade it to 2016, then 2016 to 2019. Otherwise you can only clean install 2019 to overwrite the existing operating system, and to avoid data loss, it’s necessary to backup the server in advance. This is also true for older OS like Windows Server 2008 (r2).
*You can also in-place upgrade Windows Server 2019 to 2022 if needed.

![]() Note: In-place upgrade vs clean installation
Note: In-place upgrade vs clean installation
In-place upgrade is a relatively convenient way to avoid re-configuration and re-loading everything. However, in practice, many users failed to upgrade Windows 2012 r2 to 2019 in place, which may result in a longer time for troubleshooting than clean installation.
The main concern of in-place upgrades would be what apps cannot be upgraded (such as Domain Controllers, Exchange or email servers, SQL or Oracle servers, etc.), and what services should be disabled before upgrading.
If you are not very sure about all this, then a better approach might be to first backup data on your current Windows Server 2012 r2 → fresh install Windows Server 2019 → then selectively restore data to Server 2019.
For more details, please check Windows Server in-place upgrade vs clean install.
Must-know information for Windows Server 2019 upgrading
◉ Windows Server 2019 has its own system requirements. If your computer does not meet the minimum standards, you will not be able to upgrade to Server 2019 successfully.
System requirements of Windows Server 2019
Processor
1.4 GHz 64-bit processor
Compatible with x64 instruction set
Supports NX and DEP
Supports CMPXCHG16b, LAHF/SAHF, and PrefetchW
Supports Second Level Address Translation (EPT or NPT)
RAM
512 MB (2 GB for Server with Desktop Experience installation option)
ECC (Error Correcting Code) type or similar technology, for physical host deployments
Disk space for system partition
32 G
Network adapter requirements
An Ethernet adapter capable of at least gigabit throughput
Compliant with the PCI Express architecture specification
Other requirements
DVD drive (if you intend to install the operating system from DVD media)
◉ How much does upgrade Windows Server 2012 r2 to 2019 cost? Well, there are many factors involved in this question, like hardware, virtualization and so on. But if you mean the cost of license for upgrading, the answer is clear. Microsoft generally doesn’t offer an upgrade sale, so you need to purchase a copy or Windows Server 2019 separately. Here’s a list for your reference.
Pricing and licensing overview
Edition
Ideal for
Licensing model
CAL requirements
Pricing Open NL ERP
Datacenter
Highly virtualized datacenters and cloud environments
Core-based
Windows Server CAL
$6,155
Standard
Physical or minimally virtualized environments
Core-based
Windows Server CAL
$972
Essentials
Small businesses with up to 25 users and 50 devices
Specialty servers (server license)
No CAL required
$501
◉ Another issue worth considering is that some third-party applications may not be compatible with the latest systems. So to avoid subsequent troubles, you’d better check whether they support Windows Server 2019 or not before upgrading.
◉ In-place upgrade Server 2012 r2 to 2019 might also be supported by public or private cloud companies, but you need to check with your cloud provider for the details. Additionally, you cannot perform an in-place upgrade on any Windows Server configured to Boot from VHD. In-place upgrade from Windows Storage Server Editions to Windows Server 2019 is not supported, either. In this case, you could do a migration or clean installation instead.
How to in-place upgrade Windows Server 2012 r2 to 2019
Preparations before upgrading:
>> Patch your Windows Server 2012 r2 with the latest updates.
>> Insert and mount the Windows Server 2019 setup media.
>> Before upgrading, Microsoft suggests you to collect some information of the device. You can use it for troubleshooting purpose when the upgrade fails.
- Go to C:\Windows\system32 and run “systeminfo.exe”. Copy and store the system information.
- Open Command Prompt, type “ipconfig /all” and press Enter. Copy and store the configuration information.
- Open Registry Editor, go to the HKEY_LOCAL_MACHINE\SOFTWARE\Microsoft\WindowsNT\CurrentVersion, then copy and store the Windows Server BuildLabEx (version) and EditionID (edition).
>> Although an in-place upgrade should not delete anything, there are also data-loss or upgrade failure cases reported. So after you’ve collected related information, it’s highly recommend to make a backup of your operating system and important data.
>> Note you can’t have any virtual machines running during the in-place upgrade.
Step-by-step to perform Windows Server 2019 in-place upgrade:
1. Locate the Windows Server 2019 setup media, run setup.exe directly.
2. Select Download updates, drives and optional features (recommended) and click Next.

3. It will take some time to check device configuration, click Next when it’s done.
Whether you need to enter a license key to proceed is depending on the distribution channel you received the Windows Server 2019 setup media from.
4. Choose an edition of Windows Server 2019 that you want to install and click Next.
In this step, it’s better to check the info you collect from Register Editor (CurrentVersion), because you cannot upgrade to a different product line without data loss.

5. Accept the terms, then you can choose whether to keep personal files and apps. Click Next to continue.
✎Some users reported that the option to keep personal files and apps is GREYED OUT with the message: “you are trying to upgrade to a version of Windows that is different than the one installed”. This indicates that you are trying to upgrade to a different product line – such as Datacenter to Standard.

6. If there’s anything incompatible with Windows Server 2019, it will prompt you a message requiring you to Confirm.
7. Wait for a while and click Install to start upgrading. After finishing, your PC will automatically restart.

Now you’ve in-place upgraded Server 2012 r2 to 2019, you could take a little more time to make sure your operation is successful.
Check your current edition:
You can open Registry Editor and go to HKEY_LOCAL_MACHINE\SOFTWARE\Microsoft\WindowsNT\CurrentVersion, then check the edition of your Windows Server in ProductName.
How to clean install Windows Server 2019 securely
As mentioned earlier, in-place upgrade is a convenient but not always reliable upgrade method, so if you want to avoid all possible upgrade failures as much as possible, then a fresh install may be better for you. Here’s how to clean installing Windows Server 2019 step-by-step.
Preparation before installation
>> Download the Windows Server 2019 ISO file from Microsoft and burn Windows Server 2019 ISO to USB (over 8 GB) for installation.
>> Remember to backup current server beforehand, thus you can selectively restore the data you want to the newly upgraded server.
Step-by-step to clean install Windows Server 2019:
1. Insert the USB installation media and start your PC into BIOS, choose the USB as the first boot option to continue.
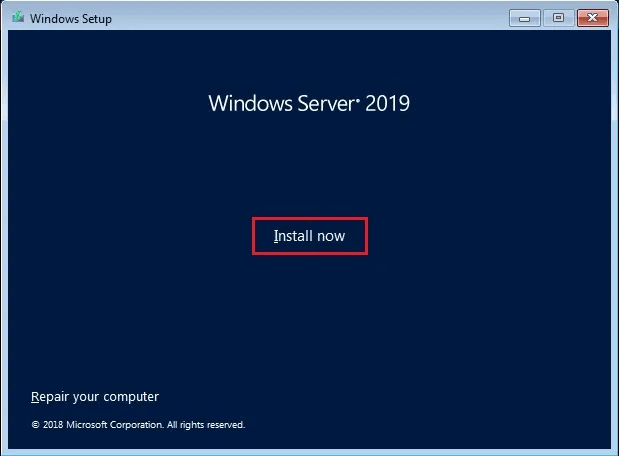
2. In the Windows Setup page, enter your language and other preferences, click Next -> Install Now to begin the Windows Server 2019 installation.
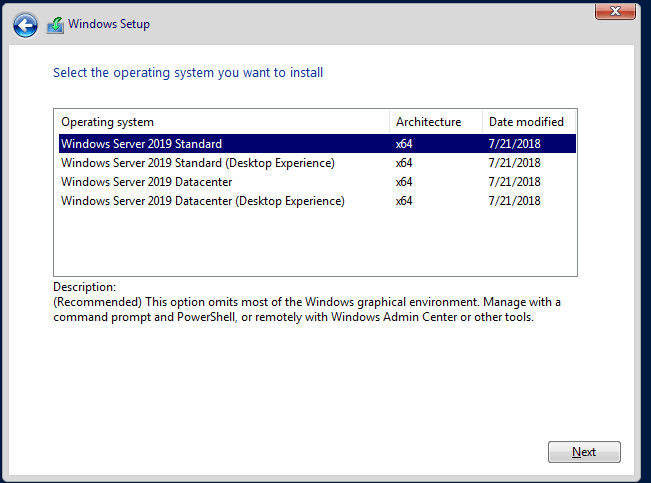
3. Select the version of Windows Server 2019 you want to install and click Next.
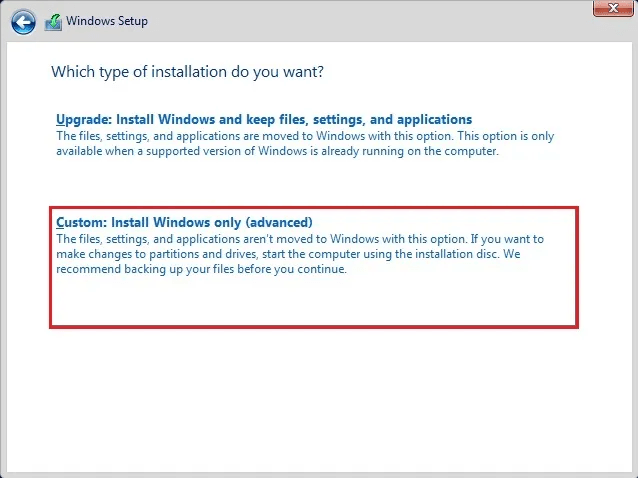
4. Then, accept the license terms and select Custom: Install Windows only (advanced) to perform a fresh install.
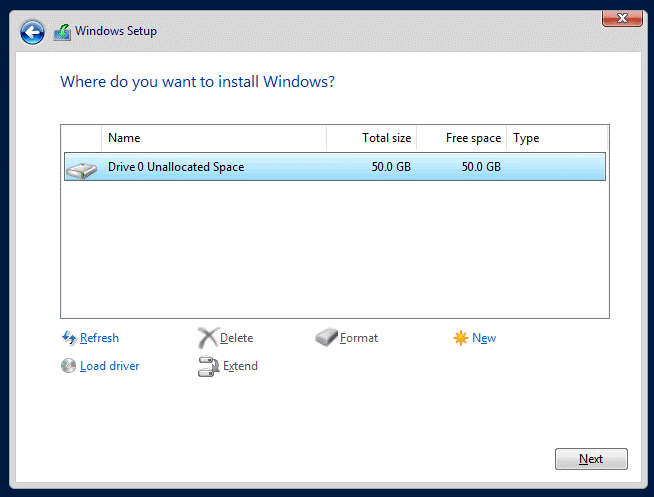
5. Select the destination to install the Windows Server and click on Next.
6. Wait for installation to complete, and the system should restart automatically afterward.
If everything runs well, you can then choose what to restore to the Windows Server 2019 system from the previous backup image.
Backup server in case of any data loss after upgrading
Although Windows Server comes with a backup utility Windows Server Backup, if you ever used it, you’ll find it complicated, slow, and not fully functional. It also has some conspicuous limitations such as the 2 TB limit for backup, the numbers of backups it could keep, the lack of individual file backup feature, etc.
With all these concerns, I prefer to use AOMEI Backupper as a Windows Server Backup alternative. It has different editions, and the Server edition is specially designed for Windows Server.
AOMEI Backupper Server supports Windows Server 2003, 2008, 2011, 2012, 2016, 2019, 2022 (including R2), Windows SBS 2003, 2008, 2011 and Windows XP, Vista, 7, 8, 8.1, 10, 11. No matter you want to upgrade Windows Server 2012 r2 to 2019, 2016 to 2019 or 2022, you could use this software to backup server to internal/external hard drive, NAS, network share, cloud service, etc.
As for functionality, it includes file/folder/partition/disk/system/cloud backup & restore with many useful options. For instance, you can create scheduled incremental or different backup, set up retention policy to auto delete older backup, restore system image to different hardware, etc. And the operation is much simpler than WSB.
Moreover, it contains Sync features to copy your data with original format and structure, Clone features to duplicate hard drive and therefore migrate Windows Server to SSD. Have a try and find more practical tools.
Download FREE Trial
Win PCs and Servers
Secure Download
Backup Windows 2012 r2 before upgrading or clean installation:
1. Click Backup on the left pane and choose a backup type. To show you how to perform individual file backup, I’ll take File Backup as an example. Optionally, you can also use System Backup in case of an upgrade failure.

Tip: To backup large amount of files, the best practice is to use the Cloud Backup feature. It enables you to backup folders to AOMEI Cloud, a cloud drive released by AOMEI Tech, which offers 1TB of free cloud storage from the time you sign up an AOMEI account until 15 days.
2. Tap Add Folder or Add File to select the data you want to backup, then specify a destination to store it.
For the source folder, you can tap the funnel icon to include/exclude files with specific suffixes in Filter settings.
For the destination path, you can choose to Select a network location or Select a cloud in the drop-down menu.

3. After that, you can manage more settings to customize the backup, and then Start Backup.
Options: Manage compression level, image splitting, backup encryption, comment, email notification, etc.
Backup Schedule: Set up an automatic task on basis of daily/weekly/monthly/event triggers/USB plug in.
Backup Scheme: You can choose backup method as full/incremental/differential, and enable automatic cleanup to delete obsolete backups automatically.

With this simple operation, you could backup whatever you want to keep before upgrading Windows Server 2012 r2 to 2019. Thus even if something goes wrong in the process of upgrading, you can easily retrieve important files or restore the operating system to an earlier state.
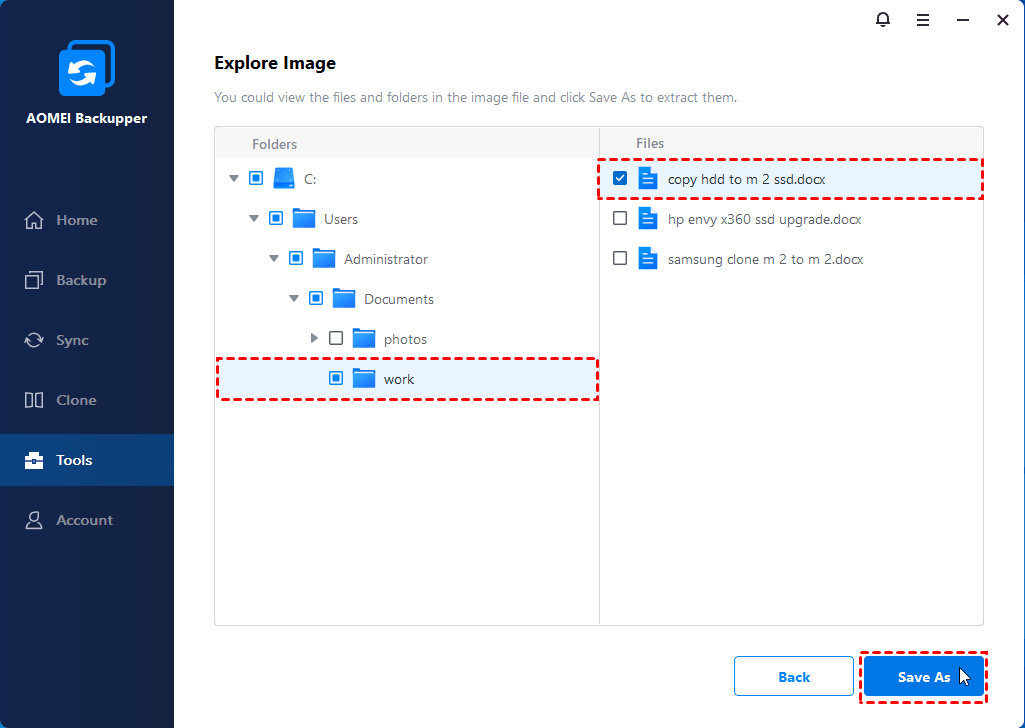
✎If you chose the clean installation way, you can also use the Explorer image feature to mount the backup image, and then choose certain data from it and restore it to the upgraded Windows Server 2019.
Conclusion
You can in-place upgrade Windows Server 2012 r2 to 2019 directly, and this process shouldn’t delete any of your files. But to avoid any unwanted data loss, it’s still recommended to backup important files in advance. Besides, if you want to upgrade Server 2012 or 2008 to 2019 through clean installation, backup is especially essential.
AOMEI Backupper is an ideal backup & restore solution for Windows Server with its high compatibility and complete features. In addition to basic data protection, it also enables you to automatically backup Windows Server to cloud, bare metal restore Windows Server to different hardware, restore Windows Server to virtual machine and so on.


![Toni Kroos là ai? [ sự thật về tiểu sử đầy đủ Toni Kroos ]](https://evbn.org/wp-content/uploads/New-Project-6635-1671934592.jpg)


