Connect to a Shared Drive or Network Folder | IT@UMN | The people behind the technology
Connecting to (a.k.a. mapping) network drives allows University members to access files stored on University servers. Storing files on network drives provides a user more storage space, backups of their files, and secure ways of sharing files between departments.
Considerations when mapping a network drive:
- In order to map a network drive, users must be granted permission by their department or supervisor to access the material. If a user is in need of permissions, supervisors or departments can submit a Departmental Data Storage request form.
- Due to HIPAA compliance, AHC drive mappings are not typically permitted.
Mapping a network drive
Mapping a network drive in Windows 10
- Connect to Split Tunnel or Full Tunnel VPN if off campus.
- Click the Start menu.
- Click File Explorer.
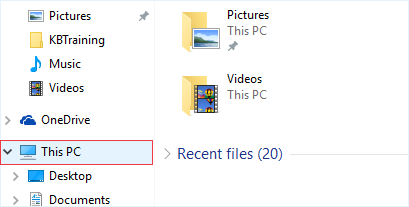
- Click This PC in the left side shortcut menu.
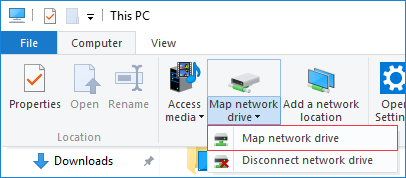
- Click Computer > Map network drive > Map network drive to enter Mapping wizard.
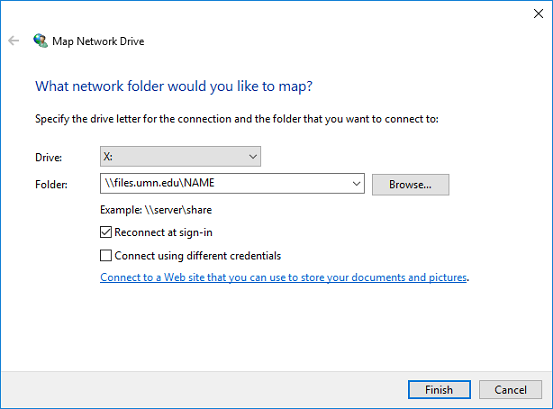
- Confirm drive letter to use (next available shows up by default).
- Enter the server path for the network folder (e.g. \\files.umn.edu\NAME\FOLDER, or \\files.umn.edu\OIT\Subfolder).
- Used letters are followed by server paths in parentheses.
- Tip: Select Reconnect at sign-in to connect this drive every time Windows starts.
- Select Connect using different credentials if using a computer that is not University-owned.
- Enter ad.umn.edu\your Internet ID and password when prompted.
- Or, you can use [email protected]
- Not sure if your computer is University-owned?
- Check the computer name.
- University-owned machines typically have names that start with UMN or end with .ad.umn.edu.
- Enter ad.umn.edu\your Internet ID and password when prompted.
- Click Finish at the bottom of the window.
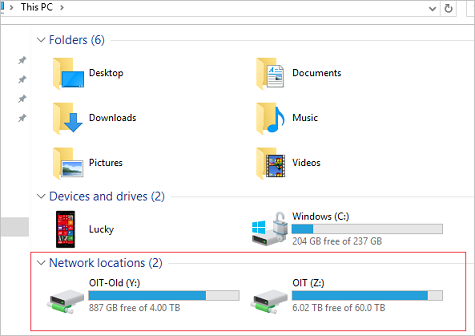
- Find the network drive located in the Network locations section of This PC.
Mapping a shared folder in Mac OS X
- Connect to Split Tunnel or Full Tunnel VPN if off campus.
- Click Finder in the Dock.

- Find Go in the top menu bar.
- Click Connect to Server (command + k).
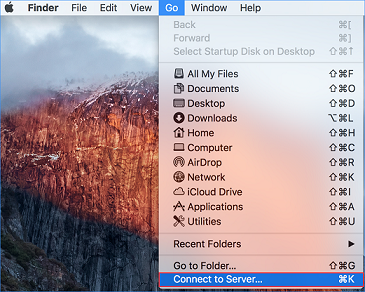
- Type cifs: + the network drive path (e.g. cifs://files.umn.edu/OIT).
- Note: Your department may give you the path as \\files.umn.edu\NAME, but Mac paths use forward slashes, not backslashes.
- Try smb: + network drive path if cifs: does not work.
- Tip: Click the + button to save frequently used network drive paths for future use.
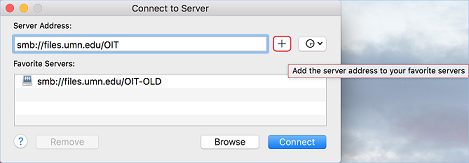
- Type AD\ + your Internet ID and your password if prompted.
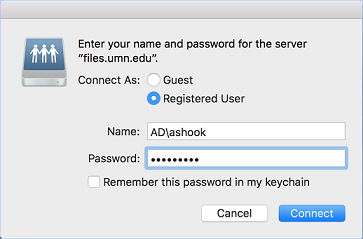
- Note: Use a backslash (\), not a forward slash (/). Use AD\ if computer is not bound to the AD. Use your Internet ID only if the computer is bound to the AD.
- Alternately, you can use [email protected]
- Note: Use a backslash (\), not a forward slash (/). Use AD\ if computer is not bound to the AD. Use your Internet ID only if the computer is bound to the AD.
- Click Connect.
- To navigate back to your network drive share.
- Click Finder.
- Click files.umn.edu under Shared in the left hand Finder menu.
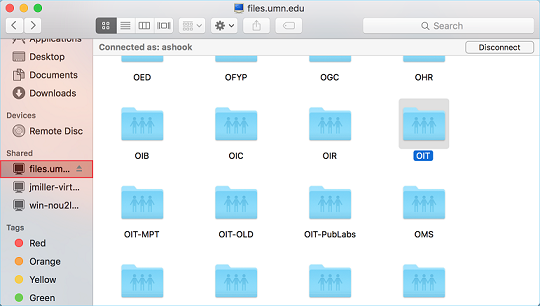
- Navigate to the folder that was shared with you.
- Note: While all of the folders in files.umn.edu are visible, you can only see the contents of folders specifically shared with you.
- To navigate back to your network drive share.


![Toni Kroos là ai? [ sự thật về tiểu sử đầy đủ Toni Kroos ]](https://evbn.org/wp-content/uploads/New-Project-6635-1671934592.jpg)


