
Configuring Network Settings on RHEL/CentOS | Windows OS Hub
In this article we’ll consider how to configure network on Linux CentOS/RHEL 7/8 and set network interfaces using configuration files, discover basic network configuration tools, etc. It is a relevant topic, since the configuration of any server starts from network configuration on it.
This article deals with the aspects of network configuration on RHEL/CentOS 7 using the standard network service. We’ll also study how to use a default NetworkManager (NM) in CentOS/RHEL 8 to configure networking.
Mục Lục
Network Interface Device Naming on RHEL/CentOS
The traditional scheme of network interface naming in Linux assigns the names like eth0, eth1, etc. However, these names are not tightly bound to the interfaces, and after a reboot multiple interfaces may get different names. It may cause some problems, for example, when you configure a firewall through firewalld or iptables. Due to it, starting from RedHat 7 and CentOS 7 it was decided to assign network interface names based on the hierarchy of different naming schemes. By default, systemd will apply naming schemes in turn choosing the first one that has been available and applicable. The network device names are assigned automatically and stay unchanged even if hardware is added or changed. On the other hand, such interface names are less readable, e. g., enp5s0 or ens3 versus the traditional eth0 or eth1.
You can get back to the default Linux interface name by performing the following actions.
Edit /etc/default/grub:
# nano /etc/default/grub
Add the following to the GRUB_CMDLINE_LINUX line:
net.ifnames=0 biosdevname=0
Here is an example of the full GRUB line:
GRUB_CMDLINE_LINUX="consoleblank=0 fsck.repair=yes crashkernel=auto nompath selinux=0 rhgb quiet net.ifnames=0 biosdevname=0"
Refresh your grub configuration:
# grub2-mkconfig -o /boot/grub2/grub.cfg
Rename the configuration file of the network interface:
# mv /etc/sysconfig/network-scripts/ifcfg-ens3 /etc/sysconfig/network-scripts/ifcfg-eth0
And change the DEVICE value:
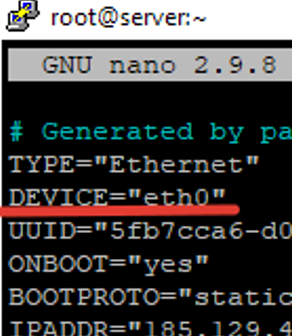
Save the file, reboot your host and make sure if the changes have been applied:
# ip a
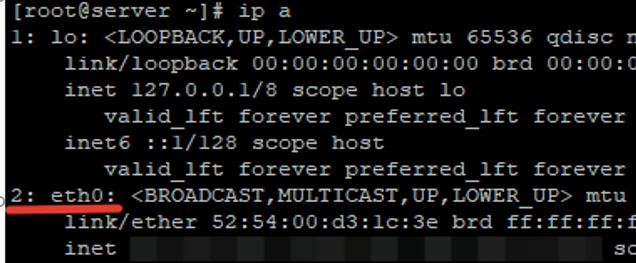
The interface is called eth0 now.
Initial Network Configuration During CentOS/RHEL Installation
Initially, during CentOS Linux installation you can configure your network interface in the graphical mode by clicking “Network & Hostname” in the menu. Here you specify your server name, add the IP address and gateway, DNS, etc. See the detailed guide on network configuration on this step following the link above.
How to Edit Network Interface Configuration File on CentOS/RHEL?
Let’s display the list of available network interfaces on the LInux host
# ip a
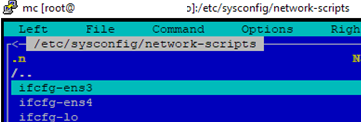
Network configuration files of your Linux host are stored in /etc/sysconfig/network-scripts. NetworkManager daemon creates these files for each network interface. In our case, the configuration file is called ifcfg-eth0 (you may have a different name depending on your network interface naming scheme).
Let’s study the main parameters:
DEVICE– the name of the network adapter matching its name in the system (it is eth0 in our example)BOOTPROTOis how an IP address is assigned (static is a value entered manually, dhcp means that the IP address is assigned automatically)IPADDR– an IP addressNETMASK– a network maskGATEWAY– a default gatewayDNS1is the primary DNS serverDNS2is an alternative DNS serverONBOOTis the method to start your network interface (yes — automatic, no — manual)UUIDis the unique identifier of your network interface. You can generate it yourself using the uuidgen commandIPV4_FAILURE_FATALdisables IPv4 network interface if it has a wrong configuration (yes — disables, no — leaves enabled)IPV6_FAILURE_FATALdisables IPv6 network interface if it has a wrong configuration (yes — disables, no — leaves enabled)IPV6_AUTOCONFallows or denies IPv6 autoconfigurationIPV6_INITenables using IPv6 addressing (yes — IPv6 addressing is used, no — addressing is not used)PEERROUTESsets the priority of the default gateway configuration when using DHCPIPV6_PEERROUTESsets the priority of the default gateway configuration when using DHCP for IPv6
Let’s configure the network interface based on this information.
How to Configure a Static IP Address in CentOS/RHEL?
Open the network config file to edit it:
# mcedit /etc/sysconfig/network-scripts/ifcfg-eth0
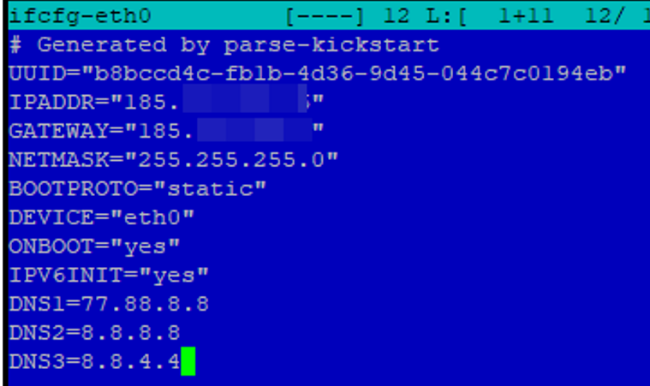
In this example, I have specified a static IP address, a subnet mask, a gateway, and several DNS servers. Enable automatic interface boot:
ONBOOT=”yes”
After you have made the changes, restart your network service. If it is OK, you will see the following listing:
# service network restart
Restarting network (via systemctl): [ OK ]
Also, you may just reload all connection profiles:
# nmcli connection reload
How to Get a Dynamic IP Address from DHCP?
If you server must get a dynamic IP address from the DHCP server on your network, open the interface configuration file and change the settings:
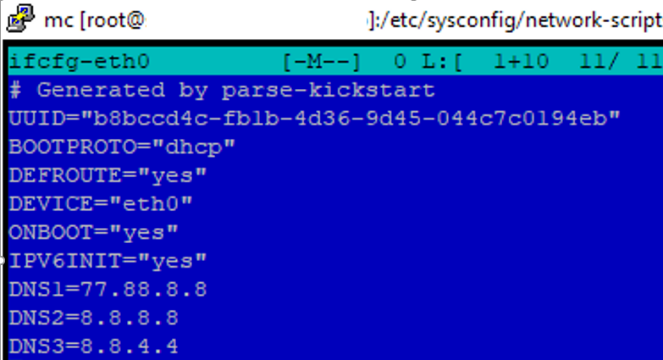
We have removed all parameters related to the IP addresses and mask, and changed the way of how the IP address is assigned to dhcp (BOOTPROTO=”dhcp”). After making all changes, don’t forget to reload the network service.
How to Disable IPv6 on RHEL/CentOS?
By the time the article had been written, ipv6 was not actively, and often administrators prefer using ipv4, if possible. So if you are not using the IPv6 protocol, disable it on your server. If you are sure that neither of your services is configured to work with ipv6, you can proceed to network interface configuration. Otherwise, it is better to start with a check. You need to check which services are using IPv6 and disable the protocol in the service config. Run this command:
# netstat -tulnp

I have a test server, so ipv6 is used only for sshd and chronyd. It may be detected by “:::”.
To prevent problems after disabling ipv6 in the network configuration, disable the protocol for the services that use them on your server. For example, open the sshd configuration file:
# mcedit /etc/ssh/sshd_config
And uncomment these lines:
#AddressFamily any
#ListenAddress 0.0.0.0
Then restart the service:
# service sshd restart

As you can see, ipv6 is not available for sshd now. Do the same for other services.
Let’s disable ipv6 protocol in the network settings. Open /etc/sysctl.conf:
# nano /etc/sysctl.conf
And add the following lines there:
net.ipv6.conf.all.disable_ipv6 = 1
net.ipv6.conf.default.disable_ipv6 = 1
Save the file and apply the changes using:
# sysctl -p
net.ipv6.conf.all.disable_ipv6 = 1
net.ipv6.conf.default.disable_ipv6 = 1
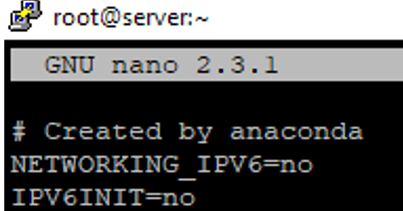
Then open /etc/sysconfig/network. Add this configuration to it:
NETWORKING_IPV6=no
IPV6INIT=no
Remove the following line from the network configuration interface file /etc/sysconfig/network-scripts/ifcfg-eth0:
IPV6INIT="yes"
And finally, disallow the use of ipv6 in grub:
# nano /etc/default/grub
Add the following to the end of GRUB_CMDLINE_LINUX line:
ipv6.disable=1

After making all changes, save the file and update grub:
# grub2-mkconfig -o /boot/grub2/grub.cfg
Reboot your server and check your network configuration:
# ifconfig
The ipv6 protocol is disabled on your server.
Setting DNS Namesservers on CentOS/RHEL
You can configure DNS nameservers for your host using /etc/resolv.conf or specify them in your network interface settings. When setting up static configuration for the Linux network interface, we have already specified the DNS servers using the following parameters:
DNS1=
DNS2=
DNS3=
Set the DNS servers you need and restart the network service.
DNS nameservers are automatically registered in /etc/resolv.conf taking them from the network configuration file. If you didn’t specify DNS servers during network configuration, do it manually in /etc/resolv.conf:
nameserver 1.1.1.1
nameserver 8.8.8.8
nameserver 8.8.4.4
Create Multiple IP Addresses to Single Network Interface on RHEL/CentOS
If you want to use multiple IP addresses in your network interface, you can configure it through the interface alias or add an additional IP address to the main configuration file.
# nano /etc/sysconfig/network-scripts/ifcfg-eth0
Change it like this:
# Generated by parse-kickstart
UUID="b8bccd4c-fb1b-4d36-9d45-044c7c0194eb"
IPADDR1="*.*.*.*"
IPADDR2="*.*.*.*"
GATEWAY="*.*.*.*"
NETMASK="255.255.255.0"
BOOTPROTO="static"
DEVICE="eth0"
ONBOOT="yes"
DNS1=1.1.1.1
DNS2=8.8.8.8
DNS3=8.8.4.4
Where:
IPADDR1 – the first IP address
IPADDR2 – the second IP address
GATEWAY – the main gateway
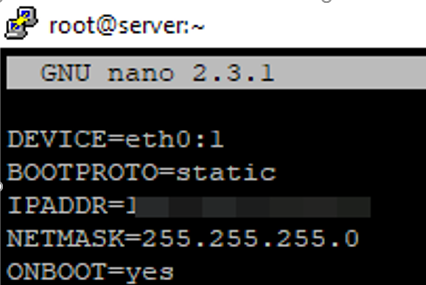
Or create an alias to your main configuration file:
# nano /etc/sysconfig/network-scripts/ifcfg-eth0:1
And add some lines here, but do not specify the gateway:
After configuration of all settings, restart your network service:
# service network restart
On Windows, you also can configure multiple IP addresses (aliases) on a single network interface.
Configure VLAN (802.1Q) Tagging on RHEL/CentOS
We told more about configuration of multiple VLANs for a network interface in CentOS/RHEL/Fedora in the article: How To Configure 802.1Q VLAN Tagging on RHEL/CentOS Linux.
Configuring Multiple Network Interfaces on RHEL/CentOS
If you have several network interfaces on your server, you can specify different IP addresses for them. Let’s learn how to do it. If you have more than one network interface on your server, the “ip a” command should display this information:
# ip a
1: lo: <LOOPBACK,UP,LOWER_UP> mtu 65536 qdisc noqueue state UNKNOWN group default qlen 1000
link/loopback 00:00:00:00:00:00 brd 00:00:00:00:00:00
inet 127.0.0.1/8 scope host lo
valid_lft forever preferred_lft forever
2: eth0: <BROADCAST,MULTICAST,UP,LOWER_UP> mtu 1500 qdisc pfifo_fast state UP group default qlen 1000
link/ether 52:52:42:54:2c:36 brd ff:ff:ff:ff:ff:ff
inet 15.*.*.*/16 brd 15.*.*.255 scope global eth0
valid_lft forever preferred_lft forever
3: eth1: <BROADCAST,MULTICAST> mtu 1500 qdisc noop state DOWN group default qlen 1000
link/ether 52:52:42:54:2c:b8 brd ff:ff:ff:ff:ff:f
To configure the second interface, create a file for it:
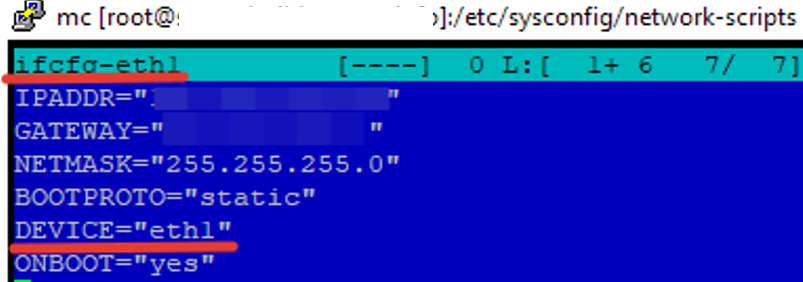
# nano /etc/sysconfig/network-scripts/ifcfg-eth1
And add the following configuration to it:
IPADDR="*.*.*.*"
GATEWAY="*.*.*.*"
NETMASK="255.255.255.0"
BOOTPROTO="static"
DEVICE="eth1"
ONBOOT="yes"
Then you must set a default gateway on your server. Check which gateway is set now and change it if necessary:
# netstat -nr
Kernel IP routing table
Destination Gateway Genmask Flags MSS Window irtt Iface
0.0.0.0 15.*.*.1 0.0.0.0 UG 0 0 0 eth1
169.254.0.0 0.0.0.0 255.255.0.0 U 0 0 0 eth0
169.254.0.0 0.0.0.0 255.255.0.0 U 0 0 0 eth1
15.*.0.0 0.0.0.0 255.255.0.0 U 0 0 0 eth0
15.*.*.0 0.0.0.0 255.255.255.0 U 0 0 0 eth1
The eth1 interface is the main gateway. I want to use eth0. Let’s change it:
# route add default gw *.*.*.* – replace the gateway with the one specified in eth0
# route delete default gw *.*.*.* — remove the eth1 gateway

If you want to keep this setting after the server reboot, add these commands to rc.local (see the article How to Start Services Automatically on Boot on RHEL/CentOS?).
Useful Networking Commands on RHEL/CentOS
ifdown eth1— disables the specified network interfaceifup eth1– enables the specified network interfaceifconfig– shows the information about all network interfacesifconfig -a | grep ether | gawk '{print $2}'— is a command to display MAC addresses of an interfaceip a | grep ether | gawk '{print $2}'— the same as above using ip aservice network restartorsystemctl restart network– restarts network service using systemctlsystemctl restart NetworkManager.service– restarts NMip routeorip route show— displays the routing table on Linuxping host– pings the specified hostwhois domain– shows whois info about a domaindig domain– shows DNS information about a domain
Network Administration Tools on RHEL/CentOS
If a server has been working for some time or it has not been configured by you, the first thing you should do is to learn what interfaces are there on the server. To make it more convenient, install the necessary tools from the basic repository:
# yum install net-tools -y
After the installation, you can use ifconfig:
# ifconfig
eth0: flags=4163<UP,BROADCAST,RUNNING,MULTICAST> mtu 1500
inet 15.*.*.* netmask 255.255.255.0 broadcast 185.*.*.255
As you can see, the name of our network interface is eth0.
If you have not installed net-tools, you can view your interfaces using the following command:
# ip a
The output will be almost the same.
Network Management Using NetworkManager in CentOS/RHEL 8
On RHEL/CentOS 8 it is recommended to use only NetworkManager for network configuration. This service manages network connections, controls settings and applies changes to network adapters.
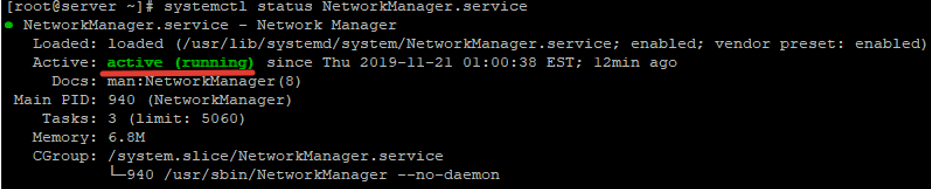
To check NM status, use this command:
# systemctl status NetworkManager.service
CentOS offers to use the command console nmcli or a graphic tool nmtui to configure a network.
To go to the network configuration mode, enter this command:
# nmtui
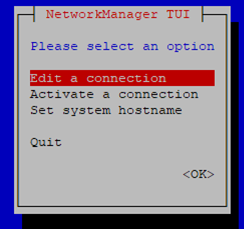
After selecting the first item, you will see a window to choose the network interface to edit:
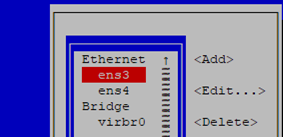
Select an interface and edit it:
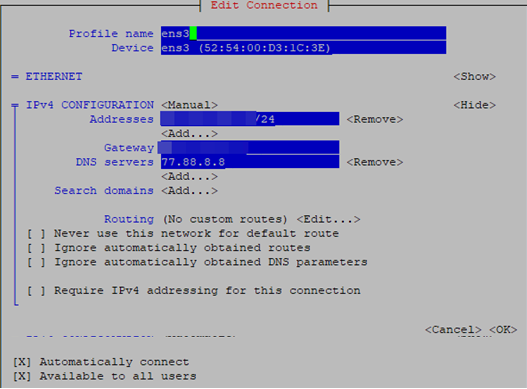
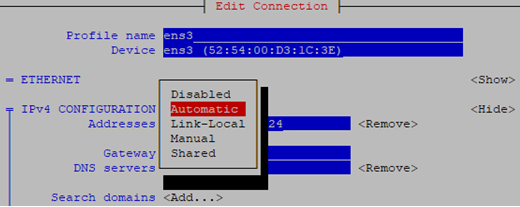
You can edit a device name, an IP address, a gateway and DNS servers. Also, you can change the way to assign an IP address to DHCP in the NM interactive menu:
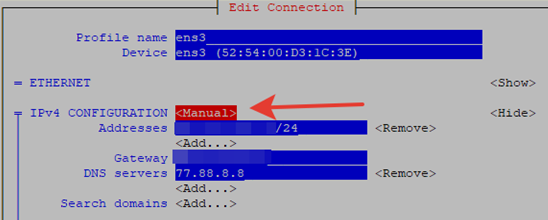
Change “manual” to “automatic”:
Then save the changes. Using nmtui you can do the same configuration tasks in the graphical mode like you do in the configuration files. If you prefer using the command prompt to configure interfaces, you can use nmcli. For example, the following commands will change an IP address, a gateway and DNS servers for eth1.
# nmcli con mod eth1 ipv4.addresses 192.168.11.24/24

# nmcli con mod eth1 ipv4.gateway 192.168.11.1

# nmcli con mod eth1 ipv4.dns "8.8.4.4"
To apply the changes, restart the interface:
# nmcli con up eth1
If it is more convenient for you to work with the configuration files, install a special package network-scripts (by default, CentOS 8 does not have it) using yum.
# yum install network-scripts -y
Upgraded:
initscripts-10.00.1-1.el8_0.1.x86_64
Installed:
network-scripts-10.00.1-1.el8_0.1.x86_64 network-scripts-team-1.27-10.el8.x86_64
Complete!
After the installation, you can edit network settings in the configuration files as described earlier.


![Toni Kroos là ai? [ sự thật về tiểu sử đầy đủ Toni Kroos ]](https://evbn.org/wp-content/uploads/New-Project-6635-1671934592.jpg)


