Building An Electric Brewery In Your Basement: Lessons Learned and Getting Started
Indoor brewing is an absolute luxury to have in comparison to brewing outdoors or in your garage. That being said, building a basement brewery requires a lot of thought and planning if you want to do it safely and properly. I’ve been through two separate brewery builds in the past few years. After investing a lot of time and money into a dedicated brew space, we ended up moving to a new home about a year later. Crushing… I know.
The good news is, a dedicated brewing space was part of the criteria in our home search (my wife is fully accepting of my craziness and I’m very thankful for that). The second time around proved to be worth the short-term aggravation and lack of brew days. Ultimately, I got a second chance to start from scratch and learn from my initial mistakes and shortcomings. It’s hard to really know what you’re going to need until you truly work in a space for a while.
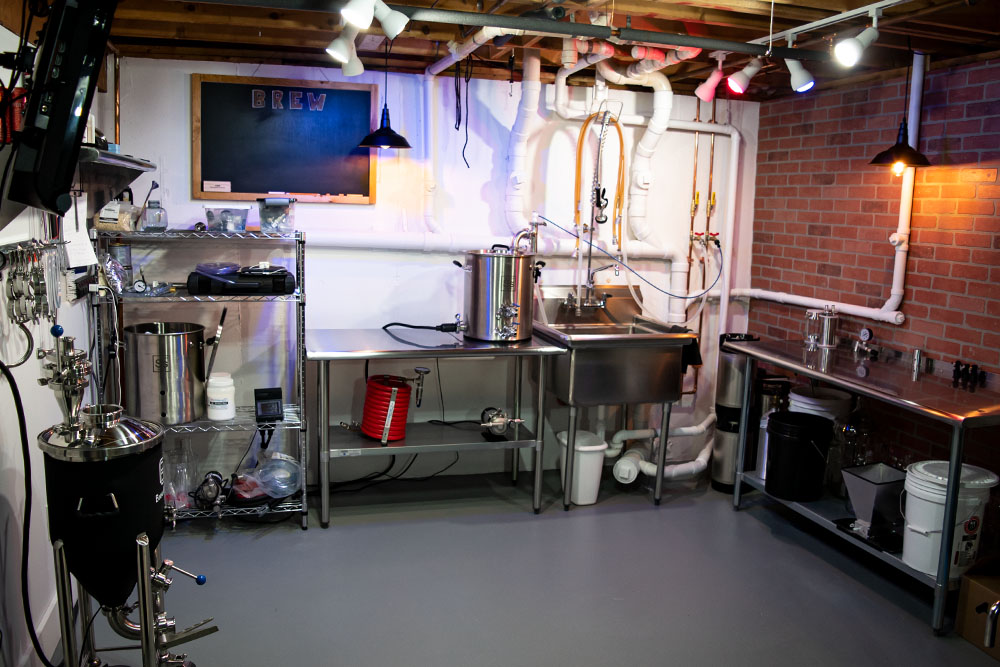
My first setup was simple, efficient, and effective. Kal over at theelectricbrewery.com created the gold standard of building an elaborate home brewery with all the bells and whistles. His site is loaded with information and is a phenomenal resource for getting started. My first build was far from any dream setup, but it got the job done.
 First brewery build – 2020
Mục Lục
Electric Brewery Basics
I did a lot of research before making a single purchase. I combed over hundreds of sites and forums looking for advice from fellow brewers. Instagram is a great place to start as so many homebrewers showcase their setups. There are so many great ideas out there and I borrowed many of them. Before I get into any specifics about my build, I think it’s important to chat about the basic considerations of brewing indoors.
Moving From Propane to Electric
One of the major advantages of electric brewing is you can brew inside. I highly DO NOT recommend attempting to burn propane in an enclosed space. The risk of carbon monoxide is dangerous and can cause serious harm. The majority of electric brewing systems feature an internal heating element powered by a 240-volt outlet (similar to a dryer or oven outlet). There are a few other options such as induction or all-in-one 120v systems that plug into a standard outlet (Clawhammer 120v or BrewZilla for example). I don’t have personal experience with these so I’m not going to get into it.
ULWD (Ultra Low Watt Density) Heating Element
I use a Spike 5500-watt ULWD ripple heating element powered by a Brew Commander. My element installs through a 1.5 inch tri-clover port and is easy to remove for cleaning etc. Plus plugging it into the Brew Commander is a snap. The Brew Commander works really well for BIAB applications. It powers one pump and one element and has a really nice touch screen display. If you’re looking to go a similar route, I can’t recommend it enough for the price point.
GFCI Protection
GFCI protection is an absolute must when it comes to combining electricity with water. GFCI stands for Ground Fault Circuit Interrupter. In short, if the current changes from water contact, it will immediately trip the circuit breaker and cut the power to your power source. This type of protection could end up saving your life.
For the basement outlets, I had an electrician install standard GFI protected outlets for pumps etc. and a dedicated Square D 30 amp GFCI protected circuit breaker for my Brew Commander. GFCI breakers are much more expensive than a standard breaker but you need to determine the value of your life (mine’s worth the $100 price tag to me). My Brew Commander plugs into an L630R twist-lock receptacle.
Ventilation or Steam Removal

Steam removal is one of the most important things to consider. Boiling wort for 60-90 minutes is going to generate a lot of steam. Potentially gallon(s) worth of water is evaporating off the kettle into your brewing environment. Without a ventilation system, you could run into serious mold/mildew build-up in your home. There are two options. A steam condenser or kitchen range hood or condensate hood.
Range/Condensate Hood
A range hood requires the installation of a vent fan that is externally vented outside your home. The problem is even a large and powerful range hood can still lead to condensation build-up. You will need at least a 400 CFM fan for the smallest home breweries and even that may not be enough depending on your setup and requirements.
Condensate hoods are the gold standard for professional commercial kitchen venting however they are very pricy options. Most vent fans will also require some form of return air through a separate vent or window. This is to make up for the air that is being pumped outside and removed from your room.
Steam Condenser
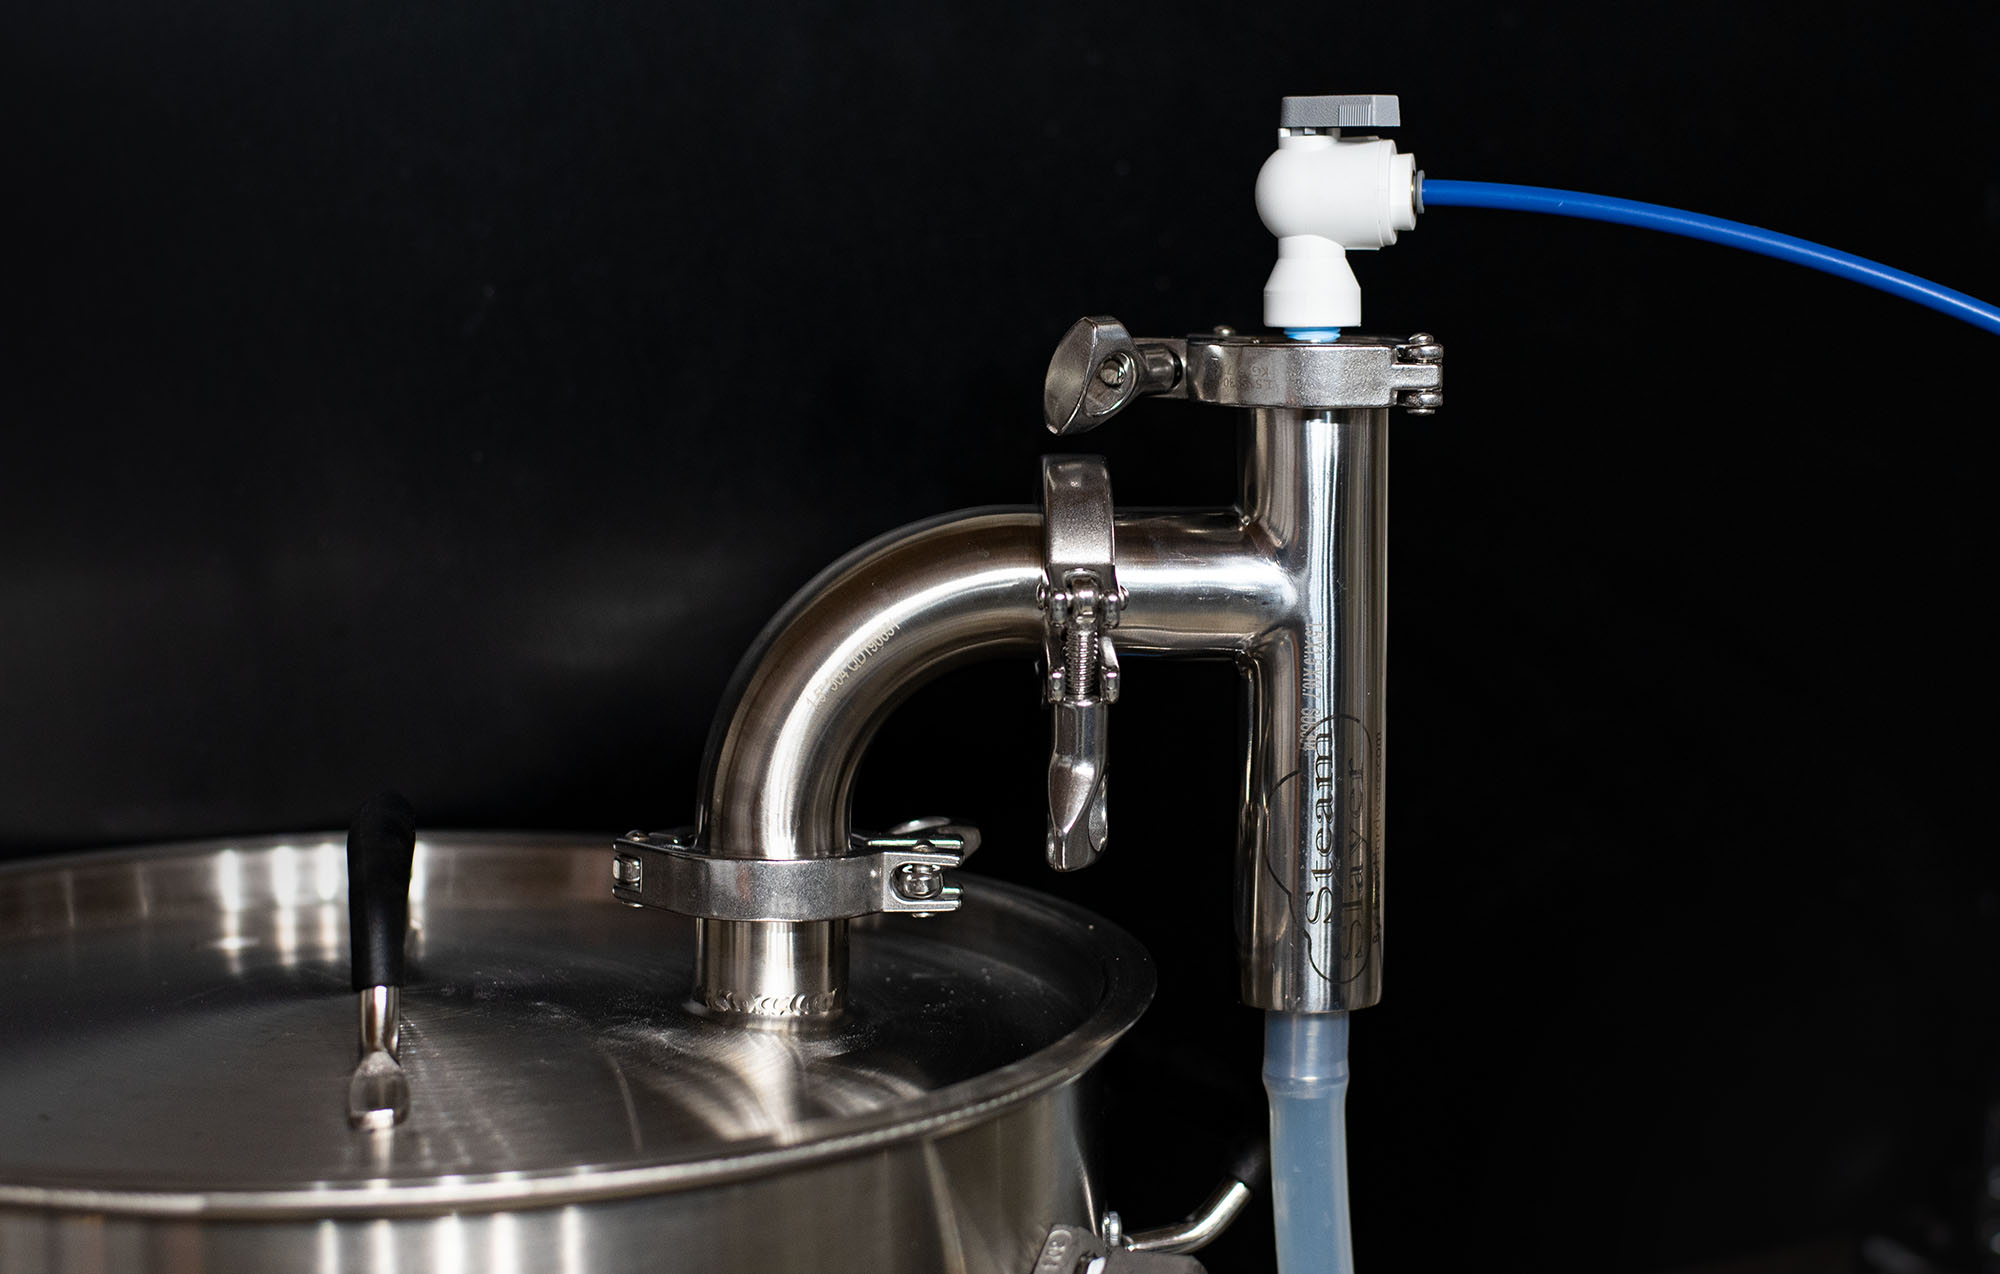
A steam condenser on the other hand is a relatively new addition to the homebrew world. Steam condensers are relevantly affordable (starting around $130) and eliminate the need for any other form of ventilation. I went with the Steam Slayer from Brew Hardware. This unit can be mounted to the kettle lid or through the sidewall of the kettle. It’s attached with a 1.5-inch TC connection. More details and full review here.
A steam condenser is equipped with a fine mist sprayer that fits inside the unit and is fed with cold tap water. Steam will enter the tee and encounter the spray turning the steam back into water. The wastewater runs out the bottom and into a bucket or a sink in my case.
The only downside to steam condensing is more water usage (about 6 gallons per hour boil) and the need to have a covered brew kettle during boiling. The good news is you will save a lot of time, money, and aggravation from trying to exhaust steam. After chatting with some homebrewers that have experience with both vents and steam condensers, I decided to go the Steam Slayer route and could not be happier with my choice. It’s really easy to use and there is zero steam escaping from my kettle. The other benefit is less boiloff (about .60 gallons an hour) and the ability to maintain a more intense boil with less power.
My Brewery Build 2.0
 New brew space 2022
I was really lucky our new house had a separate finished room off of the finished basement that was absolutely perfect for a home brewery. This area featured a drop ceiling with easily accessible utilities and Lifeproof vinyl plank flooring. This is especially amazing because the rest of the basement was finished with a drywall ceiling and carpet. It’s like they knew I was coming.
 Original room
My aspired brew room, albeit bare-bones, was already finished with easy plumbing access and plenty of electrical options, so this obviously saved a lot of time and money associated with actually finishing off a dedicated space. Needless to say, things worked out really well.

I leaned into what the space already had to offer and spruced it up. I added an 8-foot butcher block counter on top of an existing bookshelf. This serves as a “bar top” and workspace on brew days. I think I need a TV somewhere…

Utility Wall
One aspect that accidentally fell into place was a dedicated utility space directly behind the sink/kettle wall. This utility space was previously two connected closets that I ultimately decided to close up and use as the main brewing wall. While this wasn’t originally part of my vision, it turned out to be one of the best things I did. The major benefit to this area is both cosmetic and functional.
All of the sink plumbing components live behind this wall in an easily accessible space. Sink ejector pumps can be a bit of an eyesore, so the wall also conceals what would have been an ugly mess of PVC pipe. Any plumbing additions or changes down the line can be easily managed without ripping apart the wall. It also doubles as additional storage if needed.
If you’re embarking on a similar build and have the space, I cannot recommend this blueprint enough!

Sink and Water Access
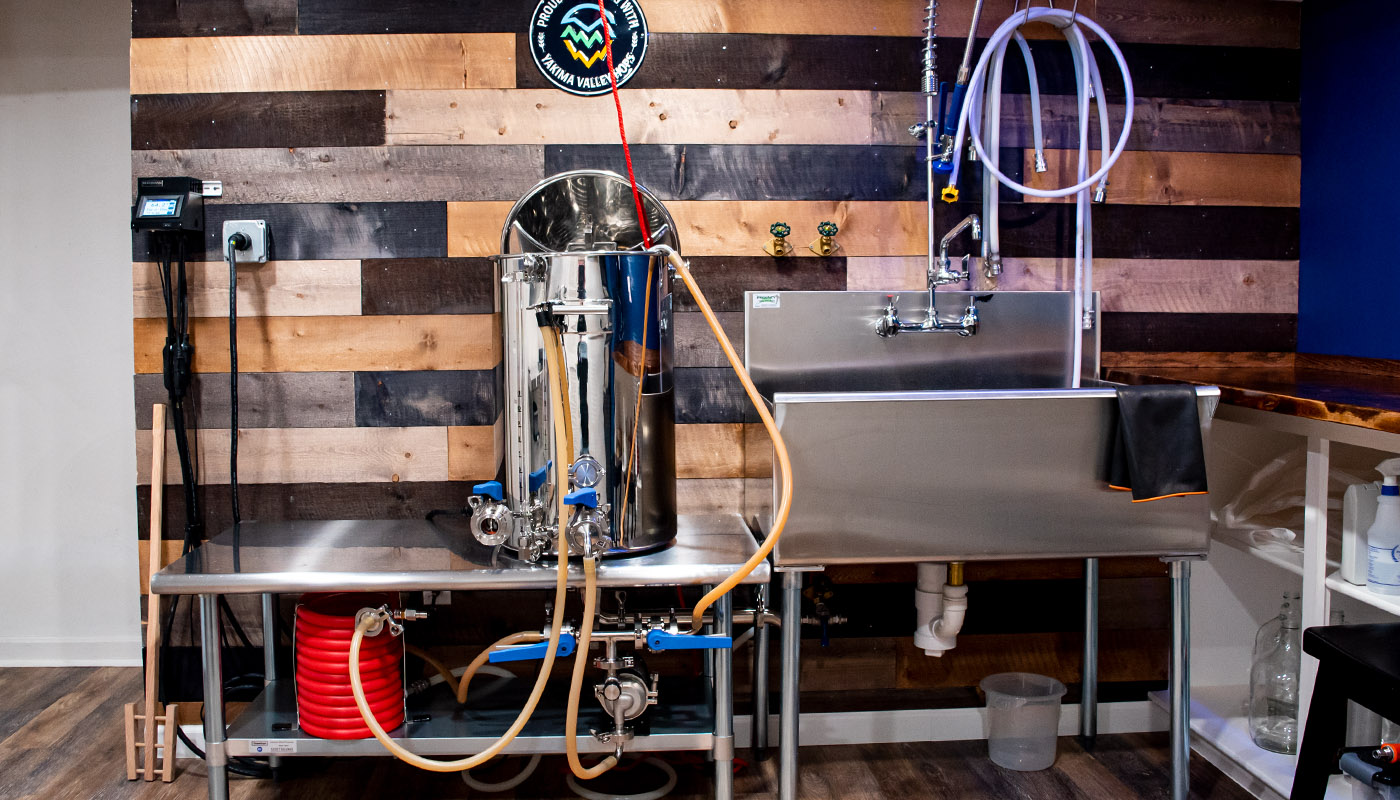
 BIAB setup
A dedicated sink is an absolute MUST-have item. I was so sick of lugging equipment around and trying to clean brew pots and fermenters outside or in my always-messy-and-full-of-crap, kitchen sink. The sink also doubles as a drain for my Steam Slayer so I don’t have to monitor and dump heavy buckets of hot water.
My first brewery featured a 24×24 stainless steel sink. The new brewery currently features a 24×36 inch Regency sink. My advice to you is to get the largest sink you can fit in your space. While I don’t clean my kettle inside the sink, it’s constantly full of buckets and bins soaking components. The larger sink makes cleaning, soaking, and maneuvering kegs a lot easier as well.

I had my plumber install 1 hot and 2 cold hose bibs above and below the sink area. I use these for spraying down kettles and fermenters with hot water, filling kettles, supplying the Steam Slayer, running my Exchilerator CFC, and feeding my RO system. I had these in my old setup and loved the convenience. My only additional was adding extra this time around.
Reverse Osmosis System
Depending on your tap water quality, it may be beneficial to add an RO system. Why use RO water in the first place? The advantage of soft, mineral-free water is that it offers a clean slate to customize your water profile to best suit your beer style. Pure water allows the brewer more flexibility in freely customizing each element. While most of us can easily purchase RO/distilled water, an RO system offers pure convenience.
My system is a 4-stage premium RO system that produces 100 gallons per day (GPD) of filtered water. You can learn more about the setup and details here. I have future plans to add an RO reservoir behind the main wall and install a pot filler. As I mentioned earlier, this will be really easy to DIY down the road with the utility area. My plan is to copy what Brian did.
Keezer/Fridge Build

My new brew space had extra storage space under the basement stairs. I figured this would be the perfect spot for an inset fridge/keezer build. My original chest freezer/bar build was a trophy piece of furniture, but it just didn’t fit with what I was trying to do here. After some thought, I decided to build a simple beer fridge to store all my draft beer. I ended up buying a black Hisense 18 cu ft fridge and added 5 Intertap faucets. My old keezer looked great but the lack of collar and top tower made maneuvering kegs and changing lines a hassle.
I love the simplicity of having pass-through shanks that make line changing and keg access a breeze. Plus, I decided to make the switch to EVABarrier tubing and Duotight fittings for convenience. I’m really glad I did.

If you’re asking yourself why I opted for a fridge over an upright freezer, it’s because upright freezers lack the extra depth that refrigerators have. Without stacking kegs (I had height restrictions), it seemed like a massive waste of dead space. Plus, I’ll enjoy the extra freezer storage for hops. I can fit 6 kegs in this fridge with a little room to spare. I opted for 5 lines so I would have extra space for my CO2 tank.
My build list for this setup is below:
Lighting
I won’t spend a lot of time on lighting but I wanted to make sure I could see what the heck I was doing. My original room was lit with a large fluorescent light fixture. While this gave off plenty of light, it wasn’t really ideal and it looked ugly. I added 6 4-inch Halo ultra-slim remodel recessed lights in place of the old fixture. These are affordable and really easy to install given you have electrical access, to begin with. They totally transformed the look of the room. Since these lights are so lightweight, the drop ceiling is strong enough to support the weight of the light on its own.
Conclusion

Having a dedicated brew space makes the entire brewing process a hell of a lot easier and a lot more enjoyable. Set up and breakdown of equipment on brew day is a thing of the past and I’m no longer running back and forth from my garage to my kitchen with equipment and ingredients. Everything has a place and makes logical sense. Not only is the space functional, but it’s nice enough to want to hang out in and have a beer. Since it sits right off our finished basement, it really adds to the ambiance.
I still have some minor finishing touches such as some shelving for glassware and other random things. I’m hoping to have a TV rigged up on the back wall as well! I don’t think I’ll truly ever be done…
There are so many sweet brew setups out there that I pulled a lot of inspiration from. I really hope this was helpful and provided a little inspiration for you as well.
shares


![Toni Kroos là ai? [ sự thật về tiểu sử đầy đủ Toni Kroos ]](https://evbn.org/wp-content/uploads/New-Project-6635-1671934592.jpg)


