Best Way To Find & Change your Default WordPress Login URL
If you have a blog on WordPress, sooner or later, you will come across a question about protecting your site from hacking. Even if you are currently reading this article and think that this will not happen to you, your site is not very popular, and even to whom it is generally necessary, then you are very mistaken. We are going to talk about WordPress Login URL changes that you can do to secure your website.
The fact is that it’s not necessarily the visitors to your site or your worst enemy who want to hack into a site. This is done by various bots that are created in order to post their links or spam comments on the site, without deleting them. Even if now you have everything well with the site, you can look at the logs in the hosting admin panel, if your provider gives such an opportunity.
In the article, we will review why it is important to change the WordPress login URL and the ways how to do that.
Why should you change the WordPress login URL
In order to enter the WordPress admin panel, as a rule, you add wp-admin to the website address. In that case, the link looks like the following: http://example.com/wp-admin. [ This is a sample WordPress Login URL]
Using this link, absolutely anyone can go to the page and admin panel and try to access your site. They can use the brute to collate the login and password. We can say that using the default WordPress login URL can be dangerous for your site security.
On the Internet, there is a lot of information about the redirect from the wp-admin page. And a lot of useful information that allows you to filter out curious visitors who do not yet know that the entrance to the admin panel is located at http://example.com/wp-login.
When such user enters http://example.com/wp-admin, WordPress redirects him to http://example.com/wp-login.php. That’s how WordPress Login URL generally behave while you try to sign in. There, he can try to enter the correct password. The various bots use the same address to attack your site. As the result, it takes your site’s resources and overloads it.
How to avoid that? You will need to change the WordPress login page.
Additionally, when you allowed registering on the site, it means your visitors have access to the login page and then you need to monitor all those who can access the site.
One of the possible solutions is to close the registration for the users.
In that case, only you will have access to the login page. The bottom line of the method is to change WordPress login URL.
If you allow registration, then, of course, visitors will know this address, but the bots that are configured for standard pages will disappear immediately. If there is no registration, no one else will be able to access the page.
How to change the WordPress login URL?
Let us understand some of the best steps to change the WordPress Login URLs in this blog.
1. Changing the .htaccess file
First of all, you will need to get access to your website root folder via FTP. You will be able to find the login information in your hosting account control panel, or by contacting tech support. Use one of the FTP file managers to access the site. The most popular ones are FileZilla and Total Commander.
When you find the site, download it to your local drive and then open in any text editor. The simplest option is standard Notepad. Add the following code in the bottom of the file:
1
2
3
4
5
6
7
8
9
10
11
12
13
14
15
16
17
18
19
20
21
22
23
24
25
26
27
28
29
30
31
32
33
34
35
36
37
38
39
40
41
# BEGIN Hide console URL
<
IfModule
mod_rewrite
.
c
>
RewriteEngine
On
RewriteRule
^
custom_admin_url
/
?
$
/
wp
–
login
.
php
?
your_secret_key
[
R
,
L
]
RewriteCond
%
{
HTTP_COOKIE
}
!
^
.
*
wordpress_logged_in_
.
*
$
RewriteRule
^
custom_admin_url
/
?
$
/
wp
–
login
.
php
?
your_secret_key
&redirect_to
=/
wp
–
admin
/
[
R
,
L
]
RewriteRule
^
custom_admin_url
/
?
$
/
wp
–
admin
/
?
your_secret_key
[
R
,
L
]
RewriteCond
%
{
SCRIPT_FILENAME
}
!
^
(
.
*
)
admin
–
ajax
\
.
php
RewriteCond
%
{
HTTP_REFERER
}
!
^
(
.
*
)
yoursite
.
com
/
wp
–
admin
RewriteCond
%
{
HTTP_REFERER
}
!
^
(
.
*
)
yoursite
.
com
/
wp
–
login
\
.
php
RewriteCond
%
{
HTTP_REFERER
}
!
^
(
.
*
)
yoursite
.
com
/
custom_admin_url
RewriteCond
%
{
QUERY_STRING
}
!
^
your_secret_key
RewriteCond
%
{
QUERY_STRING
}
!
^
action
=
logout
RewriteCond
%
{
QUERY_STRING
}
!
^
action
=
rp
RewriteCond
%
{
QUERY_STRING
}
!
^
action
=
postpass
RewriteCond
%
{
HTTP_COOKIE
}
!
^
.
*
wordpress_logged_in_
.
*
$
RewriteRule
^
.
*
wp
–
admin
/
?
|
^
.
*
wp
–
login
\
.
php
/
not_found
[
R
,
L
]
RewriteCond
%
{
QUERY_STRING
}
^
loggedout
=
true
RewriteRule
^
.
*
$
/
wp
–
login
.
php
?
your_secret_key
[
R
,
L
]
<
/
IfModule
>
# END Hide console URL
To make everything work, you need to replace several elements. They meet several times, so be careful.
- custom_admin_url — this is your new URL — the admission address to the admin site and just logging into the site. Create your own address. For example, control_panel something like that. Try to make it unique because the modern bots can collate the most popular addresses.
- com — your website address, without http://. Change to your own.
- your_secret_key — this should be replaced with the secret key you created. This should be a string of letters and numbers written in random order. For example, gjhehg57e3au83kwdhfh or something like that. Save it to a reliable place in case you may need to use or change it.
Now the login page will be available at yoursite.com/custom_admin_url, for example – example.com/control_panel.
Note : This method only works on Apache servers and does not work for Nginx servers.
There is another way to change the URL, and its bottom line is to change the file name. First, we completely block access to wp-login.php. To do this, add the following code to the .htaccess file:
1
2
3
4
5
6
7
<
Files
wp
–
login
.
php
>
Order
Deny
,
Allow
Deny
from
all
<
/
Files
>
Now in the website root folder, find the wp-login.php file and make its copy. You need to rename the copy, for example, mylog.php. Then we open a new mylog.php and change wp-login.php to mylog.php in it. Now, to enter the website login page, you will have to use example.com/mylog.php.
Perhaps, after the WordPress update, if the content inside changes, you will have to repeat the procedure. But until the code remains the same, everything will work.
Now when someone will try to go to the old addresses, they will be redirected to 404 error page. You can only log in using the new link.
2. Editing the wp-config.php file
In order to change the WordPress login URL, you will need a file that is responsible for displaying the form to access the panel. It is called wp-login.php. You will have to access the site via FTP and download the file to the local drive. When you copied it to the computer, rename it. Choose a convenient to use a name. Make it quite difficult and avoid too simple names. Let’s call it website_control.php (it’s not necessary to give the file this name, you are free to choose any).
Now, open the file using any code editor like Notepad ++ or VS Code. Replace the old file name (wp-login.php), with the new file name (in our case, it’s website_control.php).
In total, you must have 12 replacements. Then save and upload the file back to the hosting.
Now you can log in to the admin panel at http://example.com/website_control.php. But, the old pages — http://example.com/wp-admin and http://example.com/wp-login — are still available. And this means that we need to block an access to the admin panels with old addresses.
3. Set up a redirect from wp-admin and wp-login
In order no one could access the old addresses to enter the control panel without a 404 error, you will just need to configure the redirect.
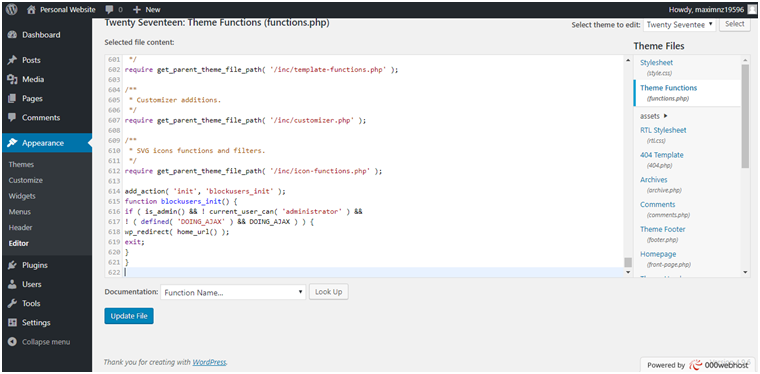
For this we need to open the functions.php file. Before you start, make a backup copy of functions.php
Open the WordPress admin panel using the new address, then go to Appearance — Editor — Theme functions. Scroll down to the bottom of the file. And in the end, insert the following code:


Redirect from wp-admin:
1
2
3
4
5
6
7
8
9
10
11
12
13
14
15
add_action
(
‘init’
,
‘blockusers_init’
)
;
function
blockusers_init
(
)
{
if
(
is_admin
(
)
&& ! current_user_can( ‘administrator’ ) &&
! ( defined( ‘DOING_AJAX’ ) && DOING_AJAX ) ) {
wp_redirect( home_url() );
exit
;
}
}
After that, the website will be redirected from http://example.com/wp-admin to http://example.com.
Redirect from wp-login:
1
2
3
4
5
6
7
8
9
10
11
12
13
14
15
function
redirect_login_page
(
)
{
$
page_viewed
=
basename
(
$
_SERVER
[
‘REQUEST_URI’
]
)
;
if
(
$
page_viewed
==
“wp-login.php?pass=1”
)
{
wp_redirect
(
home_url
(
)
)
;
exit
;
}
}
add_action
(
‘init’
,
‘redirect_login_page’
)
;
There will be the same redirect from http://example.com/wp-login.php to http://example.com.
Redirect while leaving the admin panel:
1
2
3
4
5
6
7
8
9
function
logout_page
(
)
{
$
login_page
=
home_url
(
‘wp-admin’
)
;
wp_redirect
(
$
login_page
.
“?loggedout=true”
)
;
exit
;
}
The latter code will clean all the junk code while the registered users leave the site.
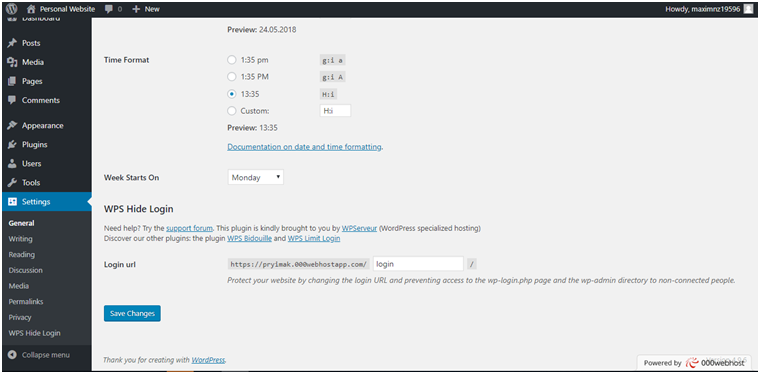
4. Using WPS Hide Login plugin to hide your WordPress Login URL.


Go to the plugin directory in your WordPress dashboard and find the WPS Hide Login in the search field. After that, install and activate the plugin. Now, go to Settings — General, and in the bottom of the page, change the WordPress login URL into the one you need to.
It will help to prevent any unauthorized access to your wp-login.php file and wp-admin folder. Your website will be much more secure.
We reviewed the several ways how to change the WordPress login URL for your website. It will definitely help to make it more secure. What way is the most convenient for you?

Final Thought
The above four methods are the prominent ways to change your WordPress Login URLs which will prevent you from being attacked by hackers. These methods are more secured and easy to implement.
Did you find a new way to change your WordPress Login URLs? Let us know your ways in the comment section below and we shall add those steps to our blog.


![Toni Kroos là ai? [ sự thật về tiểu sử đầy đủ Toni Kroos ]](https://evbn.org/wp-content/uploads/New-Project-6635-1671934592.jpg)


