
Wireless Weather Monitoring With HC-12 Long Range Transceivers :: Student Project
Keeping track of the weather can be an interesting hobby by itself or an important part of another job like flying or farming. Having your own weather station can fill you in on what is going on in your neck of the woods without relying on stations that you might not have access to, or that are far enough away to have different conditions.
Jim Greever tied multiple systems together in order to set up his wireless weather station. This multi-faceted project includes a solar panel, batteries, a regulator, a sensor, and transceiver modules all controlled by Arduinos to create a solar powered weather station.

Mục Lục
The Wireless Connection
The original idea was to use Xbee modules, but Jim decided on HC-12 modules that offer longer range and less cost. The HC-12 long range wireless modules transmit and receive information gathered by a DHT-11 temperature and humidity sensor. There were several challenges in getting the coding correct.
One of the challenges was forgetting to identify “MySerial” in both send and receive code. A more physical, or set up related problem came up when connecting the RX and TX to the wrong pins 2 and 3 on the Arduino. After ironing those bugs out, data was being sent but humidity and temperature data was being mixed. Jim traced it to a bug in the transmitter code and straightened out the data.
Powered By The Sun
His first challenge was using a solar panel with enough watts to power the Arduino and charge the battery. His station is set up in his backyard, and in his northern latitude the low angle of the sun, shorter daylight hours, and the house blocking some of the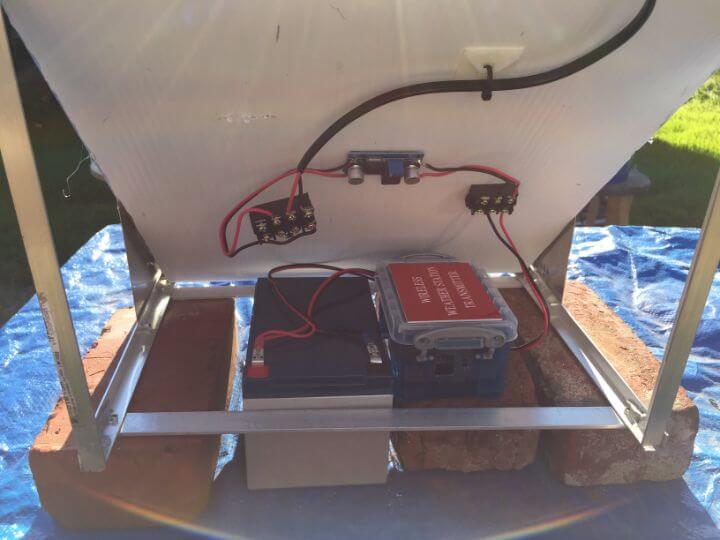 light all contributed to limited battery charge time.
He addressed this with a 20W solar panel after trying a smaller 5W panel. Another power management tool was to include a “sleep” command in part of the code to help maximize battery life. He also added a circuit to monitor battery voltage, it’s designed to disconnect output if the battery falls below 11.4VDC.
When Did That Weather Happen?
An important part of weather data is the time the measurement is taken. However, getting the Arduinos to store and display the proper date and time took some doing on this project. He added a RTC clock, but ran into trouble setting the date and time. The only thing that set correctly was the year, with the time advancing but incorrect.
 He then replaced the clock’s onboard battery, and fixed that problem. Then the format for displaying the time was an issue with some digits in minutes not displaying, as well as drift error compared to PC time, Jim enabled an RTC command in setup, and both of those issues were solved.
The last two adjustments came after he decided not to connect the weather station to his PC, so he could set the time at a specific time/date versus using the PC time/date. Finally, daylight savings time ended, meaning the onboard clock time was wrong again, so he pulled the battery and reloaded the sketch to reset the system to the correct time.
The Weather Sensor
At first Jim used a DHT-11 sensor but moved on to a BME280 (barometer, temperature and humidity) sensor that uses I2C serial communication. The data from the BME280 outputs in metric units, so a little conversion is needed for fahrenheit degrees and inches of mercury.
Additions And Tweaks
To see the weather readings in real time Jim added an OLED display. Jim tried adding an additional feature to measure rain via ADC, but this caused the data to be mixed, so to keep the project functioning it was removed.
He did run across some unique plastic boxes called “Really useful box”. They offer a size which is perfect to house a Arduino Uno and some shields or proto boards, as a bonus they are inexpensive.
Jim had a great experience setting up his weather station. He overcame a number of bugs, met new challenges, and learned a lot. Tying together a set of systems like this and generating a useful tool is a great way to explore and expand on what you can do.
Arduino Code for transmitter:
/*
  Version: 2.2
  Project is create a weather monitoring station, powered by a solar panel which also charges 4 AA
  batteries. Using a power saving mode (never tried), Arduino should run 24/7.
  Tried averaging readings, did not work as desired.
  Sleep mode works if at top of code.
  Replaced Xbee's with HC-12's, this offers longer range and less cost.
  Replaced DHT11 with BME280.
  Added a circuit to monitor battery voltage, its designed to disconnect output if battery falls < 11.4VDC.
*/

// Sleep mode lib
#include "LowPower.h"

// We'll use SoftwareSerial to communicate with the HC12:
#include <SoftwareSerial.h>

SoftwareSerial MySerial(2, 3); // RX, TX

#include <Wire.h>
#include <SPI.h>
#include <Adafruit_Sensor.h>
#include <Adafruit_BME280.h>

#define SEALEVELPRESSURE_HPA (1013.25)

Adafruit_BME280 bme; // I2C

float ff;
float addff;
float hh;
float addhh;
float addhin;
float f;
float h;
float p;
int x;
int y;
int z;

void setup() {
  Serial.begin(9600);
  MySerial.begin(9600);
  bme.begin(0x77);

} // end setup

void loop() {
  // location of sleep mode seems to have desired effect, must be at top of code.
  for (int i = 0; i < 65; i++) {
    LowPower.powerDown(SLEEP_8S, ADC_OFF, BOD_OFF);    // 8s is max for low.power lib, but with a 65 loops = 10mins
  }
  for (z = 0; z < 2; z++) {          // needed to set at least 2 runs, serial data does not always send on just one
    for (x = 0; x < 20; x++) {       // increased sample size to 20 to minimize spikes in data effecting average
      delay (500);                   // small delay to allow DHT to start and collect data
      int cc = (bme.readTemperature());
      ff = (cc * 9.0 / 5.0) + 25.0;
      addff = ff + addff;

      hh = (bme.readHumidity());
      addhh = hh + addhh;

      float hpa = (bme.readPressure() / 100.0F);
      float hin = hpa * 0.0295299830714;
      addhin = hin + addhin;

    } // end for x loop

    for (y = 0; y < 1; y ++) {
      f = addff / 20;
      h = addhh / 20;
      p = addhin / 20;
      Serial.print("Humdity: ");
      Serial.print(h);
      MySerial.write(h);
      Serial.print(" %");
      Serial.print("  Temp: ");
      Serial.print(f);
      MySerial.write(f);
      Serial.print(" deg/F");
      Serial.print("Baro: ");
      Serial.print(p);
      MySerial.write(p);
      Serial.print(" hpa");
      Serial.println("");
    }
    addff = 0;                   // clear old added data, otherwise number just keeps getting larger...
    addhh = 0;
    addhin = 0;
  }
} // end loop
Arduino Code for Receiver:
/*
  Using HC-12 (long range wireless) modules.
  To transmit and receive information from DHT-11 (temp, humidity sensor).
  Originally used Xbee's (but they are expensive).
  Had several issues with the coding. Forgot to identify "MySerial" in both send and receive code.
  Also connected RX and TX to wrong pins (2 and 3 on Arduino).
  Getting data now. But it seems a bit confusing, cannot distinguish between humidity and temperature.
  Solved by telling transmitter to Serial.write(variable).
  Tried adding an analog read to measure rain via ADC, this caused the data to be mixed.
  Removed the rain detector.
  Added a RTC clock to indicate time and date of temp/humidity.
  Having issues setting the date and time.
  The only thing that sets correctly is year, time follows but is wrong.
  Replaced clock onboard battery.
  This fixed the problem.
  Had issue with some digits in minutes not displaying.
  Tried doing some math fixes, this only caused more troubles.
  Also had issue with time error between RTC and PC.
  Removed all math fixes and enabled rtc.adjust line to run everytime in setup.
  This fixed both issues.
  Replaced DHT-11 sensor with BME280 (Barometer, temperature and humidity) sensor. This uses I2C serial communication.
  All its data outputs in meteric.
  Also replaced 5W solar panel with 20W panel.
  Daylight savings time messed up onboard clock time. Pulled battery and reloaded sketch.
  Added a OLED display and LiPo battery pack.
  After realizing Im not viewing or using my PC, I set the time at a specific time/date versus using the PC time/date.
*/

#include <SoftwareSerial.h>
#include <Wire.h>
#include "RTClib.h"
#include <Adafruit_GFX.h>
#include <Adafruit_SSD1306.h>

SoftwareSerial MySerial(2, 3); // RX, TX
RTC_DS1307 rtc;

#define OLED_RESET 4
Adafruit_SSD1306 display(OLED_RESET);

//#if (SSD1306_LCDHEIGHT != 64)
//#error("Height incorrect, please fix Adafruit_SSD1306.h!");
//#endif

void setup() {
  MySerial.begin(9600); //begins HC-12 to receive serial data
  Serial.begin(9600); //begins PC serial data
  Wire.begin(); // begins RTC serial data

  display.begin(SSD1306_SWITCHCAPVCC, 0x3C); // Initialize with the I2C addr 0x3D (for the 128x64)
  display.setTextColor(WHITE);

  //rtc.adjust(DateTime(2016, 11, 20, 19,45,00)); // once this is SET, remark out this statement and reload.
  display.clearDisplay();
  display.setTextSize(1);
  display.setTextColor(WHITE);
  display.setCursor(0, 0);
  display.println("Initializing...");
  display.display();
  delay (500);
}

void loop() {
  DateTime now = rtc.now(); // get time and date from RTC

  if (MySerial.available() > 1) { // checks to see if HC-12 is receiving data.
    for (int x = 0; x < 1; x ++) { // run once. Keep in mind transmitter actually sends twice.
      int h = MySerial.read(); // read humidity value
      int f = MySerial.read(); // read temperature value
      float p = MySerial.read(); // read barometeric value

      display.clearDisplay();
      display.setTextSize(1);
      display.setTextColor(WHITE);
      display.setCursor(0, 0);

      display.print(now.year(), DEC);
      display.print('/');
      display.print(now.month(), DEC);
      display.print('/');
      display.print(now.day(), DEC);
      display.print(' ');
      display.print(now.hour(), DEC);
      display.print(':');
      display.print(now.minute (), DEC);
      display.println("");
      display.println("");
      display.print("Humidity:    ");
      display.print(h);
      display.print(" %");
      display.println("");
      display.print("Temperature: ");
      display.print(f);
      display.print(" ");
      display.print(char(248)); // degree symbol
      display.print("F");
      display.println("");
      display.print("Barometer:   ");
      display.print(p);
      display.print(" Hg");

      display.display();

    }
  }
  MySerial.flush(); // flush serial data
  delay(100);
}
Downloads:
Download the hook-up schematic for receiver.
Download the hook-up schematic for transmitter.


![Toni Kroos là ai? [ sự thật về tiểu sử đầy đủ Toni Kroos ]](https://evbn.org/wp-content/uploads/New-Project-6635-1671934592.jpg)


