
Wi-Fi (Internet) Disconnects After Sleep or Hibernation on Windows 10/11 | Windows OS Hub
I have noticed a strange thing: my brand new Lenovo laptop loses Internet connection over a Wi-Fi adapter after waking up from sleep or hibernation. The network connection status shows “No internet access” or “Limited” after waking up. For some reason, the wireless adapter cannot automatically connect to my home Wi-Fi access point, and the list of available wireless networks is empty. If I correctly restart Windows with the shutdown -f –r -t 0 command, Windows automatically connects to my Wi-Fi network and I can access the Internet at once as usual. The issue is quite annoying because I need to restart the laptop several times a day
In this post, I will show you how I managed to fix the problem of losing the Wi-Fi connection in Windows 10 or 11 after resuming from sleep or hibernation.
Mục Lục
Update or Roll Back the Wi-Fi Adapter Drivers
Prior to moving to the next method, try to download and install the latest version driver for your Wi-Fi adapter drivers from the vendors’ website. If the Wi-Fi disconnection issue appeared suddenly on your Windows device, Windows probably recently automatically updated your wireless adapter driver. So, you should try to use an older version of the driver that remained in the local driver repository on your computer (see this driver rollback example).
If you have found a suitable driver and the Wi-Fi connection is not lost with it, it is recommended to prevent Windows from automatically updating the driver for this device.
Disable Power Saving Mode for Wireless Adapters in Windows
By default, the power saving mode is enabled in Windows for most classes of hardware. Windows can automatically turn off devices in order to save laptop battery power. Try to disable the power-saving mode for your wireless network adapters. Possibly due to incorrect firmware or driver, your wireless NIC adapter cannot resume after waking up from sleep mode.
- Open the Device Manager (
devmgmt.msc); - Expand the Network Adapters section and find your Wi-Fi adapter (usually it has Wireless or 802.11 in its name), then open its properties;
- Go to the Power Management tab and uncheck Allow the computer to turn off this device to save power. Save the changes by clicking OK.
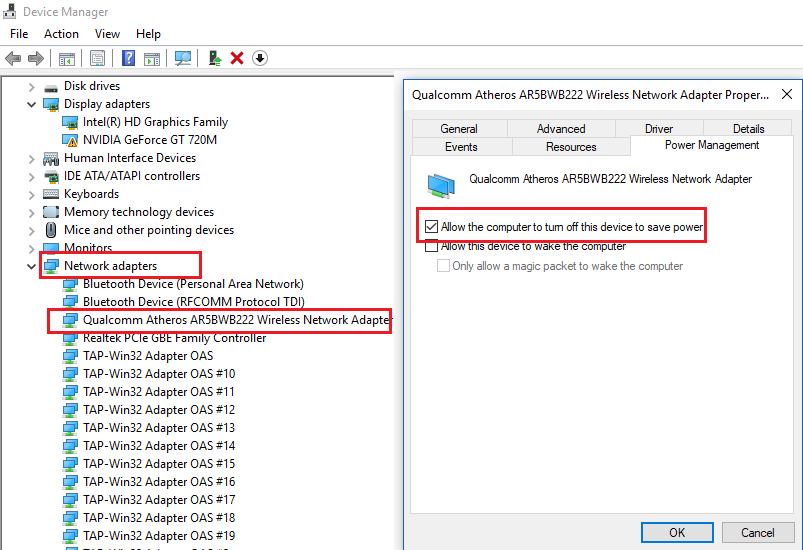
If you have multiple network adapters in your computer/laptop, including the Ethernet NICs (for example, Realtek PCI-E Controller), you must disable power saving mode in their properties as well.
It is also recommended to change power-saving options. Go to the Control Panel -> Power Options -> Change plan settings -> Change advanced power settings -> Wireless adapter settings -> Power saving mode -> set Maximum performance.
You can quickly access the Power Options dialog. Press Win+R -> and run the command:
control.exe powercfg.cpl,,3

You can change the power saving mode using the commands:
- On battery:
Maximum Performance: powercfg /SETDCVALUEINDEX SCHEME_CURRENT 19cbb8fa-5279-450e-9fac-8a3d5fedd0c1 12bbebe6-58d6-4636-95bb-3217ef867c1a 0 - Plugged in:
Maximum Performance: powercfg /SETACVALUEINDEX SCHEME_CURRENT 19cbb8fa-5279-450e-9fac-8a3d5fedd0c1 12bbebe6-58d6-4636-95bb-3217ef867c1a 0
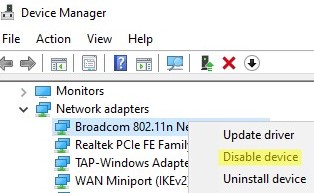
Disable and Enable Wi-Fi Adapter in Windows
In some cases, disabling and enabling the Wi-Fi adapter in Device Manager can help resolve the issue.
- Open the Device Manager console;
- Find your Wi-Fi network card in the Network Adapter section;
- Right-click on it and select Disable device;
- Then click again and select Enable Device.
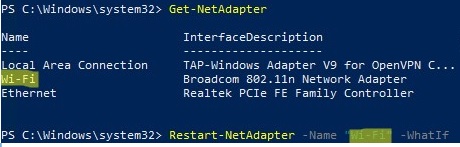
If the Internet connection is restored after re-enabling the wireless NIC, try restarting the network interface of your Wi-Fi adapter using PowerShell. List available network adapters using PowerShell:
Get-NetAdapter
Find the name of your Wi-Fi adapter, and use it in the following command to restart the wireless network interface:
Restart-NetAdapter -Name your_wi-fi_adaptername -Confirm:$false
You can create a text file on the desktop with *.bat extension and code:
powershell.exe -noprofile -executionpolicy bypass –Command "Restart-NetAdapter -Name your_wi-fi_adaptername -Confirm:$false"

Now, after waking up from sleep mode, all you have to do is click on your restart-wifi.bat file and run it as an administrator. This will restart your wireless network connection.
If you’re getting the Can’t connect to this network error when connecting to a saved Wi-Fi network , follow the steps in this article.
Restart WLAN AutoConfig Service on Windows
In my case, all methods discussed above did not help. As it turned out, the problem was related to the WLAN AutoConfig service.
WLAN AutoConfig service is used on Windows to manage wireless connections (Wi-Fi and Bluetooth). It is the WlanSvc that is responsible for detecting, connecting, and disconnecting from wireless networks. Also, it allows to create software access point (Hotspot) on Windows. If you stop the service, Windows won’t be able to see wireless networks and connect them.
After waking up from Sleep, open the list of services on your computer (Win+R -> services.msc) and find “WLAN AutoConfig” in the list. Make sure that it is configured to start automatically. Try to restart it. In my case, I couldn’t do it. When trying to restart/start the service, the following message appeared:
Windows could not start the WLAN AutoConfig service on Local Computer.
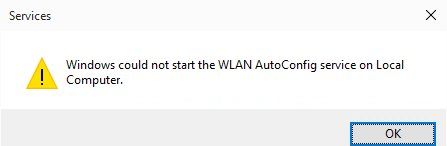
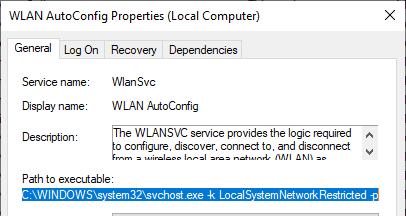
The WlanSvc starts successfully only when the computer is restarted. I found out that the svchost.exe process of WlanSvc hangs on after hibernation and sleep. It is C:\windows\system32\svchost.exe -k LocalSystemNetworkRestricted –p (you can see this path in the service properties).
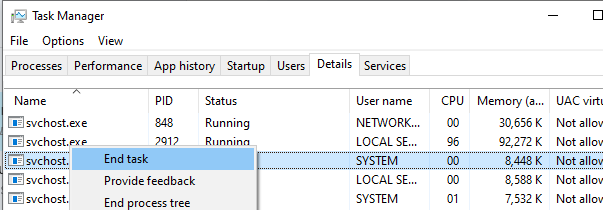
Try to kill the process with the Task Manager (Ctrl+Shift+Esc). Find Service Host: Local Service -> WLAN AutoConfig in the Processes tab, select Details in the context menu and end the process by clicking End Task. You should then be able to start the WlanSvc service from the service management console or using PowerShell:
Start-Service -Name WlanSvc -PassThru
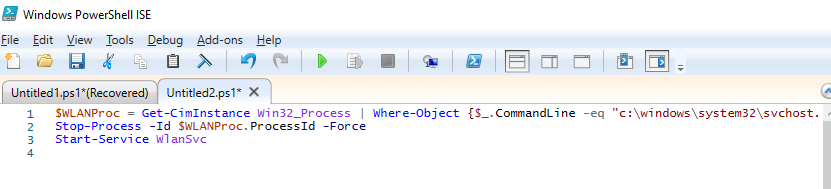
I wrote a simple PowerShell script to run as administrator when Windows wakes up from hibernation or sleep. The script restarts the WLAN AutoConfig service:
$WLANProc = Get-CimInstance Win32_Process | Where-Object {$_.CommandLine -eq "c:\windows\system32\svchost.exe -k LocalSystemNetworkRestricted -p"}

Stop-Process -Id $WLANProc.ProcessId -Force

Start-Service WlanSvc
You may also need to restart your Wi-Fi adapter:
restart-netadapter -InterfaceDescription 'your_wireless_adapter_name' -Confirm:$false
1 from the Power-Troubleshooter source in the System log (this event appears in the Event Viewer after the wakeup from hibernation or sleep mode).
You can automatically run a script on a Windows Event trigger by binding it to an event with codefrom thesource in the System log (this event appears in the Event Viewer after the wakeup from hibernation or sleep mode).
It is the last method that helped me to fix the issue with the loss of the Wi-FI network after waking up from sleep on Windows 10.
Additional fixes you can try if your laptop loses Internet (Wi-Fi) connection after sleep


![Toni Kroos là ai? [ sự thật về tiểu sử đầy đủ Toni Kroos ]](https://evbn.org/wp-content/uploads/New-Project-6635-1671934592.jpg)


