
The Perfect Beginner’s Guide to Google Display Ads Setup
If you are looking for an efficient way to do online marketing, the term “Google Display Network” probably came out at some point in your research. However, to make a smart decision, you need to know what are the benefits of using the Google Display Network and how to advertise on Google.
To help you out, we have put together a step by step guide on setting up and running your first Google Display Network campaign. Before we jump right into it, let’s take a moment to see what a Display Network is and how it can help your business.
Introduction
Google Display Network and Google Search Network are two comprehensive Google’s advertising platforms. While Google Search Network only allows you to place your text ads in the search engine results, Google Display Network has substantially farther reach by enabling you to reach people in various places.
Google Display Network ads can appear when people are browsing websites, watching YouTube videos, or while using their favourite mobile app. Before we jump into the details, let us first answer the question, “What is a Google Display Ad?”
Well, Google Display ads are visual banners. They can load on all sites and apps that are part of Google Display Network. They appear as any other banner online and can help you engage target customers or clients with the familiarity card. Here’s an example of how Google Display Ads look like.

Why is GDN advertising useful?
Consider the benefits of using the Google Display Network. First of all, Google Advertising Network is huge. At the moment, it encompasses more than 2 million websites and over 650,000 mobile apps. If you are looking for a way to expand the reach of your digital marketing initiatives, Google can help you do it.
Secondly, GDN reaches more than 90% of all internet users worldwide. With a reach this large, you’ll increase your target audience, establish a better position within your market, and even penetrate new markets.
How to Set Up & Launch a Google Display Network Advertising Campaign
Using GDN and setting up your first campaign can appear daunting. However, if you follow the next steps, you will be able to do it hassle-free. Let’s create your first Google Display Campaign. Create an account on Google and log in to Google Ads.

Once you log in, click on the “New Campaign” button.
Step 1: Campaign goal

After you click on the “New Campaign” button, you will be able to choose your campaign goal. Choosing a goal is important for two reasons. First, the campaign goal has to be in line with your business marketing goal. For example, if you want to increase brand awareness, choosing “Sales” as a campaign goal will not bear results.
- Sales – the best for driving sales online, in-app, by phone, or in-store;;
- Leads – the best for increasing lead generation and a conversion rating;
- Website traffic – the best for increasing website traffic;
- Product and brand consideration – the best for encouraging people to explore your offer;
- Brand awareness and reach – the best for building awareness and reaching more people;
- App promotion – the best for getting more app users;
- Local store visits and promotions – the best for driving visits to a local store
- Create a campaign without a goal’s guidance – launch a campaign without Google’s help (not recommended for beginners);
Secondly, once you select your campaign goal, Google will use your option to suggest the most optimal campaign settings to reach your goal efficiently. Let’s select “Website Traffic” as an example. This expands the options and allows you to choose the campaign type – choose “Display.”

Step 2: Choosing A Campaign Subtype
Now you get to select a campaign subtype. A campaign subtype will determine where your ads will appear and whether you’ll have access to settings and targeting or you want to let Google automate campaign optimisation for you. It’s essential to choose the right subtype at the start because you won’t be able to change it later.
Please note that, if you, as a marketer, want to change the subtype in the future, you will need to set up a new campaign.

There are four campaign subtypes you can choose from:
Standard display campaign
This campaign subtype comes with minimal automation and provides you with complete control of your campaign settings. If you are running a brand new Google Ads account with no history of campaigns, this will be your recommended option. You will need some time to set it up, but you get to control everything ranging from bidding to targeting options in return.
Smart display campaign
This campaign subtype comes with the perk of Google’s automation. Google uses cutting-edge technologies to automate campaign optimization, bidding, and targeting. This option is perfect for marketers who don’t have that much time on their hands but still need results. However, you need to have some historical data on your account to have access to this option. If you don’t, the option won’t even load for you.
Here are some examples of historical data:
- Minimum of 100 conversions for smart search campaign
- 50 conversions on the Display Network for smart display campaign
- An audience of at least 100 users for smart shopping campaign
Gmail campaign
If you want your ads to appear in your prospect’s Gmail inboxes, this campaign subtype is the perfect option for you. Gmail campaign will enable you to market your services and products in an engaging and non-intrusive way through your customers’ personal email accounts.
Engagement ads
Engagement ads campaign subtype is available only if you select the “Product and brand consideration” goal. This campaign subtype lets you run and test engagement ads for your Display campaigns. You’ll be able to bid and pay for these ads only if a user engages with the ad. They are perfect for cross-selling and branding when you want to reach custom-defined audiences.
Once you’ve selected the campaign’s goal, type, and subtype, you should click on “Continue.”
Step 3: Name Your Campaign

Now, you will be able to name your campaign. It may appear convenient to give it some generic name, especially if it’s your first campaign. However, once you have several campaigns up and running, it will become difficult to tell them apart. That’s why it’s smarter to keep a name relevant to its goal. For our “website traffic” goal, a good name for a campaign would be “website name + traffic.”
Step 4: Set location & language
Are your potential customers living in Japan? Do they speak English or some other language? Location and language settings will help you better target your ads. Google will automatically set the region to your region. You can change it to a relevant location yourself.

You have the option to go with your location, enter a new location, or go with all countries and territories.
Refine your location targeting by clicking on “Location options.”

You can see “People in, or who show interest in, your targeted locations” as a recommended option. However, it will also include people not actually living in the target location. If you choose the “People in or regularly in your targeted locations,” you’ll only target people who actually live in your target location.
There is also have the option to exclude locations to refine your targeting further. It basically tells Google not to display your ads to people living in specific areas. It can help you save on ads that don’t affect your conversion rating.

Google also enables you to target by language. The default setting is English, meaning that your ads will load only to users with English settings. Edit the language setting if your customers speak a specific language.
Step 5: Select A Bidding Option
Google will always take your bidding settings to determine whether to show your or your competitors’ ads to customers. This is why most marketers think that this is the most important step in setting up a GDN campaign.
Google has a smart wizard to help you with recommending the best and most optimised bidding strategy for your goal.

As you can see, Google automatically selected “High-Quality Traffic” for “What do you want to focus on?” and “Automatically maximize traffic” for “How do you want to get high-quality traffic?” based on our campaign goal “Website traffic.”

However, you should know that there are different bidding strategies that become available should you choose a different goal. You can access some of them if you click on “Or, select a bid strategy directly.” Let’s quickly go through all of them so you can know how to devise a bidding strategy for Google Display Network:
- Manual Cost-Per-Click (CPC) Bidding – this bidding strategy enables you to set bids manually. You will probably have to do it a couple of times first before you have the historical data Google needs to power smart bidding;
- Enhanced CPC – this bidding strategy will adjust your bids automatically to help your ad get into Google auction if Google assesses that your ad will most likely result in a conversion;
- Target Cost Per Action – this strategy tries to maximise the number of conversions near the amount of how much you want to spend on a conversion action;
- Target Return On Ad Spend – a smart bidding strategy that aims to achieve a pre-set return on your ad spend;
- Viewable Cost Per Thousand Impressions (CPM) – a bidding strategy tailored to help you achieve your brand awareness goals via ad impressions;
- Maximise Clicks – this strategy enables you to get maxim clicks for your campaign budget;
- Cost-Per-Engagement – this strategy allows you to bid when users actually engage with your ads.
Step 6: Determine your budget
Google Display Network allows you to set your campaign budget and have complete control of your expenses. Thanks to this setting, you can minimise the expenses and benefit from almost free advertising on Google. The best thing about it is that you can always come back to change this setting and optimise your budget.

Setting the budget is extremely important because you don’t want to end up with your entire fund being dried out in a single day. You can set and later edit your daily, monthly, and total budget.
Daily Budget
A daily budget refers to a sum that you are willing to spend in one day. In most cases, you won’t end up spending your daily budget. However, Google’s smart bidding strategy and algorithms may deem your ad highly effective in terms of driving positive engagement. If this is the case, Google will automatically exceed your daily budget.
An important thing to note is that, although the daily budget will be exceeded, you won’t be charged more than your average daily budget multiplied by the average number of days in a month. This applies to all Google Ads campaigns.
Monthly Budget
A monthly budget stands for a sum that you are willing to spend in one month. Unlike the daily budget, which Google can exceed on occasion, your monthly budget will never be exceeded. At the end of the month, you’ll be charged the exact amount you specified.
Total Budget
Unlike daily and monthly budgets, which are tied to a specific time frame, the total budget is tied to your campaign. You can set the total budget for a specific ad campaign. It’s a good way to control the total cost of a campaign. It can be used for advertising specific offers and short-term deals.
If you are running a non-profit, you should know that you can access free advertising on Google, thanks to Google Ad Grants.
Step 7: Rotating Your Ads
Google enables its users to rotate their ads. It’s a convenient option that allows you to control how often an ad appears relative to the rest of your ads in a campaign. The recommended option here is “Optimize: Prefer best performing ads.”

Google uses a specific algorithm to assess the performance of your ads relevant to your campaign goal and automatically chooses an ad that performs the best.
Step 8: Scheduling Your Ads
If you don’t schedule your ads, they will run on the default setting, which is “always.” In other words, as long as there are funds in your budget. It’s not an optimal optimization practice because it’s not cost-efficient. The opportunity to schedule your ads is quite valuable, to say the least.
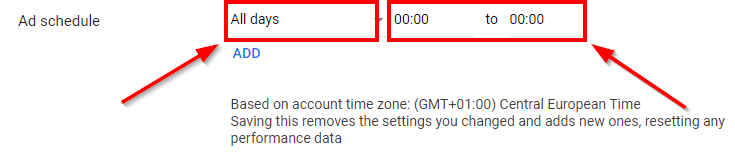
You can target specific times. For instance, schedule the ads when your prospects are most active online. Later on, you can always come back to assess your ad performance and re-schedule them for better results. As you can see in the screenshot above, you can set the days of the week, as well as the time intervals for the ads to run.
For instance, let’s say that you are running an emergency night dental office. You will definitely benefit from ad scheduling, since you can set up your ads to appear at night.

“Start and end date” setting enables you to set when you want your GDN campaign to start and to end. The default setting is for the campaign to run indefinitely. If you are marketing a limited-time offer, you should use the setting to set a time limit for your campaign.
Step 10: Choosing device types
Google Display Network allows you to choose the device types on which your ads will run. This setting is necessary because your ads won’t show the same on all screen sizes. For instance, some ads that load perfectly on large screens may be cropped or load funny on mobile devices.
If you want to make sure that your ads load perfectly on all intended devices, you should consider making desktop and mobile-specific ad campaigns.
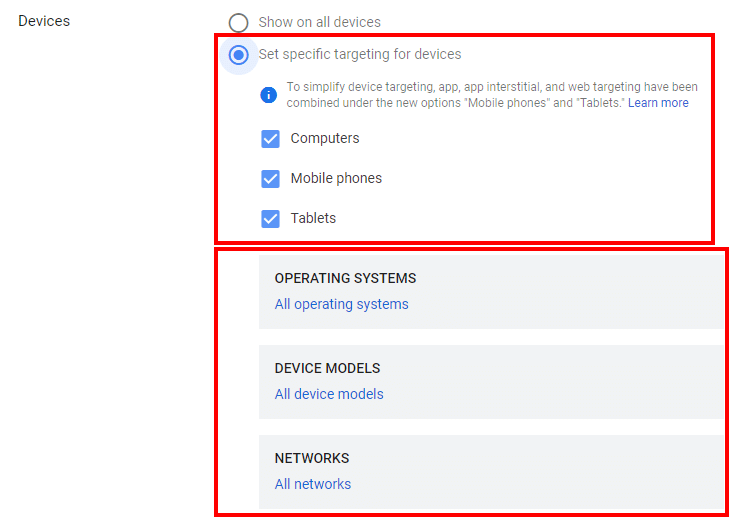
As you can see in the screenshot above, Google delivers unparalleled device targeting. Besides the device type, you can also choose the operating systems, device models, and networks.
Step 11: Set frequency capping
Frequency capping refers to a limit of how many times a prospect can see your ad. It’s a very important setting, as it can cut down the expenses of running your camping and use the funds to display ads to people with a higher chance of converting.

This setting also prevents the phenomenon of ad fatigue from occurring. Ad fatigue refers to a situation when prospects see your ad so many times that they begin to see it as spam. The most optimal setting for a general use case is 2-5 times per day.
Step 12: Setting Content Exclusions
Do you want your ad to appear on just any type of websites in the Google Display Network? An ad appearing on a website that’s not in line with your brand values and vision can affect your brand image. If you want to prevent it, you should definitely set content exclusions.

The “Content exclusions” setting allows you to opt-out of showing your ads on websites that feature content not in line with your branding efforts.
Step 13: Targeting

Targeting is the bread and butter of Google Delivery Network advertising. It will help you reach the right target audience and get your marketing message across successfully. Let’s quickly tackle all targeting options you have:
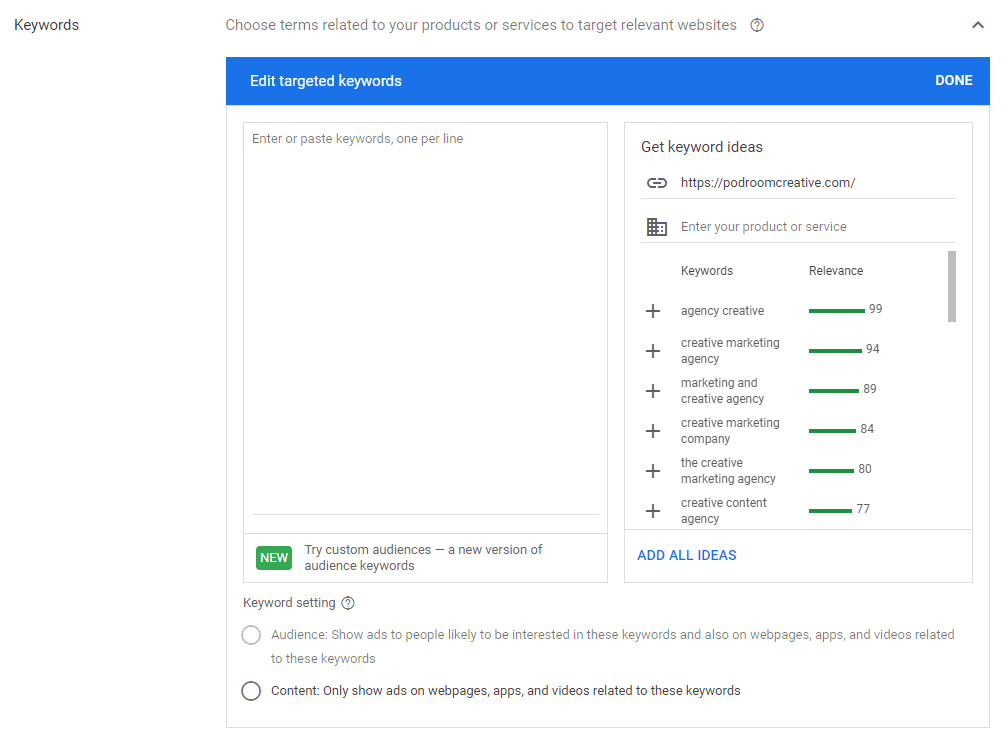
- Content keyword targeting – this targeting option will enable you to target where your ads will appear based on the keywords that summarise your services, product, or brand (you can use Google Keyword Tool to find relevant keywords).
- Custom intent audience – with this targeting option, you’ll be able to target people who are more likely to convert.

- In-market audience targeting – great for targeting people that are already in-market, interested in purchasing your products and services.
- Affinity audience targeting – provides the best results for raising awareness in the affinity groups that already have an interest in your brand, products, and services.
- Topic targeting – this targeting option synergises with keyword targeting to help you reach a very specific audience. It can do wonders if you are trying to build brand awareness in several audience segments.

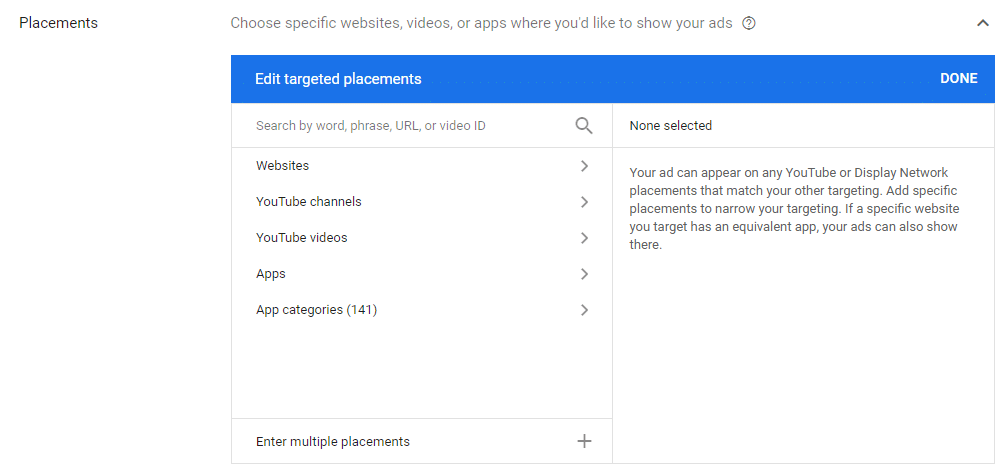
- Placement targeting – placement targeting enables you to run your ads on specific websites. Google will use your business type information to offer you a list of relevant places.
To find out more about search targeting, check out this Ultimate Search Targeting Guide.
Step 14: Display Ad Components

Every add on Google Display Network has different components, including:
- Images – Google Display Network allows you to use up to two images for your ad. Images should be relevant to your brand, product, or service.
- Videos – You can add video content to your ad and attach a unique feature image that will appear as a video thumbnail.
- Headline – the headline is a title your ad will run with. It’s limited to 30 characters and to up to 5 headlines per ad.
- Long Headline – you can add one headline per your ad, and it is limited to 90 characters. You can use it to disclose more details about your company or offer.
- Description – description is limited to 90 characters, and it should inspire people to take action. You can have up to 5 descriptions per ad (a unique description for every headline).
- Business name – this field contains the name of your brand or company.
- Advanced URL Options – in this field, you should enter your tracking template information.
- More Options – if you click on this dropdown menu, you’ll be able to access colour options and customisation to make your ad unique and more prominent.
After you submit every ad component, you’ll have to choose a primary ad format type. Ad format types can be the following.
Image Ads
Image ads are great for capturing prospects’ attention. They are often used for building brand awareness. They can be resized and reshaped to fit different spaces in websites’ layouts, which makes them the most used ad format type. You are required to submit at least 1 square and 1 landscape image.
Text Ads
Text ads can help you reach out to customers who don’t like it when someone disrupts their browsing experience. They can help you maintain a non-intrusive brand reputation while still getting closer to your goals.
Native Ads
Native ads are the ads that are retrofitted to complement the look and feel of a website they appear on. They blend perfectly with the content of the website and have no to very little impact on user experience.
Dynamic Search Ads
Remarketing with Google ads is made possible thanks to Dynamic Search Ads. They allow you to use the content already on your website to create a compelling ad copy. You can upload your offer directly to Google, and the platform will create the best possible offer for every individual prospect. You can also target cookie data to remarket products and services to your clients.
Tips for Optimising GDN campaigns
One of the most important things to know about using GDN campaigns to advertise your products or services is – management is a must-do. GDN campaigns are not set in stone. You can fine-tune your settings to achieve the best results and accomplish your specific goals. The following tips will help you get on top of your GDN campaigns like a pro.
Assess The Performance of Demographic Segments
Not all segments of your target audience will respond well to digital marketing. In fact, some of your efforts might not even reach them. It’s the main reason why you’ll sometimes see some GDN campaigns performing poorly.
To optimise your campaign, you need to go back to your demographic and location targeting settings. Take a look at the performance of all segments to be able to calibrate the campaign if necessary.
Assess Placement Performance
Once you launch the campaign, Google will automate the rest of it. However, you still have control of your campaign and can significantly improve cost efficiency and performance. To start, review where your ads are appearing. Go to “Placements -> Where Ads Showed.”
Filter the placements by unusually high CTR or spend. It will help you identify websites that drain your campaign budget and offer very little when it comes to CTR. If you are considering excluding sites in bulk, you should export web placements within the timeframe of “all time.”
You should leave the websites that appear once with just a couple of impressions. Focus on excluding duplicate placements. However, before you do, it assesses the relevance of these websites, how much they cost you, and how many conversions they generate. It will also help you refine your bidding strategy for Google Display Network.
Consider the Role of Ad Style and Location in Campaign Performance
You can use two ad types in your CDN campaigns – standard image ads and responsive ads. A standard ad can only display an image, while a responsive or smart ad can contain both text and image. Unfortunately, you can’t know in advance which display ad yields the best results for your campaign.
The study results point us to a rule of thumb. Apparently, 300 x 250 and 728 x 90 ads generate more impressions than other ad sizes. Large rectangle ad formats, including half-page ads, generate more CTRs than other ads. You should consider using these formats as a beginner and track their performance on a day-to-day basis.
Conclusion
Great job, you made it! You’ve successfully created your very first campaign on Google Display Network and now know how to advertise on Google. As you can see, the process is not as hard as you’ve previously imagined. Thanks to the size of Google Display, you’ll be able to reach more prospects than ever. With a little bit of practice in targeting, you’ll be able to reach prospects who want to buy from you.
If you still feel like you need help with setting up your Google Display Network campaign, feel free to reach out to our friendly and experienced Singapore Google Ads consultants. We are also rated by many as the best SEM company in Singapore that has proven records to delivering results!


![Toni Kroos là ai? [ sự thật về tiểu sử đầy đủ Toni Kroos ]](https://evbn.org/wp-content/uploads/New-Project-6635-1671934592.jpg)


