
Solved: Macbook Connects to Wi-Fi but Has no Internet Connection – AppleToolBox
Your MacBook is definitely connected to Wi-Fi, so why is there no Internet connection? Find out what’s going on and how to solve it in this short troubleshooting guide.
Related:
Why is my MacBook connecting to WiFi but not to the Internet?
Your MacBook might be on Wi-Fi but with no Internet connection for a range of different reasons. It could be down to your router, your Internet service provider, or your MacBook software.
Whatever the cause of your problem, you should be able to fix it with our tips below.
How can my Mac have WiFi but no Internet?
We often use the terms interchangeably, but your Wi-Fi is not actually the same as your Internet connection. Wi-Fi connects you to a local network. And usually, that network connects to the Internet.
Your router has an ethernet cable connected to the back of it. If you were to unplug that cable you’d lose Internet connection. But you’d still be able to connect to the Wi-Fi network.
How do I fix when there’s no Internet connection on my MacBook?
The first thing to do is to restart your MacBook and your wireless router. You should restart your router even if other devices can connect to the Internet.
If you haven’t already, try connecting your MacBook to a different Wi-Fi network. Go to school, work, the library, or a friend’s house and see if you can get online there.
If you can, the problem is with your personal network. Contact your Internet service provider for help on how to fix it.
Otherwise, follow our steps below to troubleshoot problems with your MacBook.
1. Forget your Wi-Fi network then reconnect
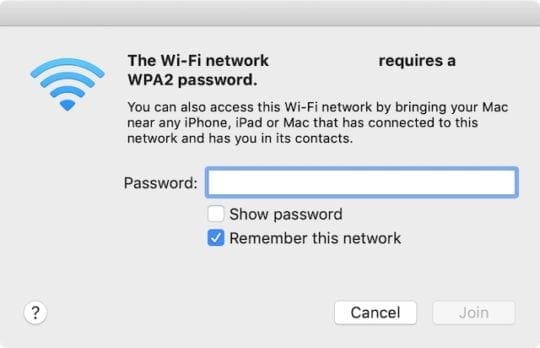
Don’t do this unless you know the password for your Wi-Fi connection. Otherwise, you won’t get back online even if the Internet is working.
- On your MacBook, go to System Preferences > Network.
- Click on Wi-Fi in the sidebar, then Advanced… in the bottom right.
- Select your Wi-Fi network in the list and delete it using the Minus (–) button.
- Click OK, then Apply.
- Now reconnect to your Wi-Fi connection and enter your Wi-Fi password.

It seems strange, but the wrong date, time, or location can affect the Internet connection on your MacBook. Correct them in the settings.
- On your MacBook, go to System Preferences > Date & Time.
- Click Time Zone and check the box to Set time zone automatically…
- If your MacBook selects the wrong location:
- Go to System Preferences > Security & Privacy > Privacy.
- Select Location Services in the sidebar.
- Check the box to Enable Location Services.

Some users can access the Internet by restarting their router or their MacBook. Often this doesn’t last long. But if you can get online, check for new macOS updates on your MacBook.
- On your MacBook, go to System Preferences > Software Updates.
- Wait for your MacBook to look for new updates.
- Download and install any available updates.
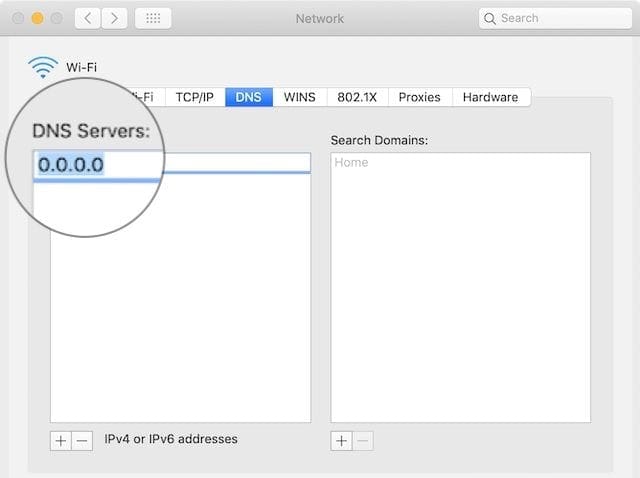
4. Change your Mac’s Domain Name System (DNS)
Domain Name System (DNS) servers map domain names to their Internet Protocol (IP) addresses and allow you to go quickly to websites and servers you visit frequently without typing the complete address.
Sometimes, changing the DNS provider from your Internet provider to a free public service like Google or Cloudflare helps your Mac connect swiftly to the internet.
Quickly switch your DNS on a Mac or MacBook
- Close any open web browser on your Mac before starting (Safari, Chrome, Firefox, and so forth)
- Go to Apple Menu > System Preferences > Network
- Select Wi-Fi and then choose Advanced
- Click the DNS tab
- Under DNS Servers, click the Plus button (+)
- Enter the IPv4 or IPv6 address for the DNS server you wish to change to. Examples include:
- 8.8.8.8 and 8.8.4.4 for Google Public DNS
- 1.1.1.1 and 1.0.0.1 for Cloudflare
- 208.67.222.222 and 208.67.220.220 for OpenDNS
- 8.26.56.26 and 8.20.247.20 for Comodo Secure DNS
- Once added, tap OK to confirm
5. Disconnect all your USB accessories

USB devices and other peripheral accessories connected to your MacBook should have shielding. Unshielded accessories can interfere with your MacBook’s Wi-Fi or Internet connection.
Unplug everything from your MacBook: mouse, keyboard, hard drive, etc. Then try connecting to the Internet again. If you can get online now, one of your accessories is causing the problem.
Reintroduce your USB accessories one at a time to find the troublemaker. Contact the manufacturer for help fixing it.
6. Run Wireless Diagnostics on your MacBook
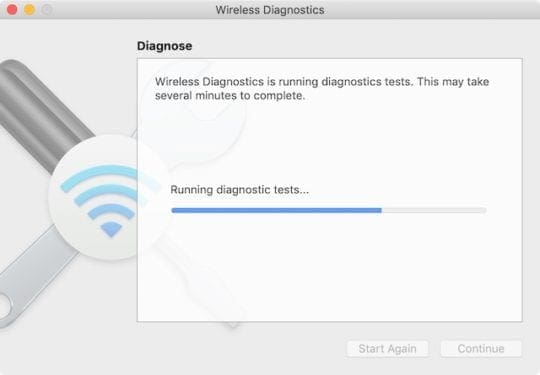
There’s a Wireless Diagnostics tool built into macOS. This diagnostics tool can’t fix all your Wi-Fi problems, but it can point you in the direction of a solution.
- Hold option and click the Wi-Fi icon in your menu bar.
- Select Open Wireless Diagnostics… from the drop-down menu.
- Follow the onscreen prompts to complete your diagnostics.
If you get an error code from the Wireless Diagnostics, find more information about it online.
7. Renew the DHCP Lease in Network preferences
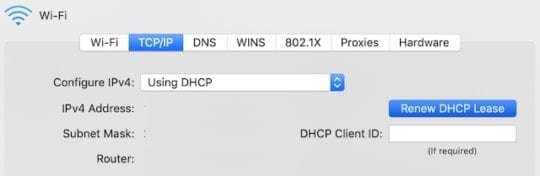
The Dynamic Host Configuration Protocol (DHCP) lets your network devices talk to each other. These devices include your router, MacBook, iPhone, or anything else on your network.
A problem with your DHCP Lease might be the reason your MacBook connects to Wi-Fi but can’t get on the Internet. The good news is it’s easy to renew the lease.
Your IP address might change when you renew your DHCP Lease.
- On your MacBook, go to System Preferences > Network.
- Click Wi-Fi in the sidebar, then click Advanced… in the bottom right.
- Go to the TCP/IP tab and click Renew DHCP Lease.
8. Create a new network location
The network location is usually set by your MacBook. But if something went wrong with this automatic selection, you can fix it yourself.
- On your MacBook, go to System Preferences > Network.
- Open the Location: drop-down menu at the top of the window.

- Select Edit Locations… and use the Plus (+) button to add a new location.
- Click Done, then Apply your new settings.
9. Remove Profiles from your MacBook
Apps and websites sometimes ask you to install Profiles on your MacBook. But bad Profiles can interfere with other processes on your computer, like the Internet connection.
- On your MacBook, go to System Preferences and look for a Profiles option.
- Remove every custom Profile.
- Restart your MacBook and try to connect to the Internet again.
10. Reset your network preferences
![]()
A common troubleshooting tip for Internet problems on iPhone is to Reset Network Settings. Unfortunately, there isn’t an easy Reset Network Settings button in macOS. But you can delete your preferences files instead.
This resets several settings on your MacBook, so make a backup first.
After you reset your network preferences, you will need to connect to the Wi-Fi network again.
- On your MacBook, click on the Desktop to highlight Finder.
- From the menu bar, click Go > Computer.
- Navigate to Macintosh HD/Library/Preferences/System Configuration.

- Delete the following files (you might not have them all):
- com.apple.airport.preferences.plist
- com.apple.network.identification.plist
- NetworkInterfaces.plist
- preferences.plist
- Settings.plist
- com.apple.airport.preferences.plist
11. Stop mDNSResponder from running
It seems unrelated, but one of the processes related to iTunes could be causing the problem. Some users have found the mDNSResponder is responsible for causing their internet problems.
You can stop the mDNSResponder from Activity Monitor. It should restart by itself without any problems.
- On your MacBook, open Activity Monitor from Utilities or using Spotlight.
- Go to the Network tab and click Process Name to sort the processes alphabetically.
- Find and select mDNSResponder.
- Click the octagonal Stop button in the top left of the window.

Hopefully, those tips got your MacBook connected to Wi-Fi and the Internet. Let us know which steps helped you fix your MacBook! We’ll be sure to keep this post updated with the best solutions.
And for those of you back online, check out this post to get even faster browsing by changing your DNS.

Dan writes tutorials and troubleshooting guides to help people make the most of their technology. Before becoming a writer, he earned a BSc in Sound Technology, supervised repairs at an Apple Store, and even taught English in China.


![Toni Kroos là ai? [ sự thật về tiểu sử đầy đủ Toni Kroos ]](https://evbn.org/wp-content/uploads/New-Project-6635-1671934592.jpg)


