
Smart Slider 3 set-up for blog slider – Designer Blogs
Image sliders are a great way to enhance the look of your blog, website, or even a post. Today I would like to show you how you can add and set-up Smart Slider 3 on your WordPress blog.
Mục Lục
Set-up Smart Slider 3 on your blog
Smart Slider 3 is a free plugin with a premium version available. All our premade, which includes slider comes with it already installed since it is part of our themes. We have a premium version available too which we usually include with our custom WordPress themes without any additional charges.
In this post, I will show you how you can install this slider on your WordPress or if you already have it, how you can set-up Smart Slider 3 to display your photos on the homepage or in your WordPress post.
Get the plugin
First thing you need to do before setting-up Smart Slider is installing it on your WordPress. It’s easy! To make it even easier below, you will find an image with all essential elements marked with red.
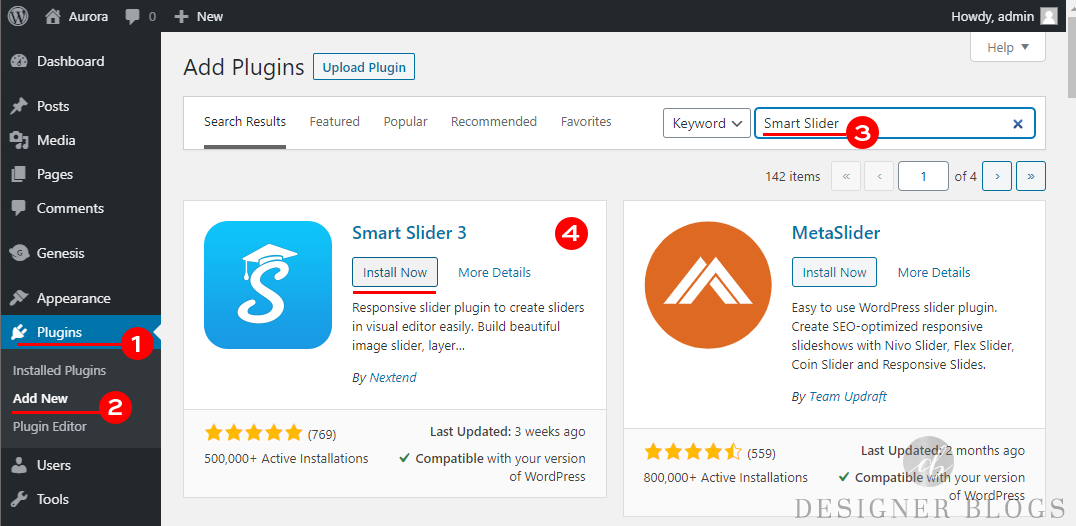
Go to your WordPress Dashboard, click on the Plugin tab on the left (#1), and from the drop-down list, pick ‘Add New’ (#2). In the new window right corner (#3), there is a place for typing in what you are looking for. Put ‘Smart Slider’ there, and you should see a Smart Slider 3 poping up as a first search result.
All you need to do is click ‘Install Now’ (#4) and ‘Activate’ once the button changes to the blue activate the button.
Congratulation! You have now successfully installed a slider plugin!
Create a slider
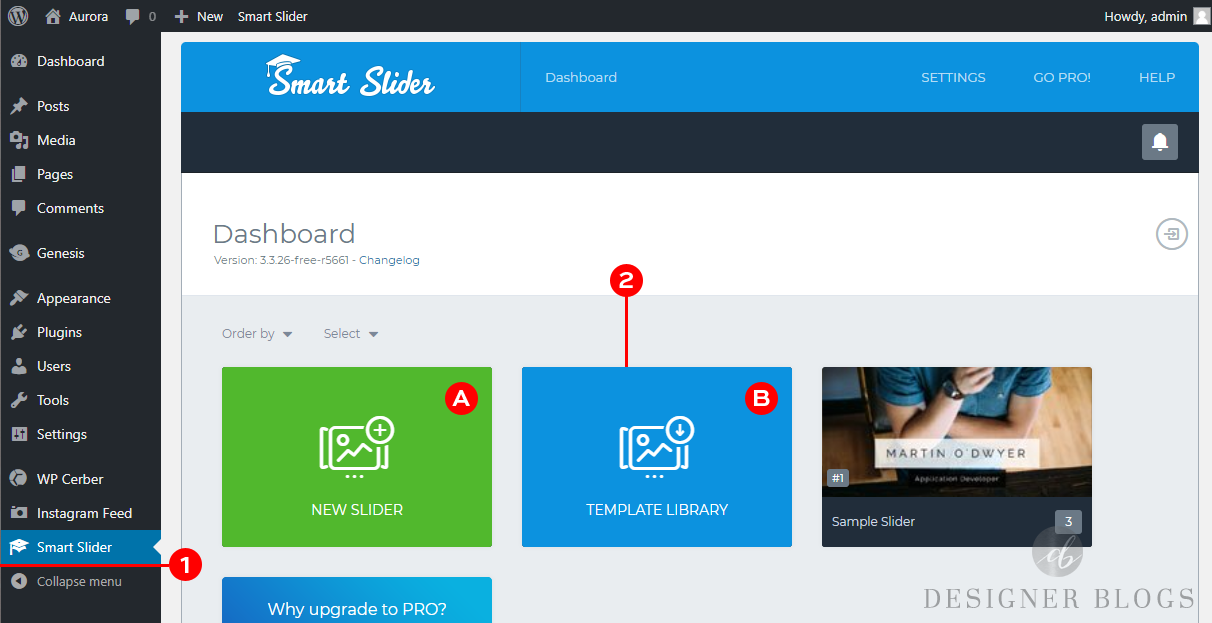
Once the Smart Slider 3 is installed, you will be able to find it under its tab on the left of your WordPress Dashboard.
There are lots of options available with this plugin; however you do not need to worry about them if you are just starting because the default setting will be just fine for now.
Take a look at the central area (#2) and decide if you want to create a slider from scratches (Option A for those picky and more advanced ones!) or use a premade template (Option B, recommended for beginners).
There is also a Sample Slider already created if you would like to play with it. All new sliders, which you will create, will appear here too.
In this post, we will focus on creating and editing a slider from scratches.
Creating a slider from scratches
This option will let you create any slider you need, consequently, it will require a little bit more work then basing on an already created layout. Clicking a large green button labeled ‘new slider’ will prompt the following pop-up window.
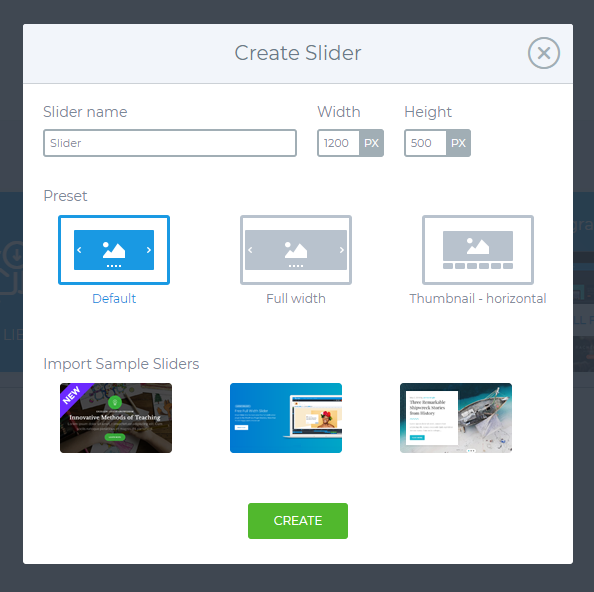
You can specify here your slider name, size and decide if you want it to be:
- Default – cover only the space of container it is in (we are using this type of slider on Rosalee theme)
- Full width – cover the entire width of your browser window (like on Aurora theme)
- Thumbnail – if you want thumbnails of your slides to be displayed under the main slider image
You will be able to change those later too, so the easiest way is keeping it all as it is and directly clicking ‘create’.
Editing your slider
Now you are editing a freshly created slider.
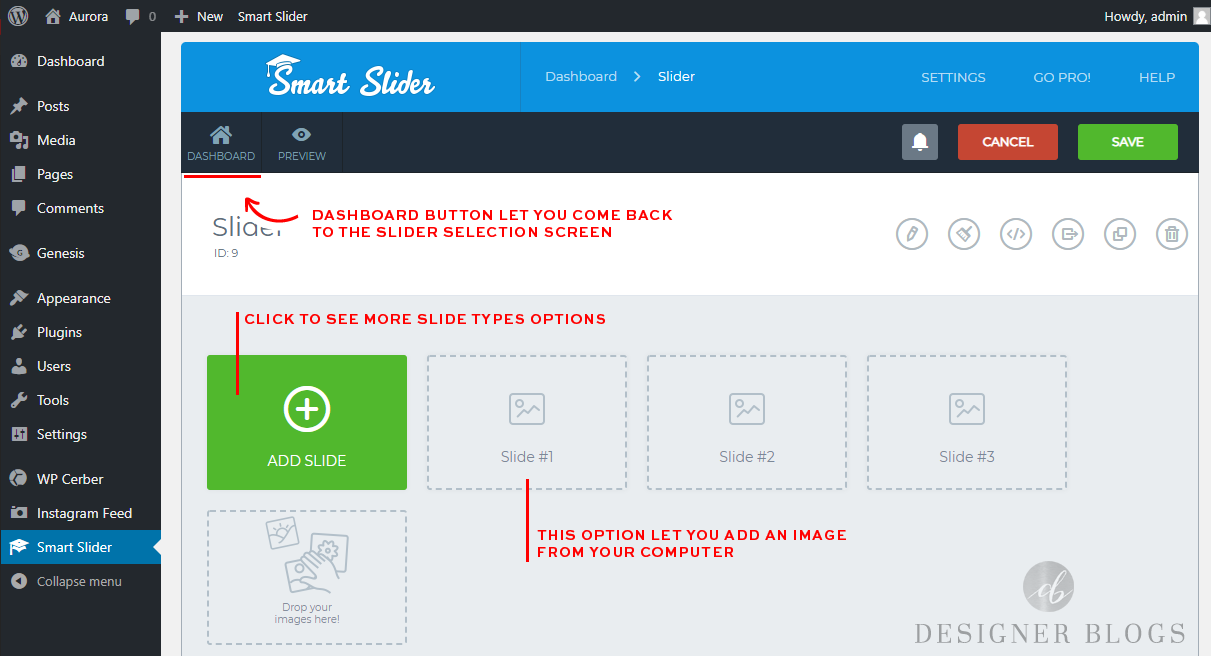
To add an image to it, you can drag and drop your photo into a grey slider area, or you can click on any from the top three rectangles with dashed borders.
Types of slides
For more slide options, you can pick a green ‘add slide’ button. It will allow you to select one of the following:

- Image – This is the same option as those showed before
- Empty – a slide with just a text
- Video – video slide which supports YouTube and Vimeo links
- Post – slide with one of your WordPress post or page
- Static Overlay – very specific kind of slide which will show over the top of all other slides. It is perfect if you want to have a photo slider with your logo over it
- Dynamic – use for the slider which will generate its content automatically, for example, recent posts slider
Once you add a slide, the main slider panel will change to show your new slides and general slider settings.
You can still add new slides using the ‘add slide’ button. To change the order of your slides you can drag and drop them.
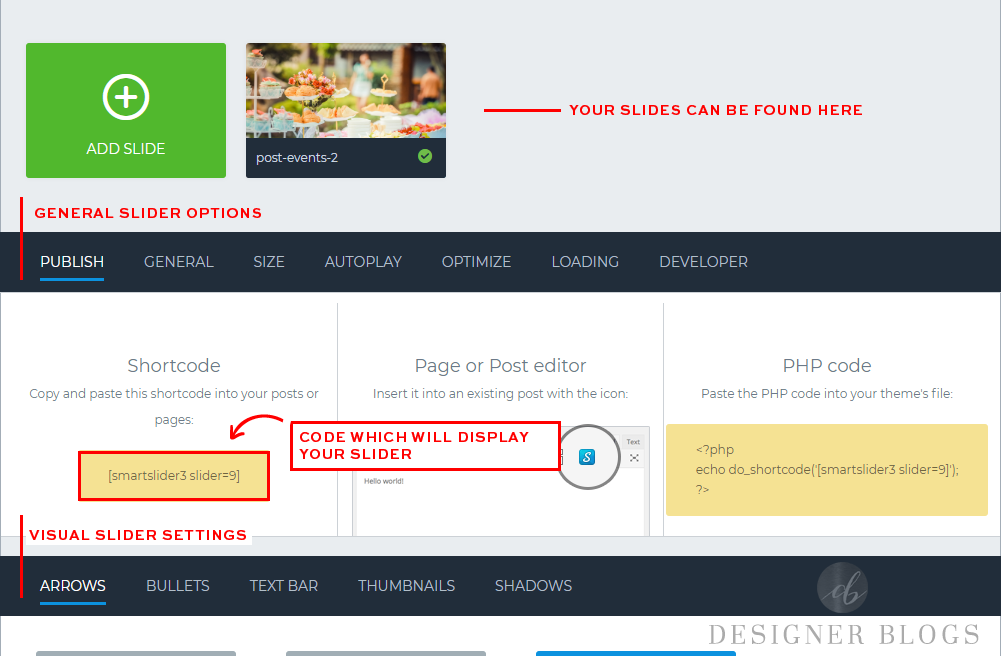
Slider settings
Each new slider has some default general and visual settings added so you can leave them as they are. You may consider checking:
- Autoplay – to make your slider play automatically if you want it to change photos on its own
- Arrows – to set up more fancy indicators for next and previous slide
- Bullets -to add small dots under your slider, which will let your visitors quickly access each slide.
When you are happy with your settings, remember to hit ‘save’ in the top right corner and use the ‘preview’ button to see your slider.

Here is how the slider with one image I just create look like with default settings:
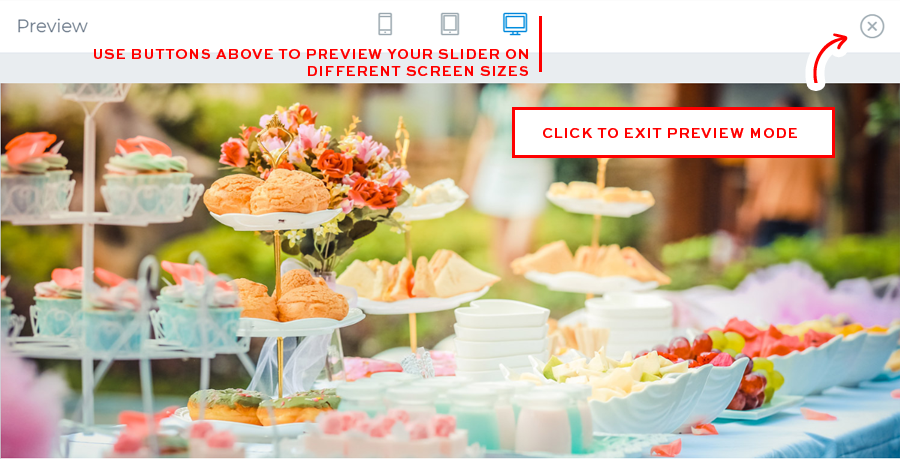
Now you can add more slides and add text to them if needed. Smart Slider 3 offers you lots of options, even with the free version. To access those available for your slides, exit the preview mode and hover the slider you want to edit.
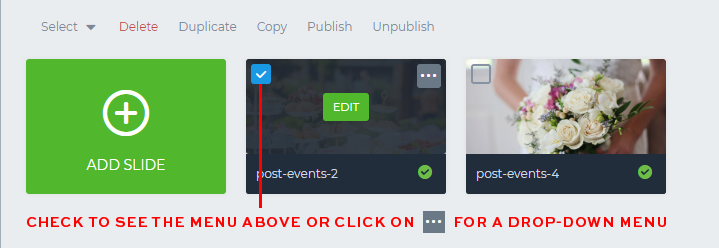
If you already have a slider created and set up by us, you can ‘Duplicate’ a slide instead of creating a new one
The green ‘edit’ button at the center of your slide will take you to the new screen, which will focus only on this slide.
You can add buttons, text, headings, and more images to your slides. It may require some practice before you will be happy with the results, but believe me that with Smart Slider, there are almost no limits (and they are not paying me for saying so! They do not sponsor this post!). Here is the look at your slide edition screen:
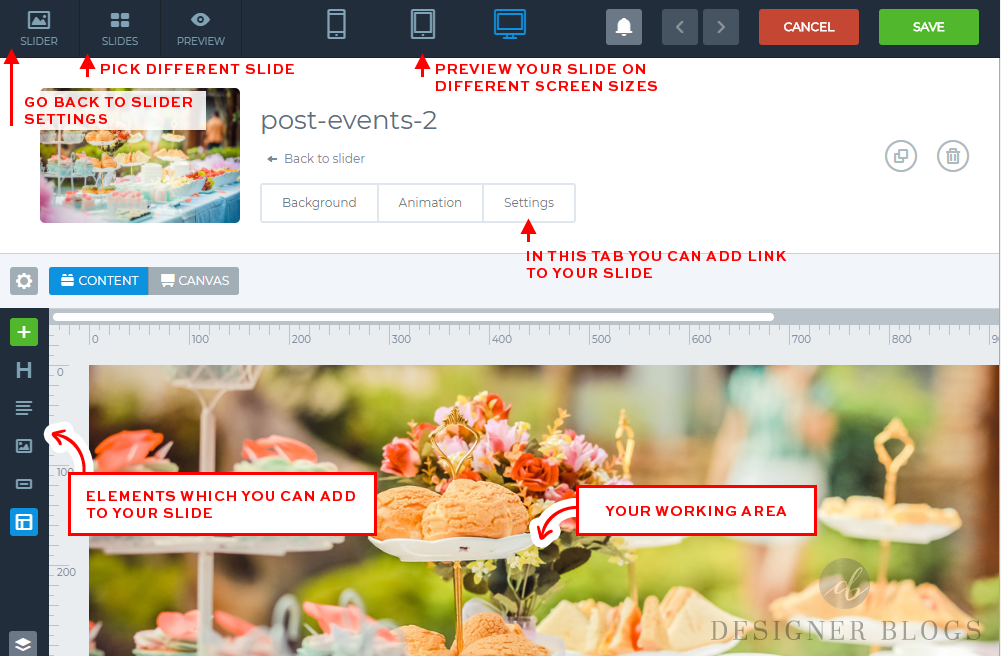
Remember always to click ‘save’ in the top right corner after you are done with editing your slide.
Once your slider is ready, you can add it to your blog or website as your Smart Slider 3 set-up is done!
Adding Smart Slider to your site
There are a few ways you can do so. If you want to add a slider to your site homepage, you will need a widget area for that. If your template does not have one, you can contact us or buy a widget area coding in our accessories shop as it may be a little bit difficult to add.
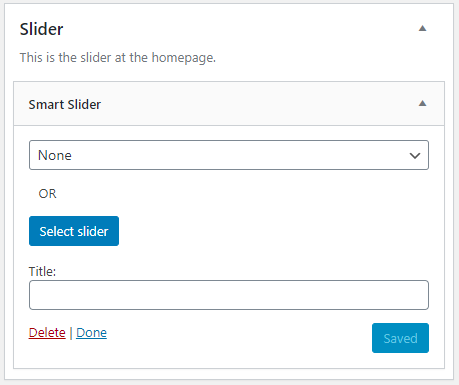
With the widget area ready, you can use a Smart Slider widget, which allows you to choose a slider from the drop-down list and add an optional title.
A slider will also appear everywhere where you add it’s shortcode. Feel free to copy/paste it to your post or Custom HTML widget area.
There is even a Gutenberg block for this slider, so make sure to give it a try.
Should I purchase a pro version of Smart Slider 3?
There is no right answer to that. To be honest, the free version is usually more than enough for beginners. If you are looking for options that are available only with a pro (specific slider templates or slides types), then you should invest in it. I bought my pro version over a year ago, and I was very skeptical about it at the beginning. I felt lost with the number of options it offers, and I couldn’t use its full potential. Now I LOVE it, and I can’t imagine working with any other slider and it is why I decided to write a post about it.
We include Smar Slider 3 with almost all our designs. I wanted to give you a tutorial on how you can edit the slides on your own as you often ask me about that.
Give it a try and support us
If you will decide to go with a Smart Slider 3 pro consider using a link from this post (you can click on any Smart Slider link in this post) as they are connected with our affiliate account. It will not cost you any extra and you can support us a little bit. I would be really thankful for that! I would never recommend a product that I’m not using by myself or which I did not test.
Show us your sliders
I hope this tutorial for setting up Smart Slider 3 was helpful. If you created any slider using it make sure to share a link to it in the comments below. I would love to see it!
P.S This post includes affiliate links. By clicking them you are supporting us. Thanks!


![Toni Kroos là ai? [ sự thật về tiểu sử đầy đủ Toni Kroos ]](https://evbn.org/wp-content/uploads/New-Project-6635-1671934592.jpg)


