Service Host Delivery Optimization High Network Usage Fix
Service Host Delivery Optimization Service, as the name suggests, is a service that optimizes the delivery of crucial updates on your system. It runs in the background on your system and consumes a very insignificant amount of resources. So, if you are seeing that this Service Host Delivery Optimization Service is consuming your network bandwidth abnormally (more than 2 Mbps) for a long period of time, there are some issues that you have to solve manually.
ADVERTISEMENT
Fix 1 – Set the connection as metered
If you set your connection as a metered one, the Service Host Delivery Optimization service will stop consuming network bandwidth.
1. At first, open the Settings window.
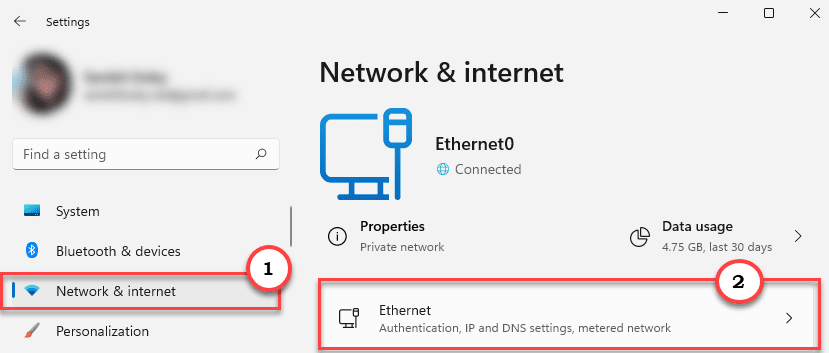
2. After that, tap on the “Network & Internet“.
3. Then, click on the network you are using (we are using an “Ethernet” connection).

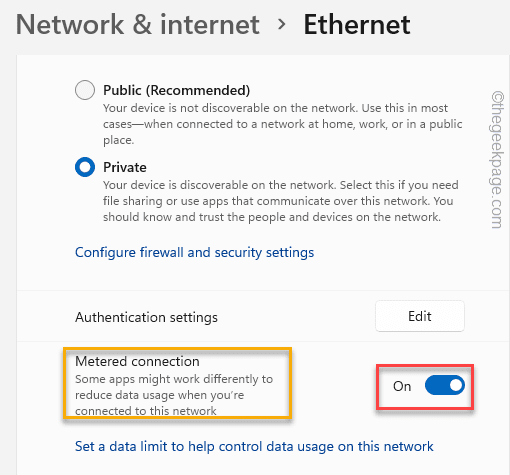
4. Then, scroll down through the right-hand side, and toggle the “Metered connection” settings to “On“.

After that, close the Settings window. This should solve the issue.
Fix 2 – Alter the Group Policy
There can be a policy in a place that is causing this issue on your system.
1. At first, press the Windows key+R keys together.
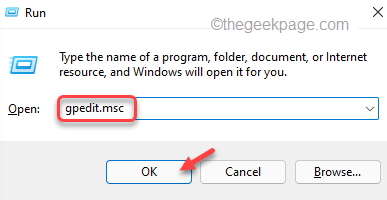
2. Then, type “gpedit.msc” and click on “OK” to open the Local Group Policy Editor.

3. When the Local Group Policy Editor opens up, go this way –
Computer Configuration > Administrative Templates > Windows Components > Delivery Optimization
4. When it opens up, look for the “Download Mode” on the right-hand side.
5. Then, double-click on the policy to open up.

6. Then, set the policy to “Enabled” to enable the policy on your system.
ADVERTISEMENT
7. After that, click on “Apply” and “OK” to save this policy setting.

8. Now, again go to this location in the Policy Editor –
Computer Configuration > Administrative Templates > Network > Background Intelligent Transfer Service (BITS)
9. Then, look for the “Limit the maximum network bandwidth for BITS background transfers” policy.
10. After that, double click on it.

11. Then, set the policy to “Enabled“.
12. Next, choose the “Limit background transfer rate (Kbps) to:” to “10“.

13. After that, tap on “Apply” and “OK“.

Once you are done, close the Local Group Policy Editor window and restart your system.
Check the status of the problem after restarting the system.
Fix 3 – Edit the registry
If the policy changes don’t affect the system, you can alter the registry using the Registry Editor.
1. At first, tap on the Windows icon and type “regedit“.
2. Then, click on the “Registry Editor” to access it.

Warning – You have to take extra care while editing the registry. We recommend you create a backup of the registry.
When the Registry Editor opens up, tap on “File“. Then click on “Export” to create a new registry backup on your system.

3. Now, expand the left-hand side this way ~
Computer\HKEY_LOCAL_MACHINE\SYSTEM\CurrentControlSet\Services\DoSvc
4. Then, double-click on the “Start” value on the right-hand side.

5. Set the value to “4“.
6. After that, click on “OK” to save the change.

After that, close the Registry Editor. Then, restart your computer to let this change the effect.
Fix 4 – Turn off Delivery Optimization
Downloading update packages from other computers can let Service Host Delivery Optimization consume high network bandwidth.
1. At first, press the Windows key+I keys together.
2. Then, tap on “Windows Update” on the left pane.
3. After that, click on the “Advanced options” on the right-hand side.
ADVERTISEMENT

4. After that, click on “Delivery Optimization“.

5. Then, set the “Allow downloads from other PCs” settings to “Off“.

Once you are done, close the Settings.
This stops your system from downloading Windows Update from other PCs in the background.
Check the status of the issue.
Fix 5 – Make sure the system is updated
You have to make sure that your Windows is updated.
1. At first, press the Windows key+I keys together.
2. Then, tap on the “Windows Update” on the left-hand side.
3. After that, click on “Check for updates“.

Windows will search for the available updates and install those.
4. After that, click on “Restart now” to restart the computer and complete the update process.

This will restart the system and complete the process.
Fix 6 – Disable Auto-updates in Store apps
The Service Host Delivery Optimization also runs to update the Store apps in the background of your system.
1. At first, launch the Microsoft Store.
2. Once Store opens up, tap on your account image at the top of the screen.
ADVERTISEMENT
3. Then, click on the “App Settings” to open it.

4. Then, set the “App updates” settings to Off status.

This should restrict that particular service from running in the background.
Fix 7 – Run SFC & DISM scans
Running the SFC and DISM scan should solve this issue if it is occurring due to corrupted system files.
1. At first, right-click on the Windows key and tap on the “cmd“.
2. Then, right-click on the “Command Prompt” and tap on “Run as administrator” to access it.

3. Now, copy-paste this command and hit Enter.
DISM.exe /Online /Cleanup-image /Restorehealth

Windows will run a DISM check.
4. Once you have done, paste this command and hit Enter to run an SFC scan.
sfc /scannow

After running these scans, you won’t face these problems again.
ADVERTISEMENT


![Toni Kroos là ai? [ sự thật về tiểu sử đầy đủ Toni Kroos ]](https://evbn.org/wp-content/uploads/New-Project-6635-1671934592.jpg)


