
Point Namecheap DNS to Flywheel
Updated on August 4th, 2022
Mục Lục
Note
This article is for customers who have purchased domains that are managed by Namecheap.
This article is for customers who have purchased domains that are managed by Namecheap. We have a general help tutorial as well as instructions for other domain providers here
Flywheel provides each site with an IP address to which domains can be pointed. This is useful if you own, for example, thisfinedomain.com, and would like it to resolve to a Flywheel site.
If you’re brand new to the world of domain names, some of the terminology may seem a little confusing. If you ever feel stuck, feel free to reference our Glossary of DNS terms.
Table of Contents
1. Add the domain to your Flywheel site and note the IP address
2. Log in to Namecheap
4. Add an A record
5. Add a CNAME record
6. Double-check your work
Note: DNS propagation times
Note: Custom nameservers
Add the domain to your Flywheel site and note the IP address
- From the site’s Overview tab, click the (+) icon in the Domains list to add the domain you’d like to point to Flywheel.
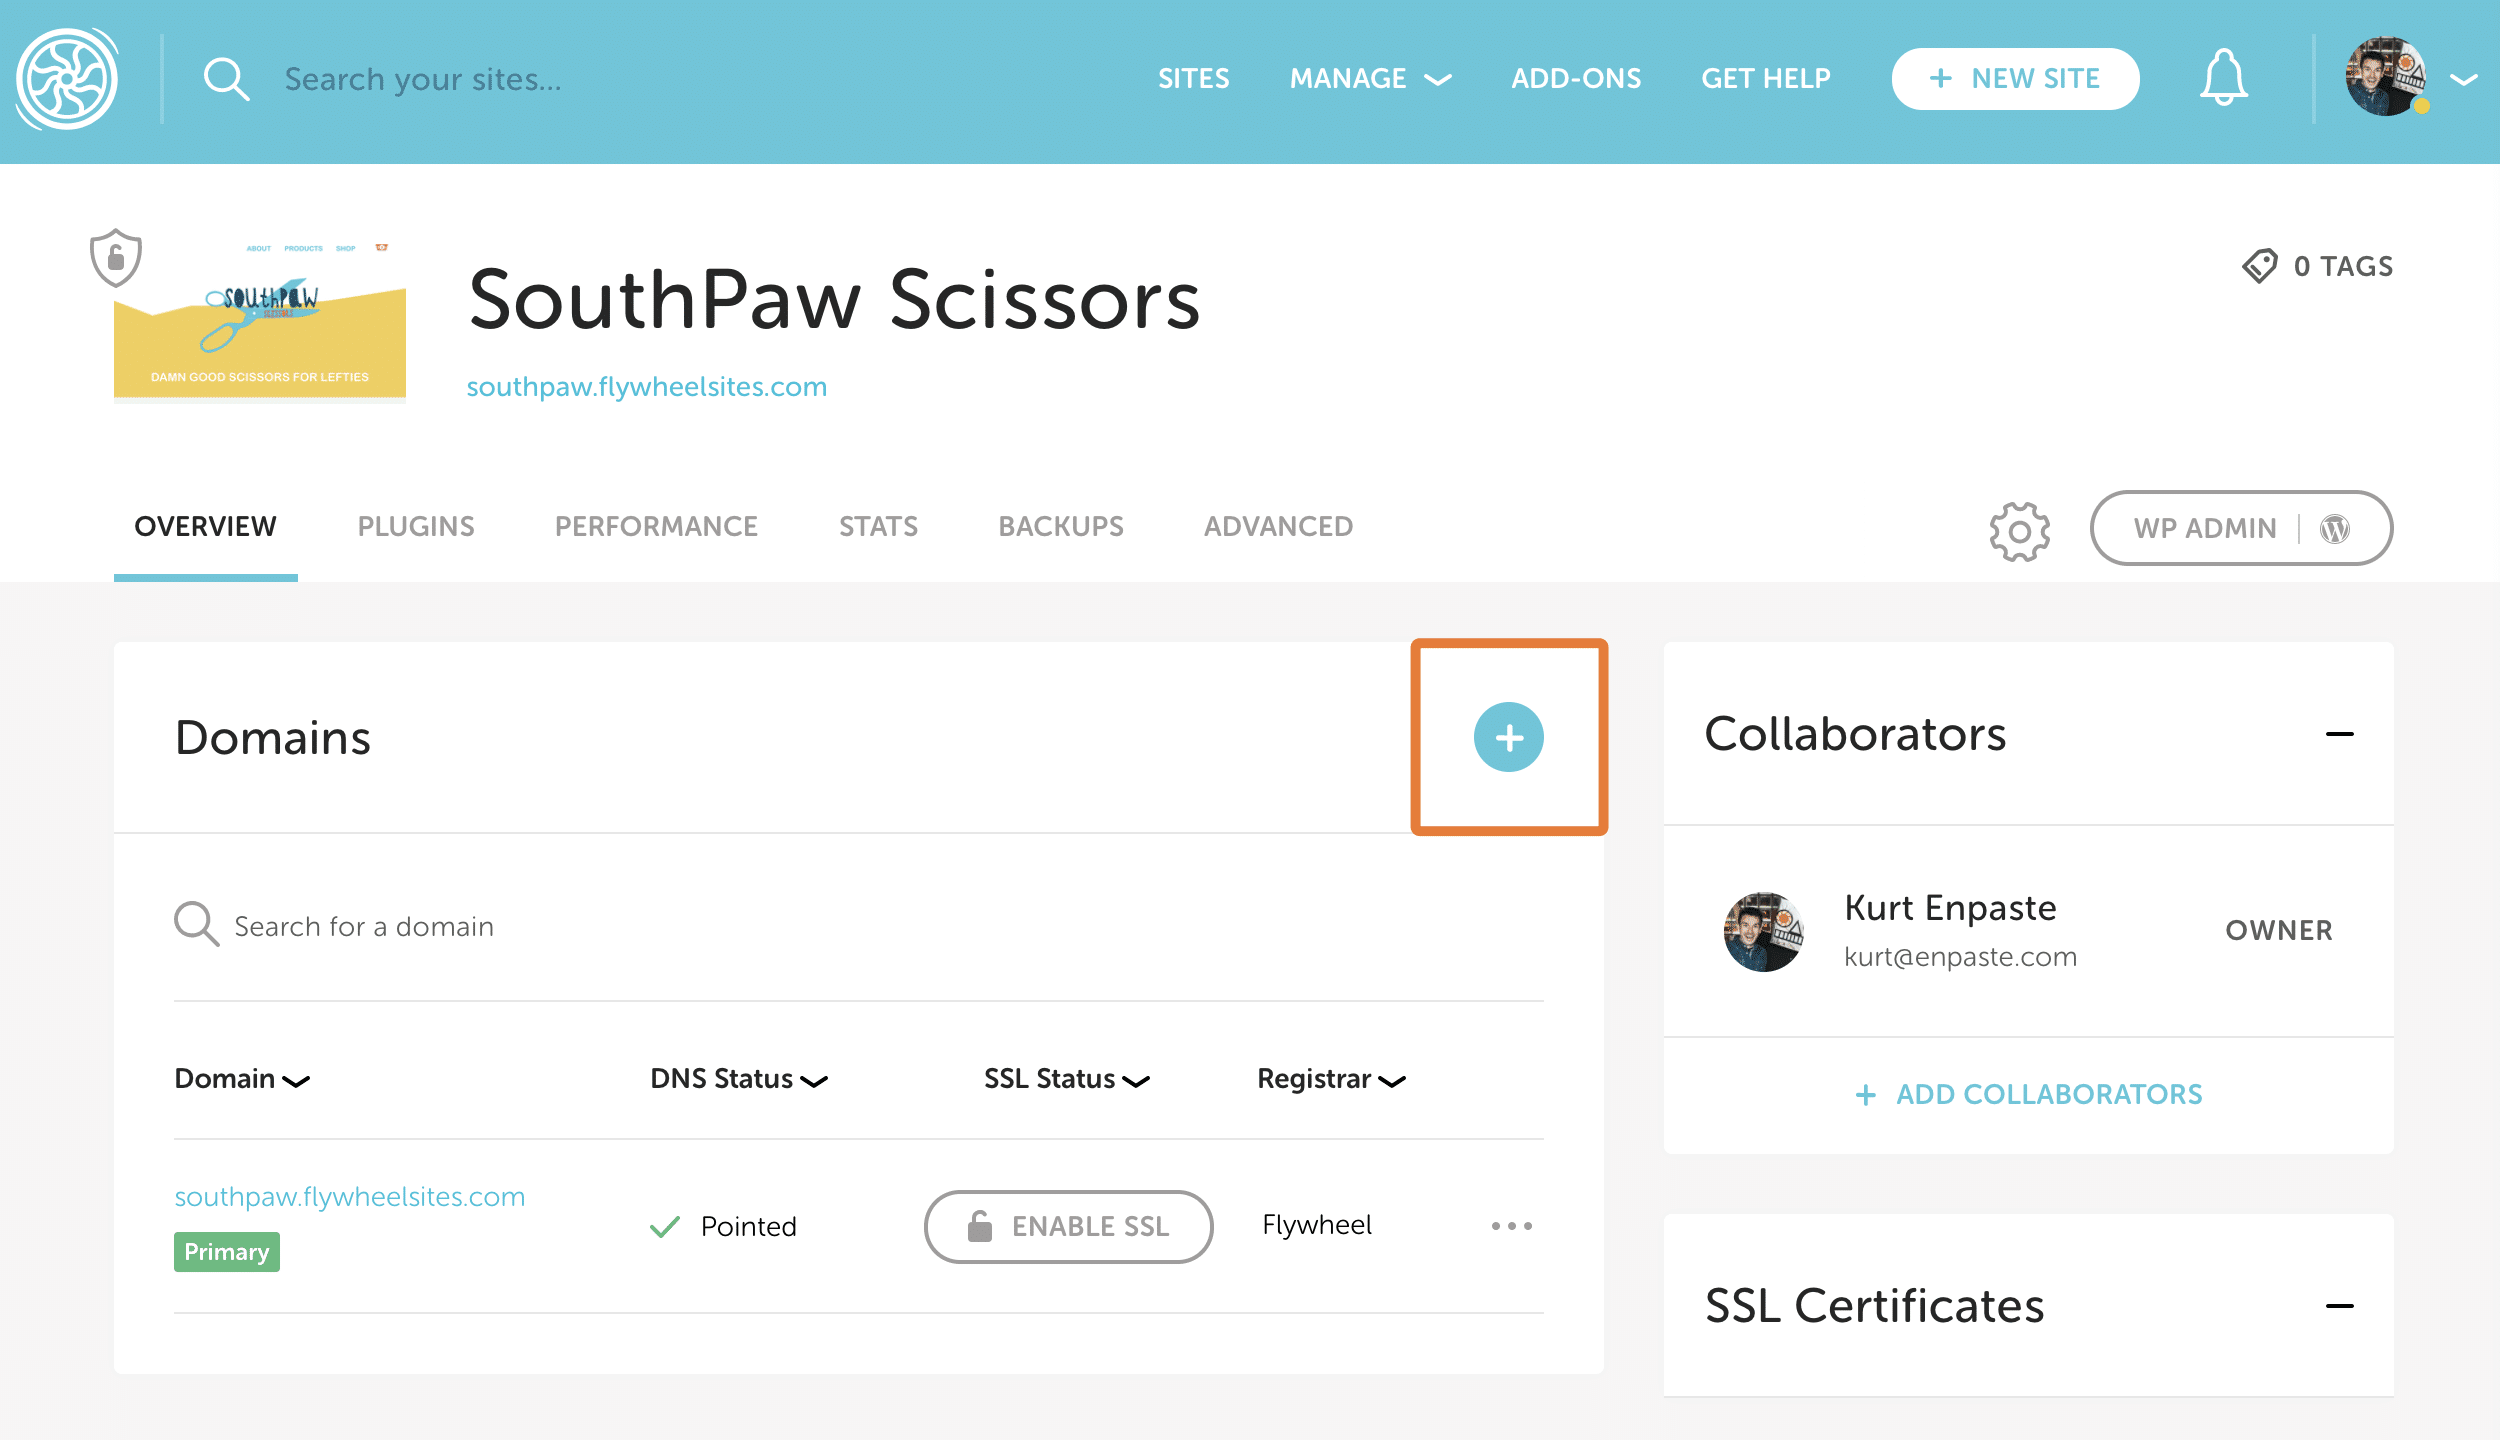
- Fill out the domain information:
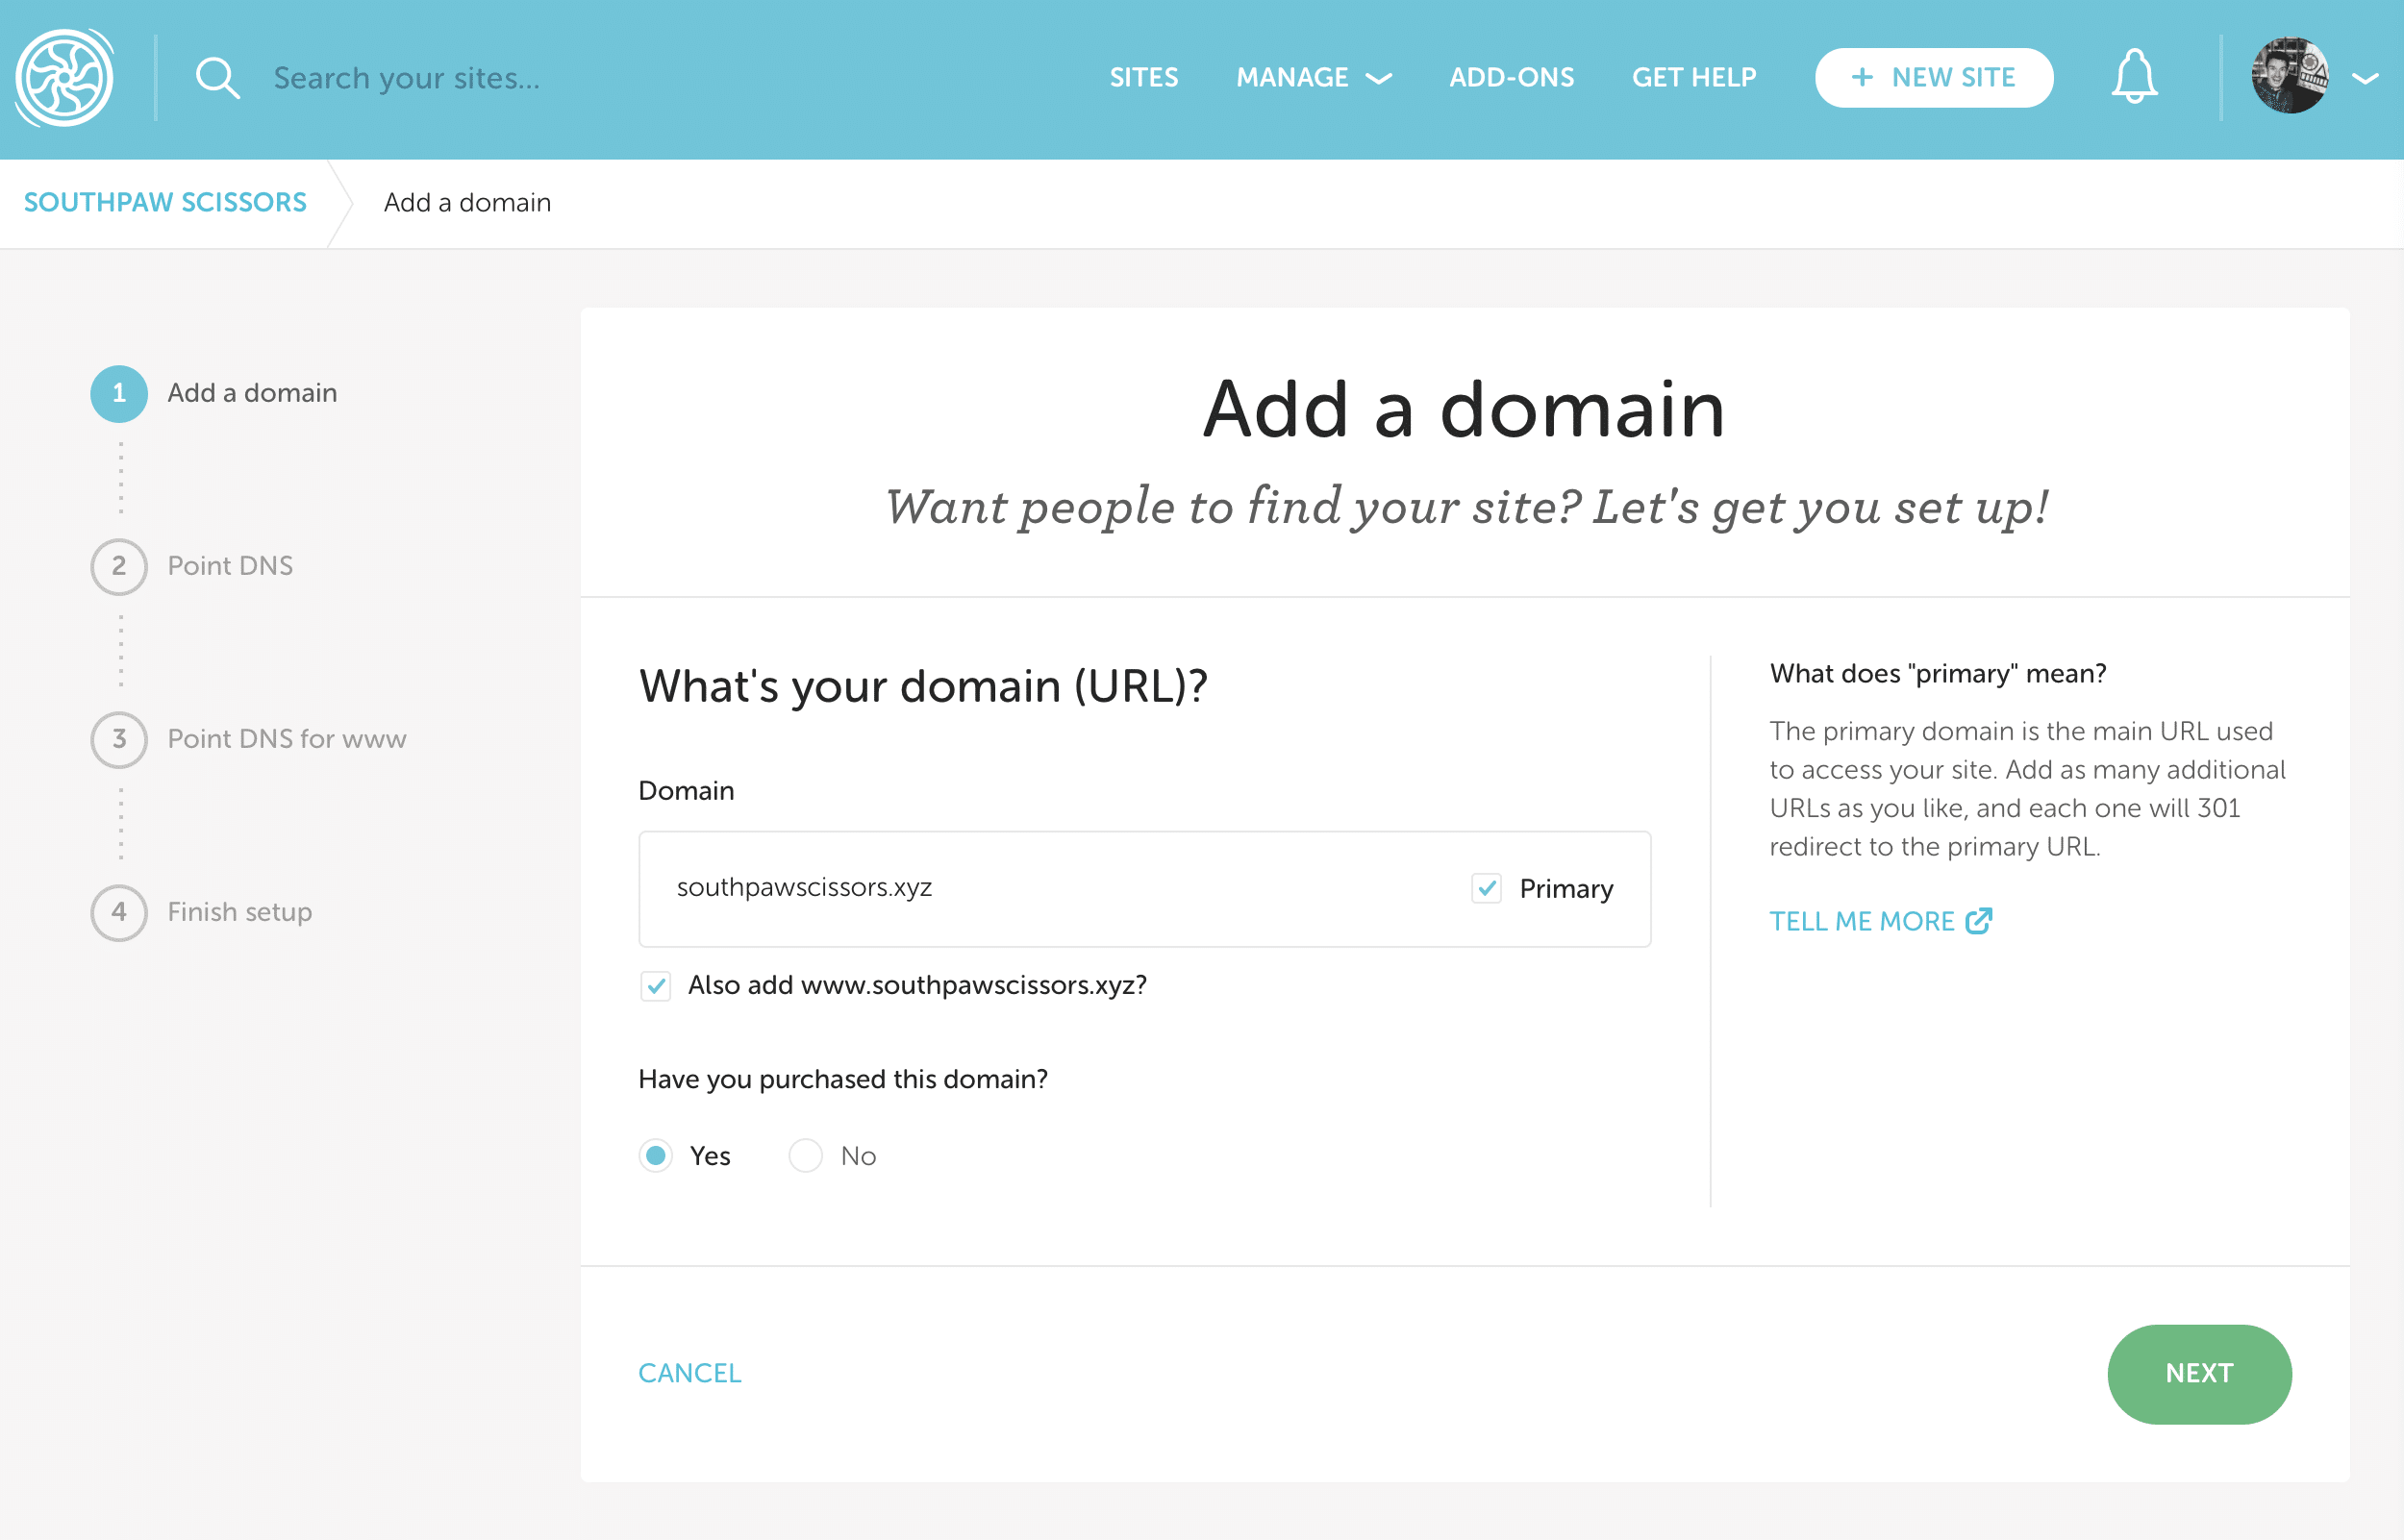
• Enter the URL in the Domain field
• Check the box to set the domain to Primary (if this will be your site’s main URL)
• By default, thewwwversion of the domain will be added (uncheck the box to skip this step)
• Select Yes for “Have you purchased this domain?”
• Click NextNote
In the background, our system will automatically update all appropriate URL references in the database to this new primary domain.
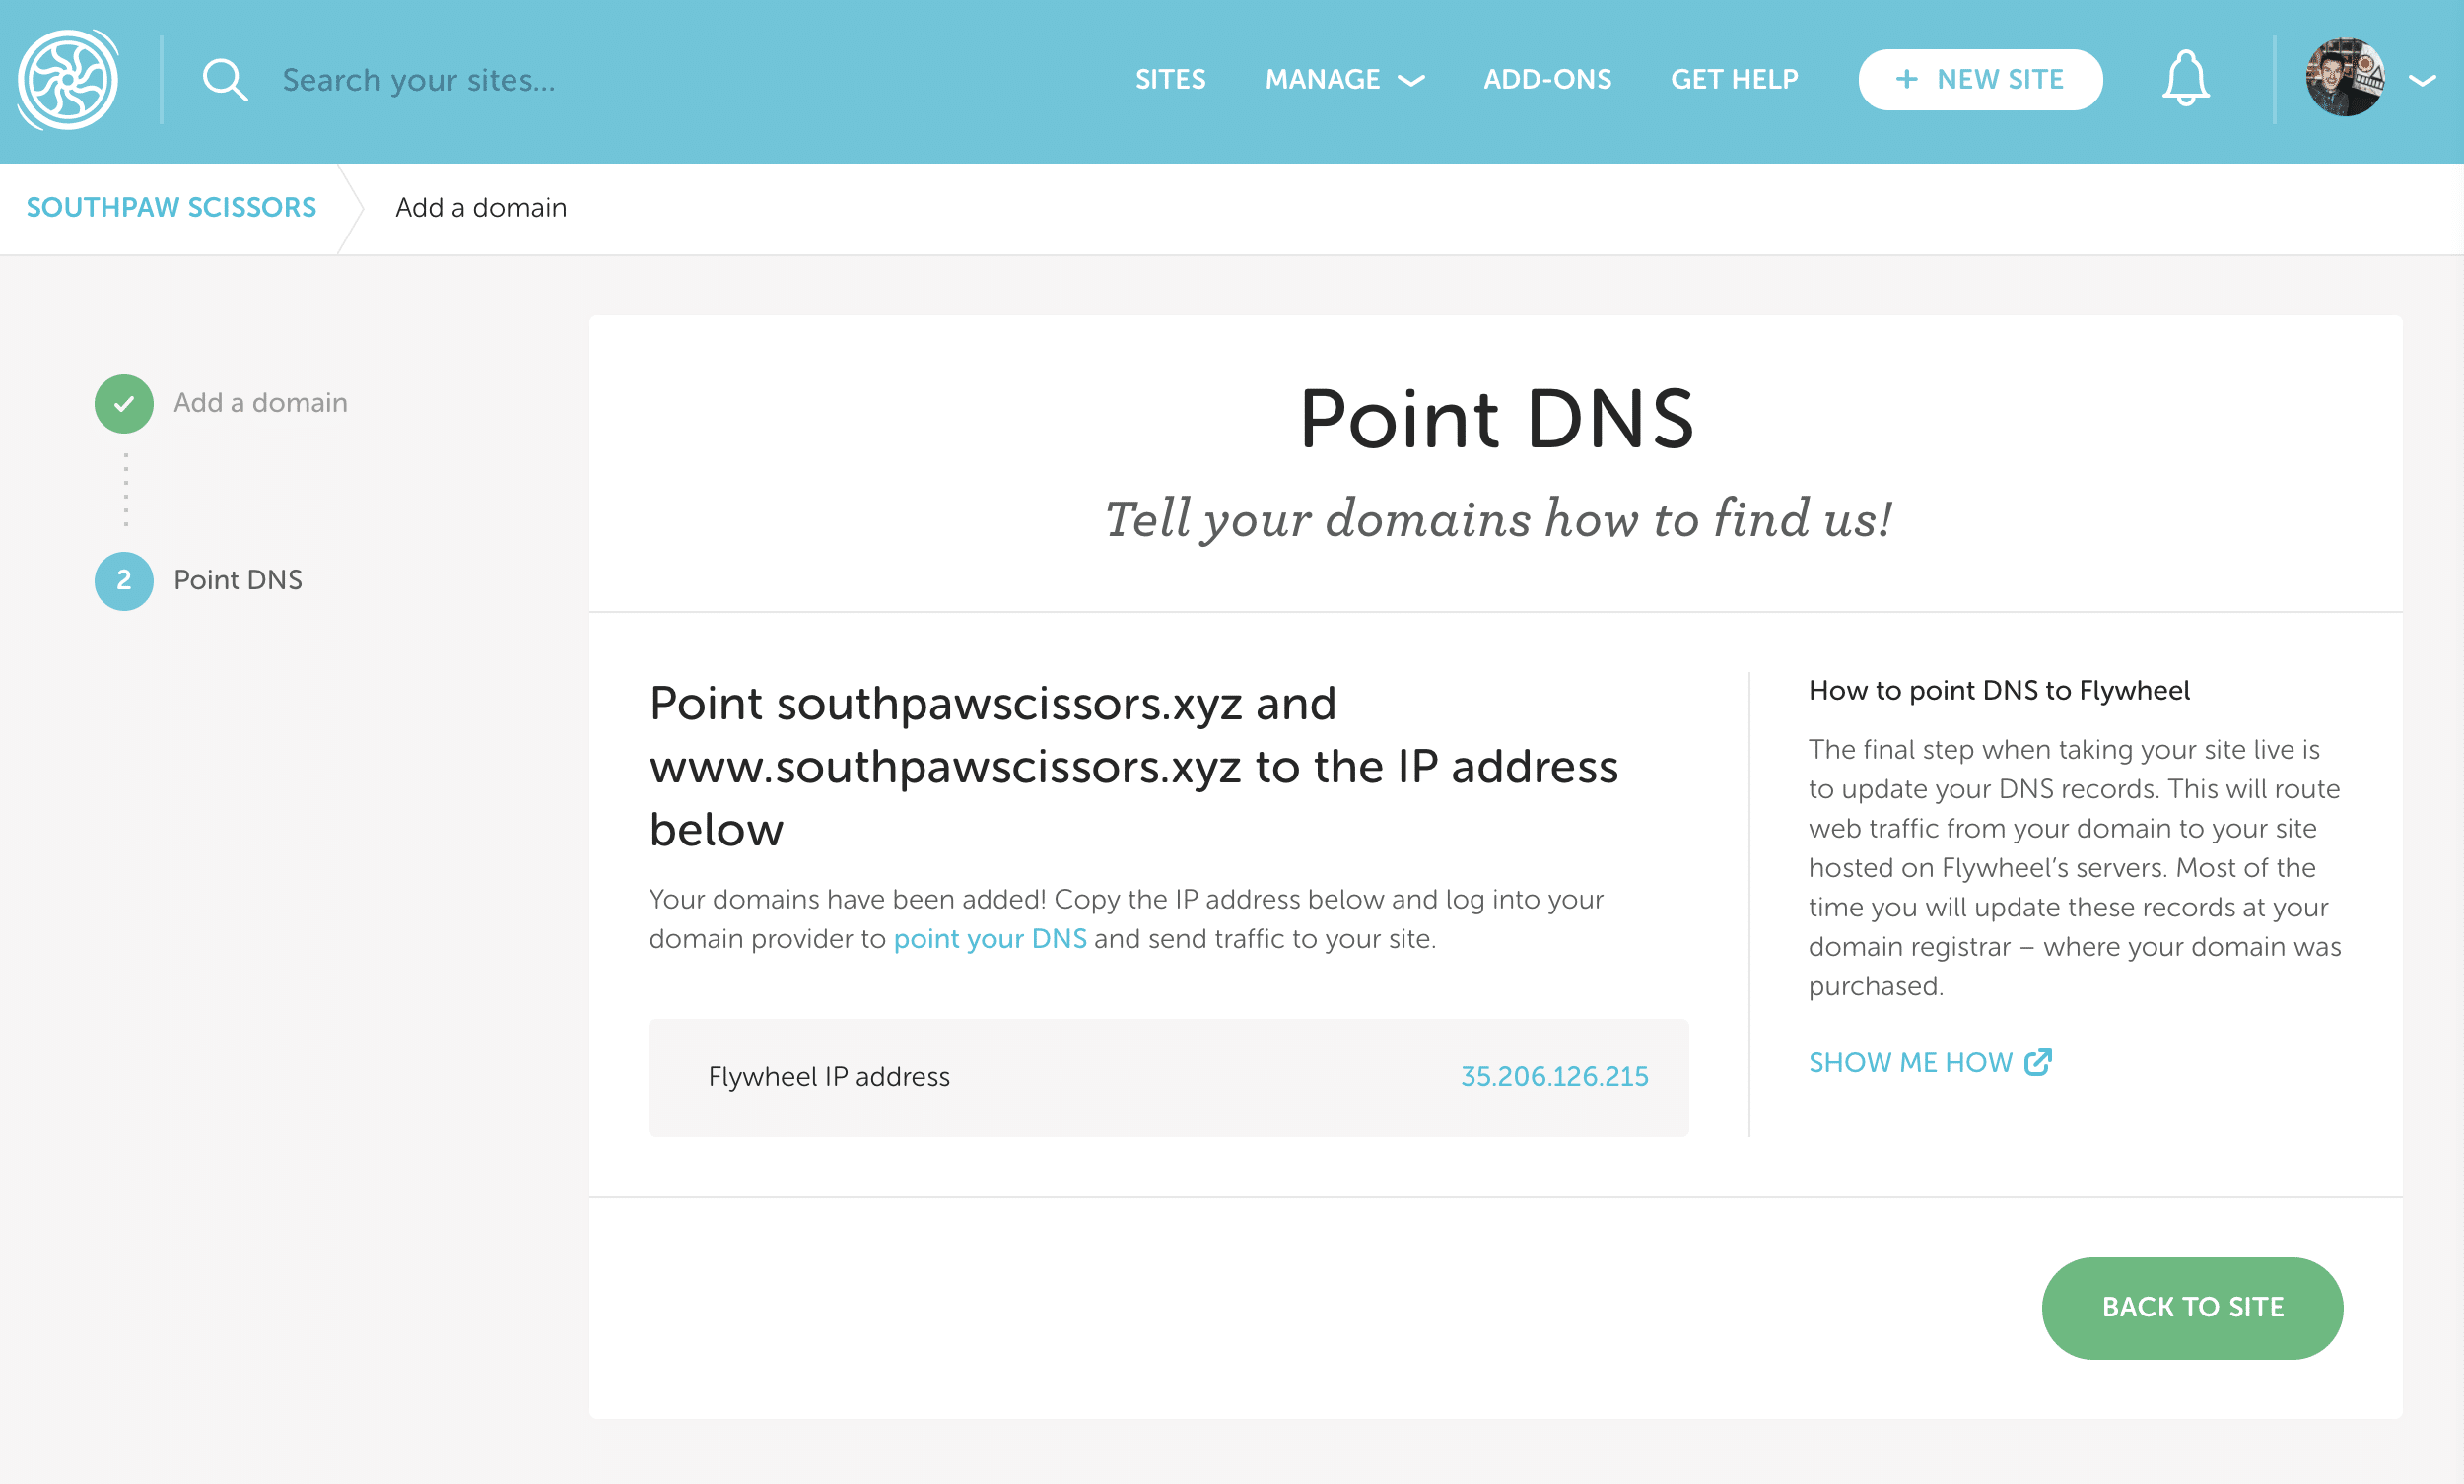
- Click the site’s IP address to copy it to your clipboard for use in Namecheap’s DNS editor (instructions below). Clicking Back to site will take you back to the site’s Overview tab.
Log in to Namecheap
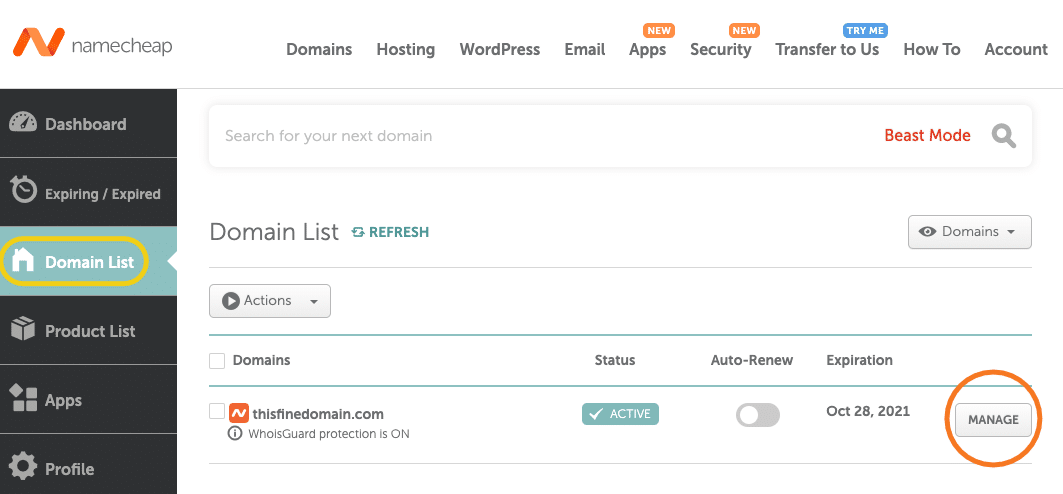
- In a separate tab, log in to the Namecheap dashboard.
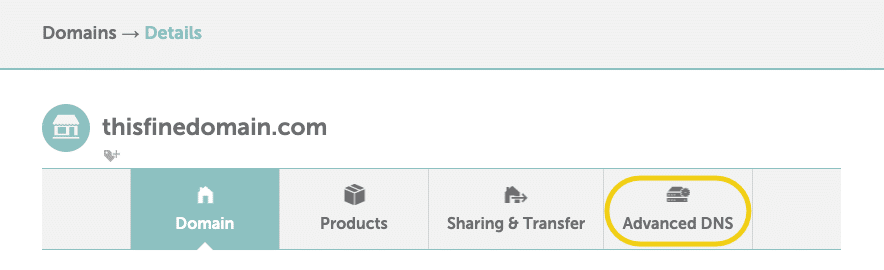
- Click on the Domain List tab, find the domain you want to point to Flywheel, then click Manage.
- On the domain details page, click Advanced DNS.
Add an A record
You may see additional records on the Advanced DNS page, especially if your domain was pointed to a different host previously. For now, we’re just going to be concerned with the A record, since it’s the record responsible for pointing your domain to your website.
Be careful about modifying or deleting any other records – especially MX records, which are responsible for email. Also, it never hurts to take a screenshot before you start making changes.
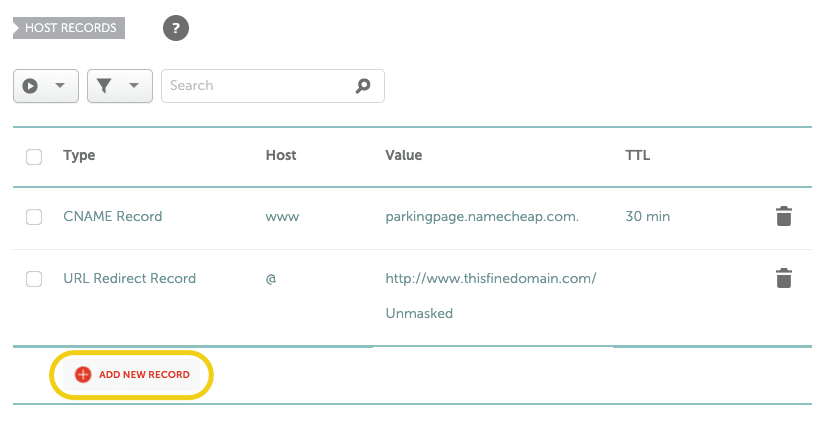
- Locate the Host Records section.
- Click the Add New Record button.
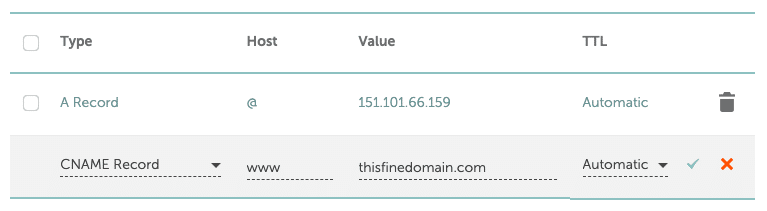
- Choose A Record for the Type.

- Enter @ for Host. Note: The @ symbol serves as a placeholder for the root level domain. In this case, it stands for thisfinedomain.com.
- Enter your site’s IP address for Value. In this example, the IP is 151.101.66.159.
- Usually, there’s no need to adjust TTL, which stands for Time To Live. For more information on TTL, check out this help article: DNS: What is TTL?
- Click the green checkmark to save the A record.
Note: Namecheap removes their placeholder host records when you add your own, so you see fewer host records after saving, don’t worry!
Unless you have a subdomain setup, for example shop.thisfinedomain.com, you should only need one A record value. At the very least, make sure that you have one A record with @ set as the host which is pointing to your Flywheel IP address.
For more information, visit Namecheap’s help article on A records.
Configure CNAME record for www
If you added the www version of your domain earlier, you’ll want to set up a CNAME record as well. A CNAME (aka canonical name) points a subdomain to another domain name.
For example, with a CNAME in place, visitors entering www.thisfinedomain.com in their browser will be re-routed to thisfinedomain.com. Without a CNAME record, visitors will instead reach an error page.
- In the Host Records section, click the Add New Record button.
- Choose CNAME Record for the Type.
- Enter www for the Host.
- Enter your root domain name for the Value. In this example, we’re using thisfinedomain.com.
- Click the green checkmark to save the CNAME record.
For more information, visit Namecheap’s help article on adding CNAME records.
Double-check your work
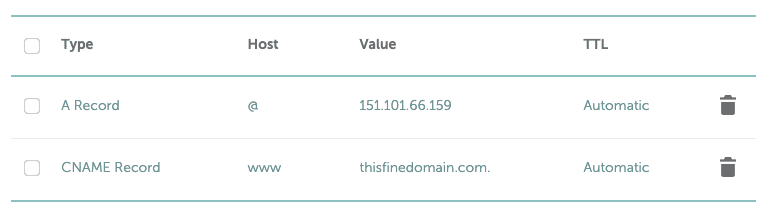
- Check Namecheap’s Advanced DNS page to make sure the record changes have been updated. Your records should look like this (with your domain’s information instead of the example domain here):
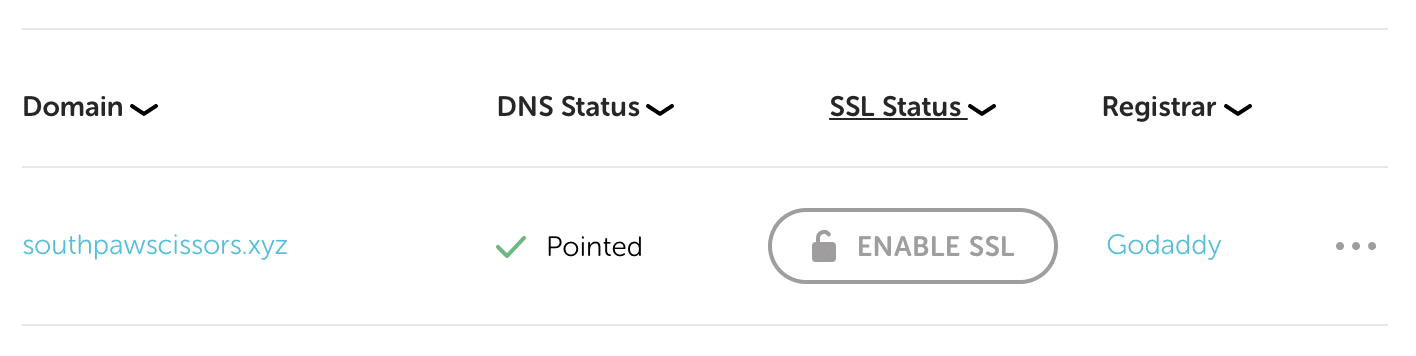
- After propagation, you can also verify your domain is successfully pointed to Flywheel by clicking the Check DNS button.
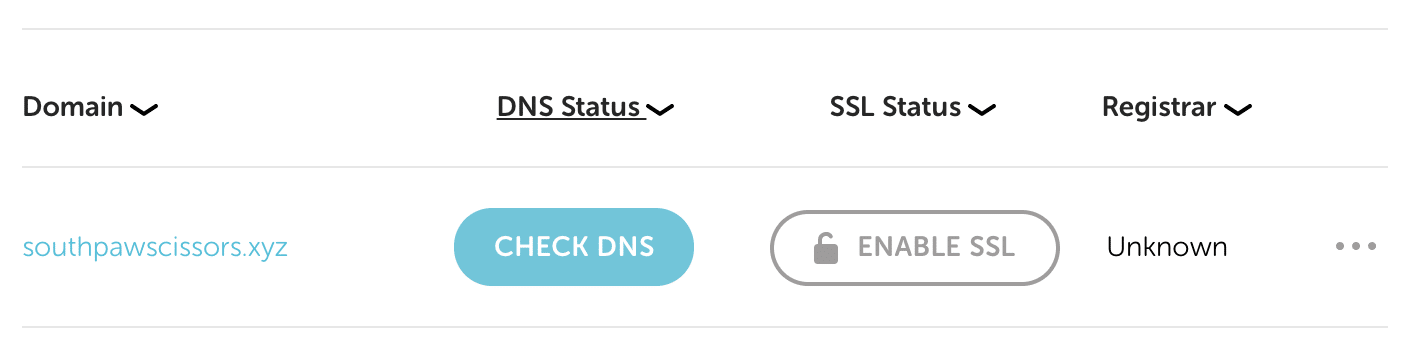
- Once your site is pointed to Flywheel, the status will switch to ✅ Pointed and the domain registrar will be displayed as well.
Note
DNS propagation times: DNS by nature can take 24-48 hours to fully propagate across the entire internet, though we generally see much quicker propagation. By default, Namecheap sets the
DNS by nature can take 24-48 hours to fully propagate across the entire internet, though we generally see much quicker propagation. By default, Namecheap sets the Time to Live setting for each record to 30 minutes. Depending on when that last hourly check was, you should see your changes go live in an hour or less.
Note
Custom nameservers: If you’ve made changes to your DNS records but nothing seems to be happening, your domain may be using custom nameservers instead of Namecheap’s defaults. This means that Namecheap’s settings will not have any effect. In this case, you will need to adjust your DNS settings at the nameserver’s admin panel instead. This situation is most likely when a proxy like Cloudflare or Sucuri is being used.
Still need help?
If you get stuck, or have any questions along the way, we’d love to help! Reach out to our support team with a screenshot of your current DNS records or provide us with your current registrar login for assistance.


![Toni Kroos là ai? [ sự thật về tiểu sử đầy đủ Toni Kroos ]](https://evbn.org/wp-content/uploads/New-Project-6635-1671934592.jpg)


