Network configuration in Ubuntu
Updated on 06/01/2023. This document is intended to support Ubuntu server administrators and aims to help you manage your network using the terminal.
Ethernet Interfaces
In order to identify the list of all network interfaces that are attached on your system, issue the command below :
ip a
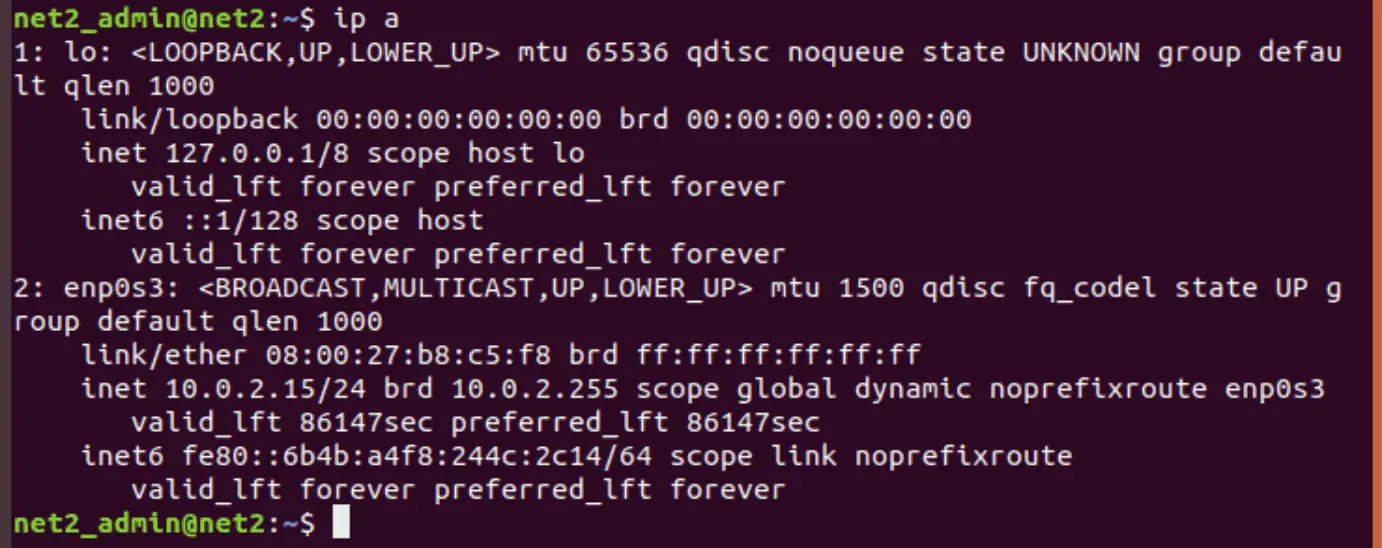
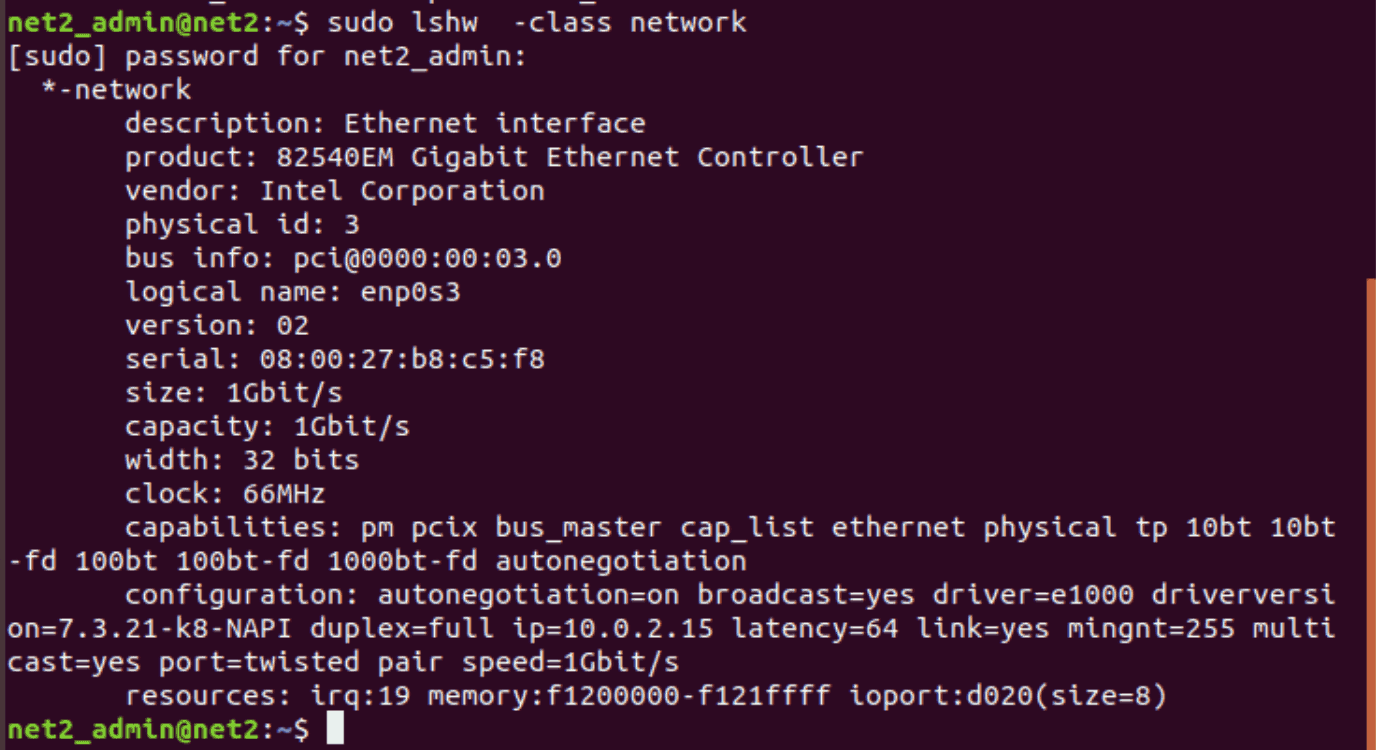
It is also possible to list all network interfaces available by running the command :
sudo lshw -class network
Ubuntu network configuration: adapters
The lshw command is useful for providing more detailed information about specific hardware adapters, such as the Ethernet interface shown above with the logical name enp0s3. It also displays the bus information, capabilities, and driver details for the adapter.
Read: What you need to do to secure Ubuntu
Ethernet Interface Logical Names
It is also possible to configure Interface logical names via a netplan configuration. In order to assign a specific logical name to a network interface, you would have to use the match and set-name keys. The latter is used to change the logical name of the device whereas the former key(match) relies on some criteria like MAC address, driver…in order to find an adapter.
network:
version: 2
renderer: networkd
ethernets:
ethpn0:
dhcp4: true
match:
macaddress: 55:44:33:22:11:00
set-name: ethpn0
Ethernet Interface Settings
ethtool is a utility used to change and display Ethernet card settings like for instance port speed, duplex mode, auto-negotiation and Wake-on-LAN. The snapshot below shows some configured settings and supported features of an Ethernet interface.
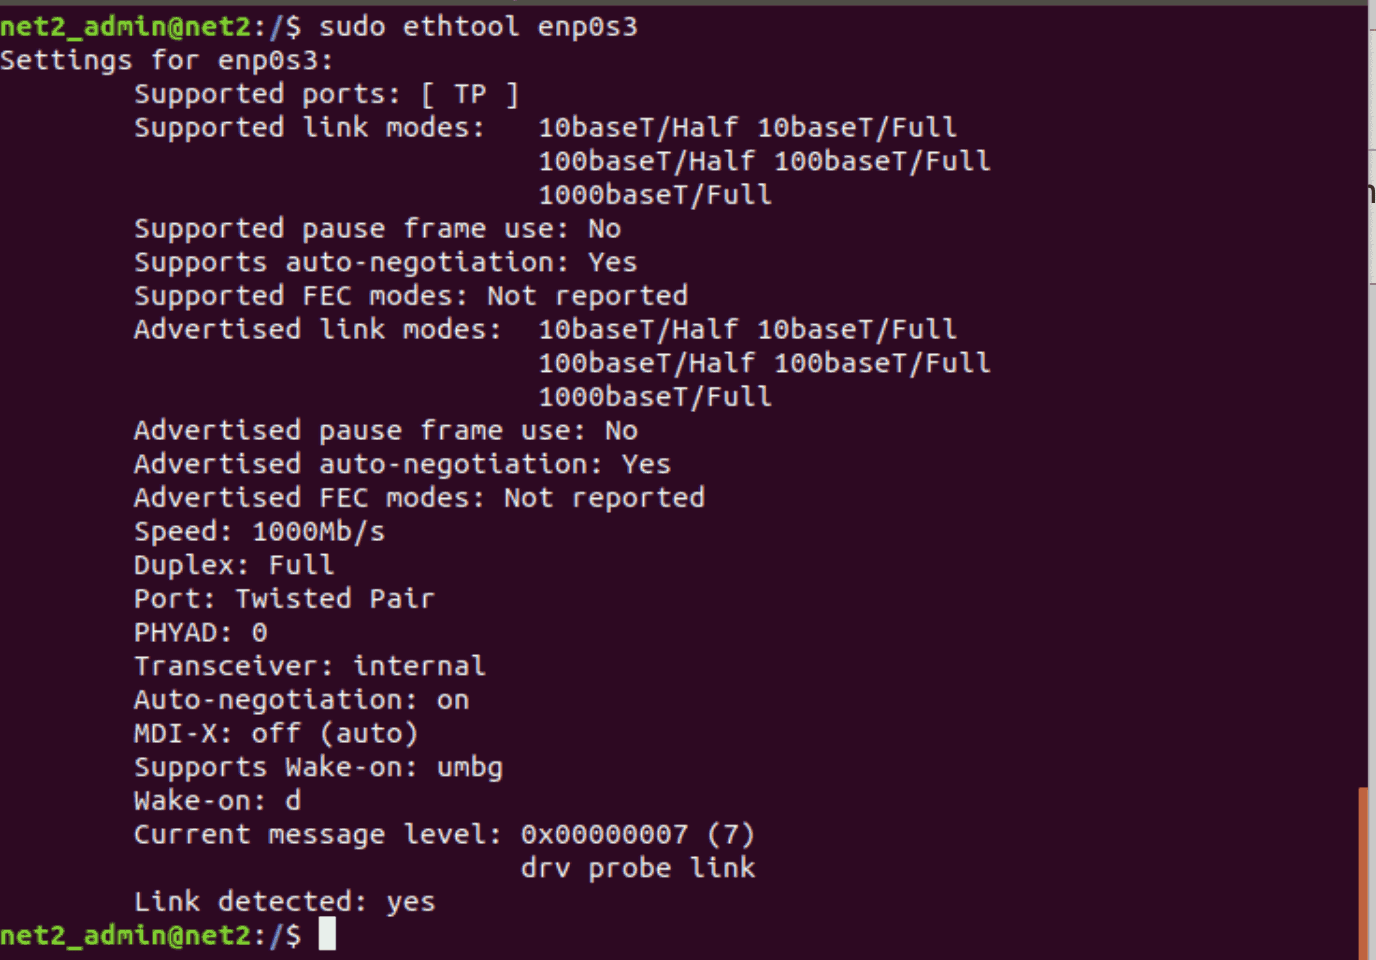
Network interface linux
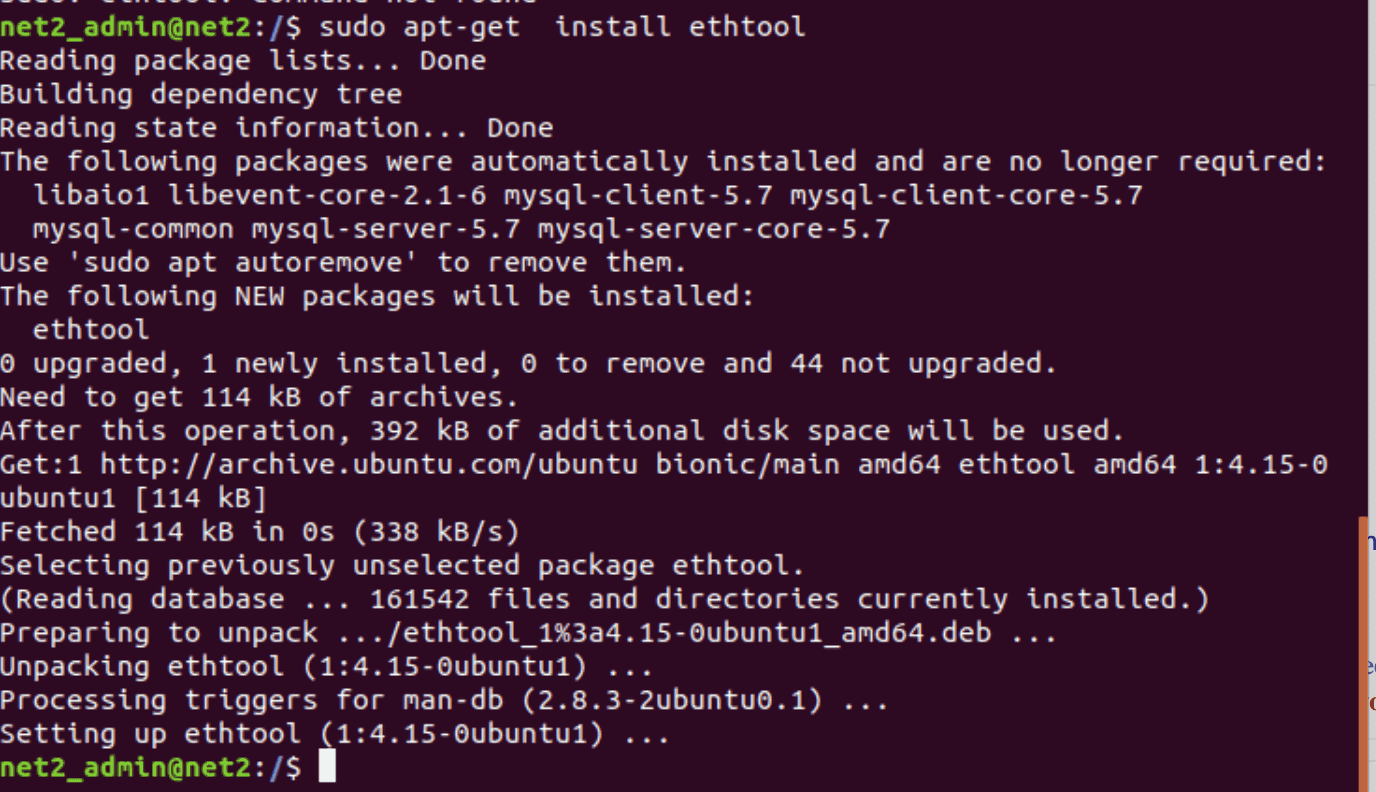
If ethtool is not installed then issue the command below :
sudo apt-get install ethtool
IP Addressing
In order to manage communication on a network(LAN or the Internet ), you will need to configure your systems IP address and default gateway.
Temporary IP Address Assignment
To temporarily set up a network, the ip command can be used. This command is available on most GNU/Linux distributions and allows for quick configuration of network settings. However, these settings are not permanent and will be lost after a system restart.
For temporary IP Address configuration, proceed as follows. Remember to modify the IP address and subnet mask according to your needs :
sudo ip addr add 10.0.32.15/24 dev enp0s3
![]()
Now in order to check the IP address configuration of enp0s3, proceed as follows:
ip address show dev enp0s3

You can also configure a default gateway in the following manner. Remember to alter the default gateway address as per your network requirements :
sudo ip route add default via 10.0.2.1
![]()
Your default gateway configuration can now be checked by issuing the ip command below :.
ip route show

Gateway linux
In case you need DNS for your temporary network configuration, you can edit the file /etc/resolv.conf and insert DNS server IP addresses.
As a good practice, it is not recommended to edit /etc/resolv.conf directly, but this is a non-persistent and temporary configuration. You can for instance enter two DNS servers to /etc/resolv.conf like :
nameserver 8.8.8.8
nameserver 8.8.4.4
In case you want to undo all your changes or if you do not need this configuration any longer, you can issue the ip command below which will purge the temporary IP configuration from the network interface :
ip addr flush enp0s3
You must either reboot or remove or alter manually the entries of /etc/resolv.conf since the flushing operation above does not clear the contents of /etc/resolv.conf.
Read: How to install Apache web server on Ubuntu ?
Dynamic IP Address Assignment (DHCP Client)
In order to configure and manage network interfaces, Ubuntu relies on a command line-based utility called Netplan which was introduced in Ubuntu 17.10.
Netplan, which works in tandem with Ubuntu Network Manager and systemd-networkd daemons (as interfaces to the kernel), is based on the YAML files making therefore the configuration of network interfaces very easy.
Netplan no longer relies on the configuration file /etc/network/interfaces but uses instead the /etc/netplan/*.yaml to read the network configuration. This is used as a location to save all your network interface configurations.
In order to enable DHCP for dynamic (non static) address assignment in your server, create a netplan configuration in the file within the directory /etc/netplan/ , mine has the name shown below, i.e. 01-network-manager-all.yaml :

Which is used to configure the first interface. If you have more than one interface however, use 02-network-manager-all.yaml for instance for the second interface. Note that Netplan uses the numerical order when it applies the configurations which means that the 02 file will be applied after the 01 file.
Your configuration should look like the example below in which it is assumed that you are configuring the second Ethernet interface enp3s1 (therefore file 02-network-manager-all.yaml).
network:
version: 2
renderer: networkd
ethernets:
enp3s1:
dhcp4: true

In order to apply the configuration using netplan, issue the command below :
sudo netplan apply
Static IP Address Assignment
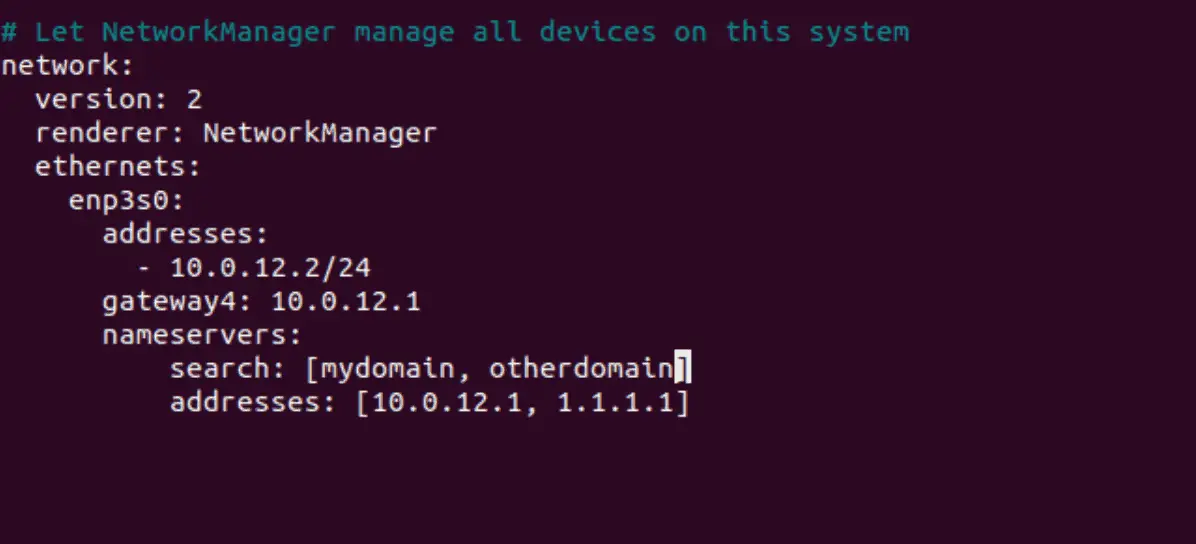
Now for static address assignment configuration, you can create a netplan configuration in the file /etc/netplan/01-network-manager-all.yaml. If for instance you would like to configure your first Ethernet interface then you can follow the example shown below. Recall to alter the addresses, gateway4, and nameservers values according to your network needs :
network:
version: 2
renderer: networkd
ethernets:
enp3s0:
addresses:
– 10.0.12.2/24
gateway4: 10.0.12.1
nameservers:
search: [mydomain, otherdomain]
addresses: [10.0.12.1, 1.1.1.1]
Once again apply the configuration using the command :
sudo netplan apply
Read: Configuring static and dynamic IP Addresses in Ubuntu using Netplan
Name Resolution
Name resolution involves mapping IP addresses to hostnames in order to make it easier to identify and access resources on a network. This can be achieved by using DNS, or Domain Name System. By setting up your system for name resolution using DNS, you can more easily identify and access resources on the network.
DNS Client Configuration
The file /etc/resolv.conf used to store static configurations that were almost never altered nor automatically changed via DCHP. Name server configuration is handled via Systemd-resolved through the systemd-resolve command. Netplan uses systemd-resolved daemon in order to generate nameservers and domains to be stored in /etc/resolv.conf, which is a symlink:
/etc/resolv.conf -> ../run/systemd/resolve/stub-resolv.conf
Insert the nameservers IP addresses to the netplan configuration file, in order to configure the resolver,. To match your network domain names, you can also include a DNS search-lists optional suffix. The file obtained should look like the output below :
network:
version: 2
renderer: networkd
ethernets:
enp0s3:
addresses:
– 10.0.12.100/24
gateway4: 10.0.12.1
nameservers:
search: [mydomain, otherdomain]
addresses: [2.2.2.2, 4.4.4.4, 5.5.5.5]
Bridging
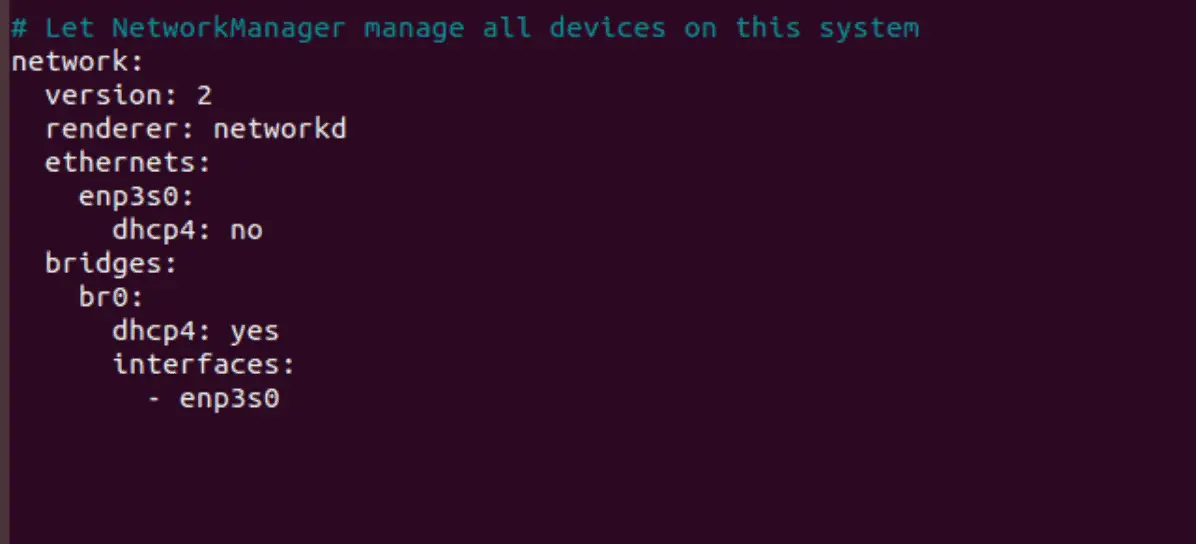
Bridging multiple interfaces can be a useful advanced configuration in a variety of situations. One example is setting up a bridge with multiple network interfaces to filter traffic between two network segments with a firewall. Another use case could be on a system with a single interface, where a bridge is used to allow VMs to directly access the external network.. Here is an example of the latter use case :
Editing your netplan configuration under /etc/netplan/ to configure the bridge:
network:
version: 2
renderer: networkd
ethernets:
enp3s0:
dhcp4: no
bridges:
br0:
dhcp4: yes
interfaces:
– enp3s0
Now enable the bridge by issuing the command:
sudo netplan apply
The bridge interface created should now be active . The state of the bridge can be controlled via the brctl which. Use man brctl for more .
Configuring Static IP address on Ubuntu Desktop
Ubuntu offers an easy-to-use graphical interface which allows you to set up a static IP address.
1 – On the top right screen, click on the network icon :
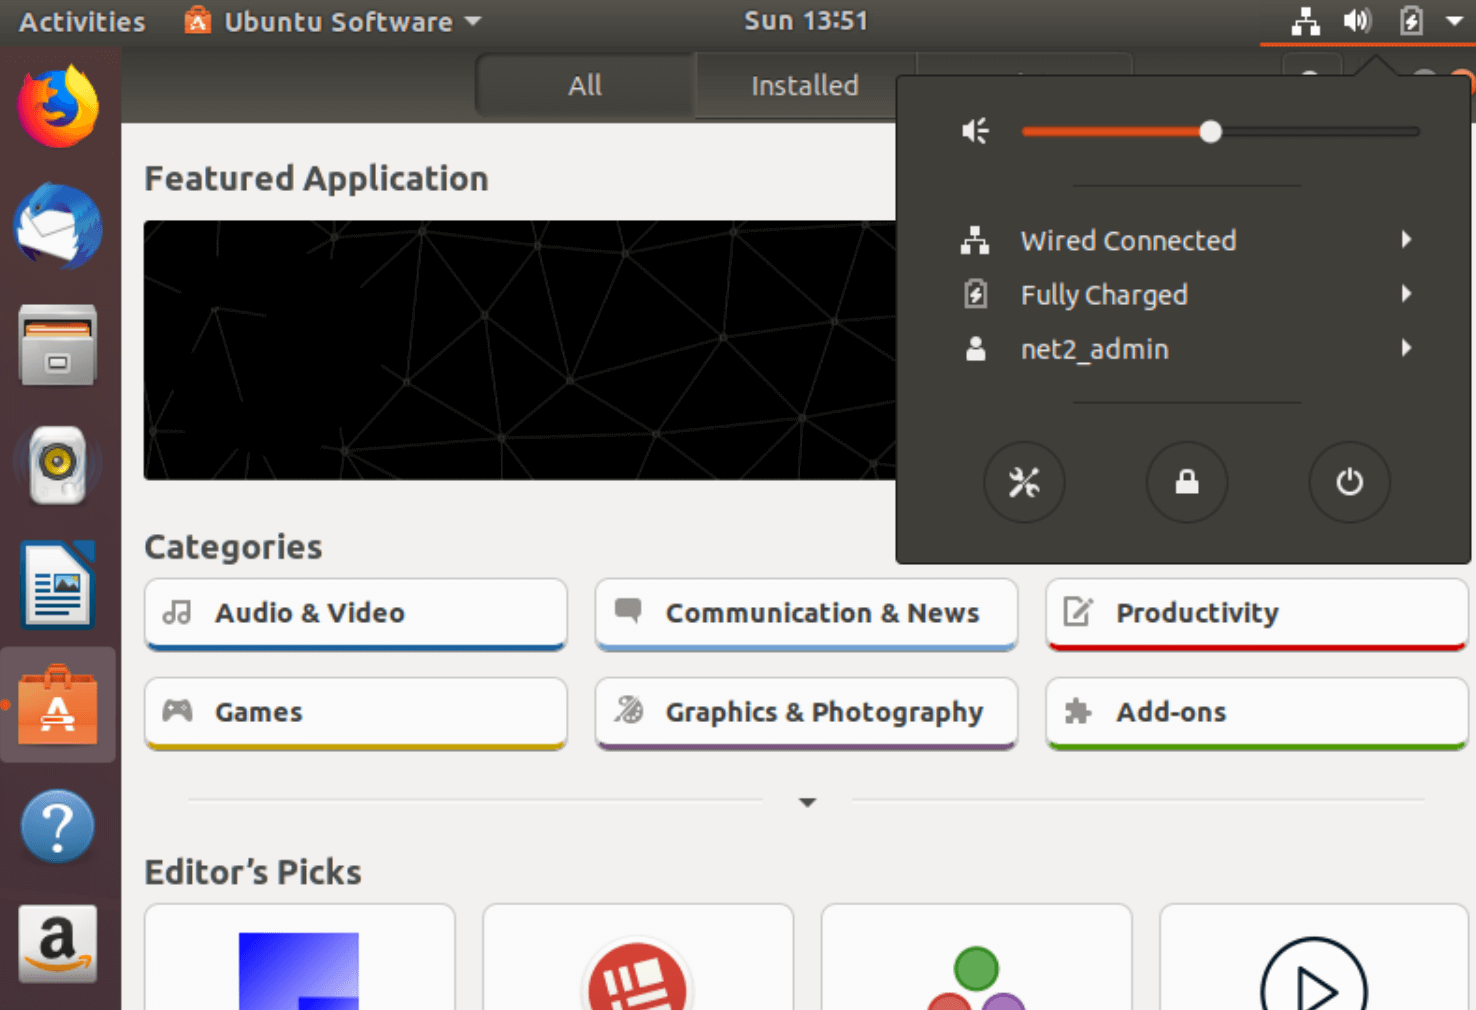
2 – Now click on the tools icon on the bottom left corner of the black window.
3 – The Network configuration window will show up. Click on the cog icon in the Wired section next to the ON button.
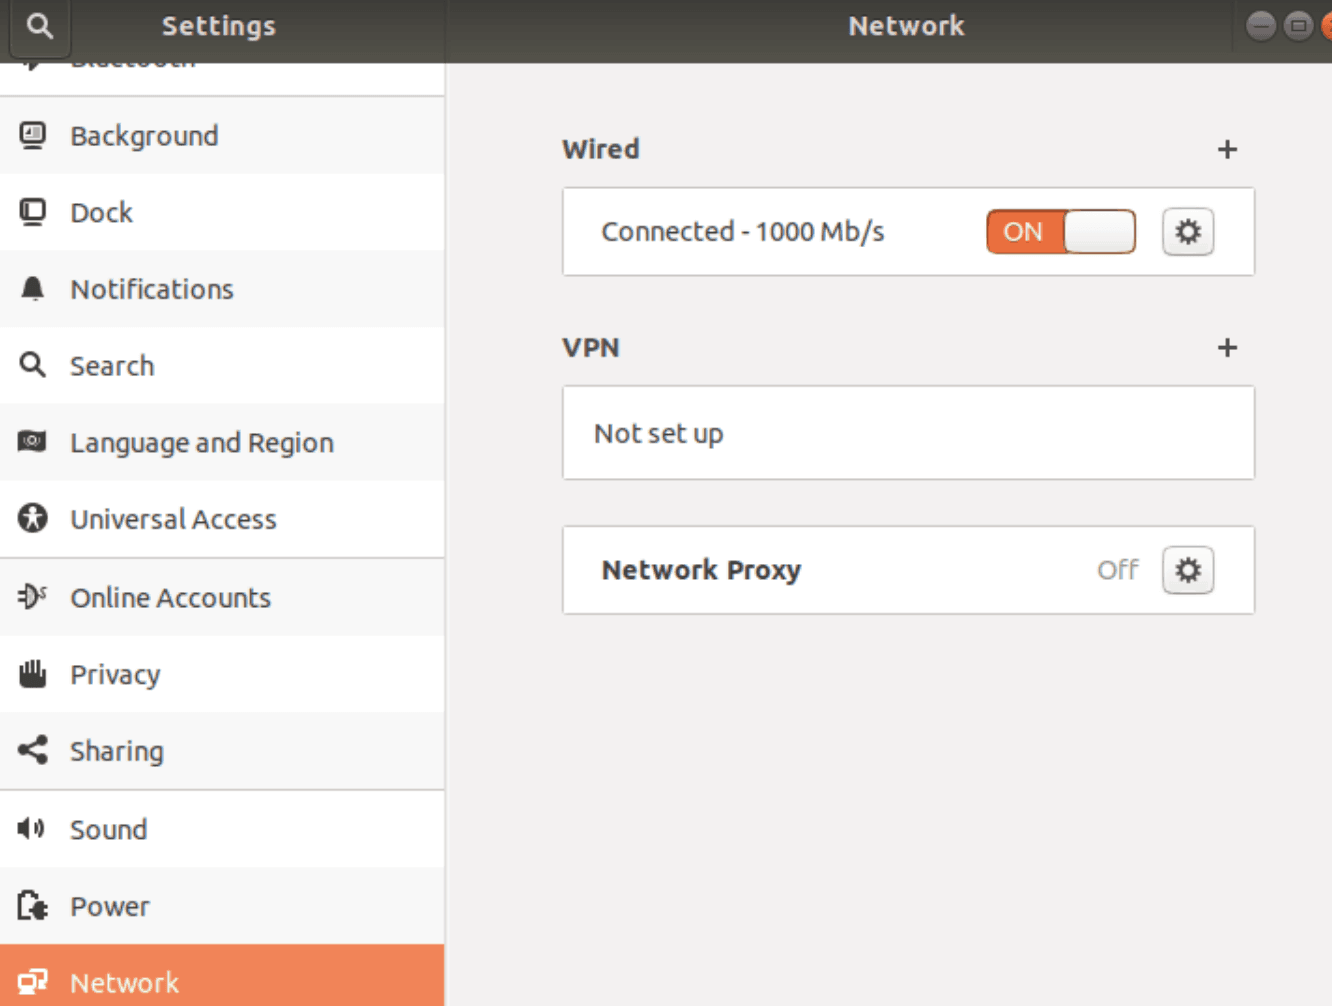
4. This will display the Network interface settings window :
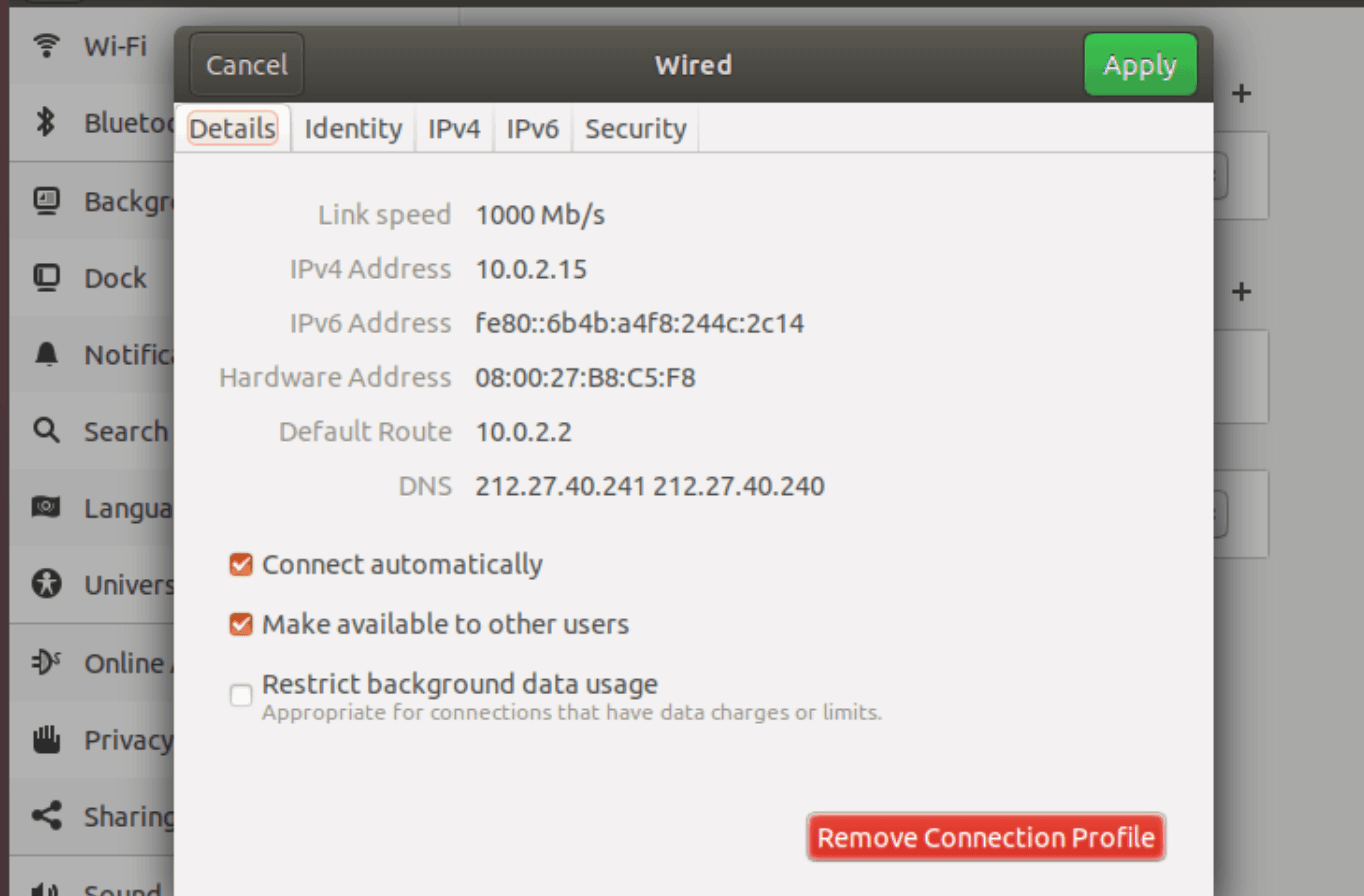
5 . In “IPv4 Method” enter your static IP address after selecting “Manual”. Enter also the Netmask and Gateway according to your network needs.Then click on the “Apply” button.
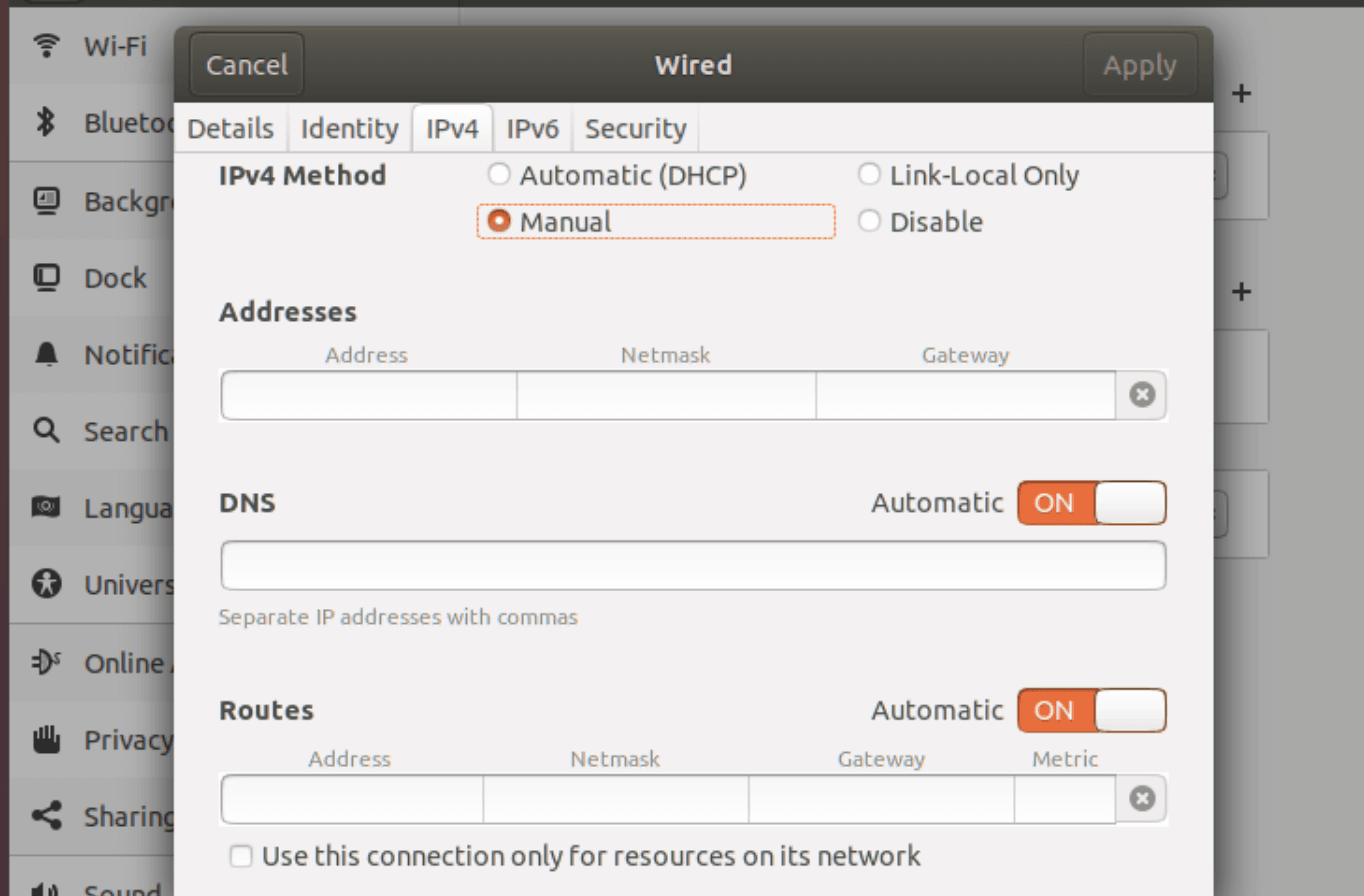
Configure IP address
Once your static IP Address is set up, open up your terminal and verify the changes by running the command :
ip addr
If you like the content, we would appreciate your support by buying us a coffee. Thank you so much for your visit and support.
![]()


![Toni Kroos là ai? [ sự thật về tiểu sử đầy đủ Toni Kroos ]](https://evbn.org/wp-content/uploads/New-Project-6635-1671934592.jpg)


