Network Location: Public or Private? What does it mean & how to set or change Network Profile
When you connect your Windows 11/10 machine to different networks, you might have observed that it gives a prompt asking if you want your device to be discoverable on the network or not or what it’s network location should be. Depending on the response, the OS decides if it is a Public Network or a Private Network. This is really an important configuration as the OS now behaves and handles traffic accordingly. This post talks about Network Location – Public or Private, what it means & how to set or change Network Profile on Windows 11/10/8/7.
Mục Lục
 Difference between Public Network and Private Network
Public Networks: These are the networks usually owned by a commercial chain-like or some malls and community centers. Here, you don’t want your machine to be visible to others or initiate any kind of data transfer with them, So when you mark a network as a public network, Windows turns off all Discovery features. Neither your device will be visible on the network, nor will you be able to see any other devices on the network. Even Homegroup feature won’t work when your PC is connected to a Public Network. This saves the machine from malicious attacks and defends it from attacks and threats over a network.
Private Networks: These are the networks usually owned by an individual – usually located in Homes and Offices. On these networks, you would usually be free to keep your machine visible to others and even initiate a data transfer between devices on the common network. So, when you mark a network as a Private Network, Windows 10 enables all kinds of discovery features. Features such as Homegroup will be enabled by default for the user to take advantage of high-speed data transfer via LAN.
How to change Network Profile in Windows
You should probably set a network location when you sign-in to it for the first time. But in case, if you are not able to do so or things change at a later stage, you can still change your initial decision.
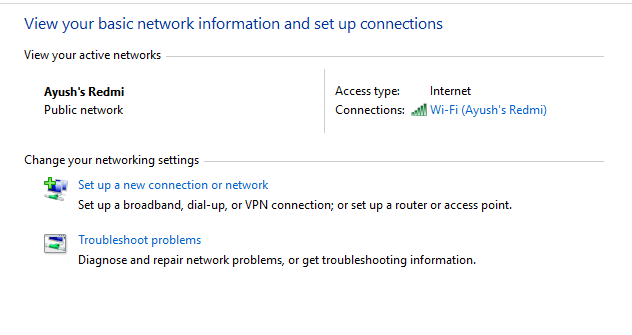
To check if your network is Private or Public navigate to Control Panel\Network and Internet\Network and Sharing Center. Here, you have to check if your network location is set according to what you need right now.
As seen in the snip above, my network is a Public Network. Hence, to change it to a Private Network I will have to change it’s Properties.
Click on the Network Icon in the System Icons.
Now in the Network list, make sure that you are connected to the network whose type needs to be changed and click on Properties.
Now that will open a page inside the Settings app. And now, you can select whatever type of network you want it to be.
This was a brief overview of what are Private and Public networks and what you can do with them. Make sure that next time you are connecting to any network, you choose your configuration wisely.
Should my network profile be set to public or private?
In simple terms, if you use your computer at home, you must opt for a Private network profile. However, if you own a business, shop, or something like that, you need to use the Public tag. A detailed guide on these two profiles is mentioned in this article, and it is recommended to follow it minutely to learn more.
Should I change my network to private?
As said earlier, there is only one way to decide whether you should change your network profile from private to public or vice versa. If you have a network at your home, there is no need to use the Public profile. However, if you have a local shop or something like that, you need to use the Public profile.
Read next: Ways To Change Network Status From Public To Private.


![Toni Kroos là ai? [ sự thật về tiểu sử đầy đủ Toni Kroos ]](https://evbn.org/wp-content/uploads/New-Project-6635-1671934592.jpg)


