
Network License Server and Client Configuration
Introducing the FARO Licensing Manager Manage all your FARO software licenses from one convenient application. Activate or update licenses for any FARO software and view/verify active maintenance plans. Click here to learn more >>
Mục Lục
Overview
Most FARO software requires a license to use it. System administrators can create a network license server to make a pool of licenses available to client computers running FARO software. Licenses are hosted on the license server and are shared with client computers over a network. On the client computers, install the FARO software. On the server, install the Sentinel HASP license driver and the Remote Update System (RUS). Once the software is installed on the client computers, the tools are installed on the server, and the server is set up, when FARO software runs on a client computer it searches the network for an available license. Click here for more information about FARO software licensing.
Note: The HASP license driver used on the server and on each client must have the same version number to avoid licensing errors. The latest FARO software always uses the latest HASP license driver. When FARO upgrades software, check the version of the HASP driver on the server. You may have to upgrade it. Click here for details about checking the version of the installed HASP license driver.
VM License Servers and FARO Software
Most FARO software supports virtual machines (VM) acting as license servers. The table below shows details.
There are many different types of VMs. Some may work better than others. To establish if your particular VM can successfully act as a license server for FARO software, from the client machines ping port 1947 on the server. If the ping is successful, your VM should be able to supply FARO licenses to the client computers.
If you choose to configure a VM as a license server, it is recommended that FARO network product license keys be supplied to the server as alphanumeric codes and not as dongles/portlocks. VMs do not have physical USB ports, and may not be able to run a USB port driver successfully. If you are attempting to use a VM with a portlock dongle as a license server, first test your USB port/hub configuration with a generic flash/thumb drive to ensure the VM can detect the USB port.
FARO Software
VM License Server Supported
VM License Server Not Supported
SCENE 5.2 and later

SCENE Process
FARO Zone 3D
FARO Zone 2D
As-Built
*
VirtuSurv
*
BuildIT
RevEng
CAM2
Measure 10
SmartInspect
Visual Inspect CAD Translator

* Not supported for trial licenses.
Server Setup
- Download and install the Sentinel HASP License Driver and Remote Update System (RUS) tool. For the downloads and complete installation instructions, see: Download and Install the SafeNet Sentinel HASP License Driver and FARO Remote Update System (RUS)
- In the Sentinel Admin Control Center, under the Options panel on the left, click Configuration.
- Click the Access from Remote Clients tab.
- Select Allow Access from Remote Clients.
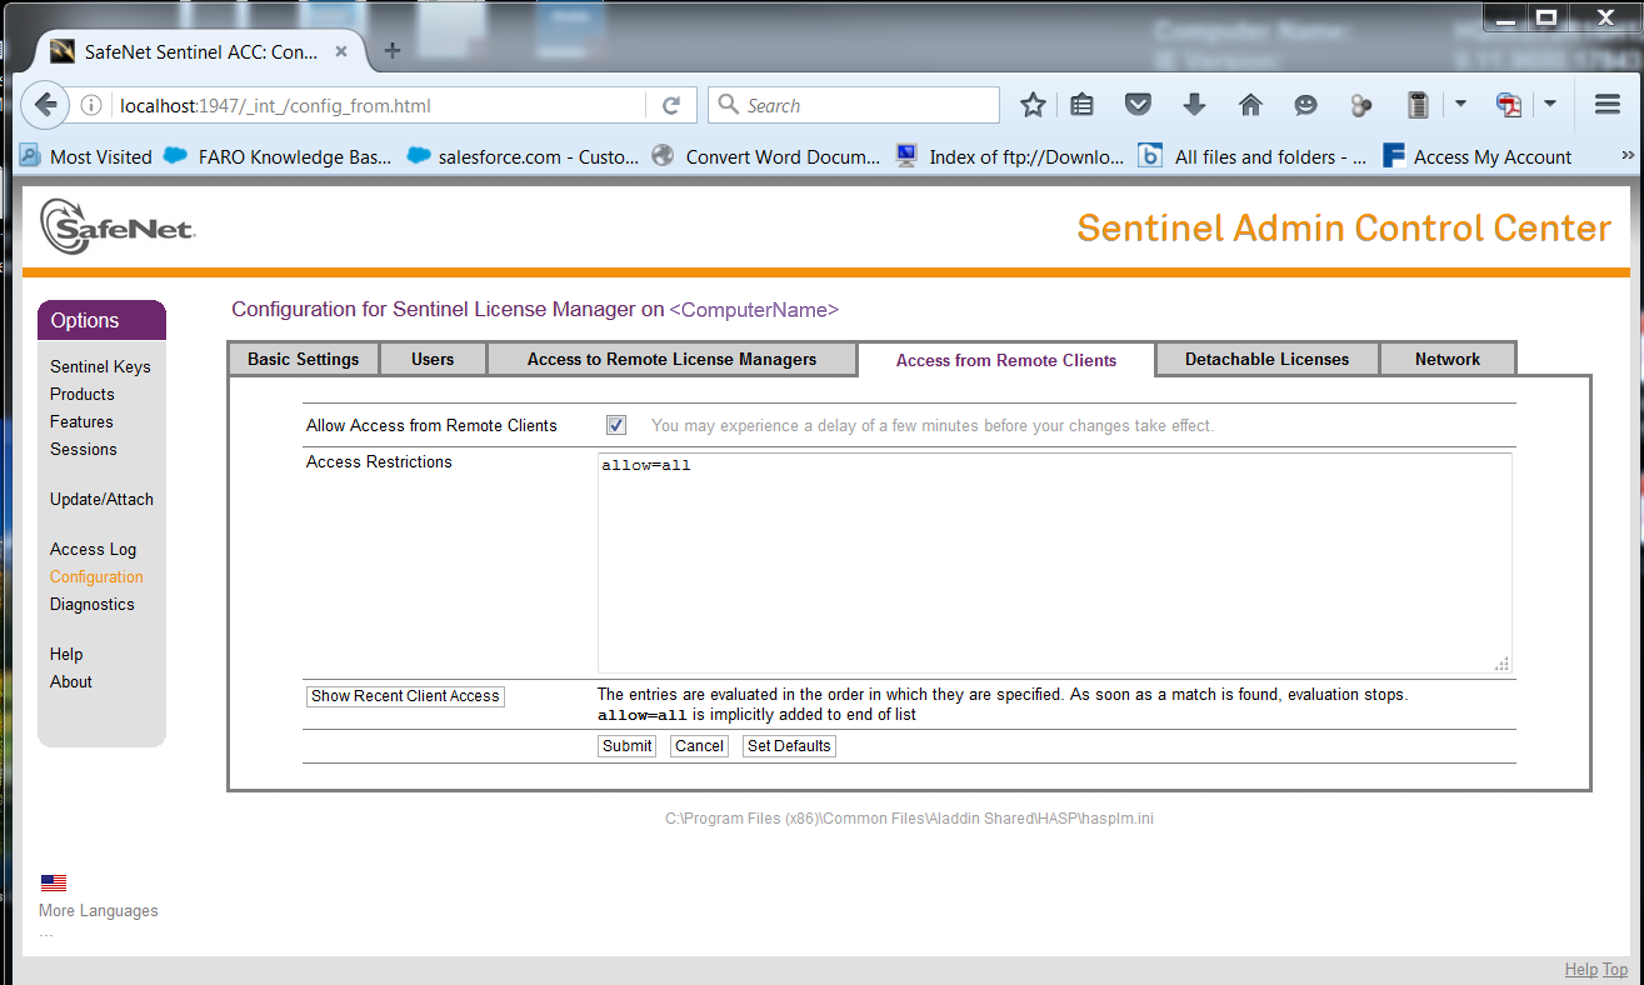
- Click Submit.
- On the server, click the Windows Start button and in the search field type Cmd then press Enter. The Command Prompt window appears.
- At the prompt, type ipconfig and press Enter.
- Write down the IPv4 Address listed under the appropriate Ethernet/Wireless LAN adapter. It will be required later to enable each client computer to access the license keys.
Activate License Keys on the Server
The way you activate keys that are shared on a license server depends on if you have product keys or if you have a network enabled dongle or portlock.
- Product Key – An alphanumeric code which can be entered in a FARO software
- Dongle/Portlock – a physical USB device which looks like a memory stick. If you have a network-enabled FARO dongle or portlock, attach it to the server. Further activation of licenses is not necessary, but you must continue with the remaining steps in this article.
- Most FARO software Dongle/Portlocks are shipped pre-activated.
Using FARO RUS, you can activate Product Keys on the server so that client computers can run FARO software.
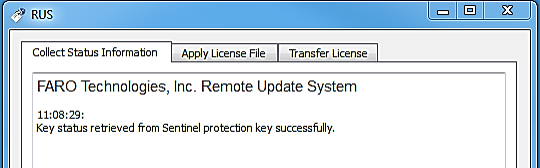
- Open the FARO Remote Update System (RUS) tool.
- On the Collect Status Information tab, make sure the “Installation of new protection key” radio button is selected and then click the Collect Information button.
- This will generate a C2V file. When prompted, save this file to your computer.

- Go the FARO Licensing Portal website at: https://license.faro.com/Portal/activation
- Click Browse and navigate to the location of the C2V file, select it and click Open.
- Paste the Product Key into the Insert Product Key field, and then click ACTIVATE.

- The next screen will verify the activation was successful, click the Download v2c file button to download the activated license file. It will be in the format of “activation_########_######.v2c”

Note: Depending on your license configuration, product keys may contain one or more products. Steps 6 and 7 can be repeated to activate multiple keys.
- Return to the RUS screen and click the
 button to navigate to the location where you saved the .V2C file(s). Select the .V2C file, and click Open.
 - Click the Apply Update button.

- The RUS will respond with a success message when the process is complete.

- If you have multiple V2C files to apply, repeat steps 8-10.
Updating License Keys on the Server
If you recently received a notice to upgrade your FARO software, have recently upgraded your FARO software and are receiving error messages that prevent you from running the software, or you recently renewed your warranty, you may need to update the software license keys on the license server. To do this, you will create a .C2V file and then using the FARO Licensing Portal create a matching .V2C file. Applying this file updates the license keys stored on your license server or on the dongle attached to your license server.
To create a .C2V file, use the FARO Remote Update System (RUS) tool. Before you begin, if you are using a dongle, make sure it is properly connected to your server’s USB port.
Note: The HASP license driver used on the server and on each client must have the same version number to avoid licensing errors. The latest FARO software always uses the latest HASP license driver. When FARO upgrades software, check the version of the HASP driver on the server. You may have to upgrade it. Click here for details about checking the version of the installed HASP license driver.
- On the license server, open the FARO Remote Update System (RUS) tool.

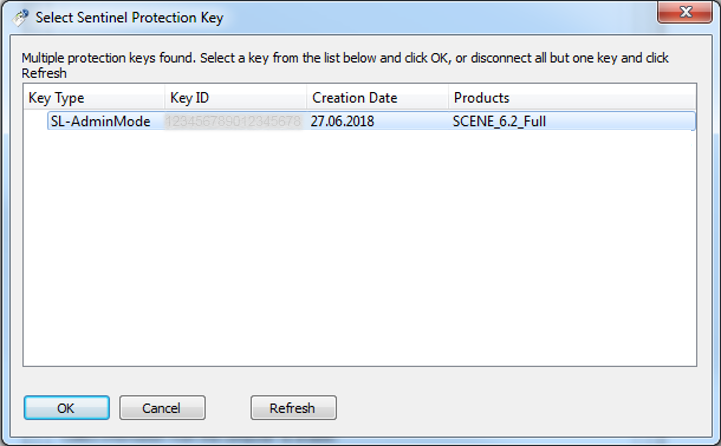
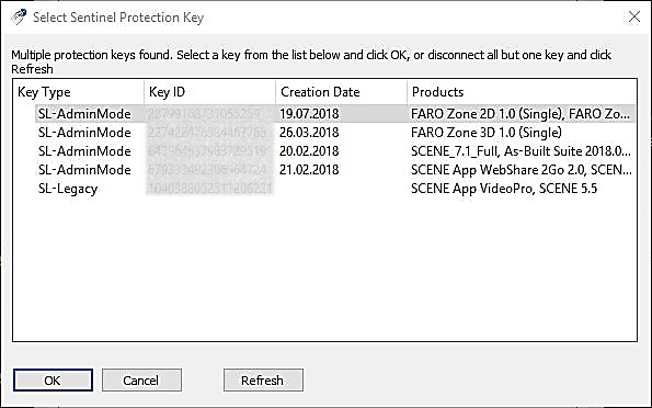
- On the Collect Status Information tab, select Update of existing protection key, and click Collect Information. The Select Sentinel Protection Key dialog box appears.
- If you only use one product key or dongle on this computer, click OK and continue to the next step.
- If you use multiple product keys or dongles on this computer, for FARO or any other vendor’s software, select the product/license key that applies to your FARO software and click OK.
Note: Under Key Type, HL- stands for hard lock–a license key stored on a dongle.
SL- stands for soft lock–a product key stored in the software on your computer.
- In the Save Key Status As window, navigate to the location where you want to save the .C2V file, enter a File name, and click Save.
- The RUS dialog box appears with a success message when the process is complete.
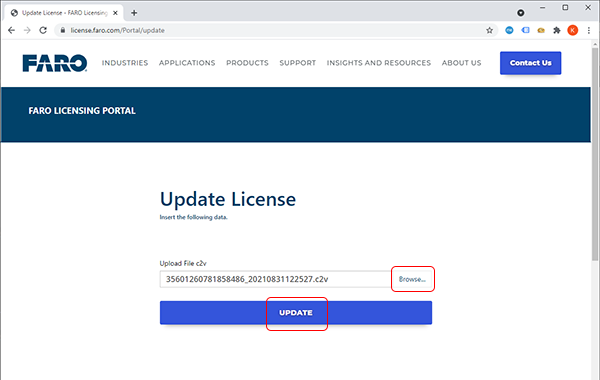
- Go the FARO Licensing Portal website at: https://license.faro.com/Portal/update
- Click Browse and navigate to the location of the C2V file, select it and click Open.
- Click Update.
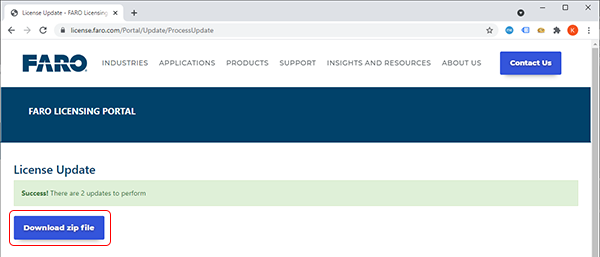
- The next screen will verify the update was successful, click the Download zip file button to download the updated license file. It will be in the format of “update_########_######.zip”. Once the download is complete unzip the file.
- Return to the RUS screen and click the button to navigate to the location where you unzipped the .V2C file. Select the .V2C file, and click Open.
- Click the Apply Update button.
- The RUS will respond with a success message when the process is complete.
Client Setup
- Download and install the FARO software on the client computers. Search this knowledge base for the download article for your FARO software.
- When the installation is complete, do not open the FARO software as it cannot yet access the remote keys.
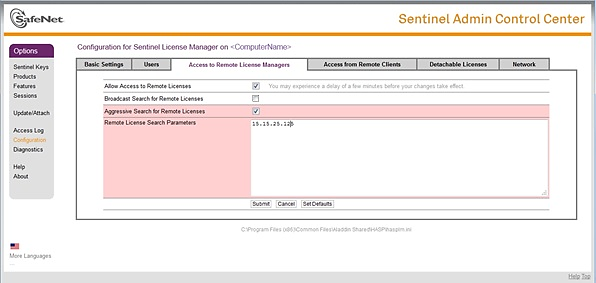
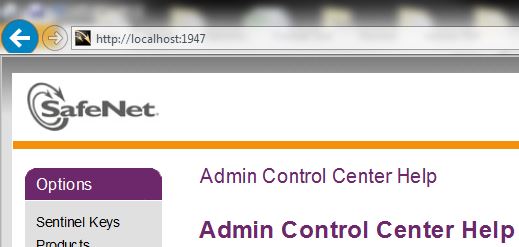
- On each client computer, open an Internet browser and go to http://localhost:1947 open the Sentinel Admin Control Center.
- In the Options panel on the left, click Configuration.
- Click the Access to Remote License Managers tab.
- Select Allow Access to Remote Licenses and Aggressive Search for Remote Licenses.
If you want to force the search for a specific server IP address, un-check Broadcast Search for Remote Licenses. This is particularly appropriate when using a VPN connection. - In the Remote License Search Parameters field, enter the IP address of the server.
- Click Submit.
- Open FARO software to confirm that the client computer automatically finds a key on the server without asking for a key or running on a trial license.
Configure a Group of Client Computers
If you need to configure a group of networked client computers to work with a FARO® license server or to make changes to the client computer group configuration, rather than configuring each one separately, save time by configuring the first client computer and copying its configuration file to the other client computers.
- To configure the first client computer on the network, refer to the Client Setup above to enable this client computer to access remote keys. Make any other changes that would be appropriate for all client computers.
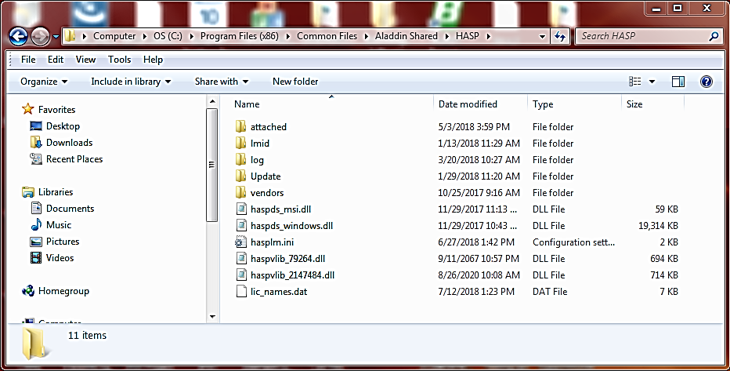
- Click Submit to store these changes in the HASP configuration file, which can be found on the client computer here: C:\Program Files (x86)\Common Files\Aladdin Shared\HASP\hasplm.in.
- Copy this hapslm.ini file to a portable file storage media, such as a USB memory stick.
- On the other client computers, navigate to C:\Program Files (x86)\Common Files\Aladdin Shared\HASP\hasplm.ini and rename the existing HASP configuration file to OLDhasplm.ini.
- Insert the portable file storage media containing the new hasplm.ini file into a port on the other client computers.
- Copy the new hasplm.ini from the portable storage media and paste it into the C:\Program Files (x86)\Common Files\Aladdin Shared\HASP\ folder on the other client computers.
- Open FARO software on the client computers to confirm that they automatically find a key on the license server without asking for a key or running on a trial license and that your configuration changes have been applied.
Detaching Network License Keys
Note: Detaching license keys is not supported within the CodeMeter licensing system used with legacy PointSense software products.
If you have a network license server that uses alphanumeric license keys, and not a dongle, you can detach a key from the server and assign it to a client computer. This enables the client to run FARO software when it is not attached to the network. You can assign the detached key an expiration date, when that date is reached the detached key is automatically disabled on the client and restored to server.
Before attempting to detach a license key, the license server must be configured to allow detaching of licenses.
- On the server, open a browser and go to http://localhost:1947. The Sentinel Admin Control Center appears.
- In the Options pane on the left, click Configuration, and click the Detachable Licenses tab.
- Check Enable Detaching of Licenses. In the Initial Detach Limits section, you may also set the number of Reserved Licenses that are to remain non-detachable and the Max. Detach Duration in days, which automatically restores the license to the server after the set number of days has expired.
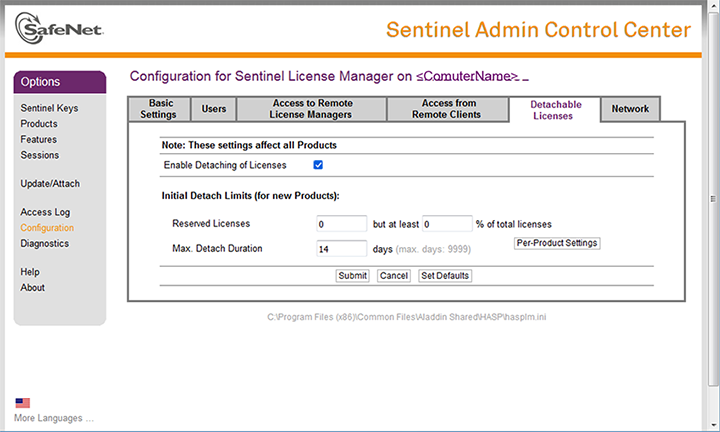
- Click Submit.
Once the license server has been configured you may now proceed to detaching a key:
- For detaching keys to client computers that are on the same network, see: Assigning a License to a Client Computer Attached to the Server
- For detaching keys to client computers that are offline or not on the same network, see: Assigning a License to a Client Computer Not Attached to the Server
Detaching a License to a Client Computer Attached to the Server
Detach a Key From the Server and Make it Available on the Client
- On the client computer, from the Sentinel Admin Control Center in the Options panel, click Products to view all available local and network keys. Detachable keys have a red arrow
 beside the Product Name and have a Detach button on the right.
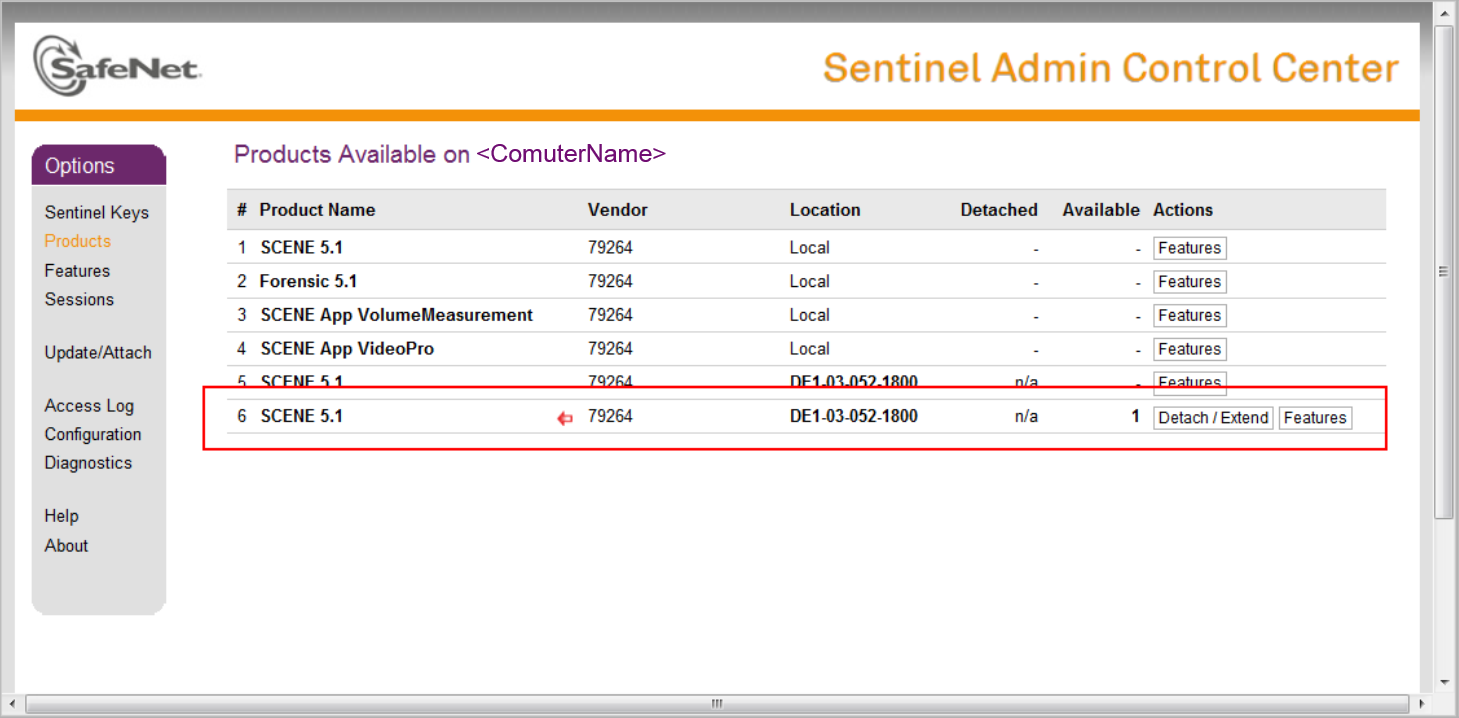
- Click the Detach button to make the key available to this client computer. The Detach form appears.
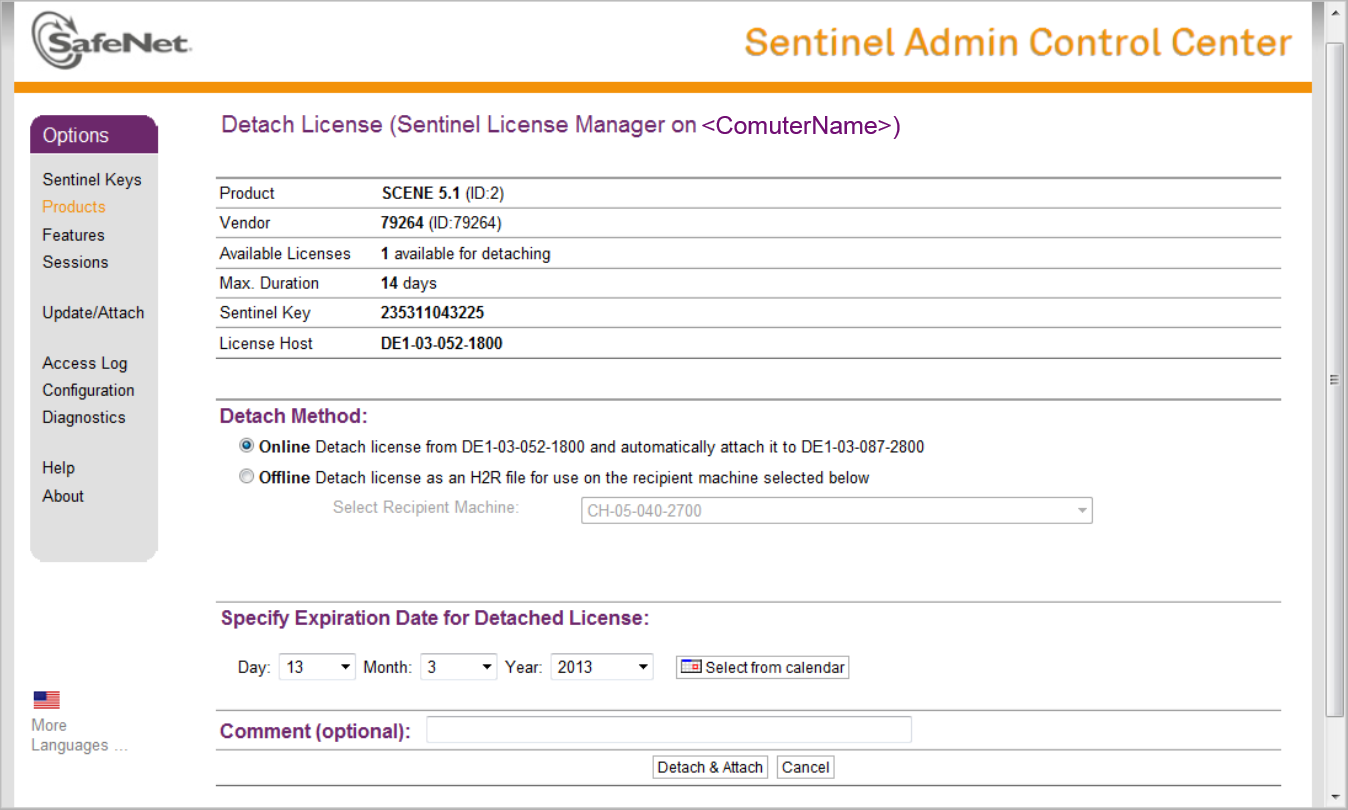
- Set the Expiration Date, the day the license will be restored to the server license pool, and click Detach & Attach. The selected date must be within the maximum number of days for which the license can be detached.
The license is temporarily attached to this client computer. The license key is returned to the network license pool when the expiration date is reached.
Returning a Detached Key to the License Pool Before the Expiration Date
You can override the expiration date for the temporary key on the client computer and return it to the license pool on the server at any time before the expiration date.
- On the client computer, from the Sentinel Admin Control Center in the Options panel, click Products to view all available local and network keys. The detached key is marked with a green arrow
 and has a Cancel License button to the right.

- Click the Cancel License button and confirm your selection on the next page. The license is now returned to the server license pool.
Detaching a License to a Client Computer Not Attached to the Server
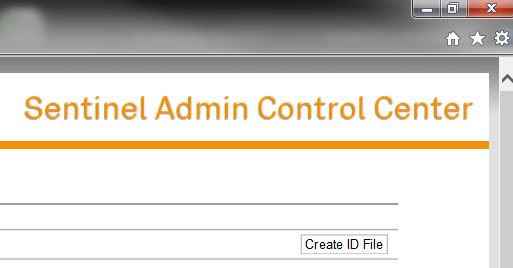
On the Client, Create an ID File
- On the client computer, open a browser and go to http://localhost:1947. This opens the Sentinel Admin Control Center.

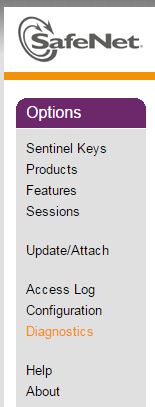
- In the Options panel on the left, click Diagnostics.
- Click the Create ID File button on the right and save the ID file to a storage media so you can transfer the file to the license server/computer.
On the Server, Apply the ID File
- On the server, save the file from your storage media to a location on the server.
- Go to the Sentinel Admin Control Center by opening http://localhost:1947 with an Internet browser.
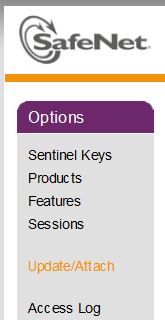
- Click on Update/Attach from the left hand side under Options.
- Click Browse and navigate to where you saved the ID File and click Open.
- Click Apply File. You should receive a prompt stating Your update was applied successfully.
On the Server, Create an .H2R File
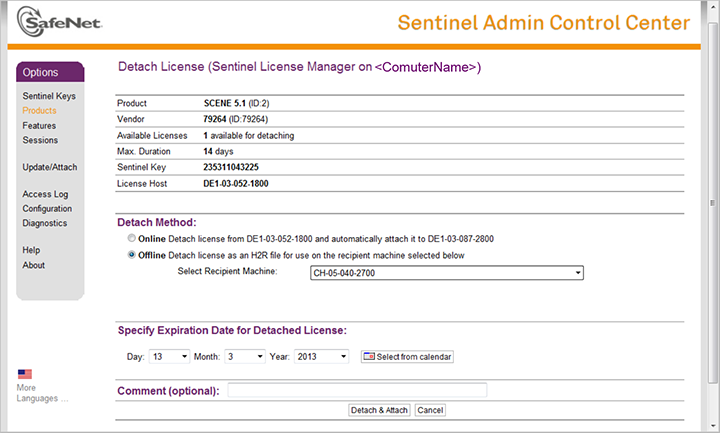
- From the Sentinel Admin Control Center in the Options panel, click Products to view all available local and network keys. Detachable keys have a red arrow beside the Product Name and have a Detach button on the right.
- Click the Detach/Extend button.
- The Detach form appears. For the Detach Method, select the Offline radio button. The Recipient Machine dropdown should list the client. Select the appropriate client.
- Set the Expiration Date, the day the license will be restored to the server license pool, and click Detach & Attach. The selected date must be within the maximum number of days for which the license can be detached.
- Save the .H2R file a storage media so you can transfer the file to the client computer.
On the Client, Apply the .H2R File
- On the client computer, click Update/Attach from the left hand side under Options.

- Click Browse and navigate to where you saved the .H2R file and click Open.
- Click Apply File. You should receive a prompt stating Your update was applied successfully.
The license is temporarily attached to this client computer. The license key is returned to the network license pool when the expiration date is reached.


![Toni Kroos là ai? [ sự thật về tiểu sử đầy đủ Toni Kroos ]](https://evbn.org/wp-content/uploads/New-Project-6635-1671934592.jpg)


