Monitor computer usage with Network LookOut Administrator Professional
This article is also available as a TechRepublic download and as a TechRepublic gallery.
The Network LookOut Administrator Professional product provides
you with a way to see live screens of remote computers, including servers,
employees, student machines, and more. Using this tool, you can monitor computer
usage in your organization to make sure that users are adhering to
organizational policies, or you can use the tool to provide help desk
assistance over the phone while making sure that the user is not having trouble
following your steps.
Network
Lookout Administrator Professional captures the physical console environment
and redirects the output to a remote workstation. The product does not use a
virtual desktop. Further, communication between the client and the host can be encrypted to protect your organization’s information.
Network
LookOut Administrator Professional is available as a download from the TechRepublic Software Library.
Installation
The
main installation window of Network Lookout (Figure A) gives you two options:
- Install the
console application — Use the option to install a management application and viewer. - Install the
client agent
— Use this option to install the client agent that communicates with the
console.
Figure A

Installation
To use the product, you must install an agent on each computer you
wish to monitor (Figure B). The
agent requires a password, and you need to choose a port number. A
password is necessary to prevent users from making configuration
changes to the client. The password is also used by the console when you
initially connect to the remote workstation. Note the check boxes at the
top of the window. These configuration options give you a way to change the
client password and to encrypt communication between the client and the
console.
Click
the Start Agent button to get started. Click OK when you’re done.
Figure B

Agent installation
Configuration
When
you run the console application for the first time, you are prompted to provide
a password that secures the console. After all, if someone managed to get to
your computer while you were away and you forgot to lock your console, you
probably wouldn’t want that person to be able to watch what everyone in the
organization is doing.
To monitor a computer, click the Add Computer option at the top of the
console window (Figure C). In the
Add Computer dialog box, provide the computer’s name or IP address, a friendly
name to use in the viewer, and the password you assigned when you installed the
agent.
If you
want to remotely install and configure the agent, click the Remote Agent
Installation/Configuration button.
Figure C

Add Computer
When
you add a new computer, you can configure some advanced options (Figure D) that help to determine how well the
application will perform, as well as other options.
First,
choose the TCP port that you wish to use for communication between the console
and the client. The two check boxes control how the console will connect to
remote clients when you initially start the console. If you select the
Automatically Connect At Start option, the console viewer will
attach to the client as soon as the console application starts up. You’ll see
only a thumbnail view, but the console will actively watch the client computer.
The Automatically Connect When Disconnected check box means exactly what
it says.
The
real meat here is at the bottom of the window. This is where you specify the
number of colors that will be displayed in the console’s remote view window.
The fewer colors you choose, the better the performance will be, since fewer
colors results in less network traffic.
Figure D

Advanced options
After
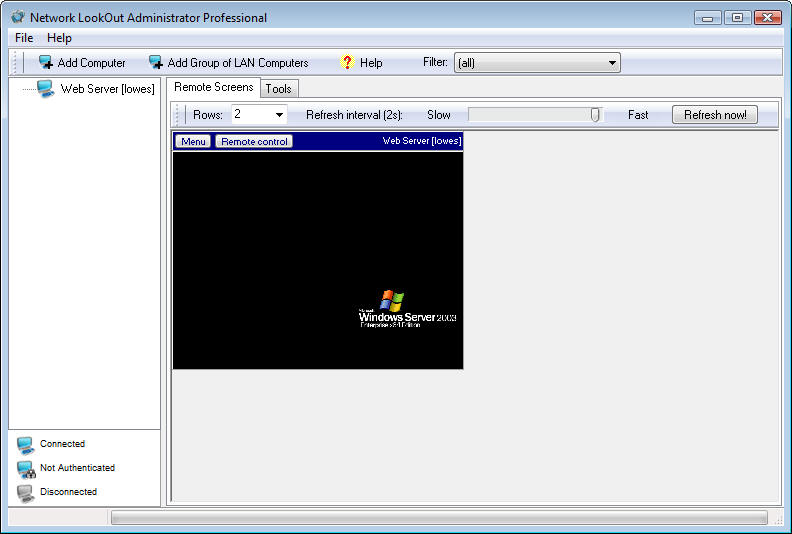
you add a monitored client to the console, a thumbnail view of that client
shows up on the console’s Remote Screens tab (Figure E). Note the two buttons at the top of the thumbnail view.
One is a Menu button and the other is a Remote Control button. Also note that
the monitored client’s friendly name is displayed above the thumbnail, along
with the name of the user currently logged into the system.
Figure E

A client is added
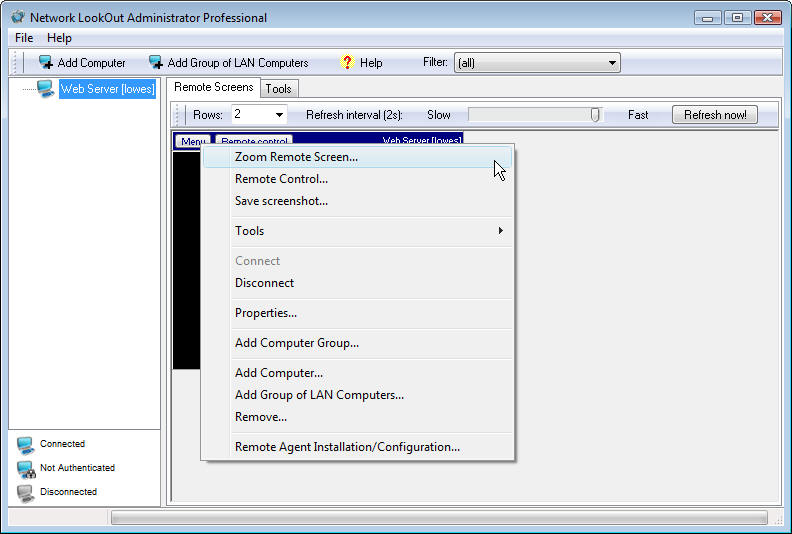
The Menu button
provides a number of options that help you use the product more effectively
(Figure F).
- Zoom
Remote Screen — Shows
the remote screen full size. This is a view-only mode. - Remote Control — This shows the remote
client at full size but is also interactive. - Save Screenshot — If you see something
particularly interesting on the remote client, use this option to save a
copy of the screen. - Tools — I’ll talk about this soon.
- Connect/Disconnect — If you’re connected to a
client, disconnect, and vice versa. - Properties — Open the Properties page for
the client. This is the same window you see when you choose to add a
new computer. - Add Computer
Group — If you have
a number of monitored computers, it’s easier to find a particular system
when the entire list is organized. Therefore, you can add a group into
which you can place individual monitored clients. - Add
Computer — Add another
computer to the list of monitored systems. Add Group Of LAN Computers —
Add monitored clients en masse. I’ll show this to you in a bit. - Remove — Remove the computer from the
management console. Note that this does not uninstall the remote
computer’s client. - Remote Agent
Installation/Configuration
— Remotely configure this computer’s client. You are prompted for a user
name and password when you choose this option.
Figure F

Menu button
The
Tools menu gives you a number of options related to the management of remote
workstations (Figure G). For
example, if a user left his desk and forgot to lock his computer, you can do
that for him by using the Lock Workstations option on the Tools
menu. As you can see, with the exception of actually turning a computer on, you
can just about completely manage a client.
Figure G

Tools menu
When
you select one of the options from the Tools menu, it’s not executed without
some input from you. A list of your monitored computers is first displayed so
that you can pick and choose which computers will be subject to the operation.
When
you remotely control a computer, there will come a time when you need to unlock
or log into the system. To do so, you need to use Ctrl-Alt-Del. However, if you
just hit the key combination on your keyboard, it will be executed only on your
local system. Therefore, when you’re in remote control mode, use the shortcut menu
(left-click the icon in the upper-left corner of the window) and choose
Send Ctrl-Alt-Del.
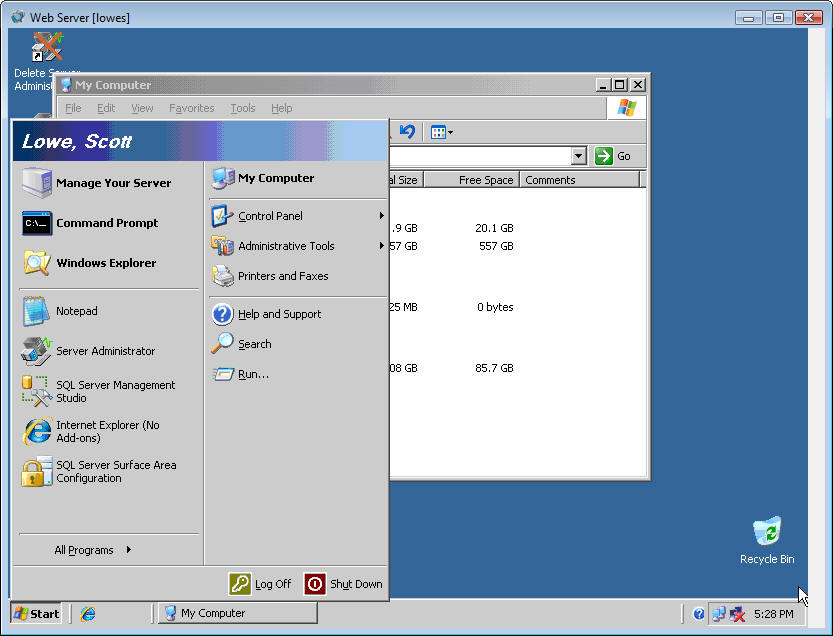
The
remote control option allows you to fully manage a computer as if you were
sitting at the physical console (Figure
H).
Figure H

Remote control
Like
the Tools menu, the Tools tab in the console window gives you a bunch of client
management options (Figure I). Many
of these are identical to what you saw earlier on the Tools menu, but there is
some new stuff here, including:
- A way to remotely execute programs.
- A way to open a Web site on the remote computer.
- A way to open a document on the remote computer.
Figure I

Tools tab
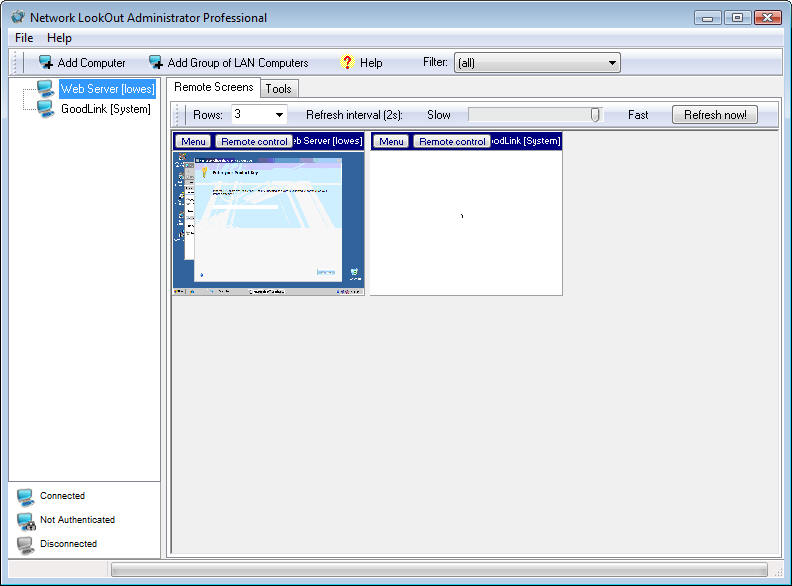
Network
Lookout allows you to monitor any number of clients. Each client gets its own
thumbnail view, as you can see in Figure J. By the way, for better performance as you add clients,
you can change the refresh interval by moving the slider bar that is positioned
between the Slow and Fast labels. The slider bar ranges from Live to 60
seconds.
Figure J

Thumbnails
If you
get to a point where you don’t need to monitor a client anymore, from the
client, open the agent and provide the agent’s password. Then, click the
Uninstall Agent button located at the bottom of the window.
Adding
computers individually can quickly become a tedious process. Therefore, if you
have a number of computers you want to add, use the Add Group Of LAN
Computers option located at the top of the main console window (Figure K).
From
the Add Group Of Computers window, place a check mark next to each computer on which you would like to install the LookOut agent. If you want to add all
computers in the domain, choose the Select All option. Provide a password for
the agent. Every computer will use this password for client agent management.
Also choose the color level, bearing in mind that fewer colors results in
better overall performance.
Select
the check box next to Remotely Install Agent Where Possible to avoid
having to walk around to each client to perform a manual installation. Click
the Add Computers button when you’re ready to proceed.
Figure K

Add domain
After
you select the computers you want to add, you need to provide the details for
an account that has permission to install the client agent. Use an account with
domain admin privileges for this task. The console window (Figure L) will let you know the status of the installation process.
Figure L

Remote console
My take
Network LookOut Administrator can be an incredibly useful
product for an IT help desk or for a company that wants to monitor the
computing activity of its employees.
The
company actually produces four products:
- Net Monitor for Employees
- Net Monitor for Employees Professional
- Network LookOut Administrator
- Network LookOut Administrator Professional
Net Monitor for Employees is the most limited of the group and does not even
support remote agent installation, nor does it support remote control. It’s a
view-only product. Net Monitor for Employees Professional, on the other hand,
is the most feature-filled of the four and even includes the ability to record
a remote desktop. Outside of a help desk scenario, I can see where this line of
products would be useful in organizations worried about employee productivity
or adherence to computing policies.


![Toni Kroos là ai? [ sự thật về tiểu sử đầy đủ Toni Kroos ]](https://evbn.org/wp-content/uploads/New-Project-6635-1671934592.jpg)


