
How to create and manage Docker networks
Docker allows you to create specific networks and attach containers to them. Here’s how to make use of this highly flexible feature.
We may be compensated by vendors who appear on this page through methods such as affiliate links or sponsored partnerships. This may influence how and where their products appear on our site, but vendors cannot pay to influence the content of our reviews. For more info, visit our Terms of Use page

Docker is one of the most flexible and user-friendly container systems on the market. Once up to speed on the platform, there’s very little you can’t do. Of course, the more you learn about Docker, the more you realize there is to learn about Docker. One such instance is Docker networks. Did you know you can actually create networks that offer complete isolation for Docker and then deploy containers on those isolated networks?
Out of the box, Docker creates three networks:
- bridge – An automatically generated network with a subnet and a gateway.
- host – Allows a container to attach to the host’s network.
- none – A container-specific network stack that lacks a network interface.
Docker connects to the bridge network by default; this allows deployed containers to be seen on your network. Let’s see how we can manage those networks, create a new network, and then deploy a container on our new network.
Mục Lục
Viewing networks
To view the current list of Docker networks, issue the command:
docker network ls
The above command will list out the Docker networks (Figure A).
Figure A

You can get more information on a particular network, by issuing the command docker network inspect NAME (Where NAME is the name of the network you want to view). If you want to view details on the bridge network, that command would be docker network inspect bridge. The output of that command would give you all the information you need about that network (Figure B).
Figure B

Creating a new network
I’m going to demonstrate how to create a bridge network and then show you how to deploy a container on that network. We’ll create a network called isolated. The creation of this network can be achieved with a single command:
docker network create --driver bridge isolated
The output of that command will be a long string of characters that represents the ID of that newly-created network (Figure C).
Figure C

Run the inspect command on that newly created network with the command docker network inspect isolated to see that our new network has been automatically given its own subnet and gateway (Figure D).
Figure D

But what if you want to create a network with a specific subnet and gateway? That’s possible as well. Let’s say you want to create a network with a subnet of 192.168.2.0/24, a gateway of 192.168.2.10, and the name new_subnet. The command for this would be:
docker network create --driver=bridge --subnet=192.168.2.0/24 --gateway=192.168.2.10 new_subnet
Once created, inspect the network, with the command docker network inspect new_subnet to see the results (Figure E).
Figure E

Attaching a container to a networking
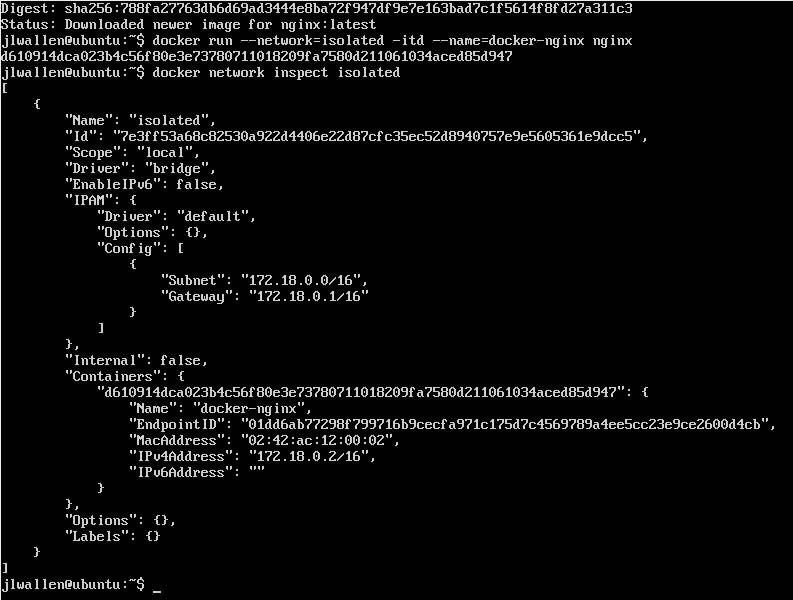
Let’s attach a container to our newly created network. Say you’ve already pulled down the nginx image and want to launch a container, named docker-nginx, attached to the isolated network. To do this, the command would look like:
docker run --network=isolated -itd --name=docker-nginx nginx
If you now run the command docker network inspect isolated, you’ll see that the container has been attached (Figure F).
Figure F
Any other container you create on this network would be able to automatically connect to one another. So if you create a database container on isolated, it would be available for any other container on the same network.
Making Docker even more flexible
With the ability to create specific networks and associate containers with them, Docker becomes even more flexible. For more information on Docker networks, check out the official Docker networking documentation, which outlines quite a lot of information.


![Toni Kroos là ai? [ sự thật về tiểu sử đầy đủ Toni Kroos ]](https://evbn.org/wp-content/uploads/New-Project-6635-1671934592.jpg)


