How to create a Facebook page for your blog – Fat Mum Slim
How to create a Facebook page for your blog
One thing I learned whilst being over at the Disney Social Media Moms conference was that Facebook is going to continue to play a big role in blogger’s lives, in one way or another. Facebook are keen to listen to us, love our feedback and will continue to change and evolve.
Creating a Facebook fan page is easy, but I’ll break it down for you so that even my Ma could make one.
1. You’ll need a personal Facebook account to start. If you’re not keen to have a personal Facebook book account, don’t fret, you can make it as private as you like. It’s just the first step in creating a fan page. Click here to sign-up.
2. Now it’s time to create a page. Click here to start setting one up.
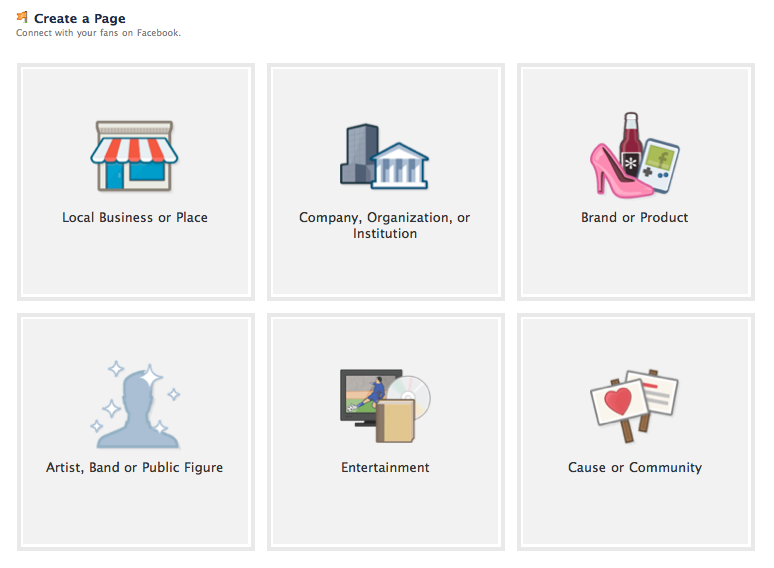
3. Next you’ll have to decide what your page is. Don’t worry if you can’t see an appropriate option, as once you’re signed up you’ll be given more options. If you’re a personal blogger I’d suggest clicking ‘Artist, Band or Public Figure’. If you have a product or service attached to your blog then just choose the appropriate category.
 4. Once you’ve clicked the box to choose the category in which your page belongs, then select from the drop-down menu whichever suits you best. For a personal blogger, I’d choose Writer. Add the name of your page – ie your blog’s name {spaces allowed}, tick the box and click Get Started.

5.
You’ll be then taken to your page, which looks confusing and a bit of a hot mess. Again don’t worry. You’ll get there. At the top of the page you’ll see two drop down menus to confirm your page’s category. Your selections will be public {appearing at the top of your page}, so choose what best describes what you do. I chose
Website & Blogs
, and then
Personal Blog
.

6.
For the next steps you’ll follow Facebook’s lead. You don’t have to do any or all of these steps in order to get started. You can come back and do any of these at a later stage.
For the next steps you’ll follow Facebook’s lead. You don’t have to do any or all of these steps in order to get started. You can come back and do any of these at a later stage.
Here are a few more details for each step:
-
Upload an image
– This will be your profile image and will be how your readers/customers will visually connect with your page. I’d suggest using a logo, or something that represents your blog. This image can be 180 pixels by 540 pixels {next week I’ll show you some great Facebook profile images that you can use as inspiration}. Just upload an image at this stage, and don’t worry about the sizing – Facebook will resize it to fit your page
-
Invite your friends
– If you already have a Facebook account with a plethora of friends who you don’t mind sharing your blog with, tell them about your blog {click
Suggest to Friends
}. If you didn’t have a Facebook account or a gaggle of friends, you can share your Facebook page on your blog, or on Twitter or wait until you build up your friends list
-
Tell your fans
– If you have a database list that you send newsletters out to, or have a list of contacts saved as an CSV or Excel file, then you can share your page with them by uploading them
-
Post status updates
– Now you’re ready to share your page with the world. Start by sharing a link to your latest post. Go on!

-
Promote your page on your website
– You can add a like box to your website easily by customising how you want it to appear. I suggest firstly measuring the width of your sidebar so you know which width will look cleanest on your blog. Copy & paste the URL of your Facebook page into the first box {see below}.

-
Set up your mobile phone
– Follow the steps to set up your mobile phone so that you can send text messages to update your page’s status
You’ll be then taken to your page, which looks confusing and a bit of a hot mess. Again don’t worry. You’ll get there. At the top of the page you’ll see two drop down menus to confirm your page’s category. Your selections will be public {appearing at the top of your page}, so choose what best describes what you do. I chose, and then
7. You’re ready to roll! There are many different ways you can grow your Facebook page, and I’ll share some of those in the coming months. My best advice is just jump in. There’s no right or wrong. In the beginning you might feel like you’re talking to yourself, but it will help your page to gain momentum.
Good luck. x

You May Also Like


![Toni Kroos là ai? [ sự thật về tiểu sử đầy đủ Toni Kroos ]](https://evbn.org/wp-content/uploads/New-Project-6635-1671934592.jpg)


