How to build a Raspberry Pi NAS – Raspberry Pi
Mục Lục
How to build a Raspberry Pi NAS
All tutorials

Network-attached storage (NAS) allows you to save files from your computer and mobile devices to external hard drives via your home or office wireless network. Using Raspberry Pi, you can connect your existing storage devices — such as external portable hard drives and USB flash drives — to create secure backups of all your important files, accessible from anywhere in the world.
What you’ll need
Shopping list
- Raspberry Pi
- USB-C power supply unit (PSU)
- microSD card
- Powered USB hub
- Ethernet cable
- External storage
Choosing the right Raspberry Pi and accessories
The faster your Raspberry Pi, the faster your data will save to your external storage. For this reason, we recommend using a Raspberry Pi 4 8GB, but any member of the Raspberry Pi 4 range should do the trick.
If you’re using a Raspberry Pi 4 or a Raspberry Pi 400, you will need a USB-C power supply and a micro-HDMI-to-standard-HDMI cable. Older models will require a micro USB power supply and a standard-HDMI-to-HDMI cable instead.
Power supplies come in a variety of formats, and you may find that an unofficial model such as a phone charger won’t be powerful enough for your Raspberry Pi. For ease and reliability, we offer affordable official USB-C and micro USB power supplies in a variety of regional formats. If you plan to use your own power supply, you’ll see a lightning bolt in the top right corner of your screen if it’s not supplying enough power to the computer.
Install Raspberry Pi OS Lite
We’re going to use Raspberry Pi Imager to install Raspberry Pi OS Lite onto your microSD card. Raspberry Pi Imager is available for free for Windows, macOS, Ubuntu for x86 and Raspberry Pi OS, and can be downloaded here.

Open the Imager application and connect your microSD card to your computer
Connect your microSD card to your computer using an SD card adapter. We recommend a minimum storage size of 16GB.
Install Raspberry Pi OS to your microSD card
In Raspberry Pi Imager:
CHOOSE OS: Raspberry Pi OS can be found under Raspberry Pi OS (other). We’re using the smaller-sized Raspberry Pi OS Lite, as we do not need the desktop environment for our project.

Open advanced menu: press Ctrl-Shift-X to bring up the Raspberry Pi Imager advanced menu, or click the Advanced Menu button.
Enable SSH: check the Enable SSH box and set a username and password. You’ll need these details to access your Raspberry Pi and network storage.

Select save to close the advanced menu.
CHOOSE STORAGE: select your microSD card.

Finally, select Write.

Once complete, you can remove your microSD card from your computer and insert it into your Raspberry Pi.
Storage options
For this tutorial, we’ll be using a portable USB hard drive and an internal hard drive with a SATA-to-USB adapter. You can also use a USB flash drive if you prefer. We recommend clearing your drive of data, as you may need to format it later on in the process.
To maintain a consistent power supply to your external hard drives, it is best to use a powered USB hub to connect your storage to your Raspberry Pi.
Setting up your Raspberry Pi
Your Raspberry Pi needs to be connected to your network via an Ethernet cable. For most people, this means connecting the device directly to your router. Once connected, attach your storage to the powered USB hub, and the hub to your Raspberry Pi. Lastly, connect your Raspberry Pi to the mains power via a USB-C power supply unit.
Retrieving your IP address
In order to access your Raspberry Pi via SSH from your usual computer, you’re going to need the Raspberry Pi’s IP address. An IP address is a unique string of numbers that identifies a device on your network. The easiest way to find it is to access your home router and check what devices are connected via Ethernet (LAN). The login details for accessing your router should be printed on it (look for a sticker on the side or the base), or alternatively you will be able to find them on the website of the router’s manufacturer (or of your ISP if they provided the router).
Connect via SSH
Open Terminal on your computer and run the following, replacing “pi” with your previously chosen username, and XXX.XXX.X.XXX with your Raspberry Pi’s IP address to access it:
ssh [email protected]
When asked for your password, use the password you created in Raspberry Pi Imager.

To ensure your Raspberry Pi is set up correctly for networking, run:
sudo rm -f /etc/systemd/network/99-default.link
When finished, run the following to reboot your Raspberry Pi:
sudo rebootOpenMediaVault
We’re going to be using a free piece of software called OpenMediaVault to manage our network storage. OpenMediaVault offers an easy-to-use, web-based interface, and multiple add-on options for advanced users.
Installing OpenMediaVault
Once your Raspberry Pi has booted up again, go to the Terminal and SSH back into it again.
ssh [email protected]
To install OpenMediaVault, run:
sudo wget -O - https://github.com/OpenMediaVault-Plugin-Developers/installScript/raw/master/install | sudo bash
Once complete, close Terminal.
Setting up OpenMediaVault
Open the internet browser on your usual computer and type your Raspberry Pi’s IP address into the address bar.

Sign in to OpenMediaVault using the following credentials:
Username: admin
Password: openmediavault
Change your OpenMediaVault admin password
Select the “cog” icon in the top right corner to open settings and change your OpenMediaVault admin password.
Set up network access
Select Storage and then Disks. All your attached storage, including the SD card, should show. If not, double-check everything is plugged in correctly and reboot the system.

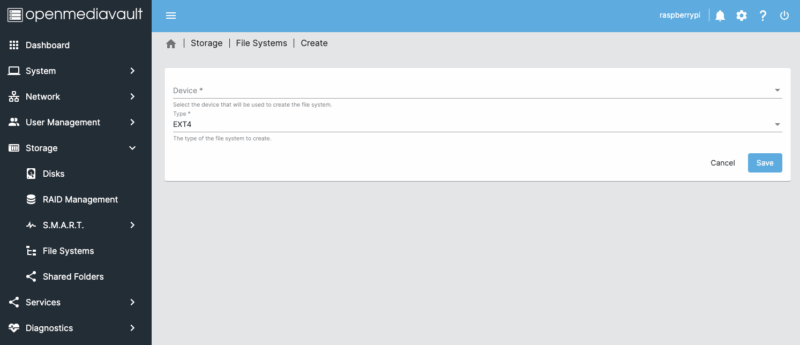
Next, navigate to Storage and File Systems. You likely won’t see anything here, so select Create. Here, you can select your storage device. We recommend selecting EXT4 for the drive format. Select OK and close.

Select the file system to mount it and apply changes.

Now, we need to create a shared folder.

Navigate to Storage and Shared Folders and select Create. Here you can name the folder, select which drive it should exist on, and grant permissions to users. By default, the permissions should be correct, but you can tweak them if you prefer a different option for your network preferences. Save and apply changes.
Lastly, we need to make sure computers on your network can find the folder.
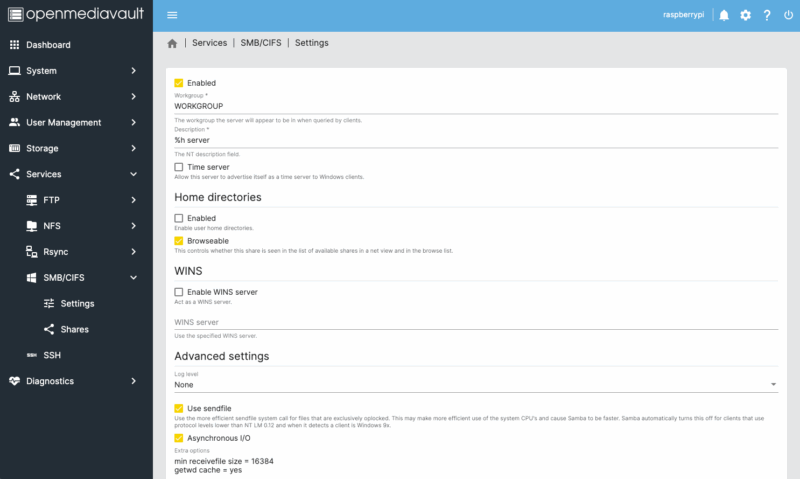
Navigate to Services and select SMB/CIFS.

Under Settings, check the Enabled box and save. Under Shares, select Create, add your shared folder, and save.
Your NAS system should now be ready to use.
Access your NAS from macOS
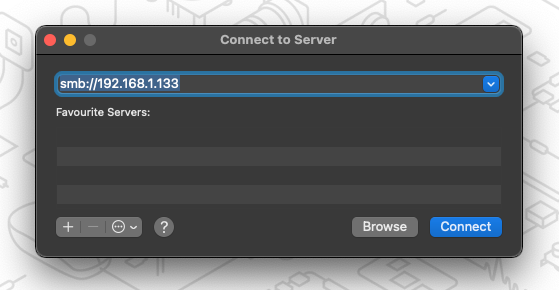
From your desktop, press Command+K. Type smb://XXX.XXX.X.XXX (replace with the IP address of your NAS Raspberry Pi).

Enter your username and password. Your username and password will be the ones you created in Raspberry Pi Imager.

Your shared folder will now show in a finder window.
Access your NAS from Windows
Open Windows Explorer. In the path bar, write \\XXX.XXX.X.XXX (using the IP address of your Raspberry Pi NAS).
That should create a new entry under Network in the left navigation bar and show its contents. Double-click on the share you want and enter the username and password that you created in Raspberry Pi Imager when prompted.
Access your NAS from an iPhone
You can connect your iPhone to your NAS system using the iOS Files app.
Open the app, navigate to the Browse view, and select the “three dots” icon in the top right of the screen.
Here, you will see a Connect to Server option. Enter the IP address of your NAS Raspberry Pi and, when prompted, enter the username and password you created in Raspberry Pi Imager, then tap Enter.
Help and support
If you find yourself having issues with OpenMediaVault, the best place to visit is the OpenMediaVault Forum. For support with official Raspberry Pi products, please visit the Raspberry Pi Forums.


![Toni Kroos là ai? [ sự thật về tiểu sử đầy đủ Toni Kroos ]](https://evbn.org/wp-content/uploads/New-Project-6635-1671934592.jpg)


