
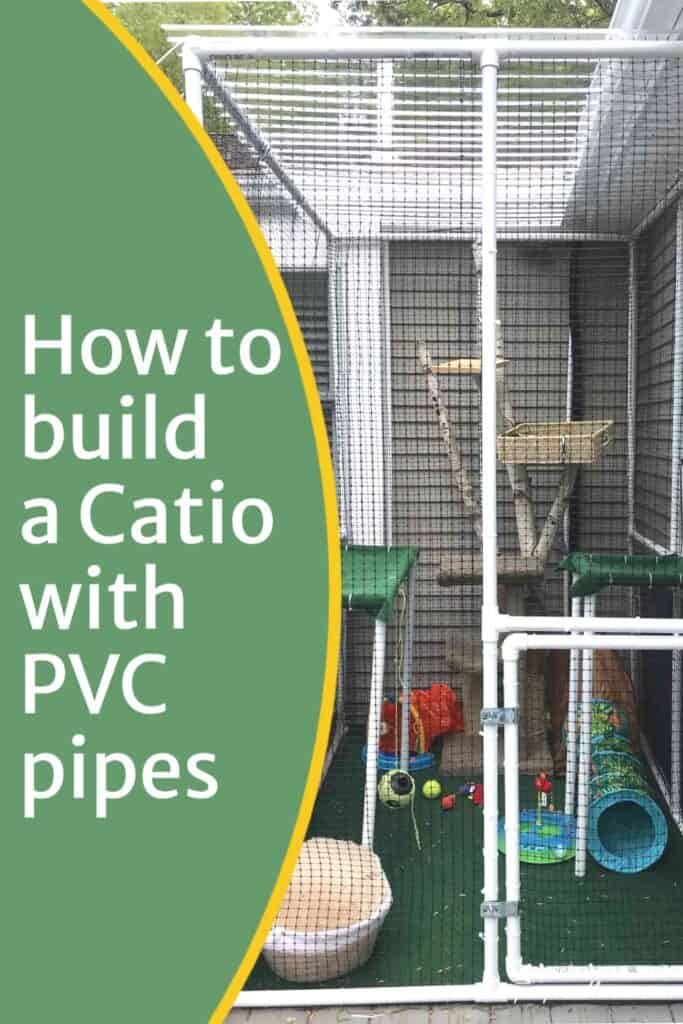
How to build a Catio with PVC pipes
Building a PVC Catio is easy, inexpensive, and fun to build. I will show you exactly how to build a catio with PVC pipes step-by-step and your cats will love you for it!
A couple of years ago I built a wooden cat enclosure, or catio, for my indoor cats. But, after a few years of storing it outside during the winter, it started to rot and get moldy.
When I first built it, I was afraid of sealing it in fear that the cats would chew on it and get sick. So, I took my chances and time took it’s toll. I thought about fixing it, or building a new one, but it would just rot again. Therefore, I needed an alternative to wood and screen, so I thought “how about PVC?”
I found a lot of PVC cages you could purchase custom made for a few thousand dollars each!!! YIKES! That wasn’t going to happen so, I decided to build my own.
BTW, I made the entire enclosure for $300.00.
This post may contain affiliate links. If you choose to purchase a recommended product, I may receive a small commission at no additional cost to you. Rest assured that I will not recommend any product that I would not use myself. For our full policies and disclosures click here.
Mục Lục
What is a Catio?
A catio is a structure built to allow your cats to have some outdoor time in a safe place. Also known as an outdoor cat enclosure, outdoor cat shelter, or cat run, a catio gives your kitty to get some fresh air and sun when they would otherwise be in danger of doing so.
Therefore, catios are purrfect for indoor cats. You see what I did there? LOL
Catios, or outdoor cat enclosures, can be made in many different configurations, materials, and sizes. If your building your own, you’re only limited to space available, your budget, and your imagination.
Why build a catio out of PVC?
There are a few different materials you could build your outdoor cat enclosure with, but in my opinion PVC is the most versatile.
Like I said above, building a cat enclosure out of PVC will allow you to keep it outdoors without fear of it rotting and falling apart. PVC is a plastic that cannot rot or break down so it’s perfect for outdoor use.
PVC is also very lightweight and will allow you to move the entire enclosure to another area if you wish. Or if you want to store it during the winter, you can easily take it apart to store it.
For those concerned with the effects of PVC, here is a couple articles with both the pros and cons of using PVC products. Is PVC Safe? The Vinyl Debate , 7 Myths About PVC – Debunked
The PVC catio, or PVC cat enclosure, is made out of PVC pipes and plastic garden fencing.
A lot of you were concerned about other animals getting into the catio with the plastic so I wanted to give you another option. I just recently upgraded my catio using a wire fencing material that is more durable than the plastic fencing. I must say that it is a lot sturdier but keep in mind that the cats can now reach thru this material because the holes are larger. Just something to think about.
I connected the sections using PVC connectors to make the frame, and used zip ties to secure the netting to it. The roof is made out of clear plastic roofing material.
Update: I have since found a better way to attach the gate to the patio. Check out these PVC hinges updated in the supply list.
I also had a reader share her Catio with me and she found these products that are pretty interesting. You may want to check these out. Thanks Linda 🙂
12″ Hook and Loop Cable straps
12″ Poly Webbing Strap and Buckles
Snap Clamps for PVC Pipes
Pvc Cat Enclosure supply list and printable directions
I have made a list of all of the supplies I used to build my catio and included it in my printable version of this post with instructions. Your measurements could be slightly different depending on the size and configuration of your cage. But, if you decide to build yours to my exact specifications this would be your supply list.

 Get a beautiful 30-page printable version of this post without all the annoying ads and non cat related info? Comes with a clickable shopping supply list for just $14.99
How to build your catio frame out of PVC Pipes
I built the catio so that my cats can climb out of the living room window directly into the enclosure. But you can definitely build a totally enclosed, free standing cage that you could put anywhere. One of the benefits of a PVC enclosure is that it’s very light so you can move it easily.
First, I decided on the overall size of the cage. This was easy because I already knew exactly where I wanted it to go (on my deck where the other cage was.) So I built it to those exact measurements. My catio’s finished measurements were 74″ long x 55″ wide by 90″ tall.
Design and sketch out your plan
The first thing you need to do is to determine what your catio will look like. I decided on making a basic 4-sided frame with a door on one end and a window one side so they could have access from the house through a window.
Sketch out each of your 4 walls with measurements and any structures you want to add. This way you can see exactly what cuts you will need to make, and how many and what kind of connectors you will need. I added 2 perches for my cats so I needed to make sure to add 3-way connectors on my cross pieces. Read more about this below.
Start building your frame from the floor up
To begin building you will need to lay out your outer frame starting with the floor and working up. My overall measurements where 74″L X 55″W X 90″H. Make sure you have a little wiggle room because the final outside measurement will depend on your cuts and connectors.
Begin with your first wall. To measure out your cuts of the PVC pipe for each wall your basically going to take your full length measurement and subtract 1″ for each place you will connect to a fitting.
For example my first wall was the wall with a door. Because I needed to frame out my door opening I added a middle upright to the wall. See image below. It measured 55″ wide total but had (2) 3-way fittings for the corners and (1) center tee fitting that connected two pieces of PVC on each side. So I needed to subtract 1″ X 4. (1″ for each end piece I’m connecting to and 2″ for the center fitting because it connects there in two spots.) This is an approximate formula that worked for me.

 Catio Themed Project Planner
Start cutting your pieces and add connectors
Figure out your new length and cut a piece of PVC pipe to this length. Now you will cut this piece into two sections. If you have more than 2 sections you will cut your pipe into how ever many sections you have. 3 sections into 3 pieces, 4 into 4 pieces etc.
You will need a ratcheting PVC cutter or a saw to cut your PVC. Here are some from Amazon or you can get them at Home Depot.
Now you need to add your connectors. You will need a 3-way connector for each of the ends to make a corner. Now you can connect your walls both vertically and horizontally.
You will also need a 3-way Tee connector to connect your wall sections in the middle for added support if your wall is long. Or add them if you are adding uprights for doors, windows, etc. I added middle connectors because I am adding horizontal cross pieces in the middle of two walls to connect perches for the cats. I want added support to hold it. Now you can connect your PVC pipes together to form your wall base frame.

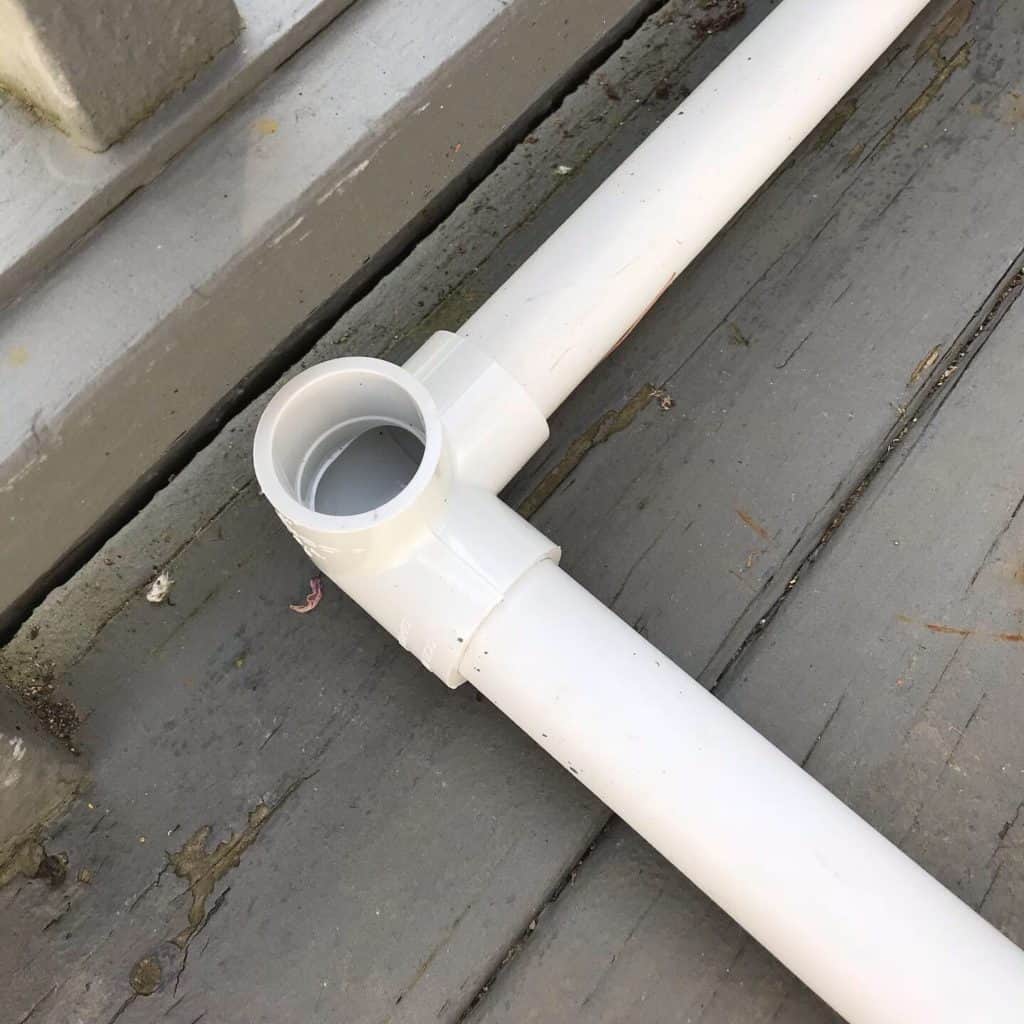 3-way corner fitting

 Tee center fitting

 Finished floor frame
Begin adding the walls to the catio
Once you have your base frame connected you can start adding the uprights. First you will need to determine the height of your frame and subtract any end connectors (top and bottom) and any middle cross pieces just like with the base.
For example: for my walls where I am adding the horizontal cross pieces I will need to subtract 1″ X 4 again. 1″ each for the top and bottom fittings and 2″ for the center cross fitting. If you are adding a door or windows you will need to keep the framing in mind so you will know how many cuts to make and the sizes.
Note: If you are going to add a solid roof then remember to make one wall slightly taller to allow rain to run off. Read more about this below.
Because of my perches and door, most of my uprights will be cut in half. See the image below. Both the right, left and front sections need to be cut in two so you can add the horizontal cross pieces. The only upright that was full length for me was the center in the back section. This is because I didn’t have any cross pieces in the back. Center back upright not in photo. Also, I changed out the wall connector on the front center section on the right to a 4-way elbows so I could frame the door. Read more about this under framing a door or window.
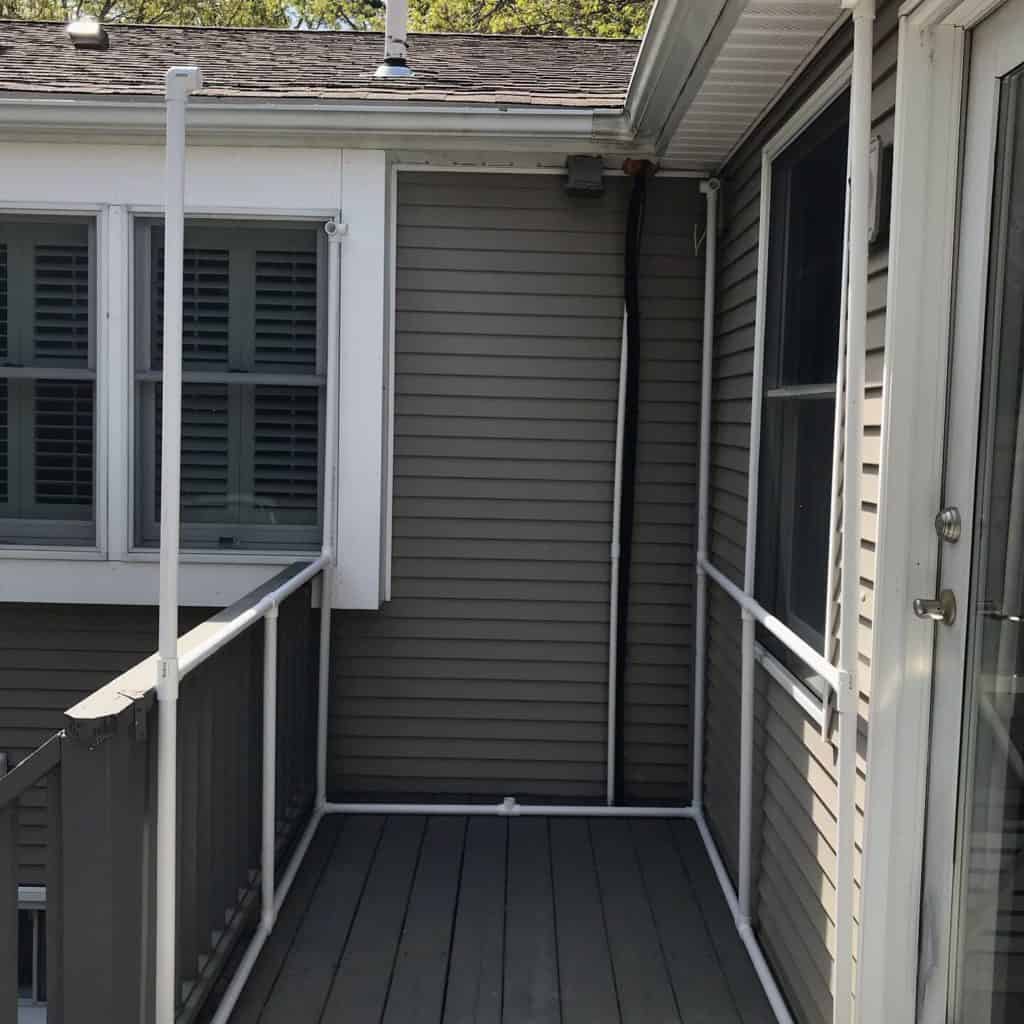 Beginning of upright installation. Picture of two side walls with vertical corner pieces and horizontal cross pieces installed. One along the top of the railing and one in front of the window.
Framing a door or window in your catio
If you are building a door or window you will need to add more PVC pipes and connectors to the walls to frame them. See the image below for a visual example of a door
 View of door framing. Door in this image is not permanently attached.
In order for me to build the front wall with the door I needed to change the upright walls a little. On the right side middle of the front wall, I needed to add a 4-way connector making this upright into two sections. This is so I could add a cross piece in two directions (one for the top of the door and one for the right side support in front of the window. I also added a Tee connector in the center upright making it into two pieces as well.
My door opening ended up being 35″ tall by 25″ wide so I made my door 34″ tall by 24″ wide. This left 1/2 inch all the way around the door.
You will then attach the door to the catio with PVC hinges and 2 – 3 1/2″ zinc swivel hasps.
Note: in the picture above it is just temporarily zip tied so it looks like it has more space than that.
Building a door
Building the actual door is the easiest part. You will just connect your PVC pieces using 90 degree elbows. Just measure the door opening, leaving 1/2 inch to an inch around each side. Then do the math of subtracting 1″ for each connection just like with the walls. My example: Opening = 34″ minus 2″ for elbows. And 24″ minus 2″ for elbows. This = 22″ PVC pipes for top and bottom and 32″ PVC pipes for sides.
How to make a window
If you were going to add a window then you would need two horizontal cross sections and two vertical cross sections. I actually didn’t frame the window I made next to the house. I just cut a section of the netting out and had the bottom cross section which I used for a perch. This isn’t how I would have you do it. I really didn’t need support around the whole window for my design because it was up against the house.
Note: I couldn’t find an image of a finished window. You would basically build it the exact same way as a door, just in a smaller size and in the middle of the wall instead of at the bottom.
Attaching the netting to your catio
Once you have all four walls constructed and connected you can begin to attach the fencing. I purchased a roll of Blue Hawk Plastic Blanket garden fencing that was 4′ wide. This product was so easy to cut and install because it is made of plastic instead of metal. I hung the fencing from top to bottom connecting each piece with 8″ long zip ties. I did this all along each PVC pipe section from the inside.

Making sure your cats are secure
For the cats I attached a zip tie every 6″ or so just so they couldn’t squeeze thru any opening. I used clear ties so you wouldn’t see them from the outside of the catico.
Note: Make sure when you are installing the fencing that you are cutting the zip ties short and turning them away from the inside of the catico. This is so your cats can’t get cut on them. Also, make sure when you cut your fencing to size that you trim off any pointy ends for the same reason. See image below
When moving onto the next section I overlapped the previous section a few inches. I did this just to add a little more stability and security to the fencing. Then I also attached the new section to the posts with the clear 8″ ties. And attached the fencing to itself with 4″ black ties to make double sure the cats wouldn’t sneak thru any openings
 See the overlap of the fencing that is connected to itself with 2″ black zip ties. Also be sure to cut the pointy ends exposed.
Move all the way around the entire enclosure adding fencing with 8″ ties to every PVC frame both horizontal and vertical, including window and door pieces. Once you finish adding all of the fencing you can cut any openings you need to for your door and windows. Again, make sure to trim off any pointy edges exposed.
Update: I have had some people mention that the garden fencing may not be secure at keeping other larger animals OUT of your catio. Although the fencing has been more than sturdy enough for keeping the cats in, I hadn’t thought about keeping other animals out because mine is on my deck, in my fenced in yard, and we close it up at night so the cats are inside the house.
So, please be mindful when choosing what material you wish you use for the catio fencing. If your cats could be exposed to wild animals or dogs, you may wish to use chicken wire or some other metal fencing in place of the plastic garden fencing. No matter what material you choose the assembly will be the same as long as the fencing is pliable and has holes for attaching it to the PVC.


You might like this…
If you don’t have outdoor space for your cats then how about giving them their own space inside? I’ll give you everything you need to think about including inspiration, projects, and products to give your cat the best Cat Room ever! Read: “Awesome Cat Room Ideas for your Home”
How to add a roof to your Catio
Now you could add fencing to the top if you wish, connecting it the same way as the walls. I decided to add a plastic roof to mine so the cats could still enjoy being outside even if it’s raining.
I purchased 26″ x 6′ Corrugated Polycarbonate Plastic Roof Panels to make my roof. This is a thin, clear plastic, corrugated material. It was perfect to keep out the rain and to let the sun shine thru. My enclosure is in a corner next to my house so it doesn’t ever get direct sun, so I don’t have to worry about the cats getting too hot. However, they do sell colored and tinted panels if you want to provide shade for them.
To install them I measured my outer frame and added a little extra for overhang and cut them to that length. Then I connected 3 panels together, overlapping slightly to make my width. I connected them together by drilling 2 small holes close together where they overlapped, then secured them together with the 8″ zip ties. I did this about 4 times across for each overlapped section.
Finally, I attached the whole thing to the top of the catico frame by drilling holes near the edges and also using zip ties to secure it.
Make sure you leave a slight pitch if your going to use a roof so any rain will drain off. These panels are not very rugged and if rain collects on them they will sag. I am also planning on adding a cross piece of wood or plastic decking board to the top of the catio just to help support the middle of the roof in case of heavy rain. You could also switch out your top/middle connectors with a 4 way connector and add a pipe across the middle of the roof for added support.
Or you can add the pitch simply by having one wall slightly higher then the others. You don’t necessarily need to cut one wall higher though. Just hammer down all the other sides so the PVC pipes are sitting into the fittings a little bit tighter. This should be all you need for the water to run off.
 corrugated roof for catico
Building the perches inside your Catio
Now it’s time for the fun part…adding some structures for your cat to relax and play on.
I decided that I wanted two perches for them to lounge on. I added one in front of the window (also as a landing for when they come into the enclosure.) The other one was on the opposite wall so they could look down over the deck.
To make these I had already installed 3-way connectors where my cross pieces were. Now I just had to add some small pieces of PVC pipe and two more 3-ways to connect them. This allowed me to give the perches legs for stability. I made my perches 14″ x 14″ near the window and 36″ x 12″ along the deck.
Next I used some Green Indoor/Outdoor Area Rug pieces and attached them to the perch frames using zip ties. This gave them a soft place to relax. You can use any type of sturdy fabric you want to make them as long as it can be out in the weather.
 Perch for cats made from PVC frame and EcoRug grass carpet
Add finishing touches to your Catio
Finally I finished the whole project off by adding the GreenRug to the floor of the catico. It’s not quite grass but gives it the look of grass. Or you can use any type of outdoor rug to give your catio some personality.
Then it was time to decorate and bring in the toys. I had already made a cat tree out of a purchased stand, some pieces of birch tree, and a basket. So, I put it in the catio and it fit perfectly. Now they have something to climb on.
Then I added a ball that I hung from one of the perches and a few store bought play things for them to explore. I really think they love it!
 The finished Catio – Cat Enclosure
PVC Catio plans, printable PDF version
Get a beautiful 30-page printable version of this post without all the annoying ads and non cat related info? Comes with a clickable shopping supply list for just $14.99
More great cat posts…


![Toni Kroos là ai? [ sự thật về tiểu sử đầy đủ Toni Kroos ]](https://evbn.org/wp-content/uploads/New-Project-6635-1671934592.jpg)


