
How to Upload Files and Images in Your Django Application
Mục Lục
How to Upload Files and Images in Your Django Application
Django file and image uploads
 Photo by: Matthew Henry
Uploading files and images occur every day, whether you are sending documents to your work colleagues or uploading media to your favorite social media platform.
In this guide, you’ll learn to upload files and images in your Django apps. You will also learn how to serve files from your Django application.
Project Setup
We will start by creating a directory where our project and a virtual environment will live.
Create a directory, cd to the directory and create a virtual environment:
mkdir filesDjango
cd  filesDjango
python3.8 -m venv env
Virtual environments are recommended to keep the project dependencies separate from the os. Activate the virtual environment and install Django in the virtual environment:
source env/bin/activate
pip install Django
Create a new Django project called file uploads:
django-admin startproject fileuploads
Inside the Django project directory, create an app called files. Apps in Django are used to separate different components and are essential for scaling apps.
Apps are also movable parts that can be moved to another Django project without breaking the code.
django-admin startapp files
Add the app files to the list of installed apps in settings.py file
INSTALLED_APPS = [
'django.contrib.admin',
'django.contrib.auth',
'django.contrib.contenttypes',
'django.contrib.sessions',
'django.contrib.messages',
'django.contrib.staticfiles',
'files',
]
Django stores files locally, with the MEDIA_ROOT and MEDIA_URL settings. Let’s define these constants in settings.py
import os
MEDIA_URL = "/media/"
MEDIA_ROOT = os.path.join(BASE_DIR, 'media')
MEDIA_ROOT will be used to manage our stored files, while MEDIA_URL will be the url for the media being served
Upload Files
Uploading files with the FileFields model field is the easiest to upload files. Let’s start by creating a simple model class in models.py, which looks like this:
Our model has 3 fields, namely, email, name, and the file to be uploaded. The upload_to attribute in the FileField points to where the files will be stored in the application
Run migrations
Migrations will create actual tables in the database.
python3.8 manage.py migrate
Forms
Django comes with an inbuilt ModelForm class, making it easy to create forms from model fields. Create a new file called forms.py and add the following code
Once we define our form above, we will get the data from the form using request.FILES using a POST request in the view.
Let’s write the view to get the data contained in the form. Open view.py and write the following code.
In the code above, we first check if the method is POST and then obtain the data from the form, validate it and save it to the database. If the method is GET, we render the form in a template.
We haven’t yet created the upload.html template, which will be used to render the form, so let’s do that. Django automatically looks for templates in a template directory, so create the files as follows
templates/
       files/
         -upload.html
To server the form in the template, the form must have the attribute enctype=”multipart/form-data.” Otherwise, request.FILES will return empty
{% block content %}
<form method = "post", enctype="multipart/form-data">
   {% csrf_token %}
   {{ form.as_p }}
   <button type="submit"> Submit</button>
</form>
{% endblock %}
The csrf_token tag will protect the form against malicious data while form.as_p will display the fields as paragraphs.
Registering URL Paths
The first step is to create a urls.py file to register urls for displaying the form. Create a file urls.py and add the following code
Next register the files URLs in the root url.py file as follows
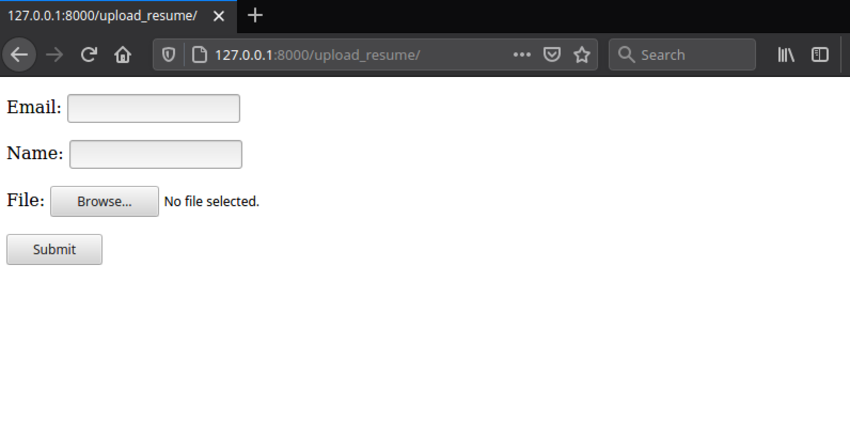
Now, if you run server and navigate to http://127.0.0.1:8000/upload_resume/, you should see your form as shown below
Django Admin
Django comes with the Django admin, a powerful interface that allows developers to add data. Let’s register the Resume model in admin.py as follows:
from django.contrib import admin
from .models import Resume
# Register your models here.
admin.site.register(Resume)
Create a superuser
A superuser will allow you to perform admin stuff
python3.8 manage.py createsuperuser
Username (leave blank to use 'earthtoast'):
Email address:
Password:
Password (again):
Superuser created successfully.
Now navigate to http://127.0.0.1:8000/admin/ and login with the superuser we created above, and you can be able to view the submitted data.
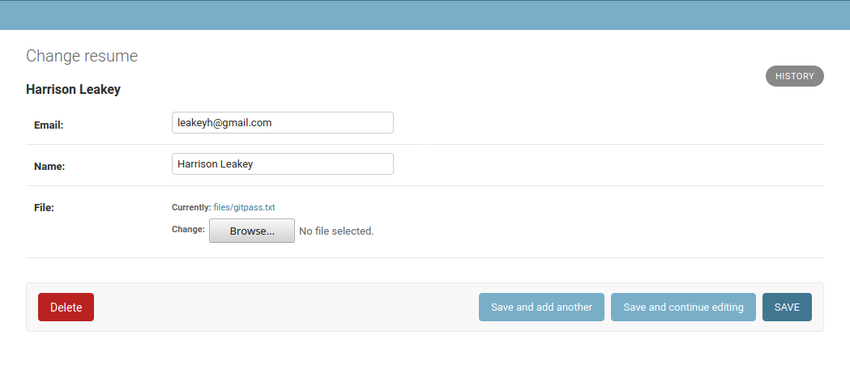
As you can see above, the file has been stored in the files directory.
Upload Images in Your Django Application
We have seen how to upload files using the FileField; what about images?. To uplpad images, we will use am ImageField. Go to models and add the ImageField as shown below.
The imageField we defined above requires the pillow library, so let’s install pillow with pip.
pip install Pillow
Apply migrations to effect the changes made to our models.
python3.8 manage.py makemigrations files
Migrations for 'files':
  files/migrations/0002_image.py
    - Create model Image
Run migrate command
python3.8 manage.py migrate
Operations to perform:
  Apply all migrations: admin, auth, contenttypes, files, sessions
Running migrations:
  Applying files.0002_image... OK
Next, we will create a form just like we created the Resume form earlier.
Next, let’s create the view for rendering the image upload form. In views.py, add the following code.
Create the file image.html in the templates folder and add the following code.
Next, hook the upload_imge view to URL. Open urls.py and add the following code.
Your image upload form can be found at http://127.0.0.1:8000/upload_images/
Serving Files
The first step is to add django.template.context_processors.media in the context_processors option of TEMPLATES in settings.py file,
Setting this option will allow us to use {{ MEDIA_URL }} in our template.
Next, update the view to fetch our images from the database.
Update the image.html template to display our images
We can serve uploaded files from the media route during development using django.views.static.serve() view. Let’s add the following path to the root URL file.
Now if you navigate to http://127.0.0.1:8000/upload_images/, the images will be displayed as expected.
Conclusion
This tutorial has covered everything you need to start working with files and media in your Django projects. The Pillow library also provides a lot of functionality for opening, manipulating, and saving many different image file formats.


![Toni Kroos là ai? [ sự thật về tiểu sử đầy đủ Toni Kroos ]](https://evbn.org/wp-content/uploads/New-Project-6635-1671934592.jpg)


