
How to Start a Travel Blog (Step-by-Step Guide for 2022)
Congratulations, you’ve decided you want to know how to start a travel blog! Let us be the first to welcome you to the club. You’re in for a fun ride!
Before we start there are a few things we need to clear up about starting a travel blog.
First of all, it’s not hard. Second of all, it doesn’t take long. Third, it is cheap.
The difficult part comes in trying to grow and make money from your travel blog, but there’s a lot of potential to do this successfully, and the rewards are worth the effort.
These days we make over USD$30’000 a month from this website and our various media clients. In other words, we make a good living from travel blogging.
We’re going to assume you’re in the same position that we were when we first decided to start NOMADasaurus. One day we decided to make a travel blog. So we opened up Google, started researching, and became completely overwhelmed with an entire world that we knew nothing about.
Hosting, domains, analytics, content management systems, HTML, social media marketing, SEO – all these terms went straight over our heads.
The truth is that starting a travel blog is actually quite a simple step-by-step process, and there’s no need to get overwhelmed by it all.
Let us walk you through that process.
We’re going to show you exactly how to start a travel blog in less than an hour!
- Pick a blog name
- Define your brand
- Register your domain
- Purchase website hosting
- Set up your host (we’ll show you how)
- Install WordPress (the easy way)
- Pick a theme
- Get some essential plugins
- Plus have some bonus professional tips to start making money asap!
What You Need Before Our ‘How to Start a Travel Blog’ Guide
You’re going to need a few things before we begin.
- A computer (not a smart phone).
- An internet connection.
- A credit card or debit card.
- 1 hour of free time.
- A delicious drink to enjoy.
You also may have seen these companies that give you a free website and only take a few minutes to setup.
Some examples are Wix, Blogspot, WordPress.com and others. These are absolutely fine if you just want to make an online diary about your travels, and maybe have a few friends and family follow along.
But these aren’t any good if you want to make a successful travel blog, or if you ever want to try and make money from it in the future.
Do yourself a favour and start with your own hosted travel blog from the very beginning. Not sure what that means or how to do it? Well, let’s get started…
Step 1 – Pick Your Name and Brand
This is by far the hardest part of starting a travel blog. Picking a name can literally take weeks.
This will be your online identity, and you’ll be telling people all around the world this on a daily basis, so make it something you are happy with.
If you want to start a travel blog about one particular place or thing rather than being the face of your travel blog, then this is easier.
You can be “Food Adventures In New York City”, and everyone will know exactly what your blog is about.
Example: Is your name Jim? Then perhaps something like “Travelling Jim” would work for your blog name. Say it out loud. Do you like it? Awesome. In fact, let’s use “Travelling Jim” as our example blog for the rest of this article.
Tips For Picking A Travel Blog Name
- Keep it as short and simple as possible. You don’t want to be telling people, “Hey, make sure you check out my blog, ‘www.jimistravellingtheworldforanindefiniteamountoftimestartingin2020-ihopeyoufollowme.com’” What a mouthful! If you can keep it between one to four words, awesome! Also avoid having a hyphen (-) in there, again for simplicity.
- Give your blog longevity. Travelling Jim works well, but “Jim’s 2020 Travels” doesn’t. What if you travel in 2017? Same with “Adventures Of A 21-Year-Old”. That’s not going to work when you’re 22
- Don’t limit yourself. If you want to start a travel blog about one particular place or topic, then go for it. These can be very successful in a niche market. But if you are travelling to Australia for example, don’t call your blog, “Jim Travels Australia”. How are you going to blog about Europe if you ever go there? If you want to have a general travel blog and don’t know what your exact plans are in the future, keep it broad.
- Think outside the box. While you want to keep things as simple and general as possible, don’t forget that travel changes people. Don’t call your blog “Forever Single Traveller” just because you’re single when you started. What if you get a partner? Then you’re no longer the Forever Single Traveller. Same with something like “$1 A Day Travels”, because you’re broke when you start. Maybe in two years time you won’t be broke (and hopefully you’re actually making money from your travel blog). Reasons like this are why it’s great to keep it simple. This also helps with brand partnerships in the future, but you don’t need to worry about that today.
You’ve thought long and hard about it, and love “Travelling Jim”. Next step is to make sure it is available. This is easy to do.
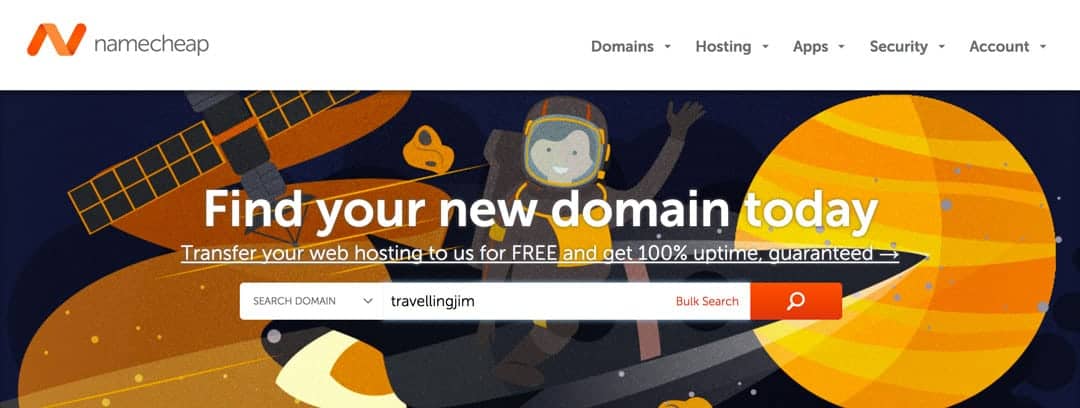
- Type in “travellingjim.com” into your internet browser. If nothing comes up, you might be in luck. If it does, it’s time to come up with something new.
- Go to NameCheap.com and type in “travellingjim” into the little box. Hit search and see what it says. If it’s available, then the name is yours for the taking! You’re ready for the next step.
- Go ahead and buy that domain on NameCheap. You’ll then own your URL for as many years as you choose to buy it for, and it’ll be quite cheap (around US$10 a year). If you would prefer to buy it with your hosting and have it all in one place, hold off and you can do that in the next step.
Bonus Tip: If “travellingjim.com” is taken, but “travellingjim.net” is available, DO NOT go for it. This gets very confusing if you tell someone your blog is called “Travelling Jim” and they accidentally go to .com instead of .net. Find something that is fully available.
 Go to NameCheap and search for your blog name.
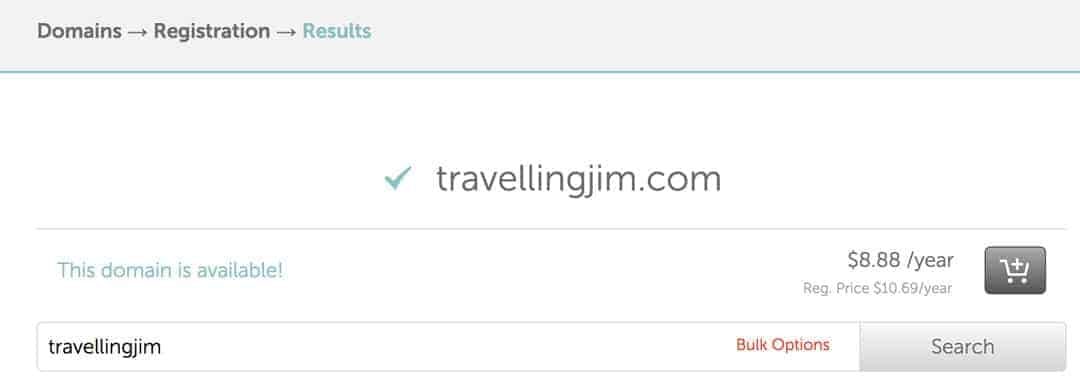 If it’s available, you’re just about ready to start calling yourself Travelling Jim!
Tips For Defining Your Brand
You have a very important question to ask yourself: What is your travel blog about?
You’re probably thinking, “Duh, travel!” And you are right. But in this day and age having a “travel blog” isn’t enough.
If you have zero plans to turn your travel blog into a way to make money while travelling, then you can skip this part.
But if you do want to start earning money from your travel blog one day, you need to come up with a direction and style that will give people a reason to read your posts.
Don’t worry, your brand can change over time. Ours has! But for now, here’s some tips to get you started.
- Will you be making videos or trying to take amazing photos?
- Do you have a unique back story?
- Want to write about the awesome food you find?
- Interested in documenting environmental issues and sustainable tourism?
- Are you an adventure traveller? If so, what kind of adventures?
- Delving into culture?
The list is endless. You will get bonus points if you are doing something truly epic that gives people a reason to follow you. For example even though we had already been travelling for years, we only started this travel blog when we began our “Thailand to South Africa without flying” mission. That gave us purpose and reason to write.
If you can’t think of anything right now that’s ok. Just keep in mind that as your blog grows it will be handy to have a brand and direction.
 Our brand focuses on adventure and cultural travel in off the beaten path destinations. What will your brand be?
Step 2 – Get Hosting And The Domain
Now that all the thinking is done, it’s time to get started on the technical things. This is what will take less than 48 minutes.
Don’t worry, it’s not difficult and we’ll walk you through the process of how to start a travel blog from scratch.
Domains vs Hosts
If you don’t know what these are, let us try to explain them as easily as possible. Let’s go with a ‘house’ analogy.
A domain (travellingjim.com) is an address. A host is a house. A website is you.
You live in a house, and your address is how people find your house. In internet terms, your website lives on a host and travellingjim.com is the address.
In more details, a host is a company that has a bunch of computers (also called servers) that are permanently connected to the internet.
Your blog and all its content, pictures, videos, etc actually “lives” on your host’s computers.
When someone types in “travellingjim.com”, their browser (e.g. Chrome or Safari) downloads your blog from one of these computers, and opens it up on your reader’s device.
Don’t stress too much about all this. Once you’ve set it all up once, it will be a long time before you have to worry about this again.
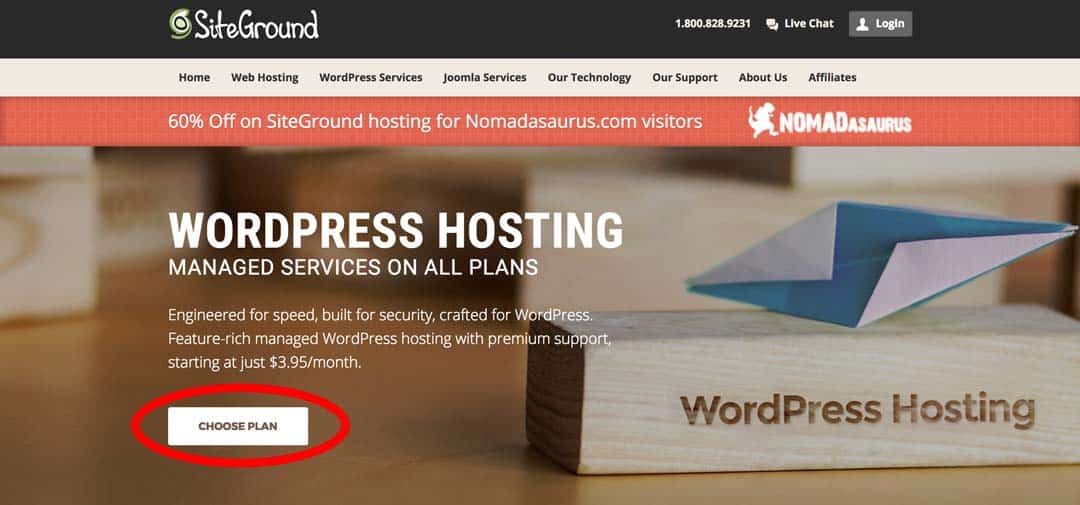
Our Favourite Host is SiteGround
We personally use and recommend SiteGround. They are our third hosts now (having previously been with Bluehost and Dreamhost), and we couldn’t be any happier that we changed over.
Besides being great for established websites, they are also perfect for brand new blogs.
They have incredible support, fast servers, an easy control panel to navigate and very high uptime.
They are also very affordable, and getting setup with them is super simple. They really make it very easy when it comes to how to start a travel blog.
We must stress this again – their support is amazing. We have lost count of the number of times we’ve been confused about some technical thing we’ve tried to implement on our site and screwed up, just to jump on SiteGround’s 24/7 instant chat service and have their experts fix the problem for us in a matter of minutes. This alone makes them the best company out there.
By all means, feel free to go and do your own research. You’ll find that most companies have the same prices on their entry-level plans (SiteGround is $3.95 a month) and you won’t likely notice any difference in quality until your blog grows.
But we only ever recommend brands that we have used and are happy with, so that’s why we’re going through the next few stages with SiteGround.
Managed WordPress Hosting
As we’re going to go with WordPress (the best option by far), it’s good to get a dedicated and managed WordPress hosting solution.
What this means is that your host and server is optimised to run WordPress efficiently and with no issues.
Luckily SiteGround has a spectacular Managed WordPress Hosting solution which includes premium plugins (more on plugins at the bottom of this article), one-click installation, great security and a bunch more.
And if you sign up to SiteGround’s Managed WordPress Hosting solutions through our links, you will receive 60% off the regular price. Amazing deals all around!
Note: We are not sponsored by SiteGround in any way, shape or form. We pay for our hosting just the same as everyone else does (and in fact are on their higher-end cloud plan due to us needing to trust the best host out there to manage our website). We just really, really love them.
Step By Step Guide With SiteGround
We’re going to walk you through the process of how to start a travel blog step by step.
- Go to SiteGround and click on “Sign Up”
- Choose the “Start Up” plan. This is only $3.95 a month and has all the features you’ll need to get started. If you feel like you really want to focus on growing your travel blog to more than just your friends and family reading it, you can go with the “Grow Big” plan, but if you’re happy to keep costs down let’s go with Start Up.
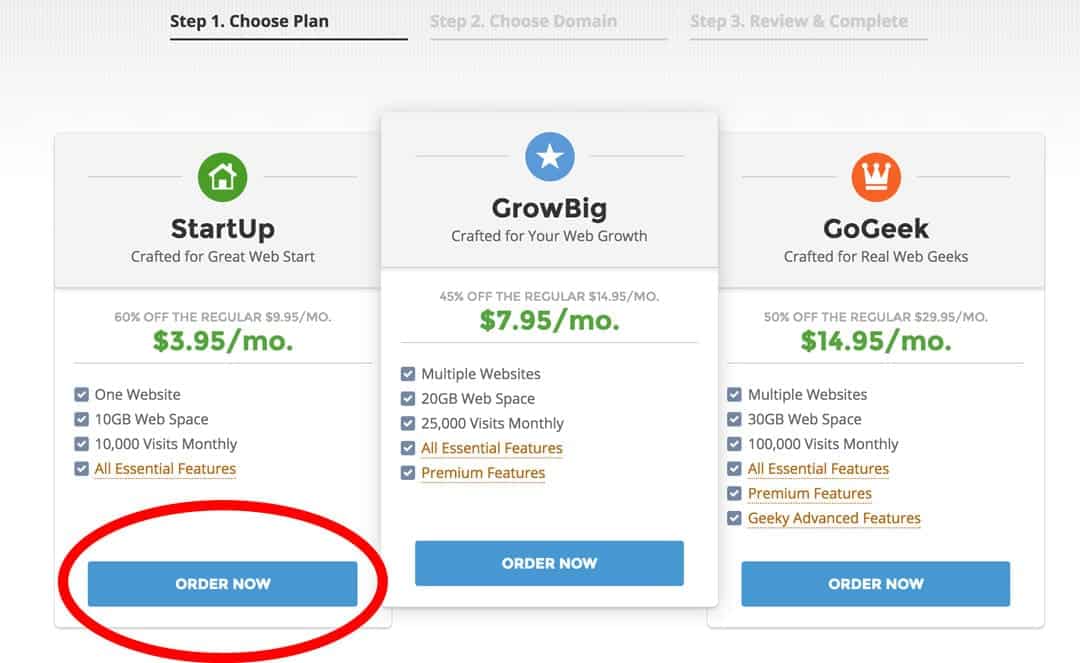
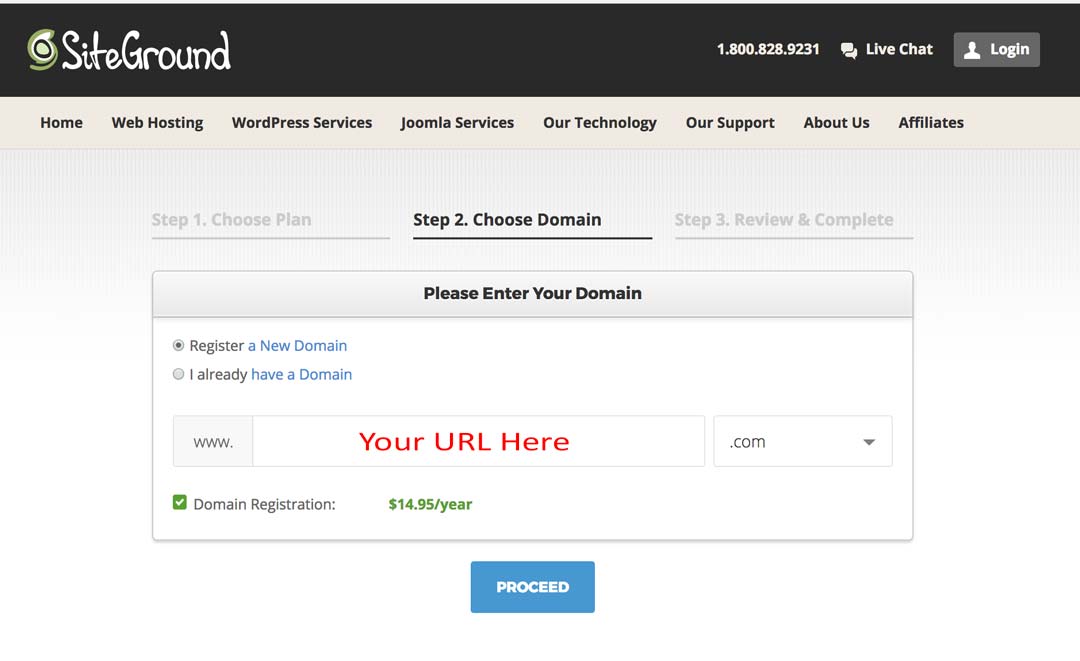
- Choose the “Register A New Domain” section. Enter whatever your domain is (travellingjim.com), and click proceed.
- Enter some account details and your payment options. We recommend paying for at least 12 months up front. On the $3.95 plan, that works out to be only $47.40. Even cheaper than $50! You don’t need Domain Privacy or HackAlert Monitoring, so feel free to unselect those and keep your costs down.
***UPDATE – Siteground now charges $14.95 a year for registering a new domain. Website transfers are still free if you already own your own domain name, which you can buy with NameCheap.
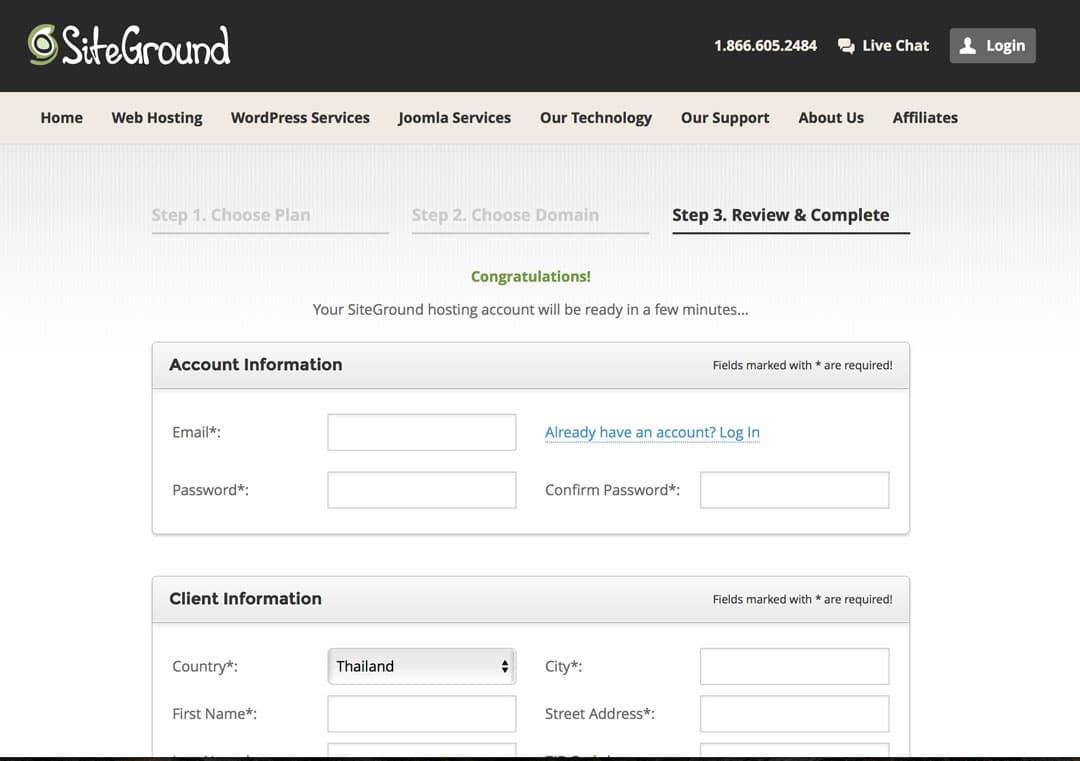 Enter your account details.
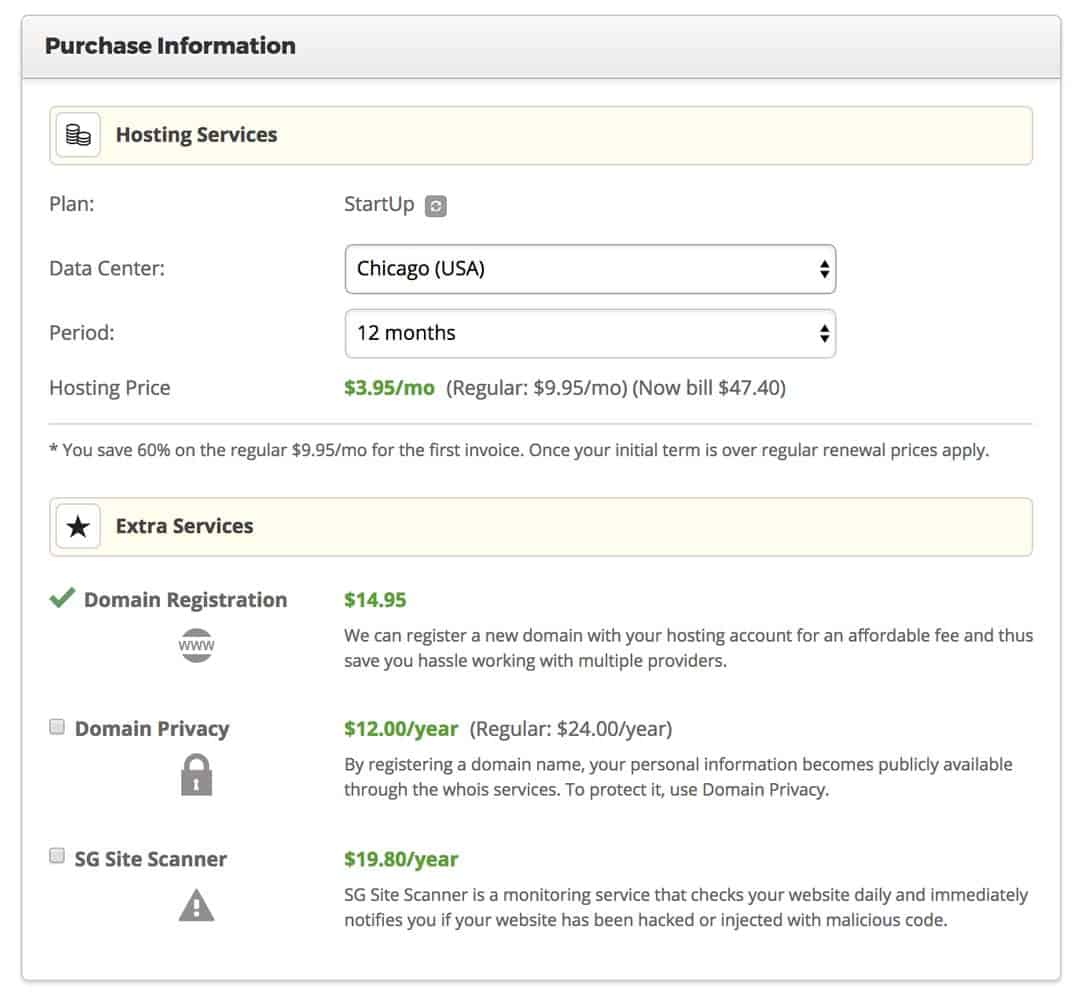 At the top under hosting services change your Data Centre to whichever city is closest to you. Uncheck Domain Privacy and SG Site Scanner.
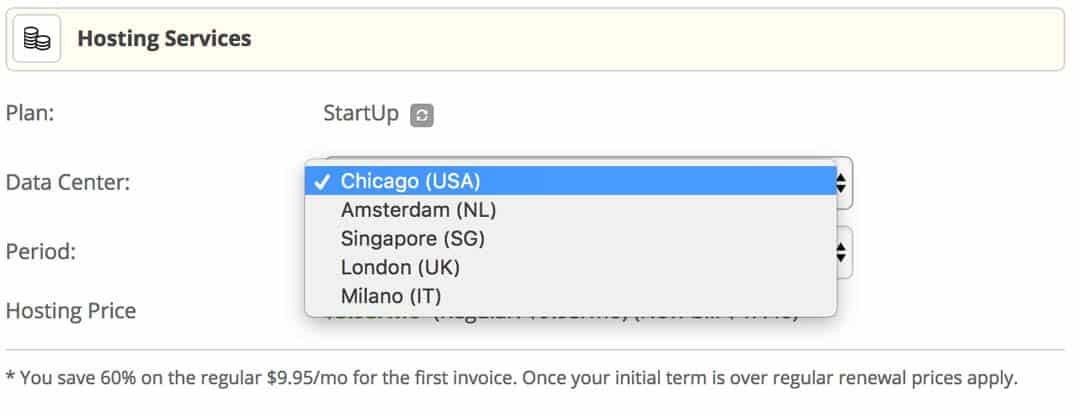 Choose whichever city you live closest to.
- You’ve now come to a verify page. SiteGround will run a fraud check to make sure everything is all good.
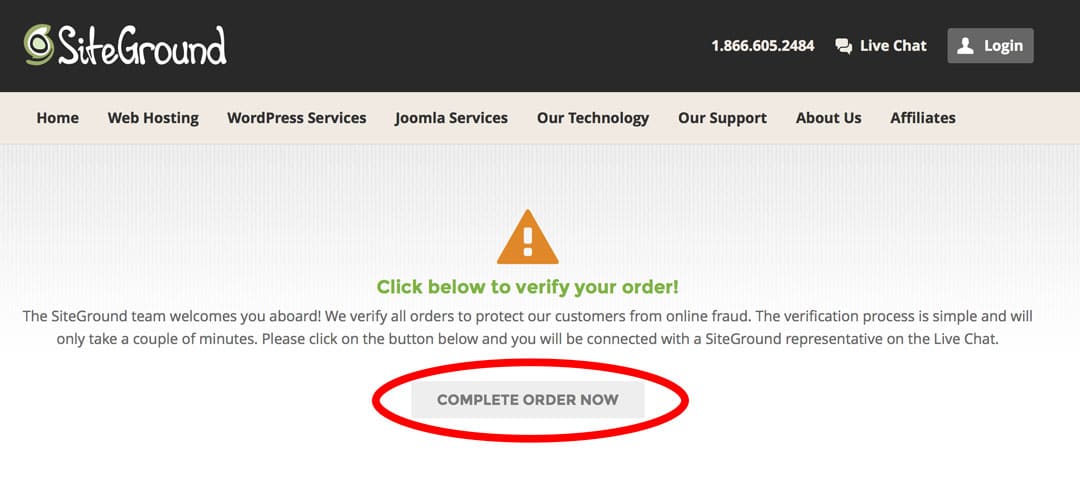 Complete your order.
Congratulations! You are now the proud owner of a new domain and host! At this point you will get all your login details for SiteGround sent to you in an email.
Step 3 – Install WordPress
Don’t finish your drink just yet, there’s still a little bit more you need to do to finish starting a travel blog. And the next thing is to install WordPress.
What is WordPress we hear you ask? WordPress is a “Content Management System”, or CMS for short. Basically that is the system that allows you to put words, pictures and style on a website without knowing any coding or programming. WordPress makes building your website easy. In fact WordPress is used on 26% of all website on the entire web.
Now is a good time to mention that there are actually two WordPress’s. There’s WordPress.com and WordPress.org. WordPress.com is for free blogs, WordPress.org is for people who want to own their own blogs. You’re going to go with .org.
Installing WordPress onto your host is very easy to do, and with SiteGround it’s actually all automatically done for you with a very simple process.
- Login to SiteGround and click on “Get your new site up and running – Set up in 2 min!”
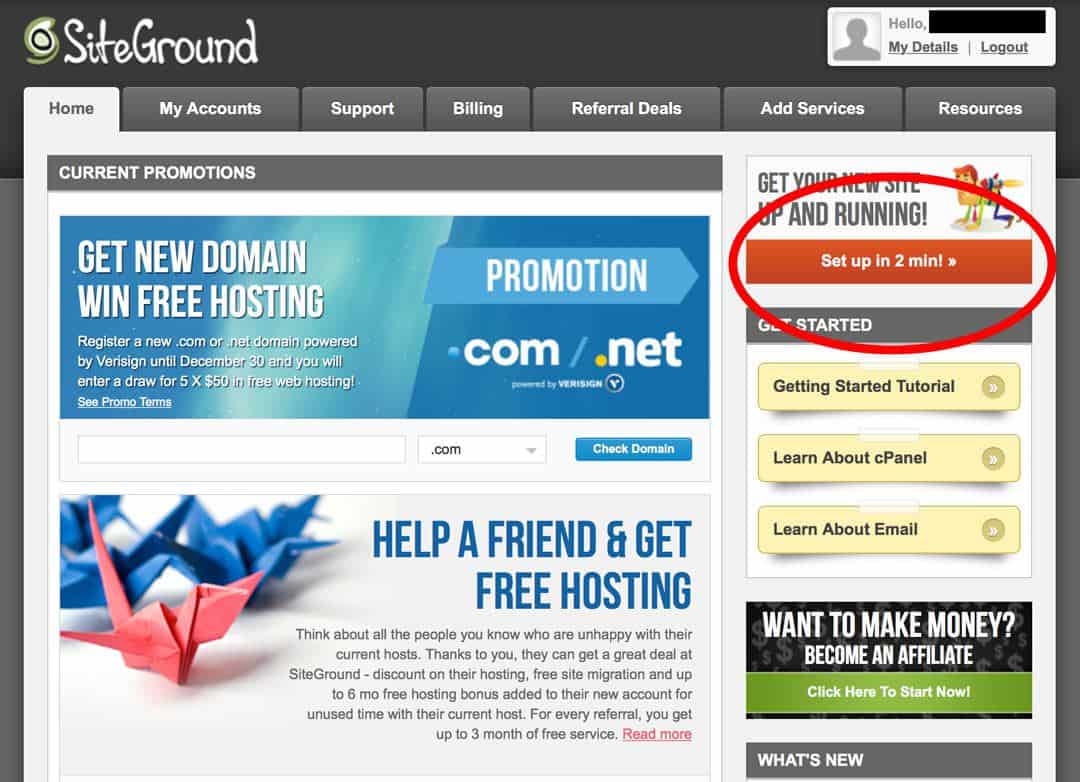 Get set up.
- You’ll get a popup with the SiteGround Account Setup Wizard. Select “Start a new website at (URL)” and hit proceed.
 Select “start a new website”.
- Now you’ll be asked what type of website you need. Select “Personal/Blog” and then scroll down. The software you are going to use is WordPress, so select that and move onto the next part.
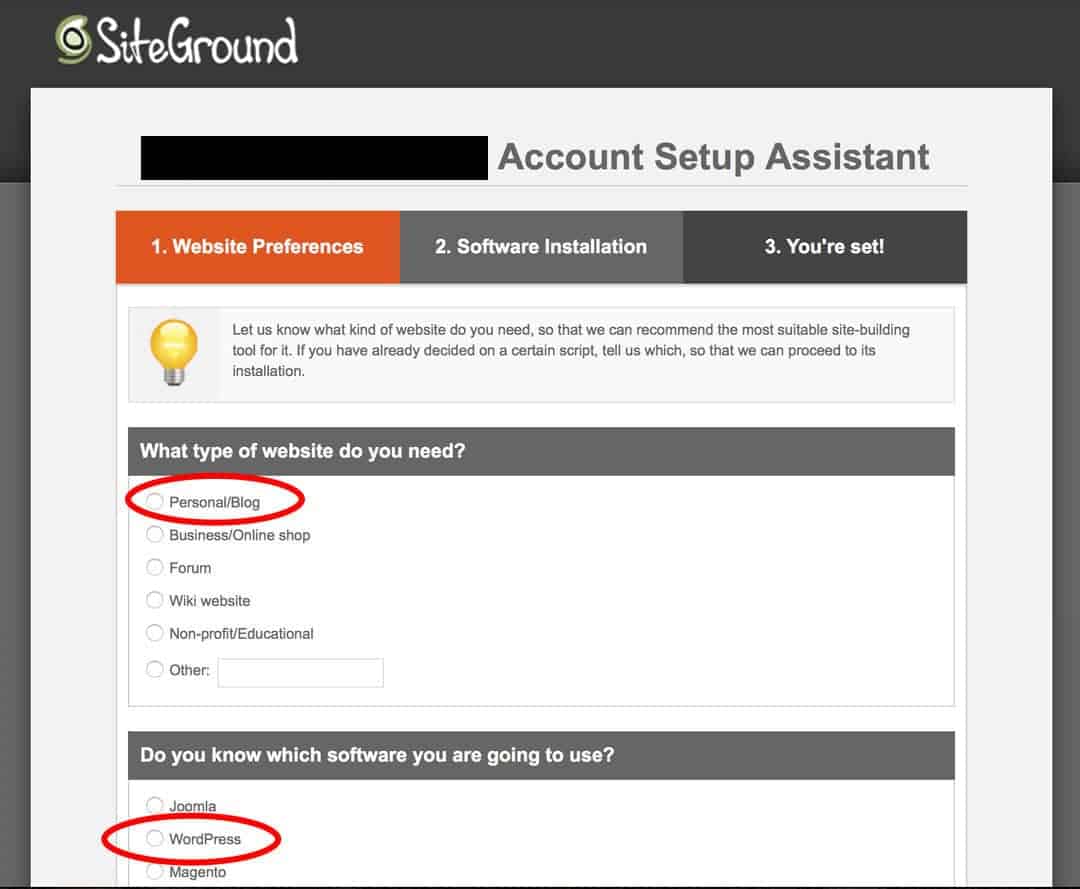 Select “Personal/Blog” and select “WordPress” below.
- Now you need to make up your WordPress login details. We recommend choosing something that would be really hard for people to guess, as this is the door to your website. So don’t choose “Admin” as your username for example. You will need these login details to access the “behind the scenes” section of your blog.
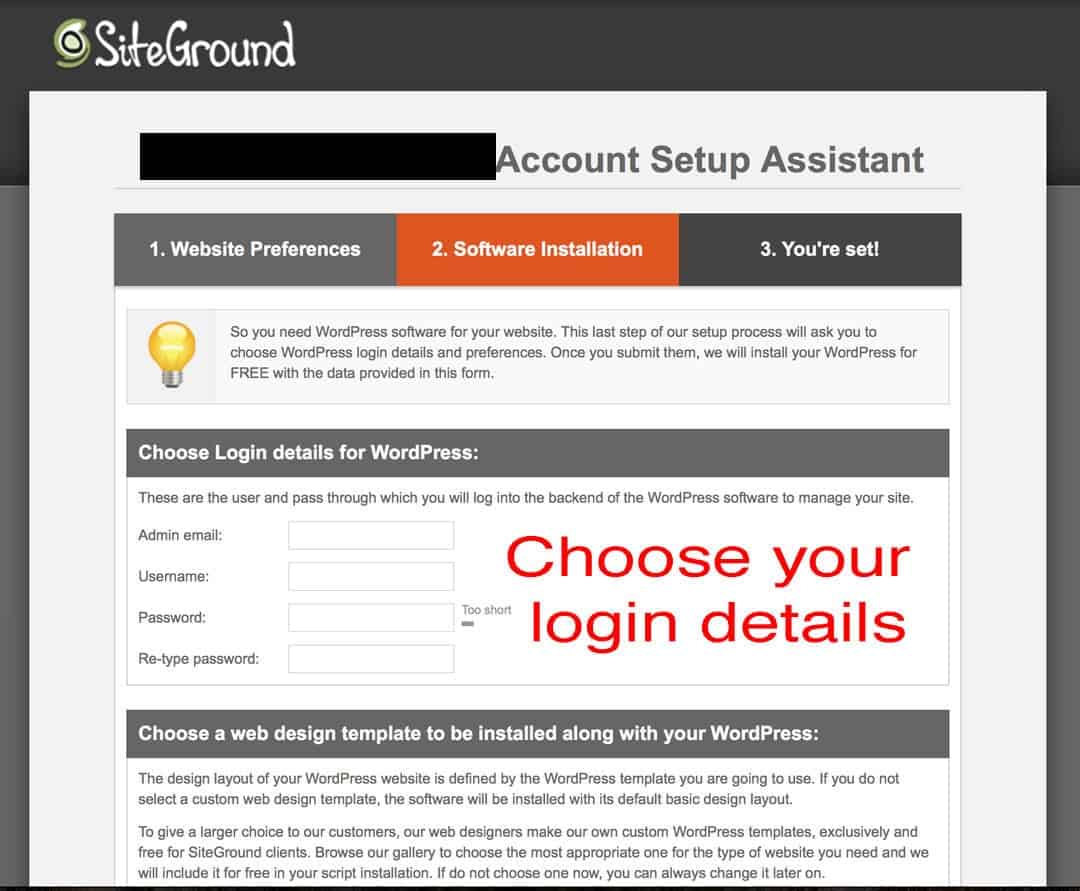 Choose your login details.
- Now you’ll be given an opportunity to choose your web design template. This is otherwise known as a theme, which we will go into more in Step 4. Feel free to click around and see if you can find a design you like. Otherwise you can skip this part for now.
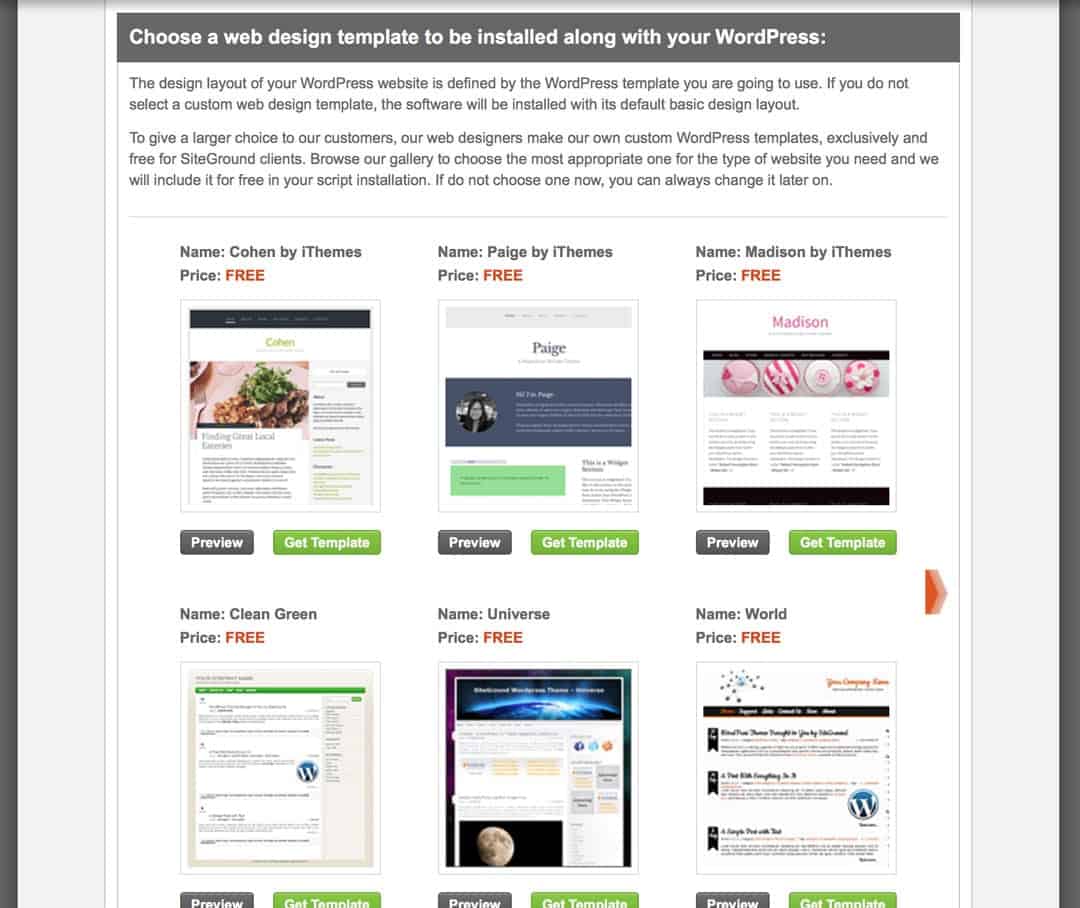 If you want to choose a theme now you can, but you can do this later.
And guess what – you’re done! You’ll get a very satisfying “Congratulations” with a big tick, and all your login credentials. We suggest you write these down somewhere safe.
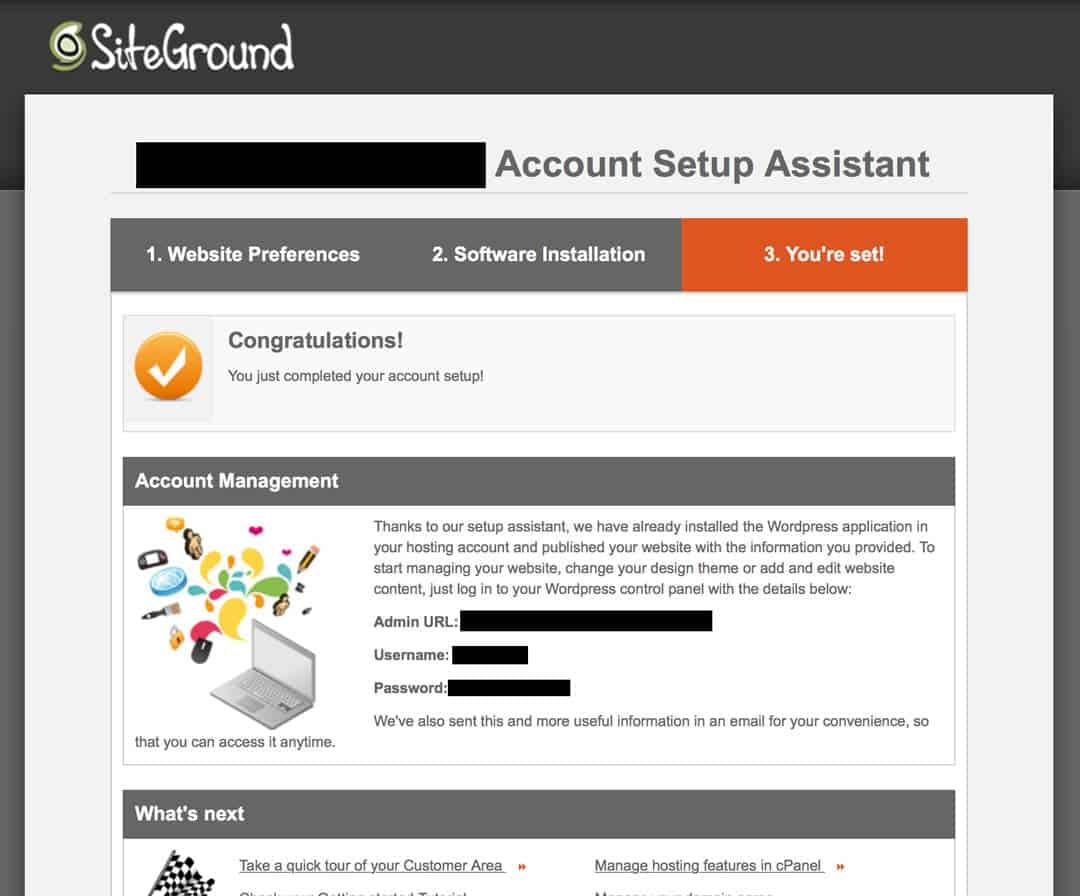 Congratulations! You just installed your Content Management System, WordPress!
What now? Well now you want to actually go to your website. And as usual, this is very easy to do.
- Simply go to the address bar in your internet browser and type in “travellingjim.com/wp-login.php”. You’ll be taken to this screen:
 The login page for your website.
- Put in your login credentials and you’ll be taken to the WordPress dashboard. This is what it looks like (with a few less options on the left panel):
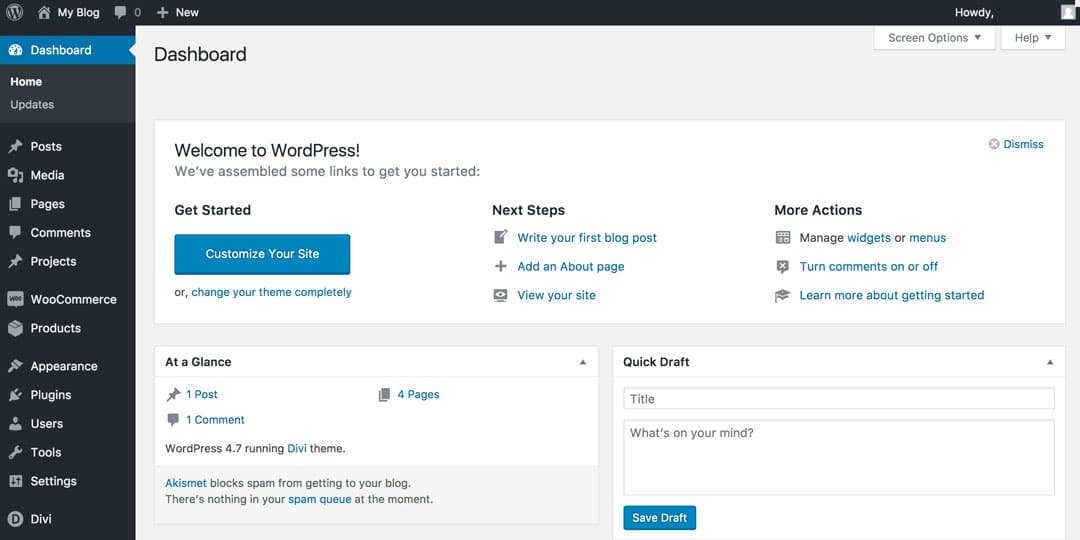 Welcome to your WordPress dashboard.
Welcome to WordPress! This is where all the magic happens. You will write your blogs under “Posts”, make things like your about page under “Pages”, change the style of your blog under “Appearance”, and so on. You’ll get pretty familiar with all this over the course of a month or so. But for now, let’s move on to the next stage!
Step 4 – Pick A Free Theme
You’ve got your domain, you’ve got your host, you’ve installed WordPress, now you need to choose a theme. What’s a theme? Well that’s what your website looks like when people go to it. Keeping up with the house analogy from before, think of it as all your furnishings and decorations.
Back in the day you needed someone who was good at computer coding to make your website look good. These days you just install a theme with a few clicks.
- Go into your WordPress dashboard.
- Look for “appearance” on the left panel and click on themes.
- Activate the WordPress Twenty Seventeen theme if it isn’t already, and your website is officially up and running!
- Now just type in travellingjim.com into your internet browser! There it is – how exciting!
Free vs Premium Themes
There are thousands of themes out there to choose from. Some are free (yay!) and some cost money.
When you’re just starting out you should be pretty happy with just a free theme. But as time goes on and you get more content on your blog, you’ll likely want to upgrade to a paid theme. Why? They offer more customisation, they’re faster, and they look better.
All you have to do is Google “WordPress themes” and be prepared to lose the next few hours of your life as you scroll around. This all comes down to personal taste.
Personally for a few websites we own, we use the Elementor page builder theme. It’s a very powerful and simple to use “drag and drop” designer that is only limited by your imagination, but they also make a number of other awesome premium themes you can choose from.
And guess what – you are now the proud owner of a fully functional travel blog! You did! If you want you can leave now and go get another drink. Otherwise stick around for some bonus tips to help make your travel blog extra awesome!
 Now you have a published, working travel blog! Congratulations!
Step 5 – Download Essential Plugins
Now that your travel blog is fully setup and ready to go, it’s time to install some plugins. Think of plugins as extra additions to make your house better, like a security system or new light fixtures.
Again there’s thousands of plugins out there, but to begin with you only need a few core ones. To install a plugin go into your WordPress dashboard, look on the lefthand panel, click “Plugins” then click “Add New” on the page that opens up. Search for the ones listed below, click download, and activate. WordPress will do the rest.
Aksimet
This is an anti-spam plugin that filters out crap messages left on your blog. Don’t ask why (you’ll find out as time goes on), but you’re going to end up with hundreds of spam comments on your posts. Just install this plugin and let it do all the filtering.
Yoast SEO
You’re going to hear the term “SEO” a lot during your journey as a travel blogger. SEO stands for “search engine optimisation”, and that basically means when people go to a search engine like Google and type in something – for example “things to do in Berlin” – the posts that have the best SEO go to the top of the results, meaning more people click on them. It’s complicated and you’ll learn a lot more about it later, but for now just install Yoast.
Yoast is a plugin that pops up at the bottom of the section when you are writing a blog post. You put in whatever keywords you think you are writing about (like “best places for breakfast in Sydney”) and it will give you a list of things you can improve on to help make your post rank higher in Google.
W3 Total Cache
Another plugin that is hard to explain for beginners, but essentially W3 Cache will make your website load faster for people who visit it. This is important. Install it and use the automatic settings until you learn more about it. One cool thing to note as well is that if you signed up on the Siteground “Grow Big” account, you also get a cacheing feature on your plan. Check it out.
WordFence
WordFence is a great plugin that adds a layer of security to your website. This will stop people hacking your travel blog. Don’t ask why, but for whatever reason your blog will come under attack from hackers. Everyone’s does. So just install WordFence and let it do its thing.
Travel Blogging Tips
You’re now well on your way to being a travel blogger! Your site is up and running, you’ve installed WordPress, you have a theme to make it look pretty, and you’re ready to start writing.
Time to hit the world!
However if you’re still interested in becoming a professional travel blogger, or just would like to grow your travel blog, here are a few last bonus tips to help out.
Google Analytics
Google Analytics is a program that tells you how many people go to your travel blog, and how they found it. When you first start blogging you’re probably really interested to know if anyone is reading what you write! Google Analytics will tell you.
Learning about how to setup Google Analytics and how to use it is an entire blog post in itself – something that we won’t get into. But you should read this article from Moz about how to set it up properly.
Get On Social Media
Now that you’ve got an awesome travel blog, you need to sign up for social media so people can learn about you and follow your journey! The most obvious ones are Facebook, Instagram and Twitter and, but you’ll also want to look into Snapchat, YouTube and Pinterest. Go to those websites and make accounts called “Travelling Jim”, and start connecting with the world.
Make An About Page
One of the first things you should do on your travel blog is make an “about” page. Go to your WordPress dashboard and click on “Add New Page” on the lefthand panel. Name your page “About”, and write up a little biography on yourself and what your website is. Upload a few pretty pictures and you’re sorted. Then all you have to do is hit publish and you’re all set! Also make a “Contact” page while you’re at it.
Custom Design Your Blog
Because you’ve set up your theme, you can go into WordPress, click on Appearance > Theme > Customize, then start designing your blog. Pick some colours, change your font, add some menus, etc. Don’t forget to design a cool logo for yourself! If you don’t know how to do this yourself, you can just go to Fiverr and pay someone a small amount to make something basic.
Network With Other Bloggers
You’ve signed up to Facebook, so now you can start networking with other travel bloggers. There are a number of really good Facebook groups you can join where you’ll find a whole bunch of people wanting to discuss blogging, from absolute beginners right through to the biggest names in the industry. We recommend signing up for “We Travel We Blog” and “Under 1000 Club – Aspiring Travel Bloggers” first. As you come up with questions about travel blogging, we’ll all be there to help you answer them!
Don’t Sign Up For A Travel Blog Course
This might go against everything other bloggers will tell you to do. But trust us, you don’t need them. The most popular ones are “Travel Blog Success” and Nomadic Matt’s course. Guess what – everything they teach you in those courses you can learn for free on Google or by asking in those Facebook groups we told you about. Save the hundreds of dollars and learn by doing.
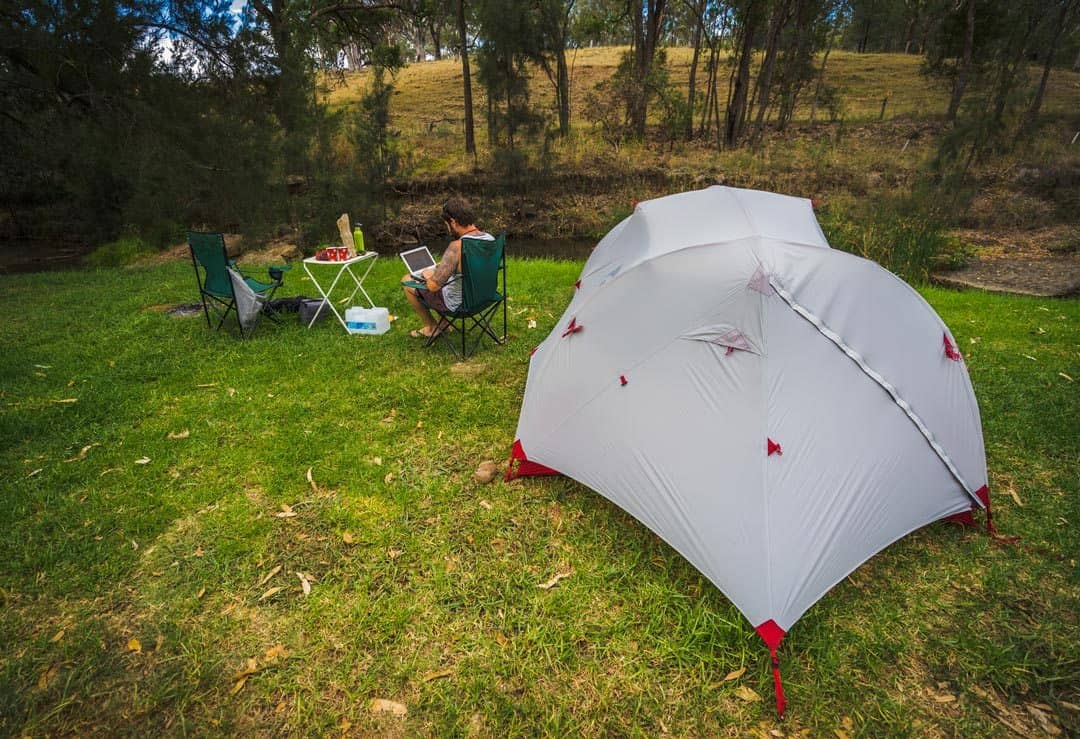
- Blogging on a camping trip in Australia – we love our job!
Start Blogging!
That’s it, that’s all! You made it to the end of the article. Together we went from being an absolute beginner to having created your very own travel blog from scratch! You deserve another drink.
There is only one thing left to do now – start blogging! Get out there, take some photos, write some stories and make the best damn travel blog on the internet!
Play around with the WordPress dashboard, go to the section that says “Posts”, add a few new ones and hit publish. We promise you that publishing your first blog post is a very, very exciting moment!
You still have a lot to learn, and that’s ok. We’ve been doing this for 3.5 years now, professionally for 2.5, and we still learn things every single day. This is an ongoing process, but you’ve made the big leap and landed on your own two feet.
If you have any other questions please feel free to email us. Also make sure to check out those Facebook groups.
Our other last tip is to use Google.
We guarantee that no matter what problem you are having, whatever segment it is that you don’t quite understand, someone else has been in the same situation and asked the same questions.
Happy travels and enjoy the journey! We’ll see you out there in the blogosphere.


![Toni Kroos là ai? [ sự thật về tiểu sử đầy đủ Toni Kroos ]](https://evbn.org/wp-content/uploads/New-Project-6635-1671934592.jpg)


