How to Install Skype for Business Windows | SoftwareKeep
Skype for Business is available both for Windows and Mac users. You can download it from the Office 365 website. Afterward, you will have to install it on your computer.
When purchasing Office 365 for a business plan, Skype for Business will be included.
Use the step-by-step instructions below to download and install Skype for Business so that you can use it on your Windows operating system.
The following is an explanation of how to get Skype for Business, download, and install it.
How to download and install Skype for Business
Step 1. Sign in to Office 365
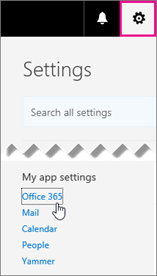
Once you sign in to Office 365, select settings that can be found on the top of your Office 365 page.

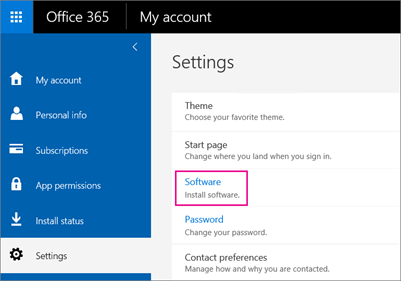
Step 2. Select the software

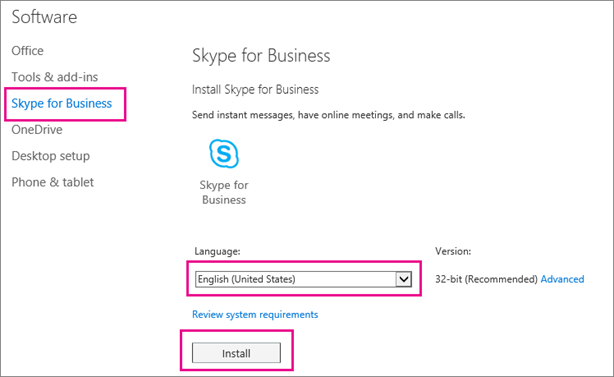
In the Office 365 page, select Skype for Business and then choose your preferred language. Based on your Office 365 plan, choose the edition that matches your Office applications and system requirements, selecting either 32 bit or 64 bit.

If you are not sure which edition you are using, choose the default option, and click on Install.
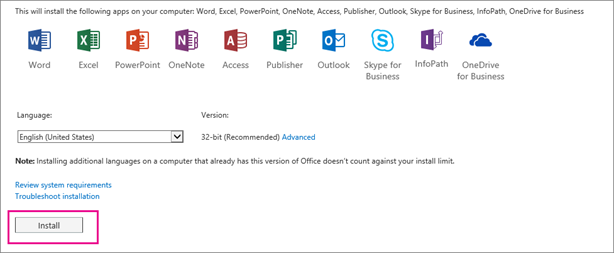
Sometimes, your Skype for Business might include other Office 365 applications. If this is the case, click on Install. This will allow you to install the Office 365 suite of applications, including Skype for Business.

Step 3. After Installation
After installing, Sign in to your account for the first time and then go to the bottom of the screen and choose Save as to download. This will allow you to download the setupskypeforbusinessentryretail.exe file to your computer.
Locate your downloaded file. For a seamless download and installation process, remember where you saved the setupskypeforbusinessentryretail.exe file. But, if the setup does not run, you will have to re-run it.
Step 4. Run the file
Your setupskypeforbusinessentryretail.exe file is downloaded now. Choose Run.

As the Office installer starts, it will display a message that it’s installing Office, which is simply Skype for Business and not Office. Once the Office installer is complete, a message will pop up that Office has been installed. Select Close and you should now be able to launch Skype for Business.
Step 5. Licensing agreement
Agree to the terms by choosing Accept to accept the licensing agreement.
The good thing about Skype for Business is that you can install it on up to 5 PCs. To complete installation on another PC, simply log on to that PC and then sign in to Office 365 portal like previously done.
Follow the same steps as done previously to download and install Skype for Business on these PCs. Your Skype for Business installation should now be complete and you’re ready to sign in to Skype for Business for the first time.
First time sign in after installation
Go to the Skype for Business sign-in page to sign up for the first time after installation. Include your Office 365 user ID and password, and then click on Sign in.

If you do not want to keep entering your password every time you sign in, we recommend that you save your password by choosing Yes.
This will recognize your sign-in info and automatically sign you next time. The next step is to go through the Skype for Business video training.
Office 2007, 2010, or 213 Skype for Business Installation
For those with Office 2007, 2010, or 2013 you don’t have to worry since you can install and use Skype for Business 2016. But, avoid installing office 365 Proplus since this will overwrite your existing Office programs.
Below are the instructions for installing Skype for Business 2016 for Office 2013, 2010, or 2007.
The download and installation process for Skype for Business with Office 365 is similar to the above-outlined steps. During installation, you will come across a page that indicates that you’re only going to install Skype for Business. The installation starts immediately after clicking the install button.
But make sure you understand that with Office 2007, Skype for Business 2016 won’t be fully integrated with your Office programs. There are also features that won’t work like the visibility of your co-workers when you type an email in Outlook such as whether they’re available, busy, or away among other features. One advantage is that you can chat (IM) and conference with your co-workers.
If upgrading to Office 2016 isn’t your preferred choice, go for the standalone Skype for Business Online Plan subscription.
How to download and install Skype for Business Basic
This refers to the free download option, although it comes with the least set of features. The features include instant messaging (IM), the ability to make audio and video calls. You can also hold online meetings using Skype for Business Basic among other capabilities.
Downloading and installation process
Similar to Skype for Business, when you click the Download button for Skype for Business
You need to select the download that matches your system requirement and version, whether 32-bit edition or 64-bit edition. In case you don’t know which version to choose, you can simply select the 32-bit edition. Check our guide on how to install Skype on Mac here.
If you’re looking for a software company you can trust for its integrity and honest business practices, look no further than SoftwareKeep. We are a Microsoft Certified Partner and a BBB Accredited Business that cares about bringing our customers a reliable, satisfying experience on the software products they need. We will be with you before, during, and after all the sales.
That’s our 360 Degree SoftwareKeep Guarantee. So, what are you waiting for? Call us Today at +1 877 315 1713 or email [email protected]. As well, you can reach us via Live Chat.


![Toni Kroos là ai? [ sự thật về tiểu sử đầy đủ Toni Kroos ]](https://evbn.org/wp-content/uploads/New-Project-6635-1671934592.jpg)


