How to Fix Wi-Fi Disconnecting Problem in Windows 10? – WebNots
Recently we have used the free upgrade offer from Microsoft to upgrade Windows 8 to the latest Windows 10. Well, the installation was quite smooth with few restarts until we struck up with the first issue. The laptop was not able to connect to the wireless (WiFi) network. After fighting hard to install the latest driver files for the network adapter, finally we could able to connect to the internet through WiFi. It did not last long as we struck with the second issue. WiFi was dropping frequently and there were no proper solutions to resolve the issue. In this article we would like to share all those things we tried to resolve the WiFi connection issues in Windows PC.
Check out our other articles if you are looking for fixing Wi-Fi issues in iPhone and MacBook.

Mục Lục
Internet Not Connected
When you have problem with wireless connection, first check whether you can connect to internet by opening a website in Edge or other browser you use. If you notice WiFi icon on the system tray shows a warning with limited or no internet connection then check this article on how to fix this issue. Try the following solutions to ensure you have working internet connection.
1. Run Windows Network Diagnostics
Windows 10 offers a handy option to troubleshoot network related issues. Simply right click on the WiFi icon on the taskbar tray and select “Troubleshoot problems” option.

 Troubleshoot Network Connections
This will open Windows Network Diagnostics and the system will automatically start detecting the network problems on your PC. Most of the time, this will help to fix wireless related issues. You can also view the detailed information to get the troubleshooting report like below.
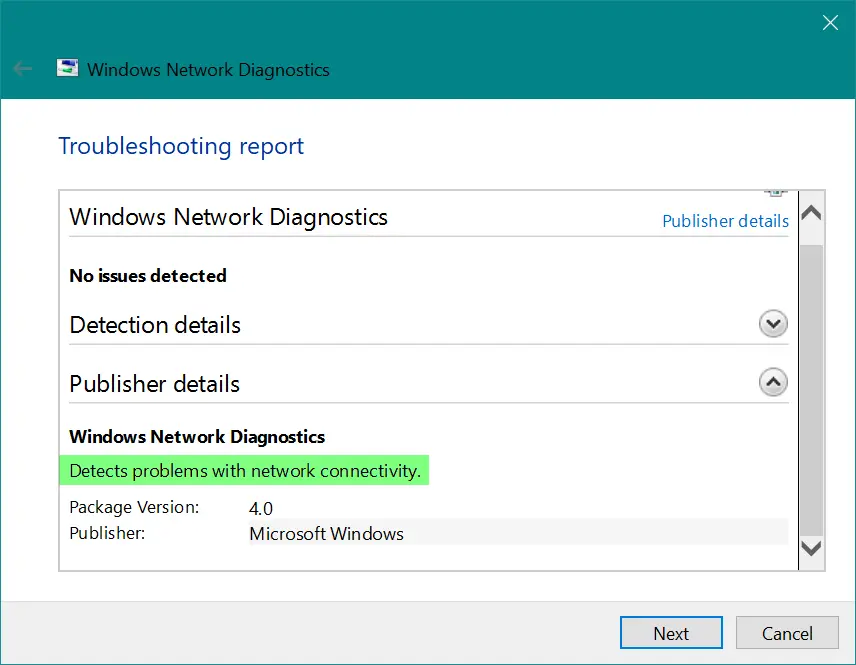 Windows Network Diagnostics Tool
2. Network Adapter Issue
When you noticed your PC could not connect to wireless after Windows 10 upgrade, the most possible reason is the network adapter. Follow the below steps to fix this issue:
- Right click on the “Start” menu and choose “Device Manager” or use the “Cortana” search box next to “Start” menu and open “Device Manager”.
- Find out the adapter used on your PC under “Network adapters” section.

 Check Network Adapter in Device Manager
- In our case it was “Intel(R) PRO/Wireless 3945ABG”. Go to the provider’s site and download the latest driver file for Windows 10.
- Uninstall the old driver and install the newly downloaded one.
- Click on the “Scan for hardware changes” to re-enable the adapter with the newly installed driver.
This should resolve the problem of connecting to the wireless network.
3. Switch Off Airplane Mode
Windows 10 has an option to switch off wireless connection using quick “Airplane Mode”. Click on the WiFi icon on the tray and check your “Airplane Mode” is disabled.

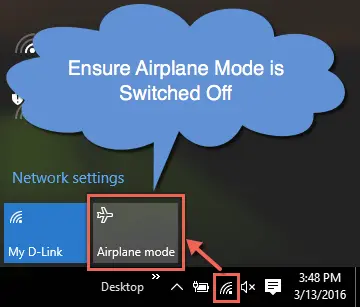 Check Airplane Mode is Off in Windows 10
WiFi Connection Frequently Dropping Off
It took few days to realize that the WiFi connection was dropping off frequently due to the problem in laptop. Since we use VPN it was the first suspect and the router being the second one. As the same VPN and router were perfectly working with the iPhone, we were forced to look into the Windows laptop for clue. When looked into the “Events Viewer”, it confirmed that the network was dropped off frequently with the error message “WLAN AutoConfig service failed to connect to a wireless network”.
 View Error Message in Event Viewer
At beginning we have tried the following steps:
- Restart the laptop, router and reset VPN settings
- Disable and enable wireless connection
- Troubleshoot the wireless connection
- Disable Windows Defender
- Check “Task Manager” to see any programs are causing the issue
None of these worked out and the problem returns back intermittently. It was time to dig the issue deeper and below is the list of options we tried to fix the issue. For us, finally the option 2 worked out and we could successfully connect to WiFi without dropping off.
Option 1 – Disable Network Discovery
Open “Network and Sharing Center” and click on the the wireless internet connection you are using.
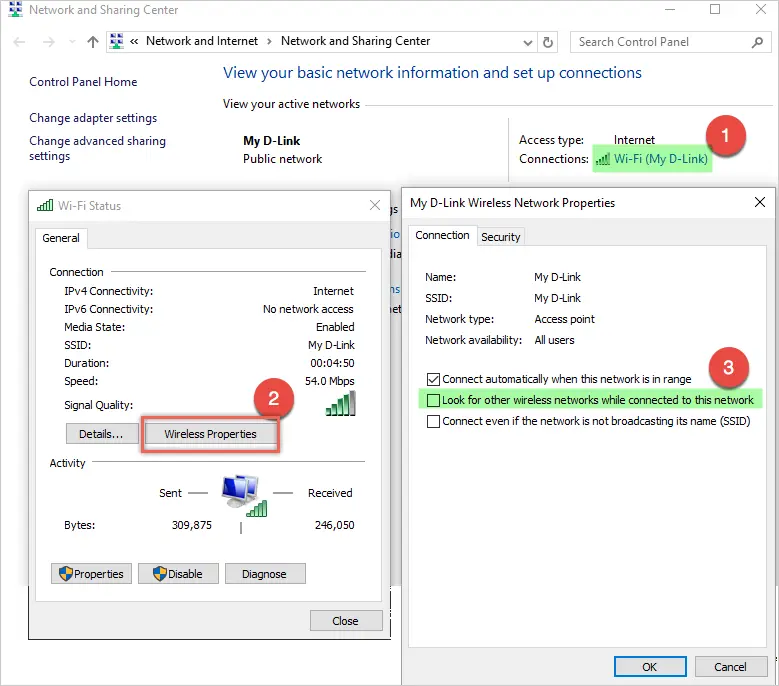 Disable Network Discovery in Windows 10
Click on the “Wireless Properties” button under “General” section which will take you to the properties of your wireless connection. Disable the option “Look for other wireless networks while connected to this network” under “Connection” tab.
Note: SSID is the name of your wireless connection, ensure to have a unique wireless connection name for your router to avoid confusion.
Option 2 – Adapter Power Management Settings
Open “Network and Sharing Centre” and click on your wireless connection name. This time click on the “Properties” button under “Activity” section.
 Change Power Settings of Wireless Adapter
You will be taken to “Wi-Fi Properties” popup and click on the “Configure” button for your wireless router connection. The next popup will show the network connection properties of your wireless router and disable the option “Allow the computer to turn off this device to save power” under “Power Management” tab.
Option 3 – Disable IPv6
IPv6 addresses are introduced with the depletion of IPv4 addresses and currently both IPv4 and IPv6 are used by most of the services. You can give try by disabling IPv6 connection under your “WiFi Properties”.

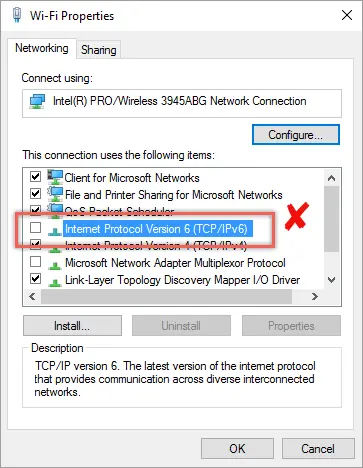 Disable IPv6 in Windows 10
Warning: Disabling IPv6 will affect accessing certain websites available only through IPv6 and also you may not able to create workgroup.
Option 4 – Restart Computer Browser Service
Right click on the Windows taskbar and click on the “Task Manager” option. By default the “Browser” services will be in a “Running” status which can be seen under “Services” tab. Right click on the “Browser” service and “Restart” it.

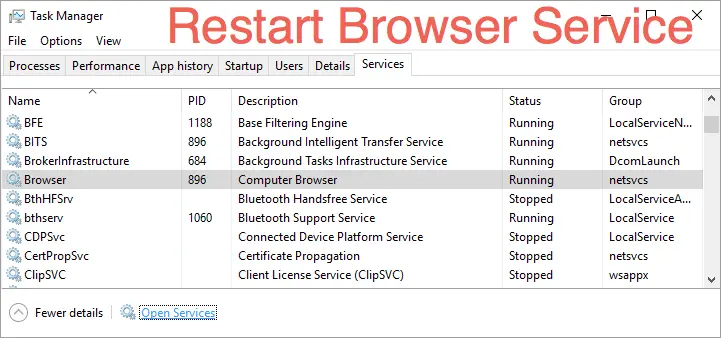 Restart Computer Browser Service
Option 5 – Tun Off Bluetooth Discovery Mode
If you have enabled Bluetooth on your laptop, navigate to Bluetooth settings and click on “More Bluetooth options”. Then disable the option “Allow Bluetooth devices to find this PC” under “Discovery” section.
 Disable Bluetooth Discovery Settings
Conclusion
We have looked into all those Microsoft and other popular forums and it is clearly evident that the wireless connectivity problem is something to do with Windows and not related to the router. Unfortunately the issue is not addressed with any appropriate solution. Though option 2 worked for us, you may need to try out different options to make the WiFi connectivity stable.


![Toni Kroos là ai? [ sự thật về tiểu sử đầy đủ Toni Kroos ]](https://evbn.org/wp-content/uploads/New-Project-6635-1671934592.jpg)


