How to Fix Network Icon Missing From Taskbar In Windows 10
Is the Network or Wireless icon missing from the taskbar on your computer? You will find below the steps to fix the problem of Network Icon Missing from Taskbar in Windows 10.
![]()
![]()
Mục Lục
Network Icon Missing From Taskbar In Windows 10
With default Windows 10 settings, the Network or Wireless Icon should always remain visible on the Taskbar and indicate the status of network connection on your computer.
Whenever your computer is connected to the internet, the Network icon automatically refreshes itself to indicate the current active status of internet connection.
Similarly, when your computer gets disconnected from the internet, the Network icon should update itself to indicate a disconnected network connection.
If the Network or Wireless icon is missing from the taskbar on your computer, you should be able to restore the missing Network icon by using troubleshooting steps as provided below.
1. Check System Tray
It is possible that the Network or Wireless icon is hidden in the system tray.
1. Click on the System Tray icon > if the Network icon is available, drag the network icon and drop it on the taskbar.
![]()
![]()
If you do not find the network icon in system tray, follow the next troubleshooting steps.
2. Check Wireless Icon Settings
Follow the steps below to make sure that Network icon is Turned ON and allowed to appear in Taskbar on your computer.
1. Click on the Start button and click on the Settings icon.
![]()
![]()
2. On the Settings screen, click on the Personalization icon.

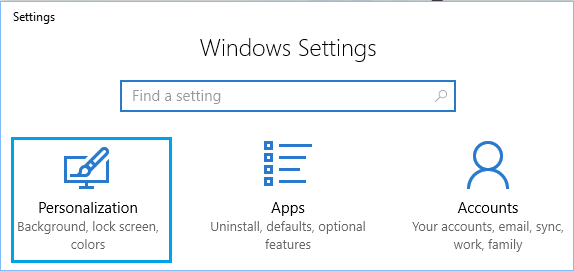
3. On the next screen, scroll down and click on Taskbar in the left pane. In the right-pane, click on Turn system icons on or off link.
![]()
![]()
4. On the next screen, move the toggle next to Network to ON position.
![]()
![]()
5. Go back to Taskbar screen by clicking on the back-arrow and click on Select which icons appear on the taskbar link.
![]()
![]()
6. On the next screen, make sure that toggle next to Network is turned ON.
![]()
![]()
The above two troubleshooting steps should help fix the problem on your computer.
3. Resume or Turn ON Network List Service
Follow the steps below to Turn on Network List Service on your computer.
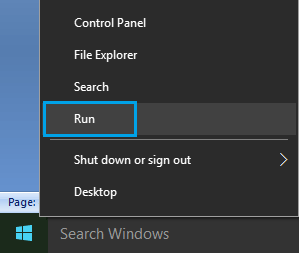
1. Right-click on the Start button and click on Run.

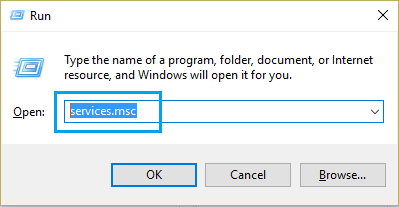
2. In the Run command window, type services.msc and click on OK.

3. On the services screen, check the status of Network List Service. If it is not running, right-click on Network List Service and click on Start, Resume or Restart option in the contextual menu.

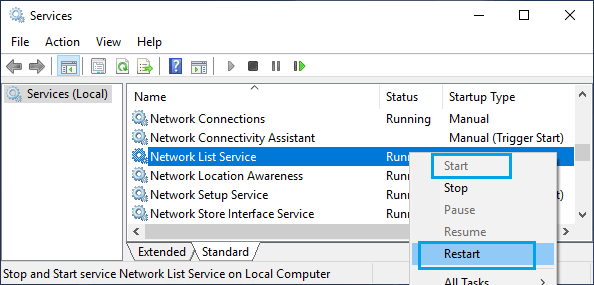
After resuming Network List Service, the Wireless Icon should appear on the taskbar of your computer.
4. Restart Windows Explorer
Follow the steps below, If the Wireless Icon is visible in the taskbar, but it is not updating itself to show the status of Network connection on your computer.
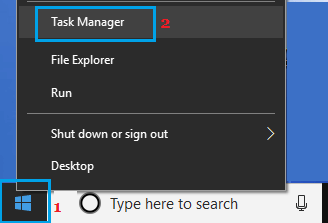
1. Right-click on the Start button and click on Task Manager.

2. On the Task Manager screen, select Windows Explorer entry under ‘Processes’ tab and click on the Restart button.

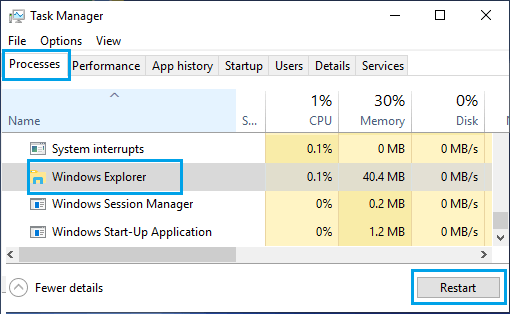
Note: If you do not see Windows Explorer entry, open any Folder on your computer and this will bring up the Windows Explorer entry in Task Manager.
Once Windows Explorer service Restarts, you should find the Network icon updating itself to show the status of network connection on your computer.


![Toni Kroos là ai? [ sự thật về tiểu sử đầy đủ Toni Kroos ]](https://evbn.org/wp-content/uploads/New-Project-6635-1671934592.jpg)


