
How to Change Public Network to Private on Windows 10
You may be wondering, “What is the difference between Windows 10 public, private, and domain network profiles, how do I change public network to private and why should I care?” Insecure public networks are everywhere and so are the bad guys. Windows 10 network profiles offer valuable built-in protection if used correctly.
A proper Windows 10 network profile goes a long way towards helping you to apply basic computer security measures for free.
Prerequisites
If you want to follow along and practice what you are learning, you are going to need any Windows 10 computer. The computer should also be connected to the internet.
Understanding Network Profiles in Windows 10
Connecting to a public network, without exposing your data and devices, is especially risky as you have no idea who or what may be connected. Conversely, on a home or work network, you may want to share files and printers with other devices and people.
Each time you connect to a WiFi network or Ethernet network connection, you risk exposing your computer to potential threats. Network profiles in Windows 10 allow you to quickly change security and file-sharing settings. There are three built-in types:
- Public – The Public profile is what should be used at the library or coffee shop. A public profile makes your computer hidden and not accessible from other computers. Your computer will not be able to share files or printers with other computers on the public network.
- Private – The Private profile is what should be used for a home or other trusted private network. A private profile makes your computer visible to other computers, and thus able to share files and printers.
- Domain – The Domain profile is typically applied when your computer is an active directory domain member. Many work computers fall into this category, and this profile contains settings that are designated by domain administrators.
Each profile has specific security, firewall, and sharing settings applied to a network connection.
Viewing Network Profiles
When connecting to a network, make sure that you are using the appropriate network profile. You can check the profile of a network connection you are using by navigating to the Control Panel → Network and Internet → Network and Sharing Center from the Windows 10 start menu.
In the View your active networks window, shown below, you will see under the Network heading the profile currently in use along with what Access type and Connections are assigned to the network profile, as shown below.
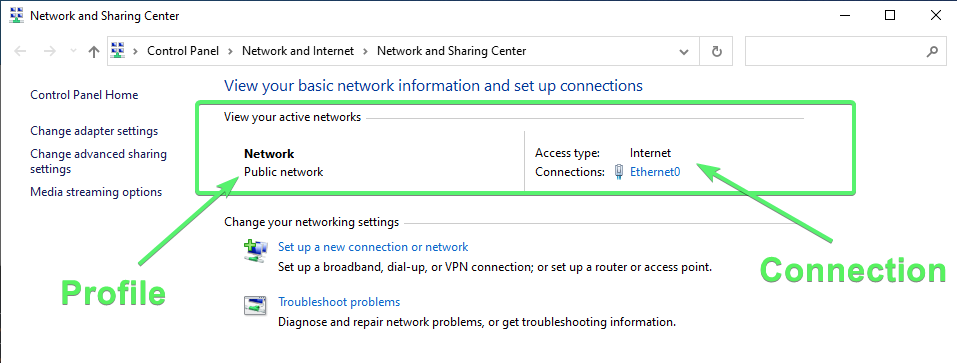 Viewing a Network Profile for an ethernet connection in the Network and Sharing Center.
Setting Network Profiles in Windows 10
Although it’s useful to see the network profile your computer is using, there are times when you need to change it too. Network profiles are configurable using the Windows Settings application or by using PowerShell.
Configuring a New Network Connection
When connecting to a new network, you will see a popup dialog, shown below, asking whether a PC to be discoverable on a network. At this time, Windows doesn’t have a network profile for this device. This dialog is the first chance you get at assigning a network profile to the newly detected network connection.
As seen below, if you select Yes, Windows 10 will change the network to Private. If you select No, your profile is set to Public, thus making your computer a little harder to be seen by prying digital eyes.
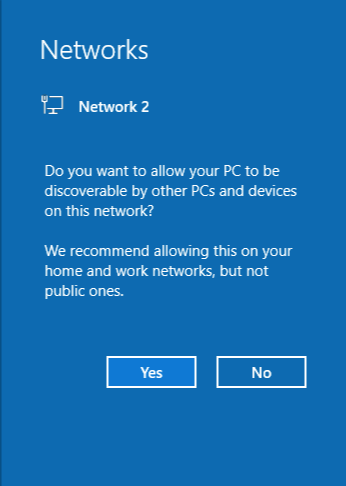 New network dialog
As shown below, in the Network and Sharing Center, a network connection is set as an Unidentified network. The Public network profile is automatically applied. This typically happens due to a network configuration issue.
 Unidentified networks are placed in a public profile by default.
Changing an Existing Network’s Network Profile
You may find that a network connection has applied a different network profile than intended. Perhaps you need to change the applied profile to allow for file and printer sharing or to make your computer discoverable on the network.
- Type “Network Status” in the Windows 10 Search box, and click on the result shown below.
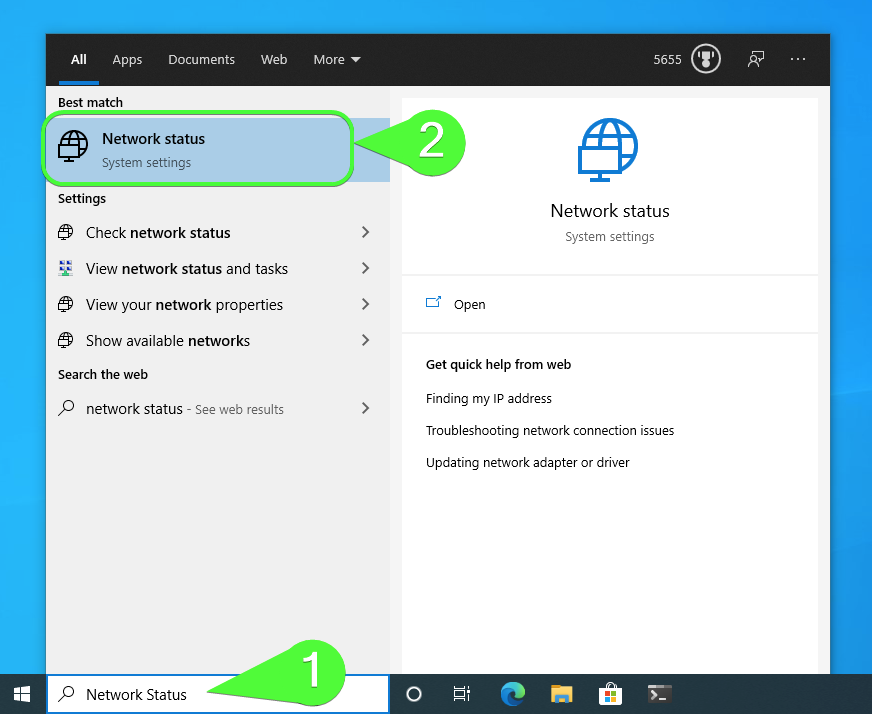 Locating the Network Status system settings screen with the Windows 10 Search Box.
2. Next, click on the Properties button of the network connection you wish to modify.
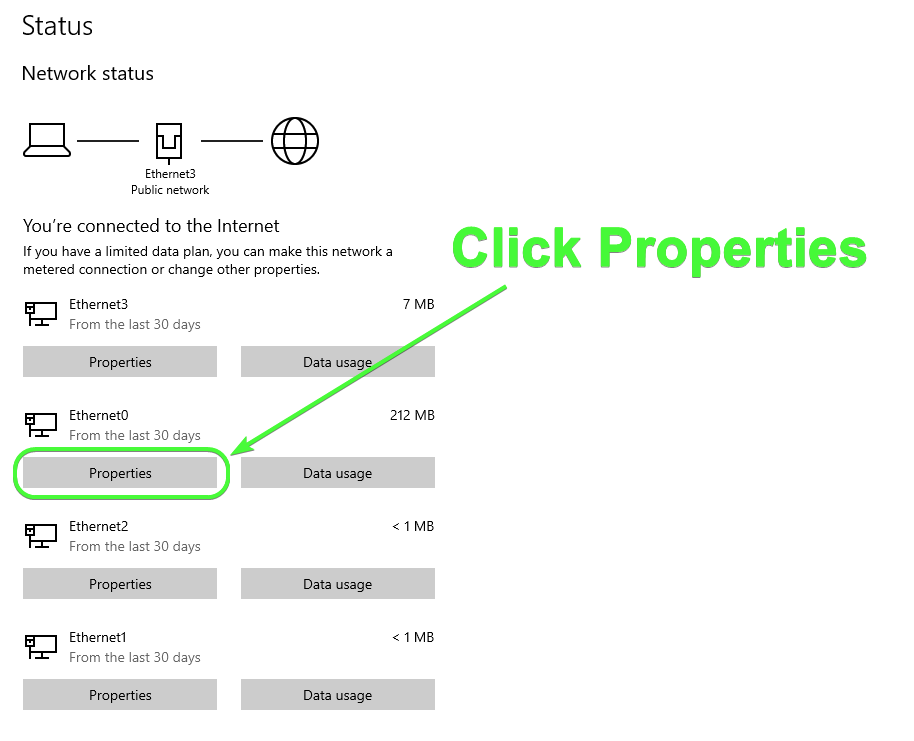 Choosing a network connection in Network Status.
3. Finally, select the Network Profile you want to apply to the network connection.
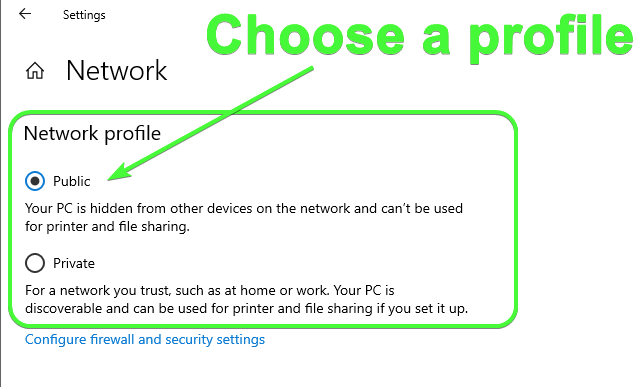 Changing a network connection’s network profile.
The profile change takes place instantly and you can close the settings window.
Using Windows PowerShell
What if you don’t want to search through the Windows settings to change a network profile? In that case, you can change a network profile using Windows PowerShell.
Windows PowerShell offers an alternative to the Windows Settings application. For those that are comfortable using the command-line, PowerShell offers a convenient method for configuring profiles.
When viewing and changing network profiles with PowerShell, you’ve got two options, Get-NetConnectionProfile and Set-NetConnectionProfile, retrieve the current network profile settings and set a new profile, respectively. To demonstrate changing network profiles with PowerShell, let’s cover a simple example; using Windows 10 to change a public network to private.
First, find the network adapter alias to change. The cmdlet Get-NetAdapter lists properties for each of your computer’s network adapters. Run the command below in a Windows PowerShell session.
(Get-NetAdapter).InterfaceAliasAs shown below, the example computer has four Ethernet adapters and a Bluetooth adapter.
 Listing all network connection interface aliases.
The output shows just the
InterfaceAliasproperty results, and yours may vary.
Run the command below to retrieve the NetworkCategory property. This property contains the currently assigned network profile for the Ethernet0 adapter.
(Get-NetConnectionProfile -InterfaceAlias 'Ethernet0').NetworkCategory Finding a network connection’s current network profile via Get-NetConnectionProfile.
Finally, run the command below to change the Windows 10 network profile from a private profile to a public profile with the Set-NetConnectionProfile cmdlet.
Set-NetConnectionProfile -InterfaceAlias 'Ethernet0' -NetworkCategory 'Public' Change the
 Ethernet0 interface to use the Public network profile.
Verify that the profile has changed by running the following command one more time.
(Get-NetConnectionProfile -InterfaceAlias 'Ethernet0').NetworkCategory As shown below, the Ethernet0 network profile is now changed to use the Public profile.
 Verifying that the
 Ethernet0 interface has changed to use the Public profile.
What about Domain Network Profiles?
If your computer is joined to an Active Directory domain, as is often the case in work environments, you will find that domain network profiles cannot be changed. Group Policy, a system of centrally configuring computer settings, manages the computer’s network profiles.
If you attempt to change the profile via Windows PowerShell, and your domain is configured to disallow network profile changes, you will see an error such as the one shown below.
# Run the following to return a True or False if your computer is a domain member.
(Get-CimInstance -ClassName Win32_ComputerSystem).PartOfDomain

# Attempt to change a domain-connected computer's Network Profile
Set-NetConnectionProfile -NetworkCategory Public -Verbose
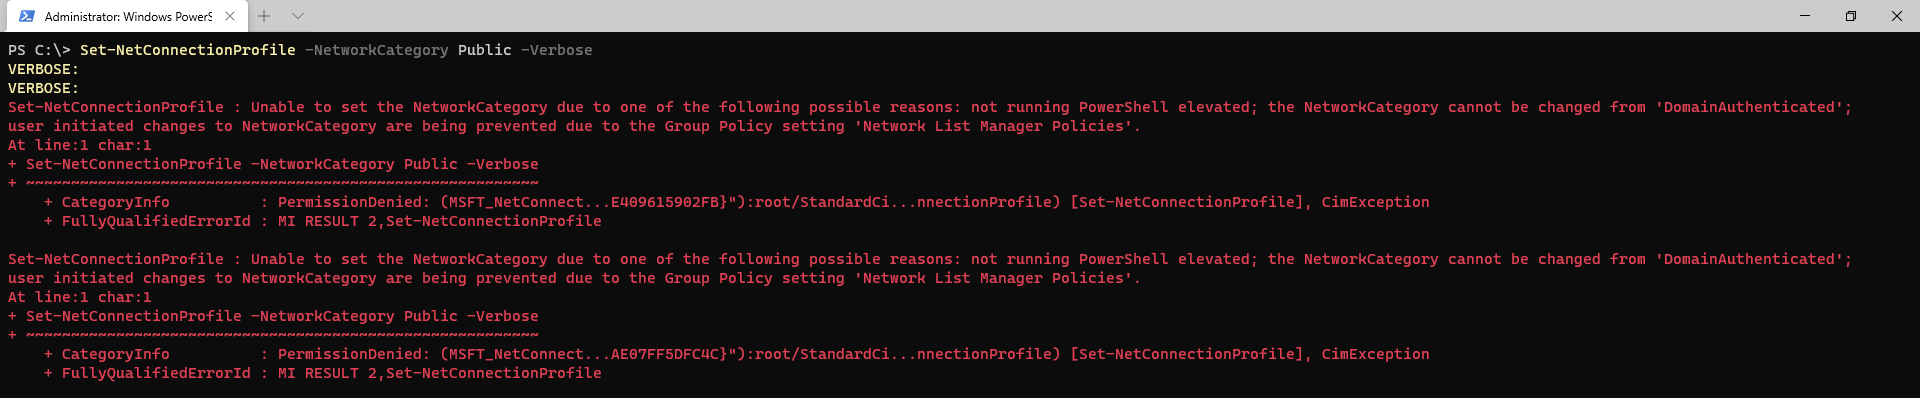 Group Policy blocking network profile change.
Next Steps
There are several built-in security features that Windows 10 offers. Changing Windows 10 network profiles from public to private is just one of the many security features available.
Try managing and running Windows Defender scans using PowerShell. You may also want to check out how you can manage the Windows Defender Firewall using PowerShell.


![Toni Kroos là ai? [ sự thật về tiểu sử đầy đủ Toni Kroos ]](https://evbn.org/wp-content/uploads/New-Project-6635-1671934592.jpg)


