
How to Build a Raised Garden Bed
Mục Lục
Introduction
If you’ve always liked the look of raised garden boxes, now is your chance to finally get out and build them. They provide a rich aesthetic to your yard and ease and convenience when gardening.
Cheap Raised Garden Beds You Can DIY
The list of reasons for switching to raised vegetable garden beds is long, but these are the main advantages:
- Tending raised plants is a lot easier on the back and knees.
- You can fill planters with top-quality soil for more productivity in a smaller space.
- Raised beds curtail creeping weeds and drifting seeds.
- The height discourages pests, especially rabbits.
Gathering materials for raised garden beds
Everything you need is available at home centers for about $200 per planter. We chose pressure-treated lumber that’s cedar tone rather than green, so they look like cedar raised garden beds. Take the time to select straight, good-looking lumber. When you get it home, cover it with plastic to slow its drying. Pressure-treated lumber tends to warp badly as it dries; much better to let it dry after assembly when the parts are fastened together.
Home centers typically carry light-gauge corrugated metal, which is fine for this metal raised garden beds project, as long as you reinforce it with plywood. Our metal is 30 gauge. When looking at gauges of metal, remember that a higher number means thinner material. Also, make sure all the screws you choose are rated for use with treated lumber.
Plus: Check out 10 easy vegetables every Midwest gardener should grow.
Cutting List
 Family Handyman
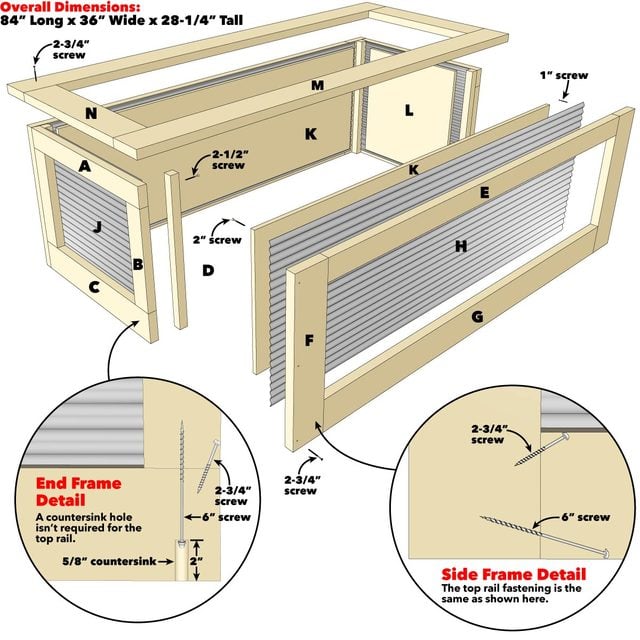
Figure A: Raised Garden Beds with Corrugated Metal
 Family Handyman
Tips for How to Build a Raised Vegetable Garden
- Start by cutting the parts according to the Cutting List. Cut shorter parts from your imperfect boards and save your straightest material for the long parts (E, G, M).
- To avoid assembly mix-ups, note that the rails fit between the stiles on the side frames. On the end frames, the stiles fit between the rails.
- We didn’t use a finish on our planters. If you do, note that it will be much easier to apply before you install the metal panels.
- If you’re tempted to miter the corners of the rim, reconsider. Outdoor miters look better than square-cut butt joints at first, but they inevitably develop ugly gaps as the wood absorbs and releases moisture.
- Here’s how to install the planter: Set it into position, then slice into the soil around it, marking its footprint. Move the planter aside and dig a shallow perimeter trench, just a couple inches deep. Set the planter in place again and check it for level in both directions.
- Add soil or deepen the trench to level the planter.
- When the planter is in place, cut a couple large slits in the bottom of the plastic liner so excess water can drain into the soil below—unless you plan to install a self-watering system. That requires a watertight liner.
- Filling this planter requires a lot of soil, almost a cubic yard. But there are ways to fill the lower half of the planter with less effort and expense. One common filler is plastic milk jugs (with caps screwed on tight). Another trick is to set plastic buckets in place upside down.
Next, check out our favorite flower bed ideas for full sun.


![Toni Kroos là ai? [ sự thật về tiểu sử đầy đủ Toni Kroos ]](https://evbn.org/wp-content/uploads/New-Project-6635-1671934592.jpg)


