
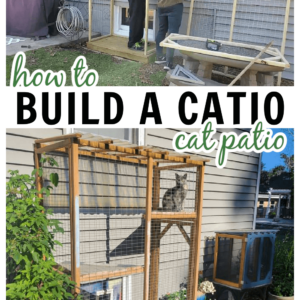
How to Build a Catio (DIY Catio Tutorial)
Mục Lục
Plans for building a DIY catio (cat patio) to let your cat sit outside in the fresh air without roaming free.
It’s easy to build a catio with a couple of pieces of wood from the hardware store and wire screen mesh. This post includes a step by step tutorial and a video tutorial on how to build a DIY catio.
I’m going to start with a little bit of honesty. I never thought I’d be writing a post about how to build a catio. NEVER. I’m not sure what this means for me and where I’m at in my life. All I do know is that I love our new cats and wanted to give them a space outside. And although I still like dogs more than cats, I’m happy because my cats are happy with their new catio. VERY happy.

Before we get started on this tutorial, let’s get something out of the way:
What is a catio?
Being a dog person for my entire life, I’ve never owned cats or even thought about cats. So this word was definitely new to my vocabulary a little over a year ago . A catio (cat + patio = catio) is an outdoor enclosure that is fenced in and gives a cat access to being outside in a protected area.
My cats absolutely LOVE being outside, but I didn’t want them to be outdoor cats and have free reign of the yard and neighborhood. This catio helps us to compromise. I leave the basement window (which connects to the catio) open during the day and night from spring through fall. Basically, they have access to this area whenever they want.
This post contains affiliate links. For more information, please see my disclosures page.
Supplies to Build a Catio
Steps to Build a Catio
In this post, I will describe the measurements I used for my catio, but you could easily adapt the size to meet your needs. To start, you’ll want to be sure your catio is large enough to be in front of a window. This allows the cat to have access to the catio through a cat door. I used a basement window and it worked perfectly.
1. Build the base
The first step is to build a base for the catio to sit on. This provides a place to screw the catio wall panels into and keeps your cat fairly clean and off the ground.
The base is made of ground-contact treated 2×4″ lumber (since it will be in contact with ground). The front and back boards are 48″ long and the side boards are 23″ long. Two 8′ boards will be enough to make the entire base.
I screwed 1×4″ treated boards to the top of the base. Each one was 48″ long, so the side edges were flush with the edge of the base. The front and back edges hang over slightly. Then, I leveled the ground and put the catio base as close to the exterior wall as possible.
2. Build the wall panels and attach mesh
To build each panel, use wood glue and 2″ exterior deck screws to attach the 2×2 boards together. It’s important to pre-drill each hole with a drill bit that is slightly thinner than the screw you are using. This ensures that the wood won’t split when you screw into the wood (especially since the screw hole will be quite close to the edge of each board).
After building each of the walls, I attached 1×2″ (24″ wide) mesh to all of the panels except the back panel. I used 1″x2″ wire mesh, but you could also use hardware cloth that has even smaller openings. I would not choose chicken wire as it’s too flimsy. Also, if the openings are any larger than 1×2″, I would worry about other smaller critters getting into the catio and causing a whole lot of chaos!
Here’s a link to the exact mesh I used. I was having trouble finding the size I was looking for anywhere but Menards.
The back panel can remain open it will be closed in by the exterior wall and it allows for you to place the cat door access anywhere within that opening.
To attach the mesh, I used an electric staple gun, but a handheld staple gun will also work just as well!
Back Panel Cut List and Assembly
- 2 – 48″ long 2×2″ boards
- 2 – 67″ long 2×2″ boards
To build the wall panels of the catio, I used 2×2″ treated wood to build each wall. The back wall is made from two 48″ pieces of wood for the top and bottom and the side pieces each measure 67″ long.
Front Panel Cut List and Assembly
- 2 – 48″ long 2×2″ boards
- 3 – 65″ long 2×2″ boards
Build the front panel with two 48″ boards for the top and bottom pieces. The sides and middle post measure 65″ in length.
Side Panels Cut List and Assembly
- 4 – 23″ long 2×2″ boards
- 4 – 65″ long 2×2″ boards
- 3 – 20″ long 2×2″ boards
The left side panel on my catio is fixed and has mesh all the way along the panel. I made the right panel to allow for a small access door. Because there is a door, I used two 20″ boards above the door opening for a stronger header. I attached the wire mesh only to the top opening in this side panel.
If you plan to build a door in your catio, build the side panel with an opening for the door, but wait to attach the door until after the whole catio has been assembled (next step).
3. Attach base and panels together
To see the building process, scroll above to view the video of the assembly of the catio.
Starting with the back panel, I used 2.5″ exterior screws to screw that panel into the bottom base (making sure that the screw is going through the top boards and into the 2×4 of the base). Then, I screwed the back panel into the exterior wall (one on each side).
After the back wall is attached, screw the side panels into the back panel using 2″ exterior screws. (Don’t forget to drill a pilot hole first and then use wood glue before screwing together the panels.)
The side walls should also be screwed into the base of the catio, going right into the 2×4 of the base.
Finally, screw the front panel into the side panels and the base of the catio in the same way as the other panels.
4. Build a roof
This is a very simple roof structure that requires no fancy angle measurements or cuts. The back panel is slightly taller than the front and side panels, which gives a slight pitch to the roof. Screw the 1×2″ boards into the top of the frame using 1.5″ exterior deck screws.
I used the least expensive corrugated roofing panel which was a clear PVC panel, but there are other options like steel, polycarbonate and foamed PVC roofing panels as well. No matter what the choice, you can use roofing screws to attach the PVC panel into each of the wood rafters.
These sharp point roofing screws work great because they have a little washer that attaches tightly to the roof panel which keeps water out. Plus, they are self drilling so they go right through the plastic without causing any splitting.
5. Build a door (optional)
I decided to make a small door that fit into the lower opening in the right panel. I used 2×2″ boards to build the door in the exact same way that I assembled the panels. Plus, I added smaller boards cut with 45 degree angles at each end to attach within each corner for structural stability.
How’s the catio holding up?
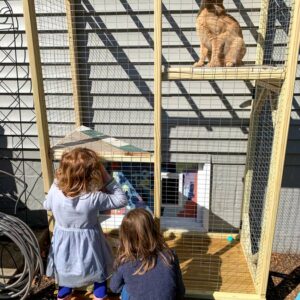
I built this cat patio a year and a half ago, and it is holding up really well! We live in the Chicago area, so we have a wide variety of weather across the seasons. For the past year and half, I’ve kept the catio up and didn’t put it away over the winter. I think you could easily move it into a garage over the winter, but I didn’t really feel the need to do so because the wood is exterior treated wood. Plus, it’s very helpful that this catio is underneath a roof line that extends about a foot and half away from the house.
To install the shelves on the inside, I attached a couple more 2x2s in the corners on the interior. Then, I screwed 1x4s right into those 2x2s. Of course, both cats always want to be on the top shelf, but they don’t really want to be near each other. SO, I think I should probably add another top shelf to the left side of the catio as well so they both have a top spot!
Join the Refresh Living DIY & Upcycling Community
Looking to decorate your home without buying new? Join the Refresh Living community for budget-friendly decorating and painting ideas sent to your inbox once every two weeks!
Virtual high five! You’re one step away; just check your email to confirm your subscription.


![Toni Kroos là ai? [ sự thật về tiểu sử đầy đủ Toni Kroos ]](https://evbn.org/wp-content/uploads/New-Project-6635-1671934592.jpg)


