How To Use The Facebook Business Manager [Guide] | EasyAutoTagging
Mục Lục
How To Use The Facebook Business Manager [Guide]
How does the Facebook Business Manager work and why should you use it?
For one thing, it’s a valuable tool to have in your arsenal.
Especially if you are managing multiple ad accounts, pages and pixels across a team.
According to Facebook anyone can use the Business Manager:
“Small to large businesses use Business Manager to organize their business assets and information in one place. You can use Business Manager to control your Facebook assets and make sure the right people have the correct access.”
and
“Your Business Manager is a central space to manage your business, separate from your personal Facebook profile. You don’t have to worry about mixing your business and personal content.”
However, it can be confusing to get started.
So let’s take a closer look at all of the Facebook Business Manager features.
The goal is to give you a concise overview of how it can serve rather than confuse 😕 you.
Otherwise, let’s dive right into the guide 👇
What is the difference between Facebook Ads Manager and Business Manager?
The difference between the Facebook Ads Manager and the Facebook Business Manager is that the Ads Manager is used to create and manage ads.
The Business Manager on the other hand is used to manage and organize all assets and information (including ad accounts) for one or multiple businesses separately from personal content.
In this post, I will focus on Business Settings within the Facebook Business Manager. I cover all of the Facebook Ads Manager features in this complete guide.
What is Facebook Business Manager?
The Facebook Business Manager is a tool that allows you to manage all of your business ad accounts, pages and assets in a single place across multiple people and organizations.
Think of it as a centralized hub where you can manage all of your clients or brand accounts and assets in an efficient manner.
You can also group assets into a line of business to leverage Facebook’s new attribution tool. More about that later.
Why Should I use the Facebook Business Manager?
You should use the Facebook Business Manager if you are managing multiple Facebook pages, ad accounts or apps across clients or if you are working with a team of people across assets.
The Facebook Business Manager provides one central location to help you to stay organized and maximize efficiency across all of the moving pieces related to advertising with Facebook.
Contents
Setting up and accessing the Facebook Business Manager
Accessing Business Settings
How to Manage Users in the Business Manager
Managing Accounts
Facebook Business Manager Data Sources
Brand Safety for Brands
Registrations for Publishers
Navigating General Settings
How to set up a Facebook Business Manager?
Time needed: 10 minutes.
To set up a Facebook Business Manager follow the steps below :
- Access Your Facebook Profile
Make sure you have an active Facebook profile that is an admin of the primary business Facebook Page.
- Go to your Facebook Business Manager
Go to https://business.facebook.com/overview
- Create Account
Click Create Account in the top right corner
- Log In
Log in using your Facebook credentials
- Business Name
Enter a name for your business
- Select Business Page
Select your primary Facebook Page, your name and email address
- Complete Steps
Complete the remainder of the onboarding flow
Note: If you have more than one Facebook Business Manager or have been added to an Agencies Business manager and go to https://business.facebook.com/ you will be redirected to a home page prompting you to select a business you are associated with. If this is the case and you are still looking to create a new Facebook Business Manager make sure to go to https://business.facebook.com/overview instead.
As you can see, it’s relatively simple to get your Business Manager set up. Now that your account is created, let’s dive right into each section of the business manager.
Get ready to manage multiple Ad Accounts, Facebook Pages, Apps and Pixels more efficiently.
How do I access the Facebook Business Manager?
To access the Facebook Business Manager:
- Make sure you are logged into Facebook
- Go to https://business.facebook.com/
If your profile is connected to more than one Facebook Business Manager they will be listed here.
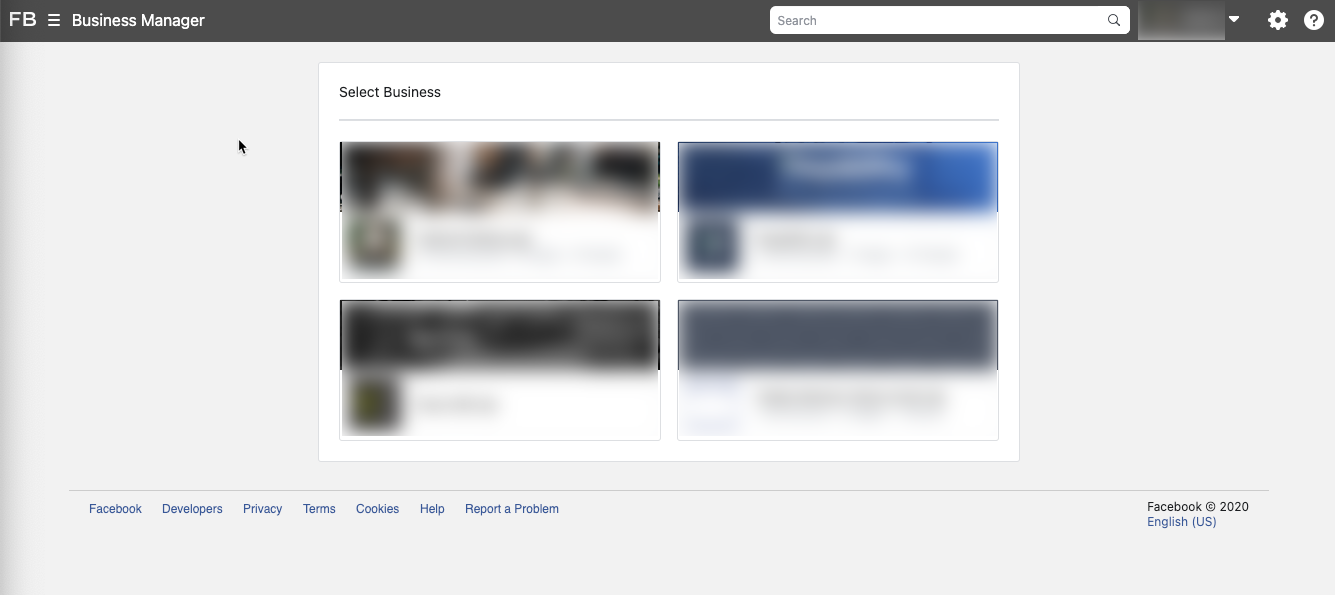
If you are not invited to an existing Facebook Business Manager or you do not have one of your own, you will be prompted to create one.
Note:
Why do you see more than one Facebook Business Manager?
When working with partners or agencies they have the ability to add you directly, as an individual, to their Facebook Business Manager. If that is the case their Facebook Business manager accounts will display as a business you can select.
Facebook Business Manager – Overview2>
Home
Once you select your business you get taken to the Facebook Business Home section https://business.facebook.com/home/accounts
It’s a bit confusing at first. Technically you are not in your Facebook Business Manager. Rather this area provides an overview of your Facebook Ads and Business activity.
The Facebook Business Manager Home section consists of four main areas:
1. Left Side Nav
2. Ad Account Overview
3. Page Overview
4. Alerts
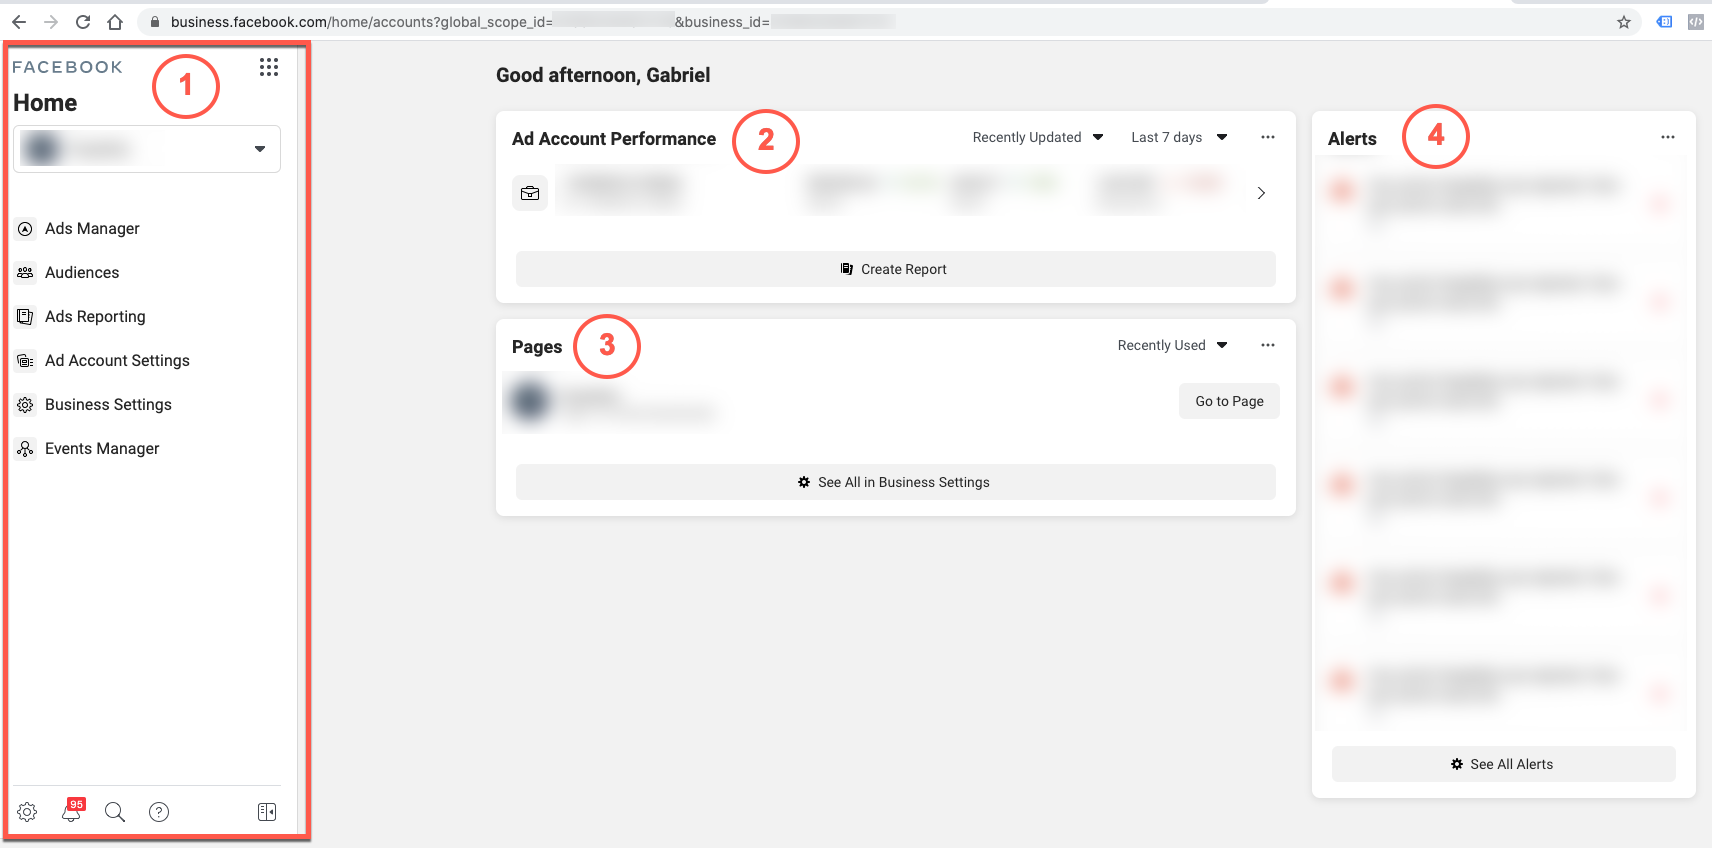
Let’s go through each one of these areas in detail.
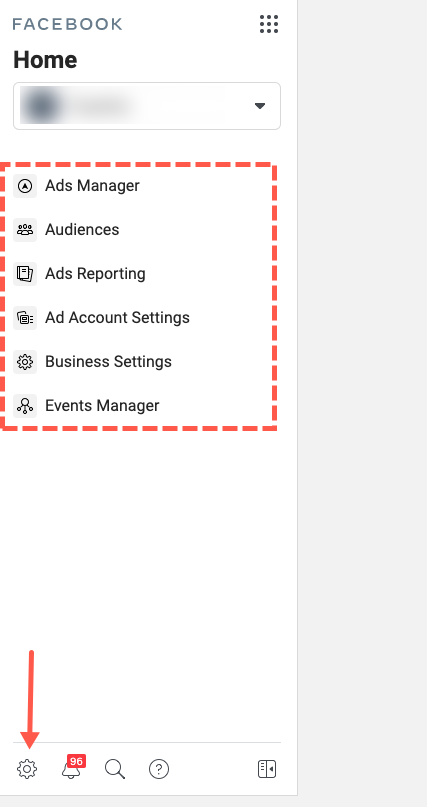
1. Left Side Nav
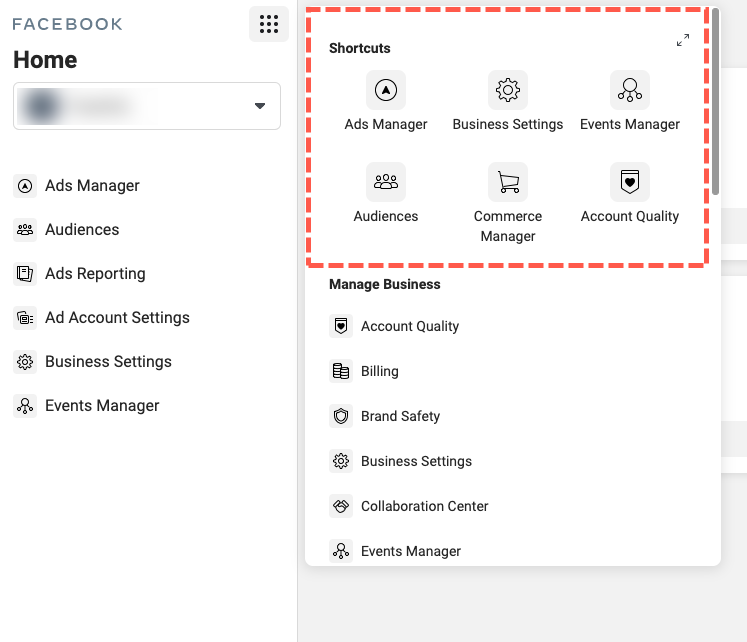
Flyout Menu
In the top right corner of the left side nav click on the square [made of squares] to access a flyout menu. This is the same as the flyout menu that you get in the Facebook Ads manager.
I typically do not access this menu from the Facebook Business Settings Home Page.
However, I do use the shortcuts when accessing this menu in the Facebook Ads Manager.
Account Access
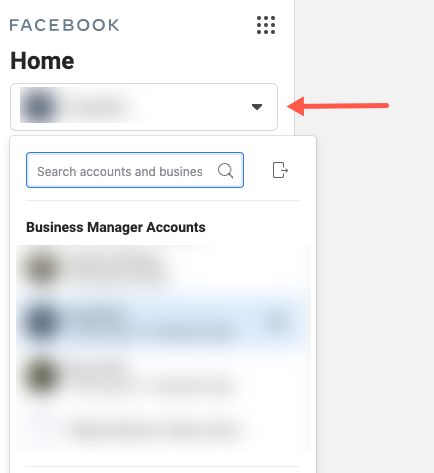
The drop down menu below Home enables you to switch between Facebook Business Manager accounts. Both accounts that you own or accounts you have been added to.
Shortcuts
The list of quick links in the left sidebar are somewhat redundant. They act the same way as the shortcuts in the flyout menu.
There is no recommended way to access different sections of the Facebook Ads Manager and Facebook Business Manager.
You can adjust it to your own preferred workflow.
At the bottom of the left side nav you can access your business settings by clicking the gear icon. This takes you the actual Facebook Business Manager. You can also view all notifications, search the Facebook Business Manager, access help or collapse the left side nav.
2. Ad Account Overview
The Ad Account Overview section provides a list of ad accounts connected to your Facebook Business manager. This area provides a general overview of Ad Account performance across all clients.
3. Page Overview
The Page Overview section is similar to the Ad Account Overview section and you can see a list of all Facebook Pages connected to the Facebook Business Manager.
4. Alerts
The Alerts section displays recent notifications across accounts so you can quickly identify alerts that need to be addressed.
Now that we have covered the Facebook Business Manager Home section let’s dive into Business Settings.
Facebook Business Manager – Business Settings
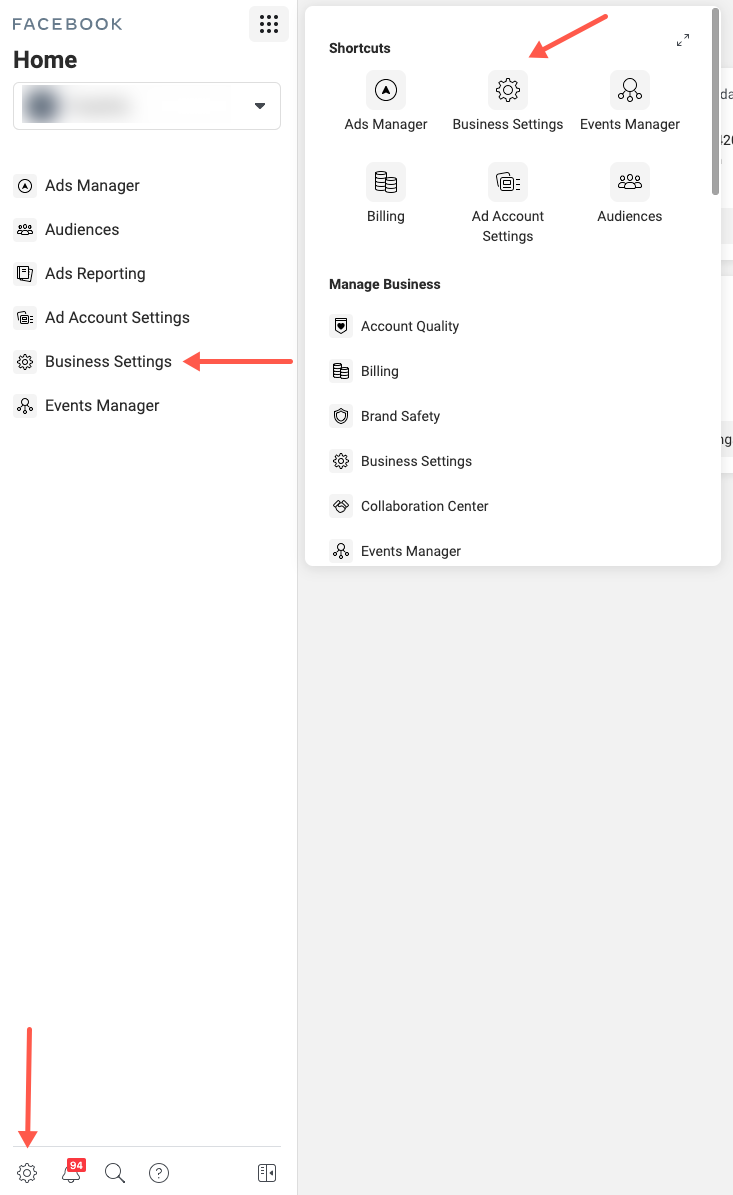
To access the business settings, you can either:
1. Click on the Business Settings gear icon in the fly-out menu under Shortcuts
2. Select the Business Settings quick link link in the left sidebar nav
3. Click on the gear icon ⚙️ at the bottom of the left side nav
Again, there is no best way to access business settings, it is really up to your preferred workflow.
Let’s go over each specific section of Facebook Business Manager Settings.
Facebook Business Settings consist of the following sections:
– Users
– Accounts
– Data Sources
– Brand Safety
– Registration
– Integrations
– Payments
– Security Center
– Requests
– Notifications
– Business Info
– Setup Guide
Let’s dive right in 👇
Facebook Business Manager – Users
Users consist of three sub-categories:
- People
- Partners
- System Users
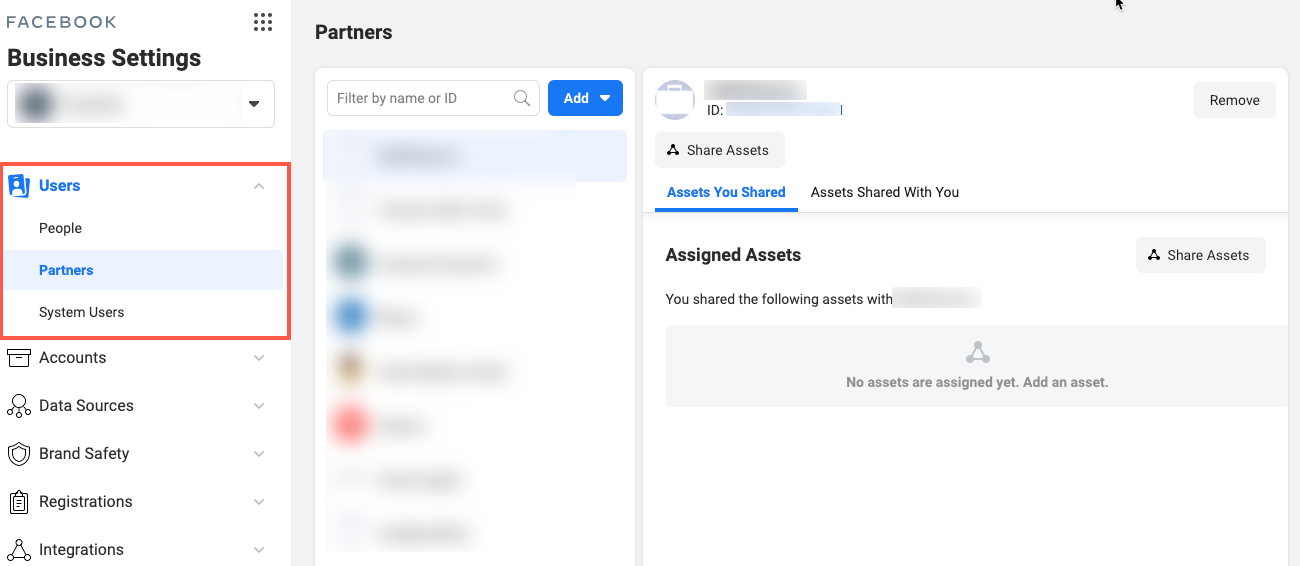
Let’s take a closer look at each one of these sub-categories.
People
Under people, you can manage existing Business Manager users and invite new users that you can then assign to single or multiple pages, ad accounts, properties catalogs or apps.
Note: For clarities sake, let’s take a closer look and define each asset type:
Pages – This is the business Facebook Page
Ad Account – Ad Account refers to any Facebook Ad Account connected to the Facebook Business Manager.
Business Asset Groups – With Asset Groups [Formerly called Properties] you can group multiple assets under a brand. For example, you can group pages, ad accounts and other business assets for each brand or client into a single Business Asset Group and simply add new team members to their respective groups.
Catalogs – Your online catalog typically connects to your product feed tied to an e-commerce store
Apps – Any connected Facebook apps
When you add or invite people to your Facebook Business Manager you can simply add them by entering their e-mail address. The invited user will then receive instructions on completing the steps to get added.
After you add the email you will want to assign a role. This only defines the persons business role.
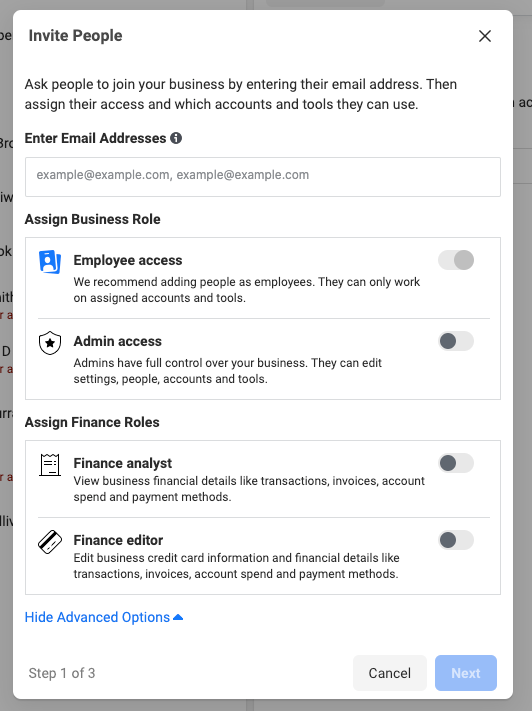
Roles are grouped into two sections. A business role and a finance role.
Business Role:
Employee access – this is the recommended access level for anyone that you only want to grant access to specific assets like pages or ad accounts.
Admin access – This access level gives the user full control over your Facebook Business Manager. They will be able to access settings, add and remove users, pages, tools…
Finance Role:
Analyst – Essentially this is view only access of all financials such as invoices and spend in your business manager.
Editor – This gives the user full access and control of financial resources including adding, removing and assigning billing methods.
Typically, when working with someone on a specific set of ad accounts and pages you will want to give them employee access only. This way you can control what they access. In addition, they will be restricted from making changes to your core assets.
However, if you are working with someone that will take ownership of multiple accounts or bringing someone on in-house, you will probably want to grant them admin access.
In the following steps you can select access to specific pages, ad accounts, catalogs and apps.

Note: If a Partner shares a their Facebook Pixel with your ad account they also appear here.
Partners
In the Partner section, you can ad partners to the Business Manager. Partners can be agencies or third-party partners such as CallRail for custom integrations.
To assign a Partner you need to be an admin, your partner must have a Business Manager, and you need your partner’s business ID.
System Users
System Users are only applicable if you are connected to an app; hence not all accounts will have access to system users. According to Facebook:
‘System users represent servers or software that make API calls to assets owned or managed by a Business Manager.’
Facebook Business Manager – Accounts
Accounts consist of seven sub-categories:
- Pages
- Ad Accounts
- Business Asset Groups
- Apps
- Instagram Accounts
- Line of Business
- WhatsApp Accounts
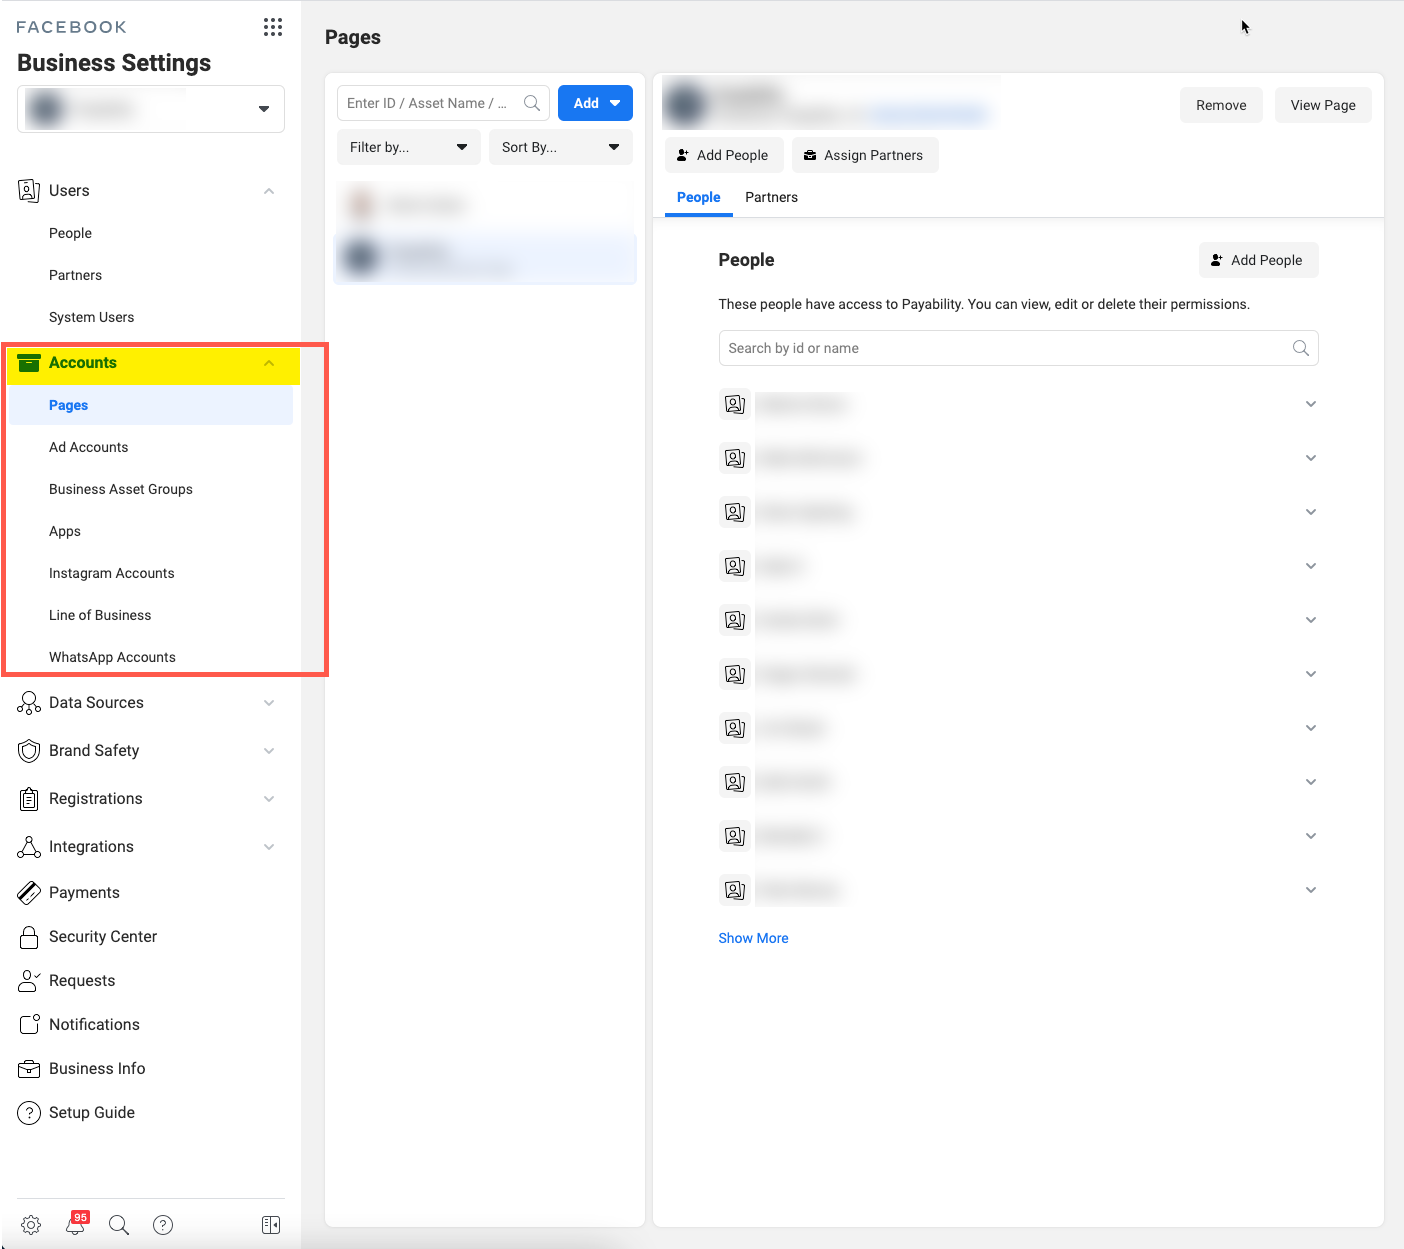
Let’s take a closer look at each one of these sub-categories.
Pages
Under the pages tab, you can see a list of pages added to the Facebook Business Manager. When you select a page in the list you can also see users that are assigned to the selected Facebook page.
This is where you have the ability to add or remove users from individual Facebook pages. If you don’t want to remove a specific user you have the option to change or update their permission levels.
In addition, you can also add new Facebook Pages that you are an admin of, request access to a new page (once you send a request, the current admin of the Facebook Page will receive a notification to accept) or create a new page.
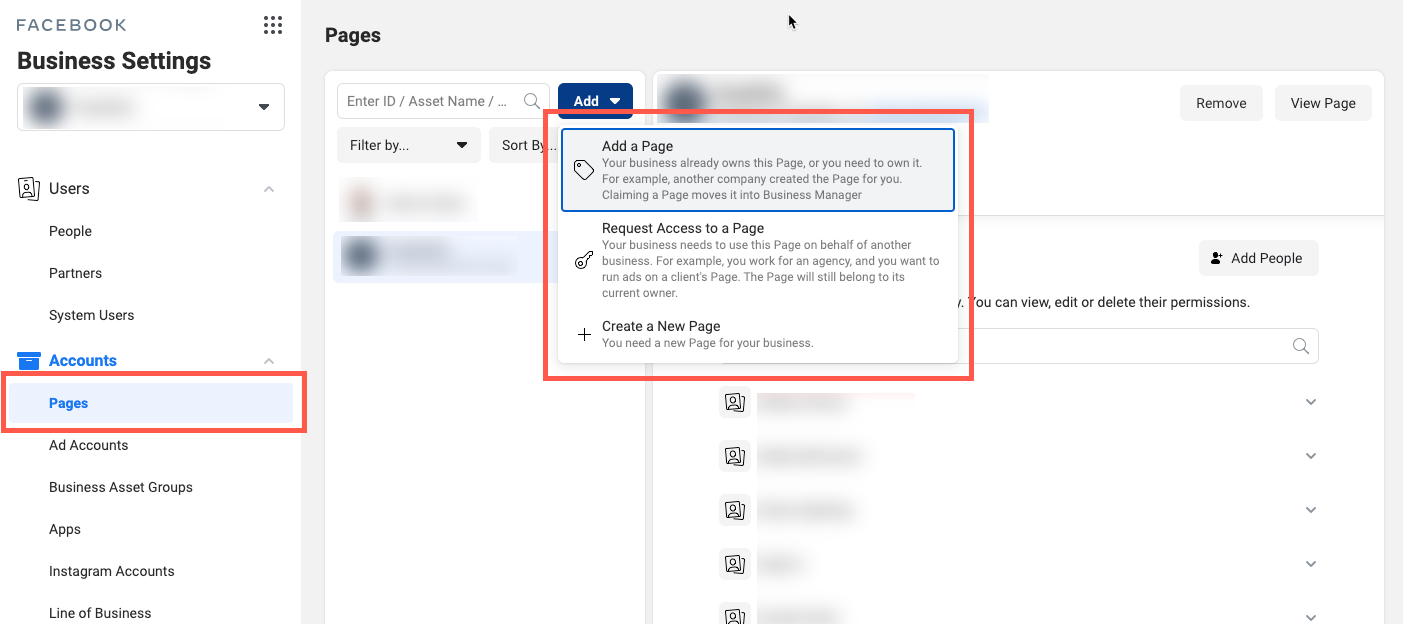
Click on the link below for step by step instructions 👇
✔️ How to add a page to the business manager.
Ad Accounts
The Ad Accounts section is similar to Pages. It enables you to get a birds-eye view of all Ad Accounts connected to the Facebook Business Manager. This makes it easier for you to manage users and user permissions across Ad Accounts.
You can also add an Ad Account by claiming one you are an admin of, requesting access (have the client share their Ad Account ID so that you can send out a request) or creating a new ad account.
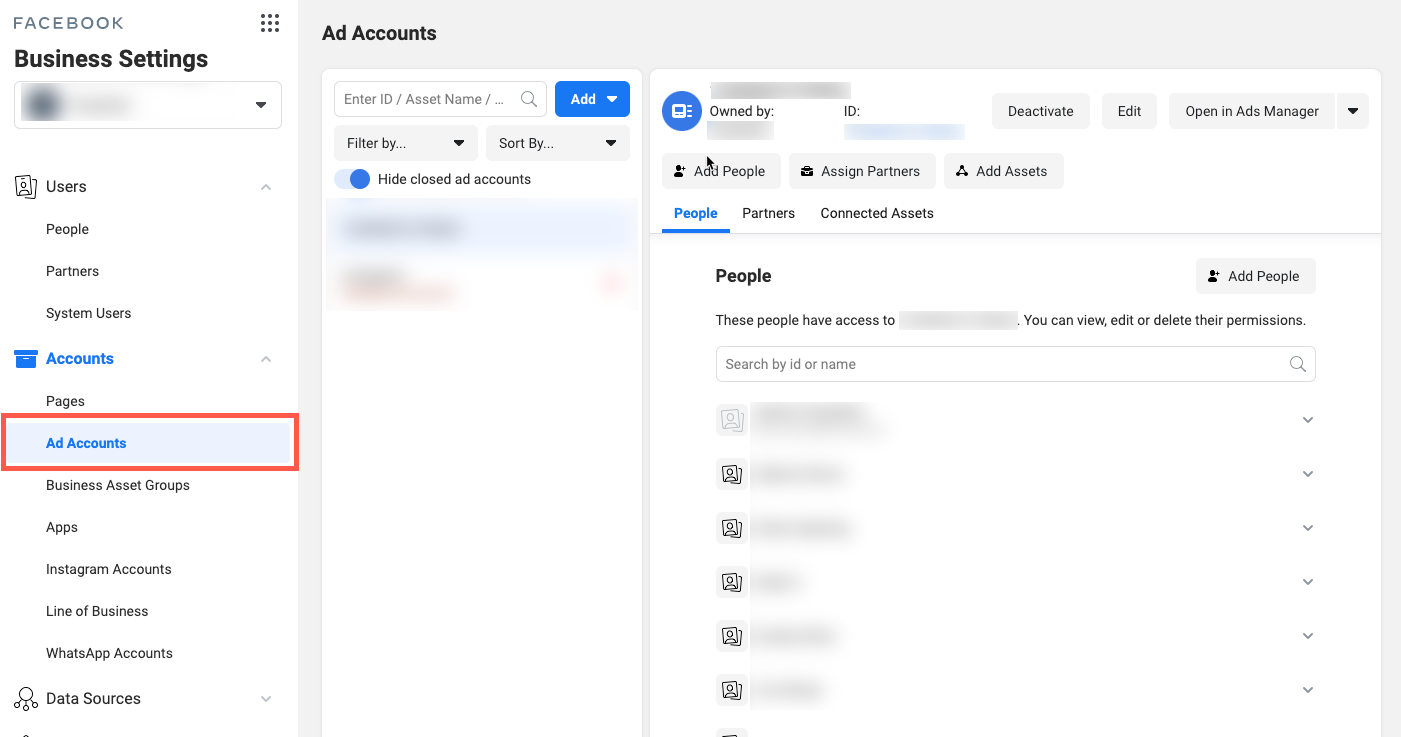
Click on the link below for step by step instructions 👇
✔️ How to add an ad account to the business manager.
Business Asset Groups
Asset Groups in the Facebook Business Manager used to be called Projects.
Business asset groups are great for managing many accounts and brands across your team.
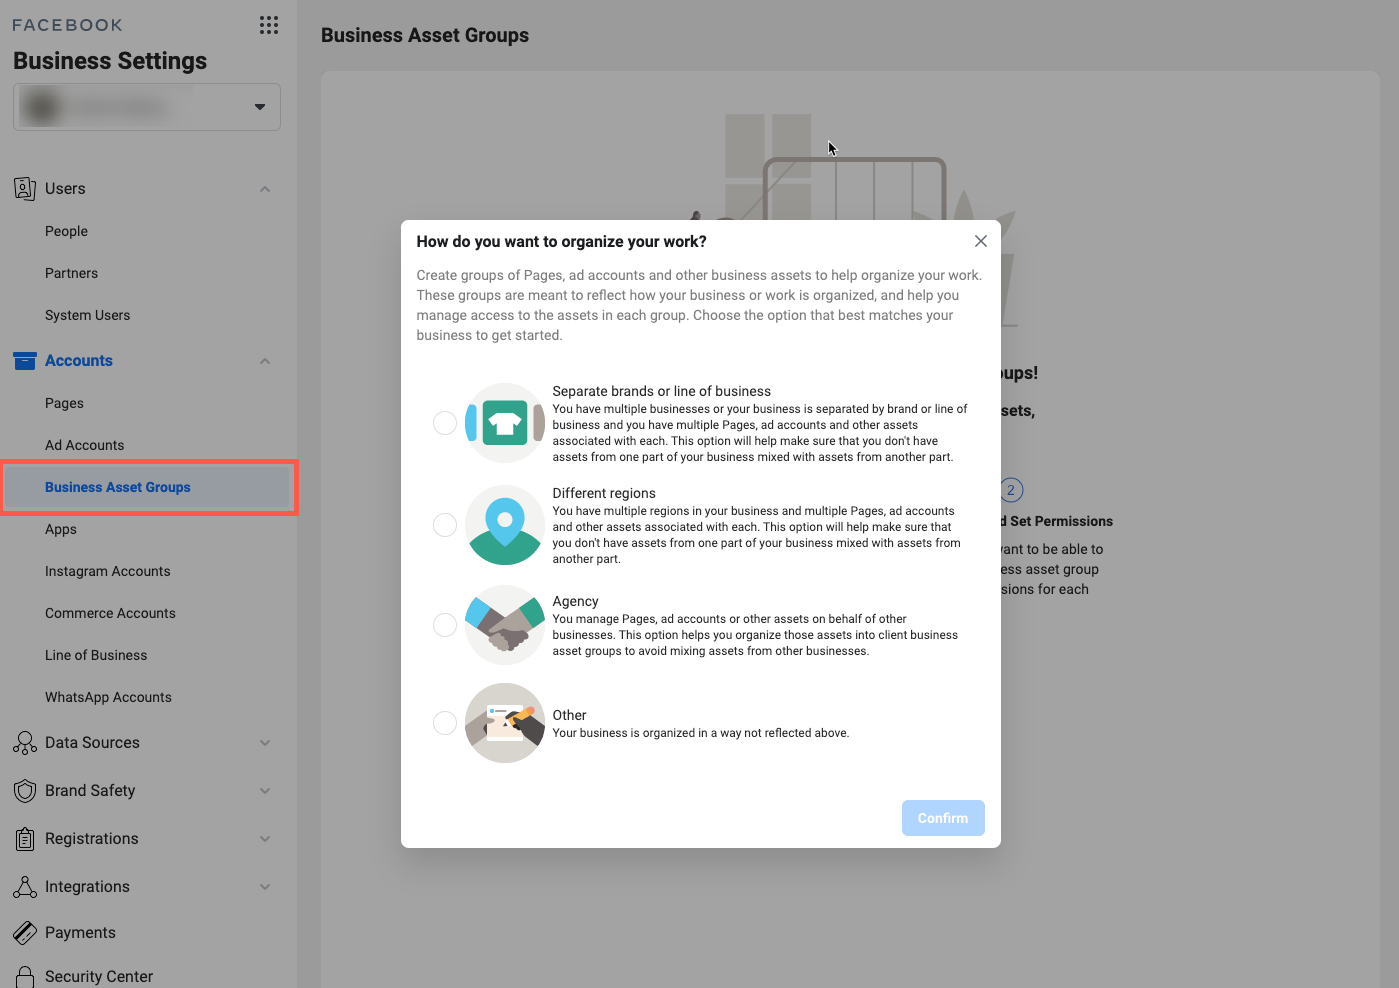
Business Asset Groups can easily be mixed up with Lines of Business. However, although similar, they serve a different purposes.
The main difference is that Asset Groups are not connected to Facebook Attribution.
You can think of Asset Groups as a folder to group pages, ad accounts and other business assets to organize your work. For example, when a team member or partner business joins you can add them to a project rather than each ad account and asset.
According to Facebook you can add the following asset types to a business asset group:
– Ad Accounts
– Pages
– Instagram Accounts
– Pixels
– Offline Events
– Apps
– Catalogs
– Custom conversions
Note: You can only add each asset to one project. However, you can change their assignment at a later date.
Apps
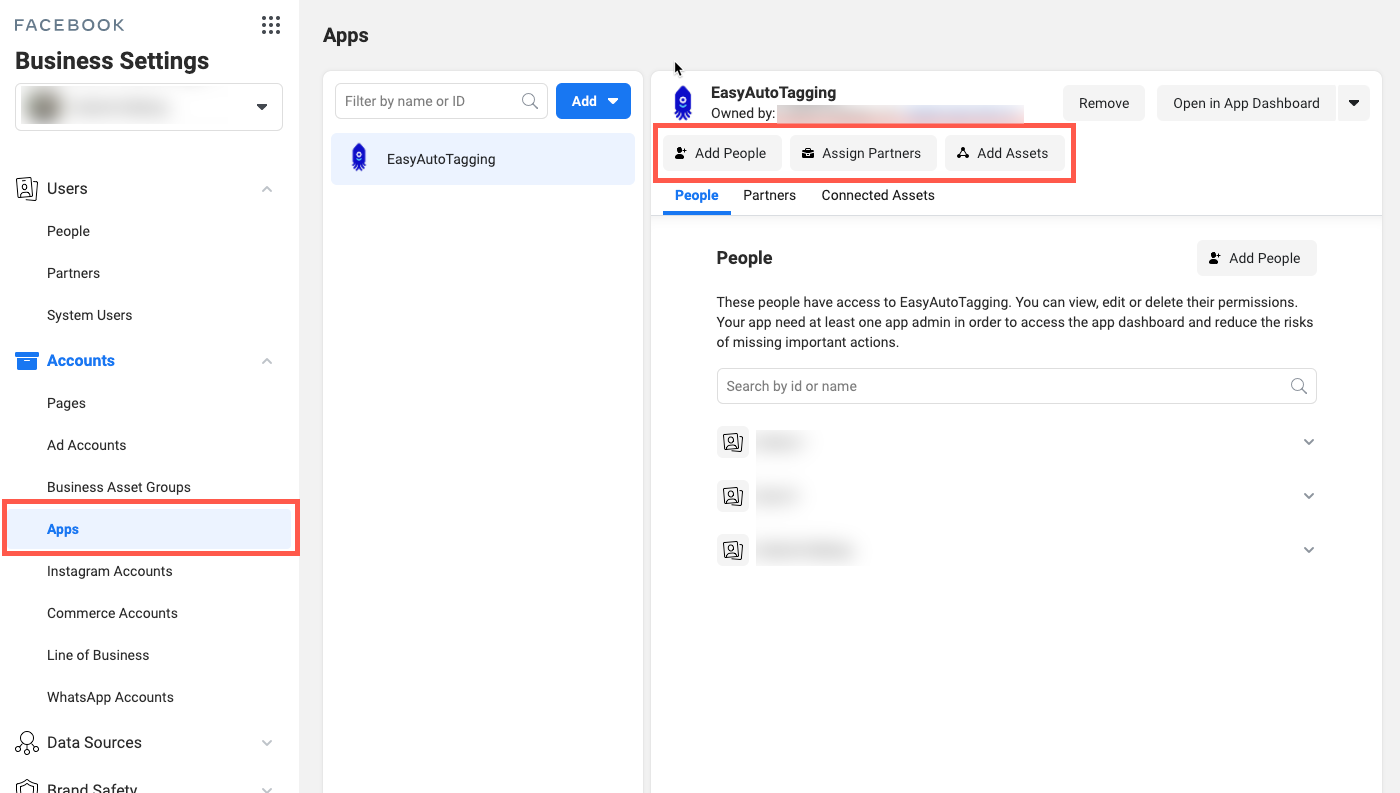
Under Apps, you can manage all assets associated with the app including People, Partners, Ad Accounts and Line of Business.
Instagram Accounts
The Instagram section is pretty straightforward. Here you can assign Instagram Accounts to Ad Accounts. In addition, the Facebook Business Manager allows you to invite partners that work with your Instagram account.
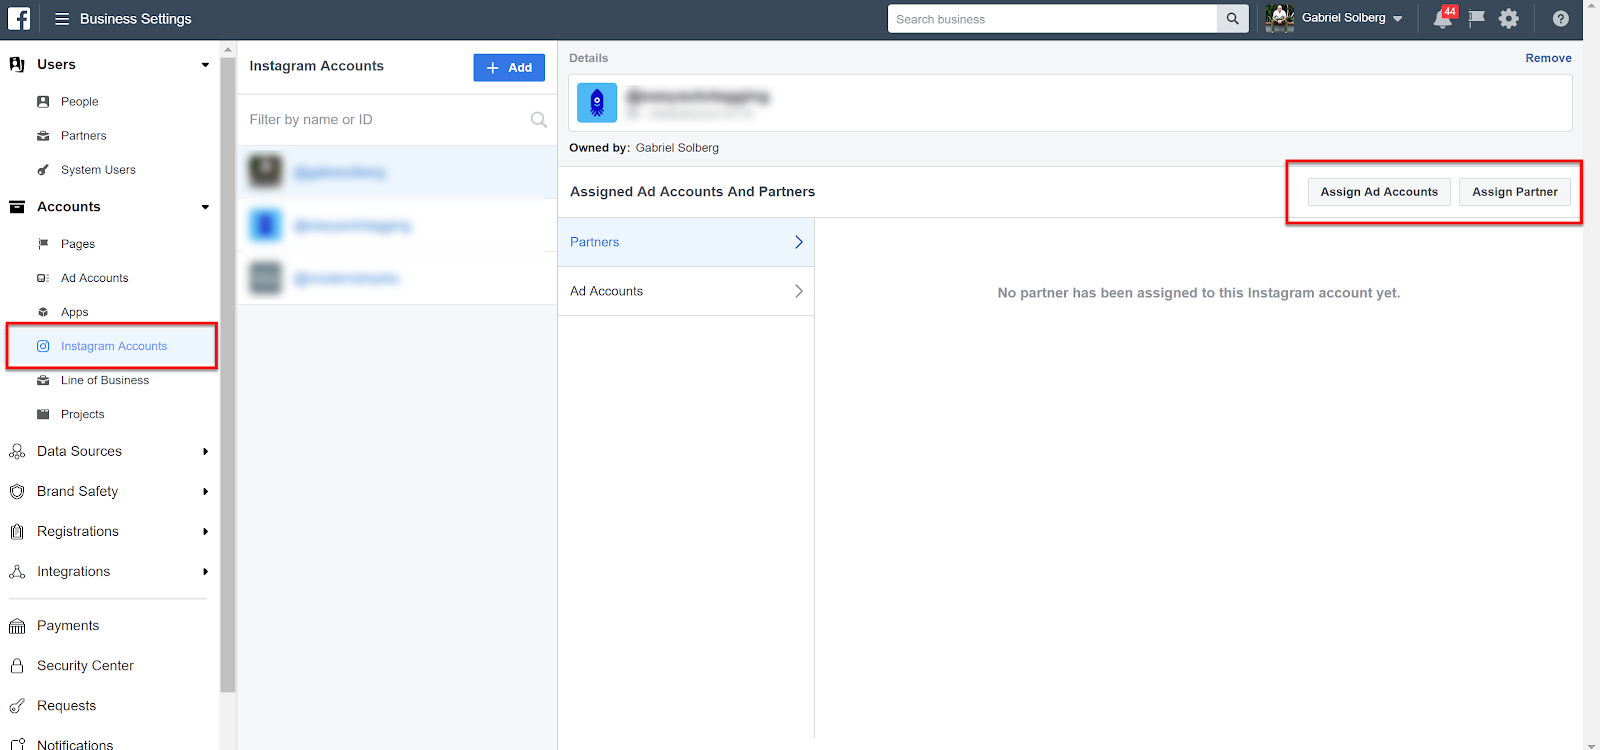
Click on the link below for step by step instructions 👇
✔️ How to connect Instagram to a business manager.
Line of Business
Let’s first define the Line of Business. A line of business is where you can group your ad accounts and assets. (i.e. pixels, offline events, apps)
As a result, the line of business can then be used for Facebook Attribution reporting to measure and understand the impact of your campaigns across ad accounts and channels.
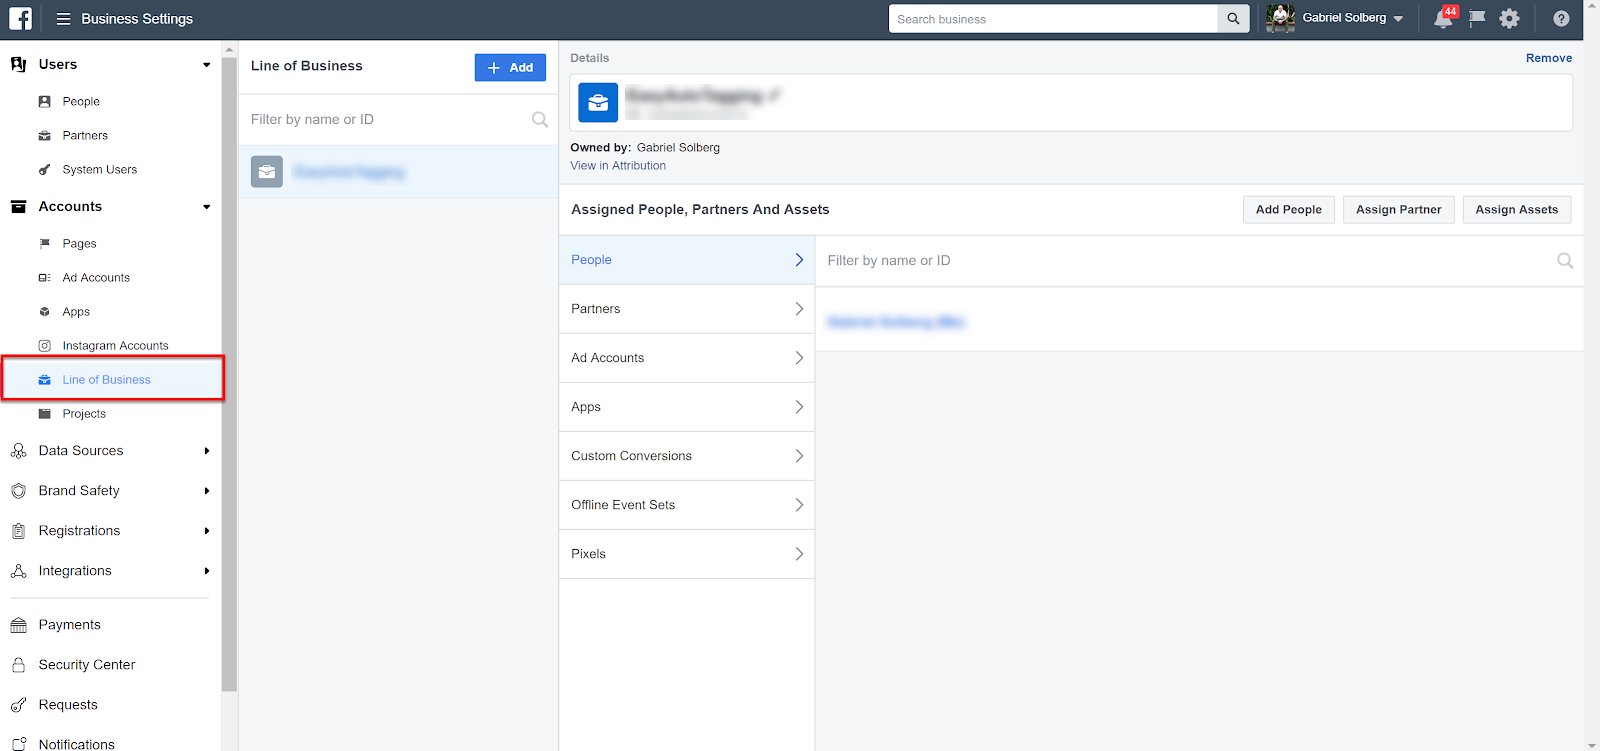
Note: Keep in mind that Facebook will only collect data moving forward from the date that the line of business was created.
Whatsapp Accounts
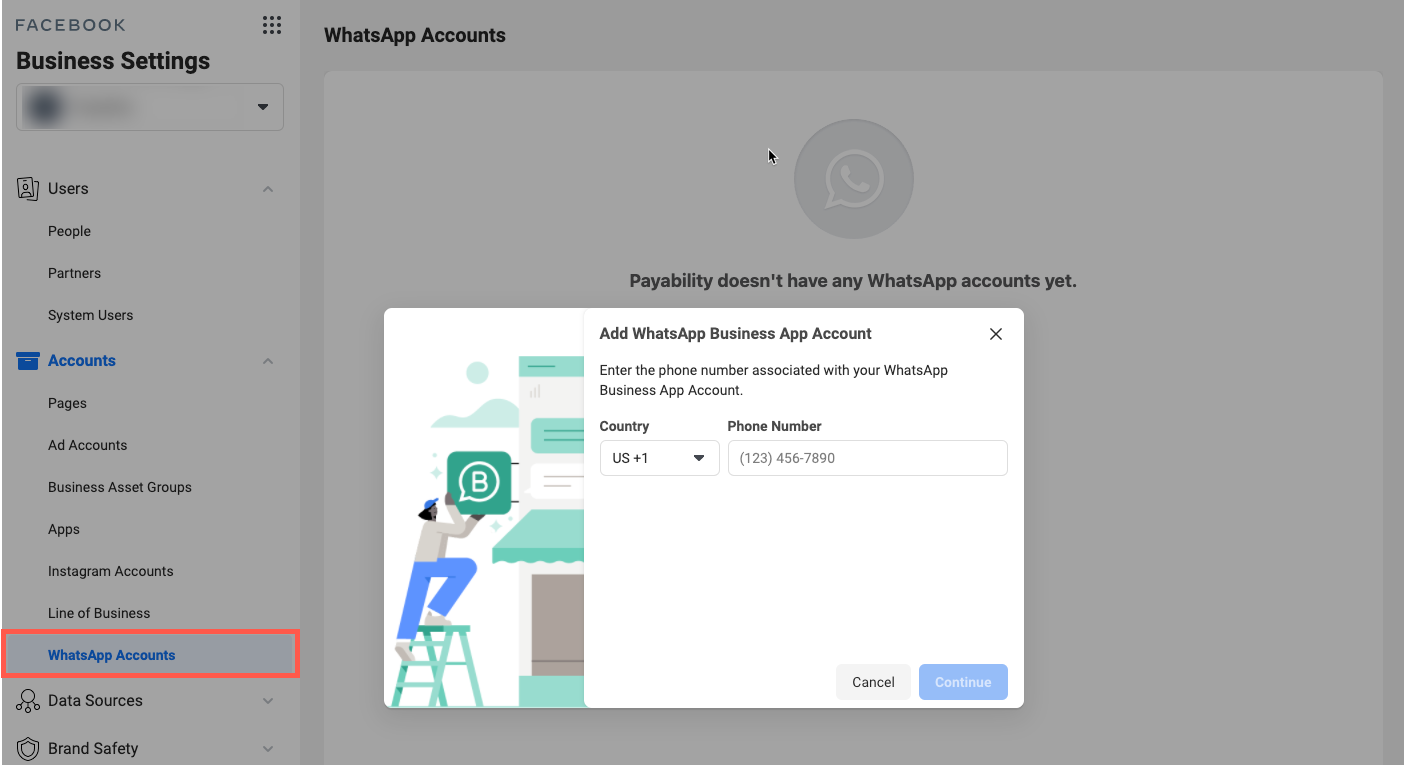
If you are advertising on Whatsapp you can add and manage your WhatsApp Business App accounts here.
Facebook Business Manager – Data Sources
Data Sources consist of seven sub-categories:
- Catalogs
- Pixels
- Offline Event Sets
- Custom Conversions
- Event Source Groups
- Shared Audiences
- Business Creative Folders
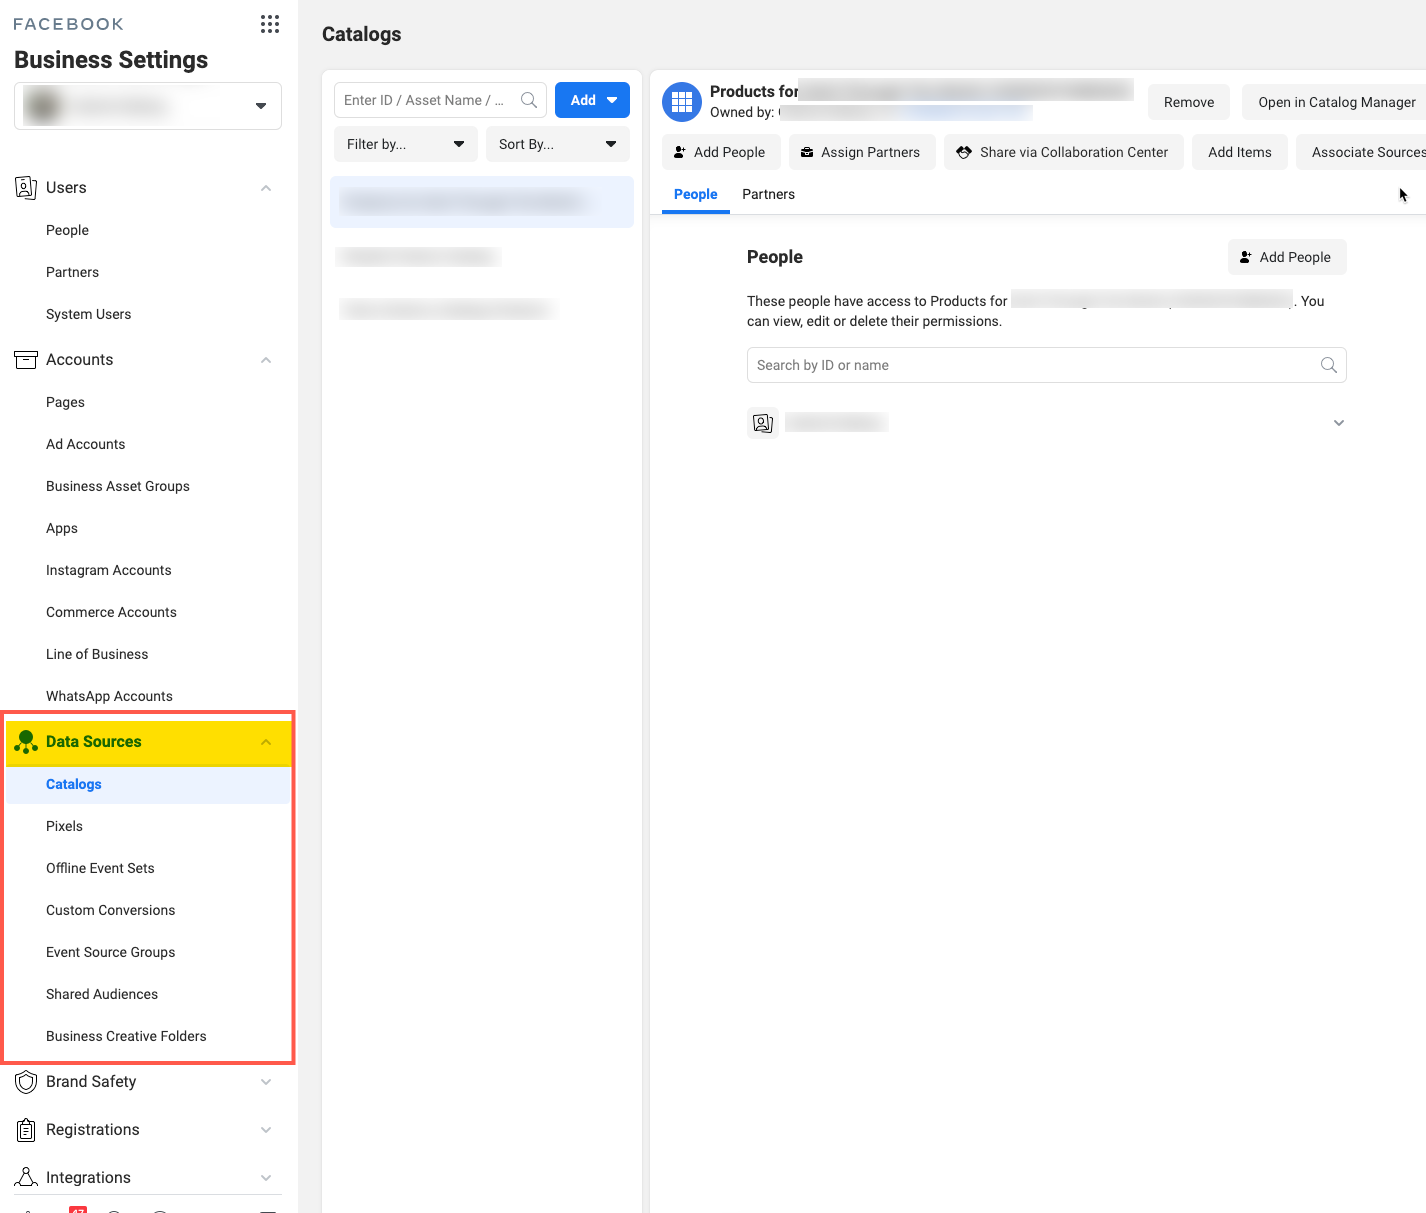
Let’s take a closer look at each one of these sub-categories.
Catalog
Catalogs contain information about the products you are advertising or want to sell. According to Facebook:
“You can create catalogs for different types of inventory, like products (ecommerce), hotels, flights, destinations, home listings or vehicles.”
The most common use case for catalogs is ecommerce. Creating a Facebook catalog allows you to dynamically serve products listed in your store that are most relevant to the consumer.
We won’t get into the steps of creating a catalog here. However, if you want to learn how you can check out this article by Ad Shark Marketing 👉 How To Create A Product Catalog For Facebook Dynamic Ads
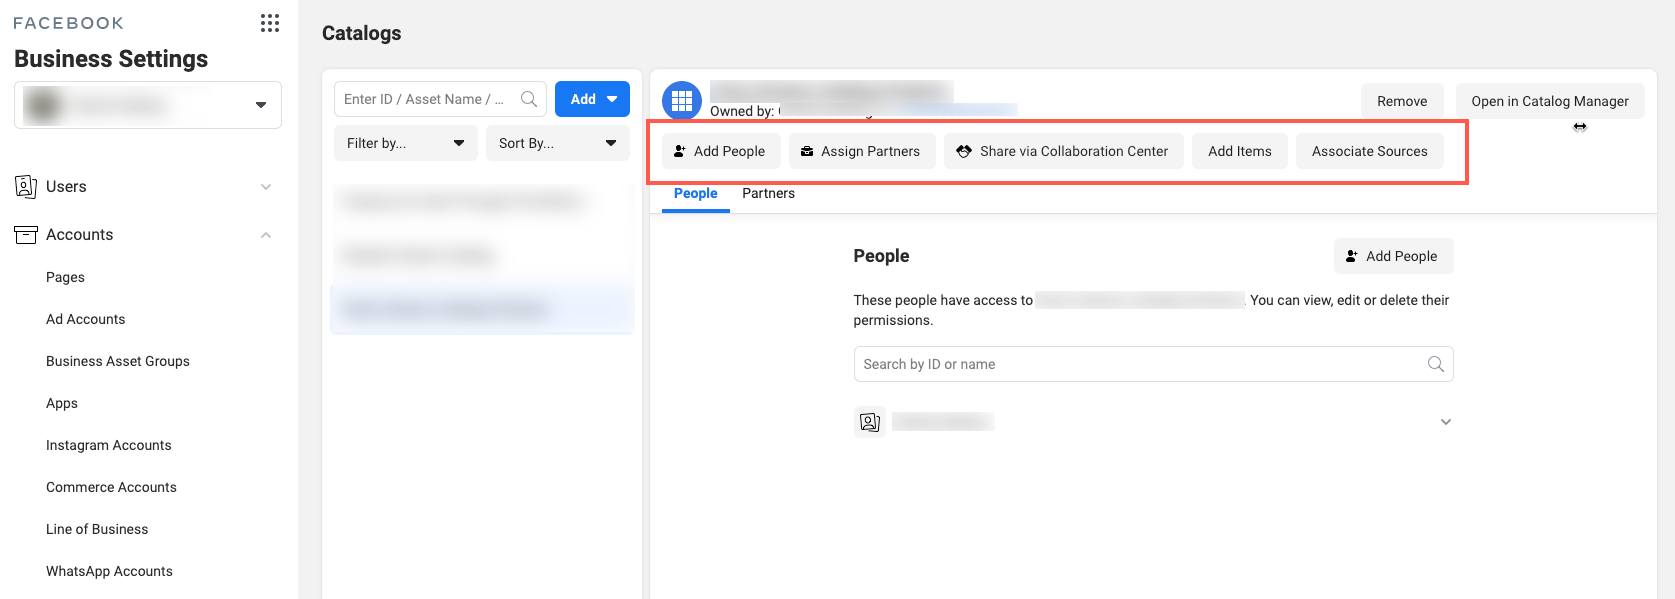
In the Facebook Business Manager under the catalogs section you can Add People, Assign Partners, Share via the Collaboration Center, Add Items to the catalog or Associate Sources.
Note: Associating sources means to associate a pixel or app with the catalog. Doing this allows dynamic ads to be served based on personalized customer behavior.
Pixels
Under pixels, you can manage pixels in one central location across all clients.
In addition, you have the option to add people or assign one or multiple pixels to a specific partner, ad account or line of business.
![]()
Offline Event Sets
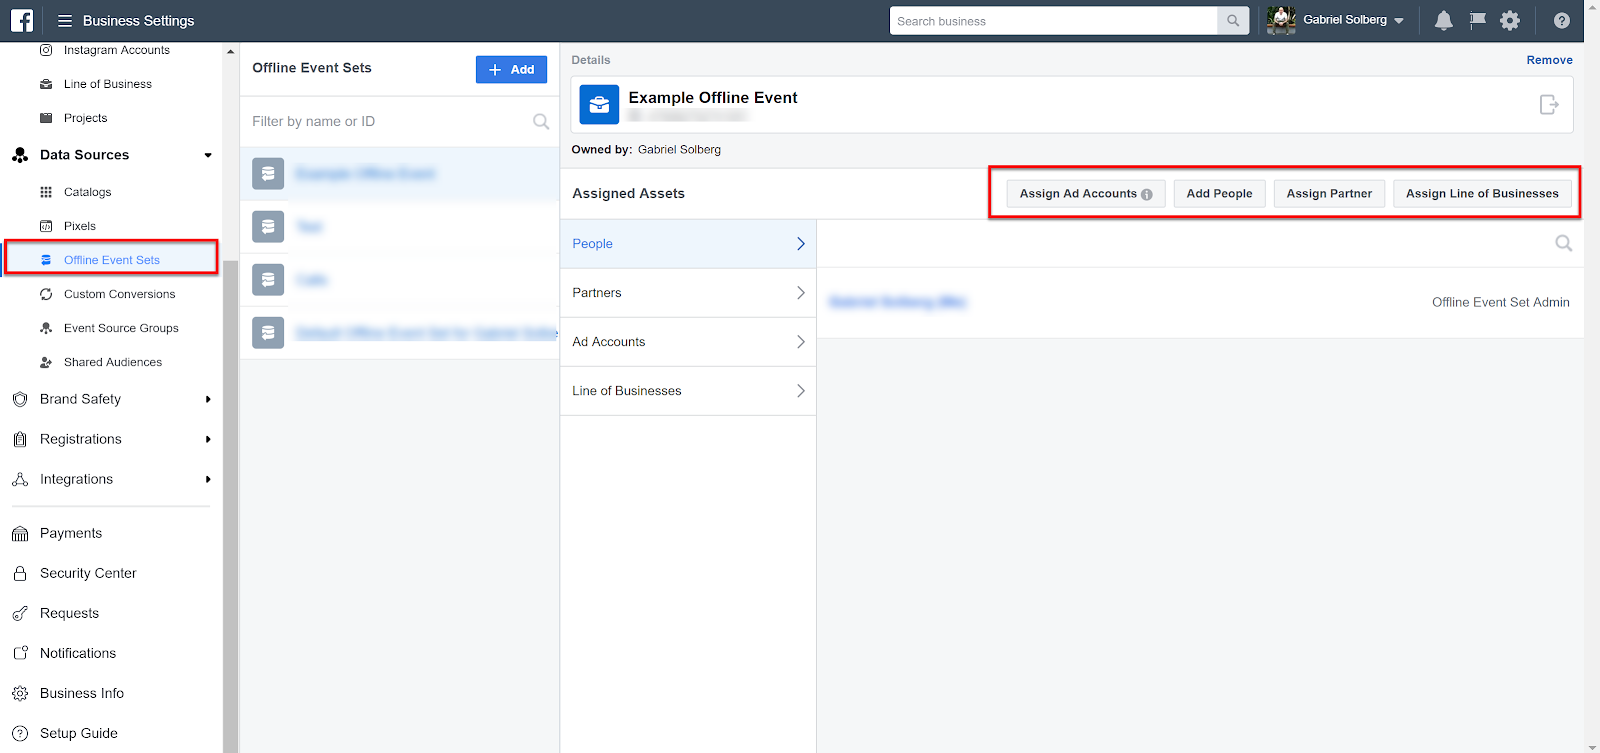
Under Offline Event Sets you can assign offline events to ad accounts. You can also assign an Offline Event Set to people, partners and a line of business.
To clarify, you do not set up offline conversions in this section.
In the Business Manager you assign and track ad accounts to Offline Event Sets.
If you want to learn more about setting up offline conversions, Facebook provides some documentation on getting started with offline conversion tracking.
Custom Conversions
When you set up the Facebook Pixel, Facebook provides standard conversion. However, more often than not, you will end up creating custom conversions, specific to your business needs.
You can now manage all of your custom conversion from the business manager and assign these across Ad Accounts, Partners and Lines of Business.
Event Source Groups
Event Source Groups are similar to Facebook Line of Business where you can group events across ad accounts, assets, pixels and offline events to a specific business. However, instead of using this for Facebook attribution reporting it is used for Facebook Analytics.
Shared Audiences
If you are sharing audience data such as custom audiences or Lookalike audience across accounts you would be able to access and manage them here.
Facebook Business Manager – Brand Safety
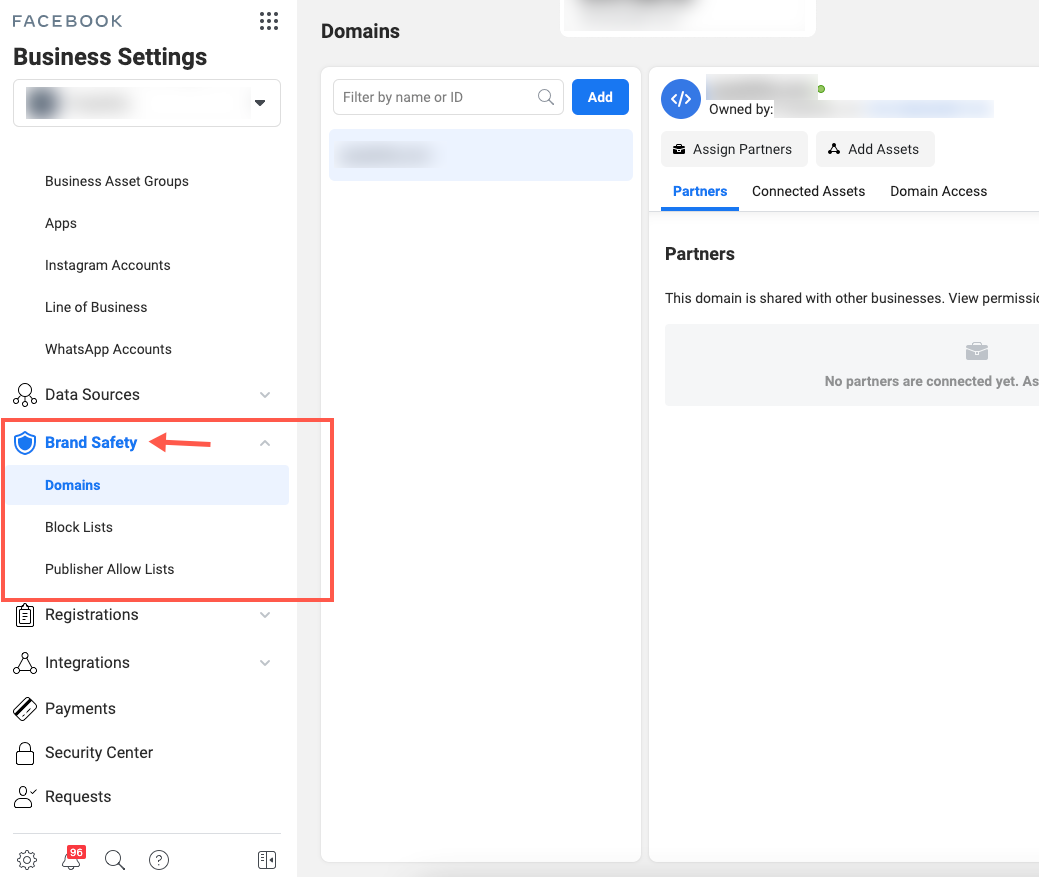
Brand Safety consist of three sub-categories:
- Domains
- Blocked Lists
- Publisher Allow List
Let’s take a closer look at each one of these sub-categories.
Domains
Domains allow you to set domains for each Facebook Business Page as a step to verify page ownership. Therefore, you cannot edit organic page post links, scheduled or live until the domain is verified. According to Facebook:
“Domain verification allows you to control editing permissions over your links and content in order to prevent misuse of your domain, including preventing bad actors from spreading misinformation.”
You can verify your domain using two verification methods. Either via HTML file upload or DNS TXT record. Click here for more information or for detailed instructions take a look at the Facebook developer documentation.
Blocked Lists
Blocked lists are ideal for exerting greater control of where your ads are displayed. If a client has a pre-defined blacklist you can upload these before any campaigns go live .
In addition, you can see where your ads can appear and have appeared if you are concerned about placement and would want to add new sites to your blocklist.
Publisher Allow List
On the other hand, publisher allow lists are the inverse of blocked lists. Uploading a publisher allow list means that your ads will only display on sites, apps and publishers that you have uploaded. Keep in mind that although this gives you greater control it does potentially drive up cost and limits reach.
Facebook Business Manager – Registrations
News Pages – This section is for publishers that want to register news pages with Facebook. You can read more about managing publisher registration in the Facebook help documentation.
Facebook Business Manager – Integrations
The Integrations section is where you can access your leads generated on Facebook. For example, you have the option to integrate with a third-party CRMs so that you can continue to nurture leads and push them down the sales funnel.
Keep in mind that default Page Admins and CRMs can access leads but once you do connect a third-party CRM new page admins and CRMs will have to be added manually.
Facebook Business Manager – General Admin Settings
Finally, let’s review the standard admin settings you can control in the Facebook Business Manager.
Payments
The Payment section is a central location to manage all payment methods and assign these to respective Ad Accounts.
Security Center
In the Facebook Business Manager Security Center you can Set up two-factor authentication and add a backup admin who can help if you happen to get locked out of your account.
Request
Under the request tab, you can get an overview of sent, received and active invitation requests.
Business Info
In the business info section, you can control your business settings and options for the primary business associated with the Facebook Business Manager.
In addition, you can also make changes such as updating your business manager name, removing yourself from or deleting a Facebook Business Manager.
Click on the link below for step by step instructions 👇
✔️ How to Delete a Facebook Business Manager Account
✔️ How to change your Facebook Business Manager name
Notifications
To stay connected, the notification settings are pretty straightforward and allow you to control notification options.
Set up Guide
Lastly, the Setup Guide gives you access to helpful Facebook Business manager documentation. That is if you still need them after this guide. 😀
Conclusion
In summary, the Facebook Business Manager can be overwhelming at first. However, once you are familiar with its features, it becomes a sweet tool for power users especially if you are managing multiple pages, ad accounts, catalogs and apps across clients.


![Toni Kroos là ai? [ sự thật về tiểu sử đầy đủ Toni Kroos ]](https://evbn.org/wp-content/uploads/New-Project-6635-1671934592.jpg)


