
How To Start a Food Blog – A Sweet Pea Chef
Want to learn how to start a food blog? Follow these 9 easy steps Dustin and Lacey used to create a six figure food blog and quit their jobs.
Hey, Dustin here!
Hey, Dustin here!
If you have ever wanted to start a food blog, but didn’t know where to start, then this is the place to be.
Over the last 7 years, we have gotten a ton of question about food blogging. From setting up a blog, marketing and promoting, making money with it, and even photography and video.
I find, in any new venture, one of the hardest things to do is to just get started.
When Lacey first started her food blog, there was a lot of technical stuff that had to get setup just so she could start sharing her recipes. I know all the technical stuff can be super frustrating and intimidating so this post is designed to walk you through, step by step, the process to set one up.
Mục Lục
Are you ready to start a food blog?
In general, you have a couple of options. You can hire someone or multiple people to start setting it all up for you. If you have the cash, then this is a fine route to go although sometimes you can hire wrong 😔
Most food bloggers I know had little cash on hand when they got started or sometimes even less than that lol.
I know that was the case for us when we first got started.
Lacey was trying to stay home with our first daughter, Jordan, and we were trying to figure out a way to make some income on the side.
If you’re like us, then you really need to go the do-it-yourself route.
FYI, we are an affiliate for some of the below links. However, all these suggestions are based on our experience and extensive research.
The steps you need to start building your own food blog: The Basics
Below is a list of the high level breakdown of what steps you need to start building your own food blog.
How to Start A Food Blog: The Basics
Step 1: Come Up with a Name and Buy The MATCHING Domain name
One of the hardest things to do when you get started is to come up with a name. Lacey was trying to build a personal chef business called Sweet Pea Chef at the time we first started hence our blogs name. But, usually you want it to reflect what your niche will be.
Ideally, you want your name to be descriptive, standout, short and definitely easy to spell. That’s not to say you can’t make it work without one or all of these it just will make your job of branding and marketing go a whole lot smoother if you have them.
Sweet Pea Chef isn’t that descriptive but it mostly meets the other criteria. This is definitely something we wish we had spent a little more time on.
Some great examples are pinchofyum, fitfoodiefinds and fitmencook you can see in all these names they are easy to spell, relatively short and descriptive of what they will cover on their site.
Key Takeaways:
- Make your blog name descriptive.
- Make it stand out.
- Make it short and easy to spell.
Once you have some name ideas the next step will be to register the domain. This is the part that gets a little tricky. If that name is already taken, you have to go back to the drawing board.
You don’t want hyphens or special characters in your name and, ideally, you want the .com version since most people will go there to find you. If it’s already taken, you will have some issues.
Again, this isn’t mandatory and there are success stories of people who have these things, but it is definitely an exception to the rule.

We use AWS, Bluehost or Namecheap for registering our domains. AWS can be a little tricky to get the hang of so if you are just starting out and aren’t that technical, I recommend going with Bluehost or Namecheap.
Cost: $10-$15 per year. Sometimes, you can register the domain for free when you buy hosting, like with Bluehost.
Step 2: Find A Reliable Web Host
The next step is finding a reliable web host. We have used a lot of different hosts over the years and some were great and some not so much. This part can sound a little daunting, but setting up your blog for success is key. We have recently switched our hosting over to Cloudways and have seen a ton of improvement in our speed and overall performance of the site.

A lot of the stuff that Cloudways does behind the scenes sets you up well for Google traffic and creating the best experience for your users, which is what this is all about. They score better on server response time which is super helpful for loading the page and making Google and users happy.
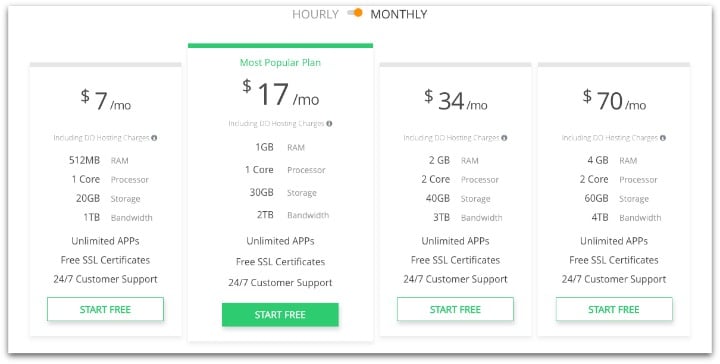
You can get started for free and, for most people just starting off, it will cost $7 a month which is more than some super cheap webhosts but actually a really good deal for how much better and more scalable your site will be. Plus it’s relatively easy to upgrade as you start seeing all that traffic you will be getting once you get started.
You can click here and signup.
Then, follow along with the tutorial to get your whole site setup in a few minutes.
If you are going to use Cloudways you will need to point your DNS to the right nameservers like this article on how to do setup namerservers from namecheap.
Cost: $3.49/month for Bluehost and $7/month for Cloudways.
Step 3: Install and Setup WordPress
This step is actually pretty straightforward. If you decided to go with Cloudways, I’ll walk you through it now. If you decided to go with bluehost, here’s how to install wordpress on bluehost.
How to Install and Setup WordPress on Cloudways.
Go ahead and login to your Cloudways account. You should see this below:
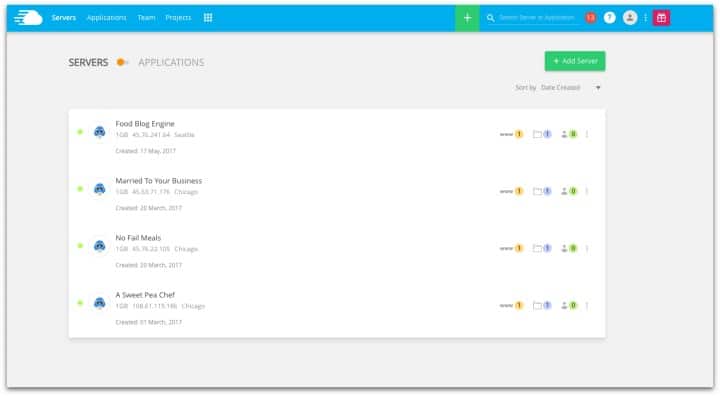
Next, click on the applications tab in the top Nav bar and create a new application. This is going to be your new WordPress blog. It should look like the image below. If you have no applications setup yet, it will look blank.
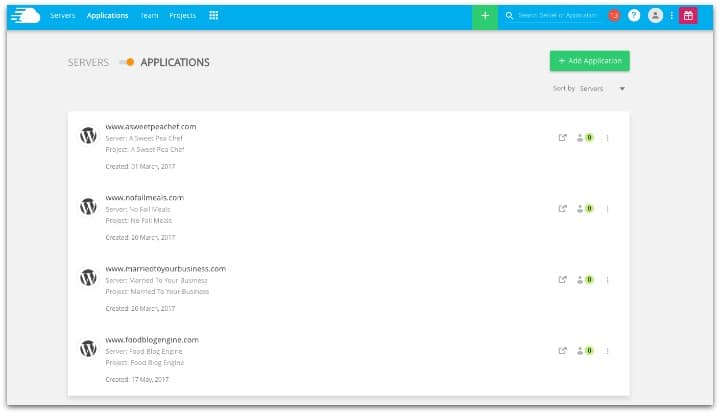
The next step is to click on add application you should see the popup in the image below:
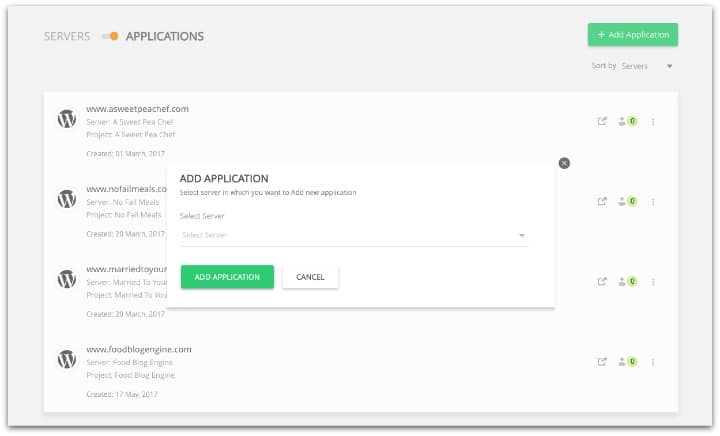
You will want to choose the new server option in the drop down if you haven’t made a server yet. Next, you should see the following page this is where we set everything up.
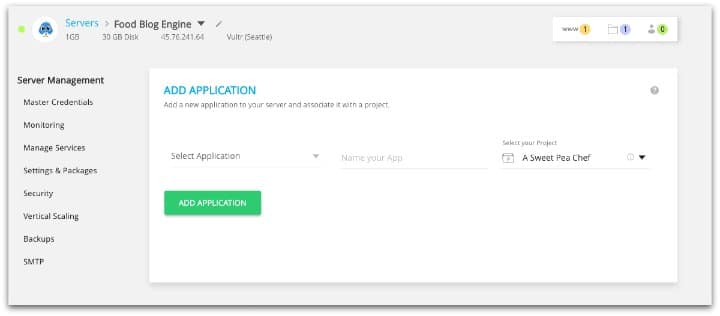
First, let’s name the application. This is just an internal name so don’t worry about it showing on your blog. Let’s call ours “Awesome Food Blog”. You can leave the Projects space open for now.
Next, lets Pick the top WordPress installation.
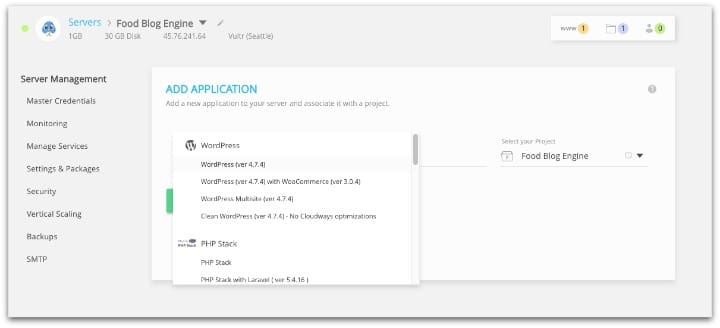
Once done, it should look like this:
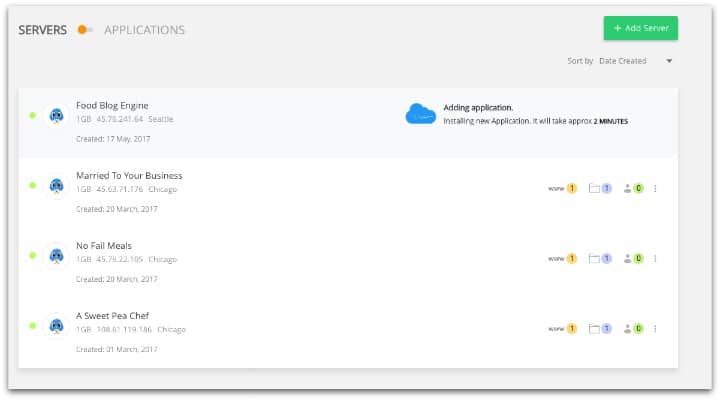
After a few minutes the WordPress blog will be installed and we should be able to see it on the homepage of our account. You will see the number of blogs you have on that server next to the www. Since I have two blogs on this server we can click in and see the “Awesome Food Blog”
After a few minutes the WordPress blog will be installed and we should be able to see it on the homepage of our account. You will see the number of blogs you have on that server next to the www. Since I have two blogs on this server we can click in and see the “Awesome Food Blog”

The next step is to attach the blog to a domain. This is where we will setup the domain that we already bought inside Cloudways. Click on your Blog and you should see the page below:
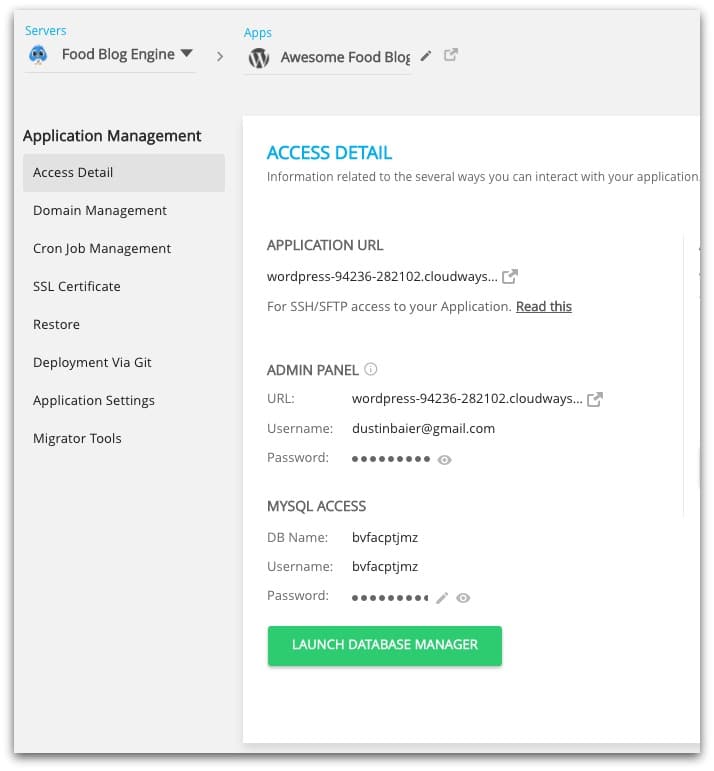
Then click on Domain Management on the left. This is where you are going to enter your domain that you already bought. There is a very detailed set of instructions that Cloudways has for this part: How Do I take My Website Live From Cloudways.
Awesome! Now we are all ready to setup our WordPress theme.
Cost: Free
Step 4: Setup a WordPress Theme
Now, we need to setup our WordPress theme. There are a few main things we need to look for in a theme:
1) Is it user friendly?
This is key. If your theme is difficult for users to use, then they won’t stay or come back to your site. It should look nice but most importantly the people visiting your site should be able to find and use what they want as easy as possible.
2) Is it easy to setup?
Another big one. If you can’t get it setup then you never get started. If it is so inflexible for you to use then that will make it hard to use in the future. Your theme should make it easy for you to change some basics like color scheme, logo, widgets, etc..
3) Is it responsive?
About half of our traffic comes from mobile. That means you need a theme that supports desktop, tablets, and mobile viewers.
4) Good for SEO (Search Engine Optimization)?
A well designed site will not be top heavy, have a lot of errors in the code it will load as fast as it can and in general goes along with making a site user friendly.
You could go with a free one, but I don’t recommend it. We have spent a ton of time and energy trying to make free stuff work well and then, a month later, it is out of date since it’s free and nobody is around to fix it. We highly recommend finding a theme from a good company that supports them and keeps them updated.
Recommended WordPress Themes
We have tried tons of different ones in the past, but our current recommendation is to use the Genesis Framework along with a StudioPress theme. They all work great and most follow the recommendations above. Just keep in mind if you are a food blog (or any blog for that matter) how will your users use this? Photography blogs are different from food blogs and those are different from self help blogs, etc…
Our current WordPress Theme recommendation for food blog
Foodie Pro Theme:
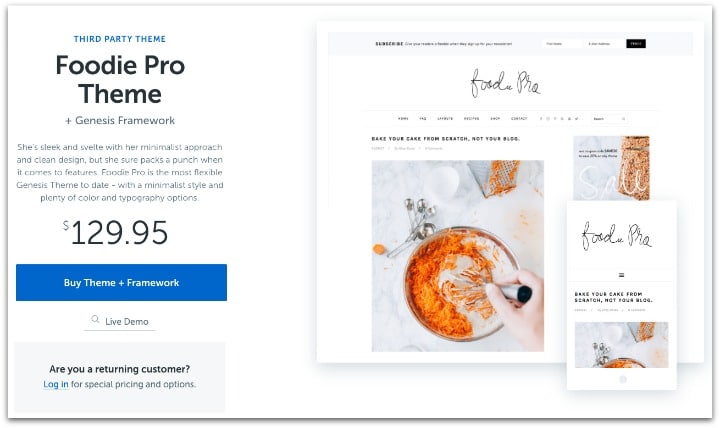
Currently, we use a modified version of the Foodie Pro theme. This was designed for food blogs and the built in recipe page along with the recipes widget are super helpful. It also is kept up to date so it has good support.
Currently, we use a modified version of the Foodie Pro theme. This was designed for food blogs and the built in recipe page along with the recipes widget are super helpful. It also is kept up to date so it has good support.
Check out the Foodie Pro Theme + Genesis for a one time fee.
Studiopress Themes:
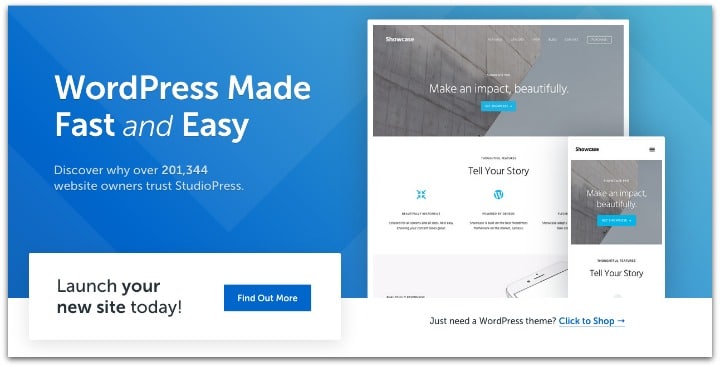
If you aren’t a fan of Foodie Pro, that’s fine there are a ton of other great themes. Studiopress offers a bunch you can check them all over here they start at $59.95 and up.
This is an area that I recommend spending a little money to get something you like and will be happy with for a few years. I know we have tried to cut corners here and it always winds up taking more time and not getting to the real work of building our blog.
Cost: Free to $200. For our setup, it cost less than $100.
Step 5: Setup WordPress Plugins
WordPress plugins are add ons to your site that allow increased functionality. There are a bunch of different ones and you don’t want to go overboard and use too many. Be mindful of what you use and make sure that these plugins are well maintained and get good ratings.
You can see in this example the high rating and the last date that it was updated. These are a decent indicator of its usability.
Here is a list of recommended plugins that we use and what they do:
1) Akismet – This plugin filters out spam comments. Spam comments are annoying and a nuesance and this plugin is the best at removing them. While you will still have to deal with this occasionally it’s a good idea to get a head start on it.
2) Yoast SEO – (Yoast Video SEO) – This plugin allows us to set everything we need for SEO up very easily on every page or post we have. We also use the Video SEO plugin since we have a lot of video on our site.

3)
3) Imagify – This plugin compresses all of the many images we have on our site. This is key for any food blog. You want to deliver the page as fast as possible and having a bunch of giant images isn’t that helpful. Even if you don’t use Imagify I highly recommend you compress your images in some way. Also only create your images at the width of your theme. For the longest time, we made our images larger just in case we needed it. However, this will slow down your page load speed unnecessarily.

4)
4) Social Warfare – Social Warfare is a great social plugin we switched over to using this one when we made the changes to SSL. It allows you to keep track of two urls and keep your social counts which was awesome. It also let’s you setup custom images for social sharing and control where the buttons show up on your site very easily. Highly recommend this plugin.

5) WP Recipe Maker – This is the best recipe plugin we have used. Every food blog needs a recipe plugin and this by far and away the best one we have used. It does everything that Google and Pinterest need to rank and share your recipes. It easily ports other recipe plugins so in case you already got setup with another one you can just port your current recipes into this plugin very easily. We switched from Easy Recipe to WP Recipe Maker and have not looked back. I also recommend here paying for the Ultimate version so you can add nutrition info into your recipe card. Google requests this so it makes sense to have it.
Cost: Free to $200. For our setup, it costs less than $100/year.
Step 6: Setup Social Sharing
Important Note: If you didn’t already setup the Social Warfare plugin from the plugins step, make sure you setup some kind of social sharing.
Social sharing is a huge part of having a successful blog nowadays. I think everyone knows that. What people don’t realize is which social sharing option they choose can effect the performance of their site.
There are a lot of options we use Social Warfare and love it. After bouncing around with a few different providers, we found this option to be the fastest for the site as well as it had the added benefit of keeping track of our share count when we switched over to an SSL site.
The paid version we recommend is here you can also give it a test drive and read about the free versus paid here.
Cost: Free to $50/month. For our setup, it costs less than $30/year.
Step 7: Use A Recipe Plugin & Include Nutritional Information
If you are a food blogger, you need a recipe plugin. But, it’s also pretty much a requirement that you provide nutritional information on your site now. Users expect it and Google rewards it. We use WP Recipe Maker and it has been great. Easy to use and they creators do a good job keeping it maintained.
If you haven’t started your food blog yet, go ahead and start with WP Recipe Maker it is super easy to use and does everything you need. If you started with something else and need to make the change, the good news is they have a great porting feature one we used when our old recipe plugin stopped being supported.
The paid version allows you to do things like have adjustable servings, nutrition labels and ingredients links.
There is a free version here and a paid one here.
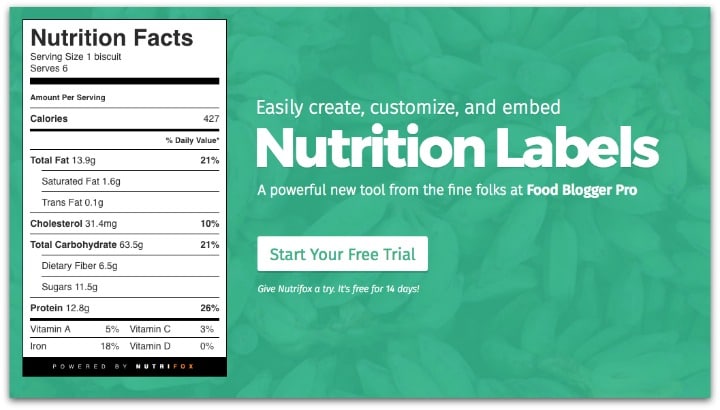
For figuring out something like nutritional information we use tools like Nutrifox. There are a number of nutritional information tools out there and depending on your budget and how many hoops you are willing to go through you can use whatever you want.
Cost: Free to $30/month. Nutrifox is $9/month.
Step 8: Setup Google Analytics and Google Webmaster
Before we get started, there are a few things that make sense to setup in order to better track your success. We use a few Google tools in order to do this.
First, you will need to get a new Google account and email if you don’t already have one. You can create a new Gmail account here.
Once you set this up you will need to setup two tools:
1) Google Analytics: This will track the traffic on your site. Including things like pageviews, bounce rate and also which pages are visited.
2) Google Webmaster Tools: This tells Google where your site is, what pages your site has and also gives you information on what keywords people are using to access your site.
Cost: Free
Step 9: Get Started Food Blogging
Awesome!
So, now you are ready to dive into the world of food bloggers. Once you get your blog up and running, make sure to drop a note in the comments here so I can go and check it out 😃 I love seeing everyone’s progress.
Got questions? I try to answer every question so go ahead and ask them in the comments below.


![Toni Kroos là ai? [ sự thật về tiểu sử đầy đủ Toni Kroos ]](https://evbn.org/wp-content/uploads/New-Project-6635-1671934592.jpg)


