
Google Apps Script Tutorial with Google Sheets | Coupler.io Blog
Google Sheets has a large number of built-in functions, including many that you don’t need. However, it does not have everything. At some point, you may want to do a particular task but can’t find a function for that. Well, that doesn’t mean you can’t do it. You may only need to take a few steps to get there. 🙂
With Google Apps Script, you can do a lot. It basically allows you to create your own functions, automate a lot of stuff, and even integrate Google Sheets with other third-party services.
The Google spreadsheet Apps Script tutorial in this article covers the basics of Google Apps Script, including several easy-to-follow examples. We will focus more on Google Sheets, though you can also write code in Google Docs, Forms, or a standalone script.
What is Google Apps Script?
Google Apps Script (GAS) is a development platform that allows you to create applications that integrate with Google Workspace apps and services.
It uses modern JavaScript as its scripting language. You don’t need to install anything. Google gives you an integrated code editor that allows you to edit your scripts within your browser. Your scripts execute on Google’s servers.
GAS plays a similar role in Google Sheets as Visual Basic for Applications (VBA) does in Excel. Both are used to extend functionality and integrate with other applications and third-party services.
What makes Google Apps Script useful?
Here are a few reasons why you would need Google Apps Script:
- Create Google Sheets custom functions.
- Add custom menus, dialogs, and sidebars to Google Docs, Sheets, and Forms.
- Interact with other Google Workspace apps and services, including Docs, Gmail, Calendar, Language, Docs, and more.
- Automate tasks using triggers.
- Build add-ons for Google Sheets, Docs, Slides, and Forms, and also publish them to the Google Workspace Marketplace.
- Develop a user interface and publish it as a web app.
- Connect with external relational databases (including Google Cloud SQL, MySQL, SQL Server, and Oracle) via the JDBC service.
What are Google Apps Script classes?
Classes are templates that encapsulate data with code for creating objects. Historically, JavaScript was class-free, so talking about classes may cause confusion. The classes described here are specific to Google implementations — Google refers to SpreadsheetApp, GmailApp, etc., as classes.
Google Apps Script provides several top-level classes. These main classes allow you to access features of other Google apps and services, for example:
- Google Sheets can be accessed using
SpreadsheetAppclass - Google Docs can be accessed using
DocumentAppclass - Google Drive can be accessed using
DriveAppclass - Gmail can be accessed using
GmailAppclass - Language service can be accessed using
LanguageAppclass - And more
Apps Scripts also provides base classes. These allow you to access user info, such as email addresses and usernames, and also control script logs and dialog boxes. Some examples of base classes:
Browser– provides access to dialog boxes specific to Google Sheets.Logger– allows the developer to write out a value to the execution logs.Session– provides access to session information, such as the user’s email address (in some circumstances) and language setting.
In this Google Apps Script Sheets tutorial, we will also use some of the classes mentioned above. For example, we’ll use the SpreadsheetApp class to access Google Sheets’s functionalities and the LanguageApp class to access Google’s language service.
Note: In February 2020, Google introduced the V8 runtime for Apps Script, which supports classes. This new runtime lets you create your own classes, which provide a means to organize code with inheritance. Think of it as creating a blueprint from which copies can be made.
Getting started with Google Apps Script
Enough intro — let’s dig in! 🙂
The best way to learn Google Apps Script is to write some code. Getting started is very straightforward — all you need is a Google account, a browser, and an internet connection.
To get started, go to Google Drive and create a new spreadsheet. Give your spreadsheet a name, for example, My First Script.
You can open the Apps Script editor by clicking Extensions > Apps Script from the menu (or Tools > Script editor if you can’t find the Extensions menu).

This will launch the Apps Script editor in a separate tab in your browser.
How to use Google Apps Script Editor
Now, we’ll show you how to use the Apps Script editor. For example, how to rename your project, add a new function, and save your changes.
Mục Lục
How to rename your project
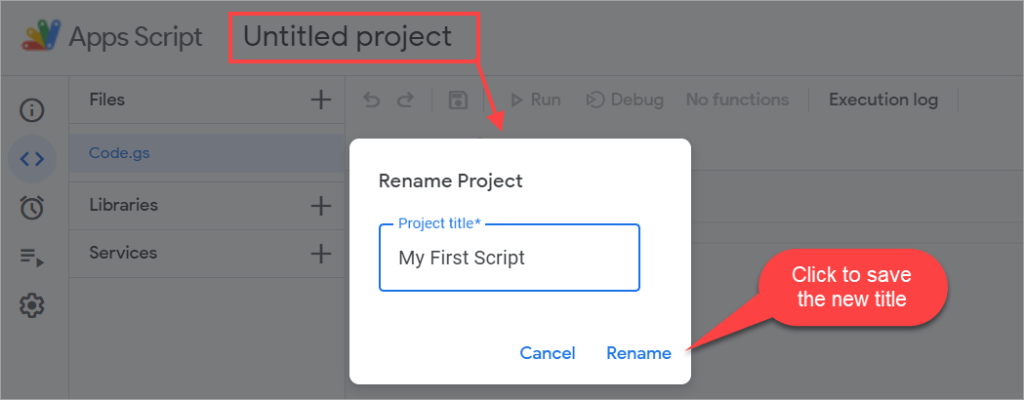
Scripts are organized as projects. By default, the project name for your scripts embedded within the spreadsheet file you just created is “Untitled project”.
At the top left, you’ll see the project name. Click on it to rename it. A small window will appear, allowing you to enter a new project title.
There is also a Code.gs file opened in the editor. It has a default function, which is blank, named myFunction().
function myFunction() {

}
How to add your first function
Delete the myFunction() code block so that your editor is now blank. Then, copy and paste the following code:
function writeHelloWorld() {
  var greeting = 'Hello world!';
  var sheet = SpreadsheetApp.getActiveSheet();
  sheet.getRange('A1').setValue(greeting);
}
Your entire code will look like this:
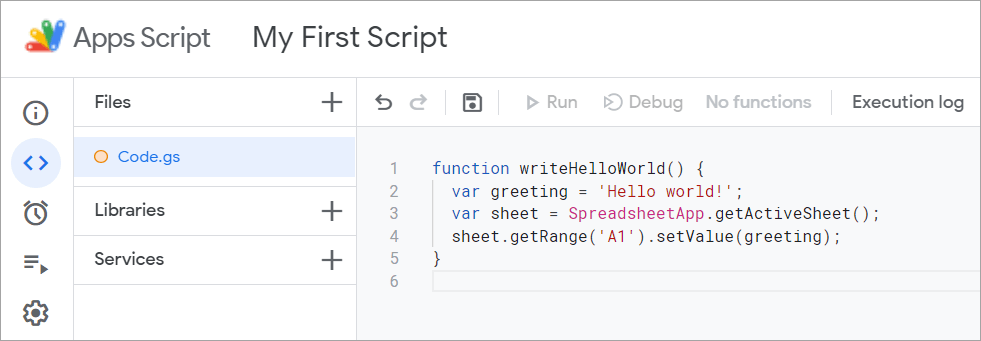
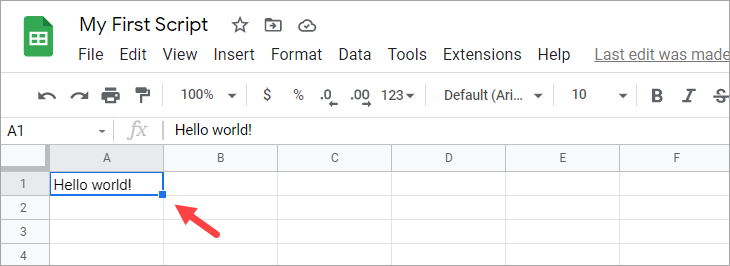
The above writeHelloWorld() function writes “Hello world!” to the spreadsheet. It demonstrates that, by using Apps Script, you can manipulate a spreadsheet.
The code uses the SpreadsheetApp class to get an object representing the active sheet using the getActiveSheet() method. Then, it gets a single cell with the address A1 using the getRange() method. Another method, setValue(), is then called with a string argument to write to A1.
How to save your changes
Notice that there is an orange circle icon on the left side of the Code.gs file name. It means your changes have not been saved yet.
To save your changes, press Ctrl+S on your keyboard. Alternatively, you can click the disk icon (
). After that, the orange icon will be gone, and you’ll be able to run your script.
How to run Google Apps Script
). After that, the orange icon will be gone, and you’ll be able to run your script.
Click the Run button to execute your function. For the first time you run the script, you will need to authorize it to access your data.
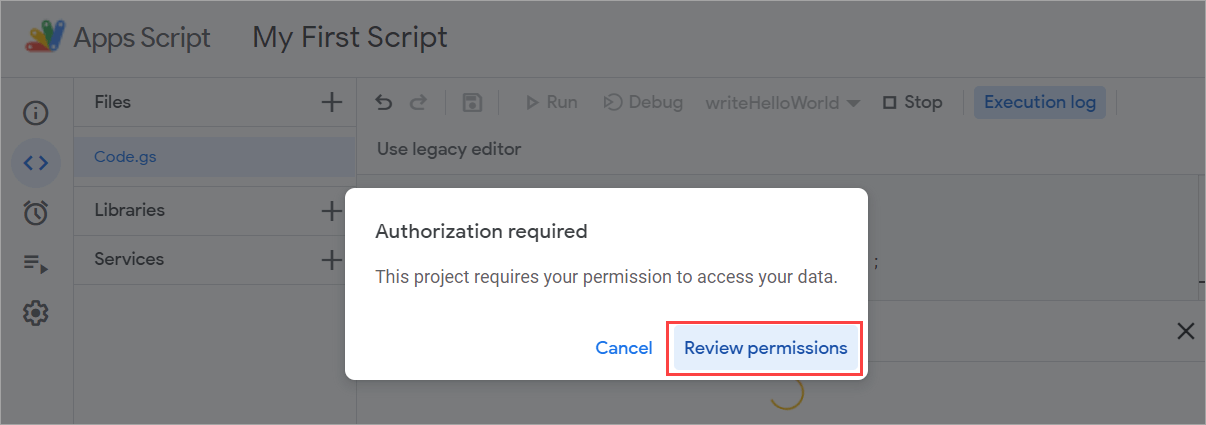
Click the Review permissions button. Another pop-up will appear, asking you to select an account to continue. After that, you may see a warning screen saying “Google hasn’t verified this app“. Continue anyway — because, in this case, we know it’s safe. Then, allow the script to access your Google account.
Once authorized, the writeHelloWorld() function will execute, and you’ll see “Hello world!” in A1:
Google Apps Script examples
Now, let’s look at some more interesting examples using Apps Script.
Connect to other Google apps using Google Apps Script
The following example shows that a GAS written in one app (Sheets) can be used to manipulate other Google apps (Docs). Though trivial and useless, this example demonstrates a very powerful feature of GAS!
Copy and paste the following function into your editor, then click the Run button to execute it.
function createDocument() {
  var greeting = 'Hello world!';

  var doc = DocumentApp.create('Hello_DocumentApp');
  doc.setText(greeting);
  doc.saveAndClose();
}
Once authorized, it will create a new Google Document with “Hello world!” written on it.

You may find it’s a bit inconvenient always having to open the editor when executing your code. A simple solution for that is to add a custom menu.
You can add the code for the custom menu within the onOpen() function. A trigger will then execute your code inside this function every time you open the spreadsheet. Here’s an example:
function onOpen(e) {

  var ui = SpreadsheetApp.getUi();
  ui.createMenu('My Custom Menu')
      .addItem('First item', 'function1')
      .addSeparator()
      .addSubMenu(ui.createMenu('Sub-menu')
          .addItem('Second item', 'function2'))
      .addToUi();
}

function function1() {
  SpreadsheetApp.getUi().alert('You clicked the first menu item!');
}

function function2() {
  SpreadsheetApp.getUi().alert('You clicked the second menu item!');
}
Note: The e parameter passed to the function is an event object. It contains information about the context that caused the trigger to fire, but using it is optional.
To test it, select the onOpen() function in the dropdown, then click the Run button.

You’ll see “My Custom Menu” in your spreadsheet menu, as shown in the following screenshot:

The onOpen() function is one of GAS’s reserved function names. Whenever you open a document, a built-in trigger executes this function first. These built-in triggers are also called simple triggers and do not need user authorization.
Other reserved function names include onEdit(), onInstall(), onSelectionChange(e), onFormSubmit(), doGet(), and doPost(). Make sure you don’t use these as your function names.
Automate tasks using Google Apps Script trigger
GAS lets you create your own triggers. These triggers are also called installable triggers because you need to authorize them before use.
With installable triggers, you can set your script to run at a certain event (when opening or editing a document, etc.) or on a schedule (hourly, daily, etc.).
Notice the following script. The getBitcoinPrice() function gets the data in the last 24 hours from the Bitstamp trading platform and outputs them in a sheet.
function getBitcoinPrice() {
  var spreadsheet = SpreadsheetApp.getActiveSpreadsheet();

  // Get the sheet with the name Sheet1
  var sheet = spreadsheet.getSheetByName("Sheet1");
  var header = ['Timestamp','High','Low','Volume','Bid','Ask'];

  // Insert headers at the top row.
  sheet.getRange("A1:F1").setValues([header]);

  var url = 'https://www.bitstamp.net/api/ticker/';

  var response = UrlFetchApp.fetch(url);

  // Proceed if no error occurred.
  if (response.getResponseCode() == 200) {

    var json = JSON.parse(response);
    var result = [];

    // Timestamp
    result.push( new Date(json.timestamp *= 1000) );

    // High
    result.push(json.high);

    // Low
    result.push(json.low);

    // Volume
    result.push(json.volume);

    // Bid (highest buy order)
    result.push(json.bid);

    // Ask (lowest sell order)
    result.push(json.ask);

    // Append output to Bitcoin sheet.
    sheet.appendRow(result);

  } else {

    // Log the response to examine the error
    Logger.log(response);
  }
}
Other than running it manually, you can create a trigger that runs the function, let’s say, every hour. And you can create a trigger either using a script or UI.
How to create a trigger using a script
To create a trigger that executes the getBitcoinPrice function every hour, copy and paste the following function to the editor:
function createTrigger() {
  ScriptApp.newTrigger('getBitcoinPrice')
      .timeBased()
      .everyHours(1)
      .create();
}
Then, run the function manually by clicking the Run button.

Note: Do not run the createTrigger() function more than once, or you’ll end up creating multiple triggers instead of just one.
Wait a few hours, and you should see the output in your spreadsheet, similar to the screenshot below:

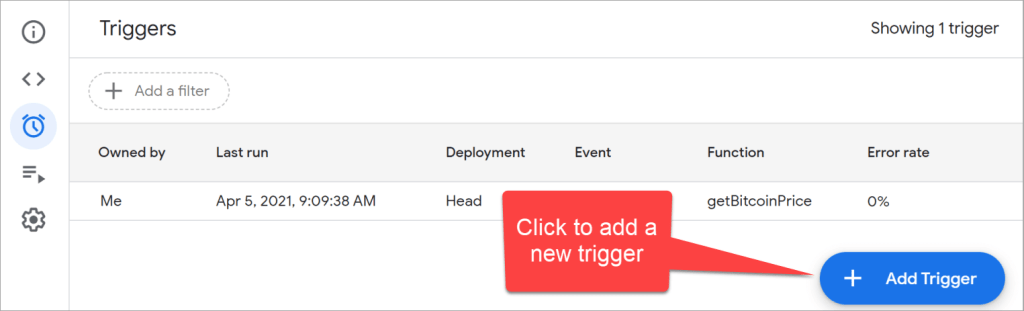
You can see the list of triggers you created on the Triggers page, which can be opened from the left menu:

The Triggers page:

How to create a trigger using UI
You can also create a trigger manually from the Triggers page. But before that, let’s add this new function to send bitcoin prices as an email with a PDF attachment.
function sendEmailBitcoinPricesPdfAttachment() {
  var file = SpreadsheetApp.getActiveSpreadsheet().getAs(MimeType.PDF);

  var to = '[email protected]'; // change to yours

  GmailApp.sendEmail(to, 'Bitcoin prices', 'Attached prices in PDF',
    { attachments: [file], name: 'BitcoinPrices via AppsScript' });
}
Then, on the Triggers page, click the Add Trigger button. A new pop-up will appear, allowing you to configure a new trigger.
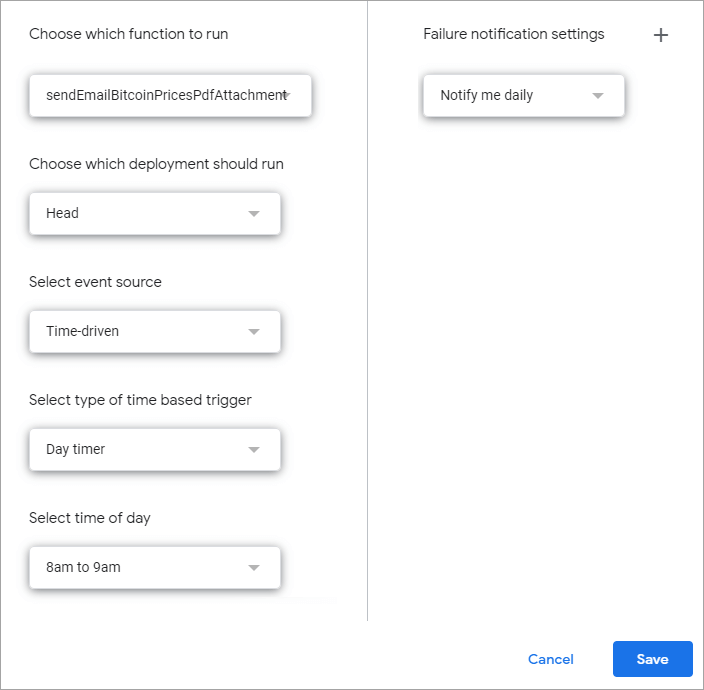
To set a trigger that runs the sendEmailBitcoinPricesPdfAttachment() every day, use the following configuration:
Explanations of the options above:
- Choose which function to run: select the
sendEmailBitcoinPricesPdfAttachment()function we just created. - Choose which deployment to run: use Head to test code.
- Select event source: select Time-driven to run the function on a schedule.
- Select type of time-based trigger: select Day timer to run the function daily. Another dropdown will appear, allowing you to select the time of day when the function will run. Note: In the above screenshot, the time is set to 8 a.m. to 9 a.m., which means it will run at some time between these hours.
- Failure notification settings: by default, you will be notified daily if the trigger fails to run. Optionally, you can change it to hourly, weekly, or even immediately.
When finished, don’t forget to click the Save button.
Custom function examples using Google Apps Script
Google Sheets offers hundreds of built-in functions like SUM, AVERAGE, CONCATENATE, and also more advanced functions like VLOOKUP, REGEXMATCH, and QUERY. When these aren’t enough for your needs, you can use GAS to write your own functions.
Let’s look at a few examples of custom functions below.
Example #1. Custom numeric function using Google Apps Script
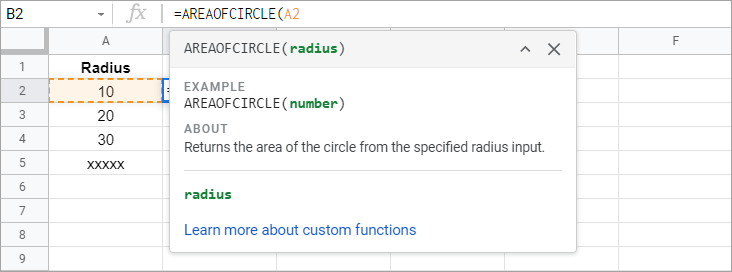
Here’s a simple custom function named AREAOFCIRCLE. The function calculates the area of a circle by taking a single numeric argument, which is the radius of the circle, and returns the area of a circle using the formula: PI * radius2. It also validates that the radius is numeric and not less than 0.
/**Returns the area of the circle from the specified radius input.
*
* @param {number} radius
* @return {number}
* @customfunction
*/
function AREAOFCIRCLE (radius) {
if (typeof radius !== 'number' || radius < 0){
throw Error('Radius must be a positive number');
}
return Math.PI * Math.pow(radius, 2);
}
To use the function, write a few radius values in your spreadsheet. Then, type an equals sign followed by the function name and any input value. For example, type =AREAOFCIRCLE(A2) and press Enter. A nice thing here is that you can see the auto-complete shows the description of the new custom function:
Copy the formula down, and you’ll see the following result:

Notice that there’s an error in B5. That’s because xxxxx is not a numeric value. Thus, using =AREAOFCIRCLE(A5) returns an error message that we defined in the code.
Example #2. Custom string function using Google Apps Script
In the following example, you will see how custom functions can be used to access other Google services, such as the language service.
The following functions perform translations from English to other languages. Each of the functions takes a string argument and translates it to a different language: French, Spanish, or Italian.
function ENGLISHTOFRENCH(english_words) {
  return LanguageApp.translate(english_words, 'en', 'fr');
}

function ENGLISHTOSPANISH(english_words) {
  return LanguageApp.translate(english_words, 'en', 'es');
}

function ENGLISHTOITALIAN(english_words) {
  return LanguageApp.translate(english_words, 'en', 'it');
}
Example usage in a spreadsheet:

The functions seem to work well for a straightforward and non-idiomatic phrase. And you can use those functions to help you translate English words to other languages. However, it’s always best to check again with native speakers for the accuracy and quality of the translations.
The following function returns an array of dates, which are the first day of each month for the given year, including their day names. This demonstrates that a custom function can also return a two-dimensional array.
function FIRSTDAYOFTHEMONTH(year) {
  var array = [];

  for (var m = 0; m <= 11; m++) {
    var firstDay = new Date(year, m, 1);

    var dayName = '';

    switch(firstDay.getDay()) {
      case 0: dayName = 'Sunday'; break;
      case 1: dayName = 'Monday'; break;
      case 2: dayName = 'Tuesday'; break;
      case 3: dayName = 'Wednesday'; break;
      case 4: dayName = 'Thursday'; break;
      case 5: dayName = 'Friday'; break;
      case 6: dayName = 'Saturday'; break;
    }

    array.push([(m+1) + '/1/' + year, dayName]);
  }

  return array;
}
Type in a cell, for example, =FIRSTDAYOFTHEMONTH(2021) in A1. You’ll see a result like this:

Example #4. Custom web function for importing CSV using Google Apps Script
Suppose you want to import CSV data from a published online file. Google Sheets has a built-in function called IMPORTDATA for that. But when doing the import, you may want to add some filters. For example, to exclude several columns. In this case, you can use the IMPORTDATA in combination with the QUERY function to give you more options.
Another alternative — you can write your own function using GAS to avoid writing several functions in one cell. Here’s an example:
function CUSTOMCSVIMPORT(url, columns) {

  var csvContent = UrlFetchApp.fetch(url).getContentText();
  var csvData = Utilities.parseCsv(csvContent);

  // Remove all white spaces, change to lower case, and split.
  var requiredColumns = columns.split(",");

  // Get the indexes of required columns
  var indexesOfRequiredColumns = [];

  if (requiredColumns.length > 0) {
    for (var i = 0; i < csvData[0].length; i++) {
      if (requiredColumns.includes((csvData[0][i]))) {
        indexesOfRequiredColumns.push(i);
      }
    }
  }

  if (indexesOfRequiredColumns.length > 0) {
    return csvData.map(r => indexesOfRequiredColumns.map(i => r[i]));
  }

  return csvData;
}
The above function allows you to import a CSV file from a URL and choose only a few columns to import.
The function has two parameters: url and columns. The second parameter (columns) accepts column names, each concatenated with a comma, for example: “columnname1,columnname2,...”
Example usage in a spreadsheet
In the following screenshot, you can see that only the columns specified in B2 are returned in the spreadsheet:

- B1 cell contains the URL of a CSV file
http://samples.openweathermap.org/storage/history_bulk.csv?appid=b1b15e88fa797225412429c1c50c122a1
- B2 cell contains the columns to import
dt,dt_iso,city_name,temp_min,temp_max,weather_main,weather_description
Can I use custom functions with ARRAYFORMULA?
You can’t nest custom functions with ARRAYFORMULA, but, you can modify your function to input and return a range in the form of a two-dimensional array. This will also optimize the performance of your spreadsheet, since each custom function run requires a call to the Apps Script server. The more custom functions calls are sent, the slower the performance of your spreadsheet will be.
Here is an example of a simple custom function that converts Fahrenheit to Celsius:
function FtoC(input) {
  return (input - 32) * 0.5556;
}

We modified it to accept both a single cell and a range of cells, as follows:
function FtoC(input) {
  return Array.isArray(input) ?
   input.map(row => row.map(cell => (cell - 32) * 0.5556)) :
      (input - 32) * 0.5556;
}
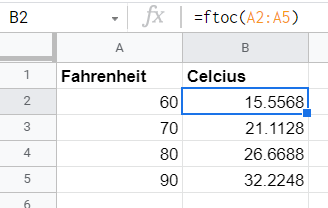
So, now you can type in =ftoc(A2:A5) and get the desired outcome.
Google Apps Script alternative: Coupler.io
Coding your own GAS function for importing data (as shown earlier with the CUSTOMCSVIMPORT function) may require a lot of effort. You’ll need to test various scenarios, try different filtering criteria, and so on.
If you’re looking for a convenient solution that is powerful and does not require any coding, you may want to try Coupler.io. It’s an integration tool that allows you to import data from CSV and other popular data sources into Google Sheets.
Coupler.io also offers more features than the IMPORTDATA function does. For a detailed comparison, you may want to check out this comparison table: IMPORTDATA vs. Coupler.io.
Here’s an example screenshot of selecting CSV data source in Coupler.io:

Simply copy and paste the CSV URL to import:

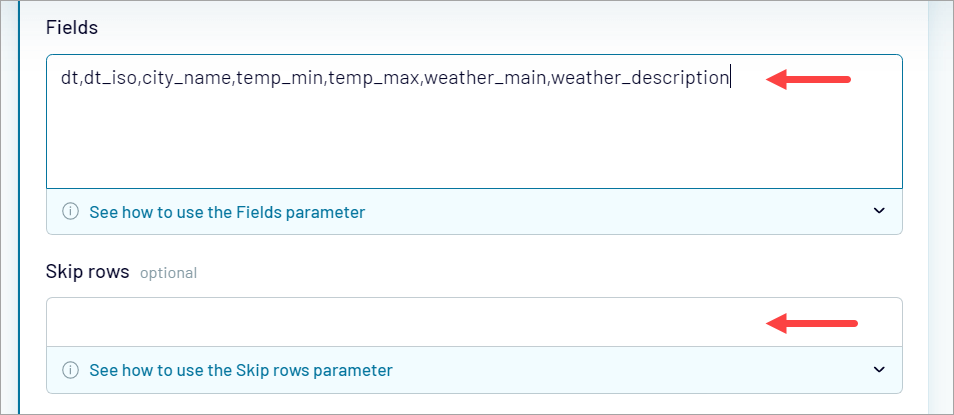
Optionally, you can specify which fields to import and even skip some rows if you’d like to:
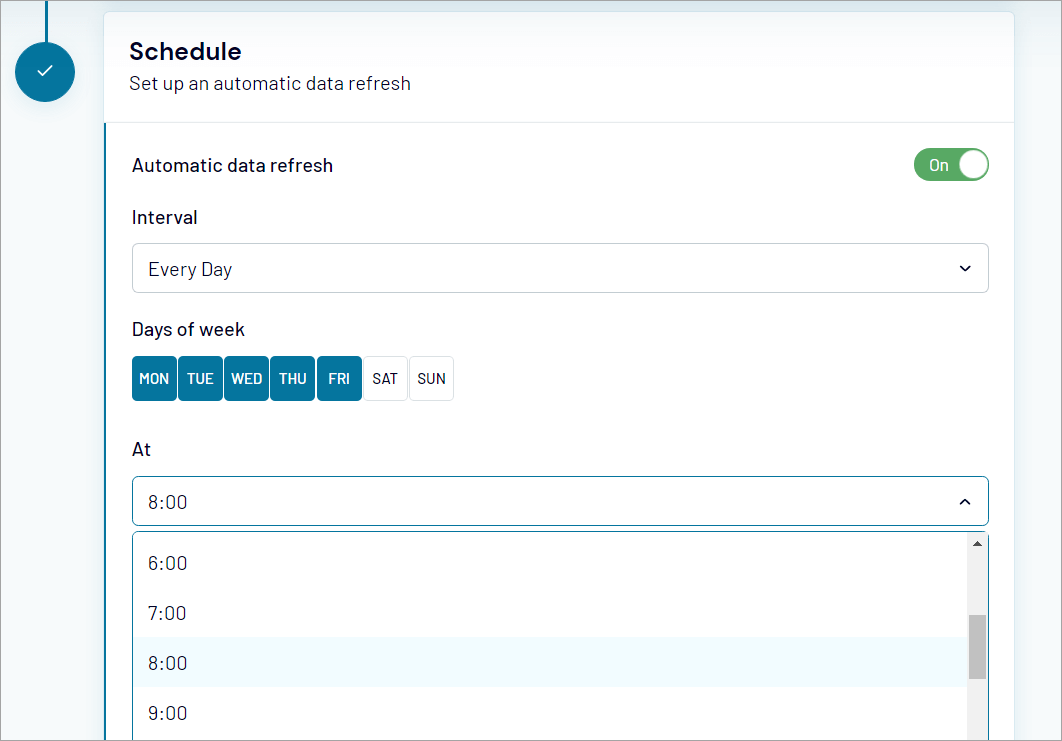
And more interestingly, you can set up an automatic data refresh on a schedule:
Google Apps Script limitations
As GAS runs on Google’s server, Google sets limits on its execution, such as:
- A script cannot run continuously for more than 6 minutes. So, for example, if you use “looping” in your function, ensure that it is bug-free and will not cause an endless execution. Also, avoid handling a huge dataset that may cause the script to run for more than 6 minutes.
- A custom function cannot execute for more than 30 seconds. So, avoid handling large external data using custom functions. Otherwise, you may see a “Maximum execution time exceeded” error.
Please note that the above limitations may change in the future. You can find the complete list of GAS limitations here.
How can I learn more about Google Apps Script
In this Google Apps Script tutorial, you’ve learned how to create custom functions, custom menus, and access to other Google apps and services. However, GAS is powerful, and you can do a lot more, such as creating add-ons, publishing web apps, and connecting to external databases.
If you want to learn more about Google Apps Script, one common suggestion is to learn JavaScript and follow the numerous tutorials available on the internet. Well, there is no doubt that the number of tutorials on the internet is huge and they can be overwhelming.
Therefore, we suggest you start with the following sources:
And here are some other free and useful resources:
- Eloquent JavaScript – ebook by Marijn Haverbeke; it’s free digitally.
Happy learning and enjoy! 🙂
Back to Blog


![Toni Kroos là ai? [ sự thật về tiểu sử đầy đủ Toni Kroos ]](https://evbn.org/wp-content/uploads/New-Project-6635-1671934592.jpg)


