
Docker system prune | How System Prune works in Docker?

Mục Lục
Introduction to Docker system prune
The ‘docker system prune’ is a Docker command that is used to remove or delete unused objects or data, it might be images, container, volume, or network as these objects are not removed unless we explicitly remove those objects, however, we need to specify the ‘–volumes’ option to remove volumes in Docker 17.06.1 or above. If we talk about images, then it removes both dangling and unreferenced images but by default, it removes only dangling images. The ‘docker system prune’ is only supported with API version 1.25 or above of the client as well as the daemon.
Syntax:
Start Your Free Software Development Course
Web development, programming languages, Software testing & others
docker system prune [OPTIONS]
Options: –
- -a, –all: It is used to remove all images including unreferenced images.
- –filter: It is used to specify a filter that provides few controls to delete the objects.
- -f, –force: It is used to remove the object without prompting for confirmation.
- –volumes: It is used to delete volumes as well.
- –help: It displays all the options that we can use with this command.
docker system prune –help
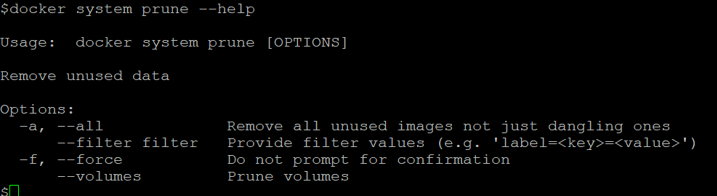
How system prune works in Docker?
When we execute the ‘docker system prune’ command, it makes an API call to the Docker daemon, and the daemon searches for all unused objects on that host and removes those objects from the system. The ‘–volumes’ option was added in Docker 17.06.1 because, in earlier versions, it removes all objects including volumes, if we don’t want to delete volumes then we have to run the ‘docker container prune’, ‘docker network prune’, etc. separately.
Examples
Let’s create a few images, networks, containers, volumes, etc. to understand all options with examples:
Example #1: Remove all unused objects to save space on the host
Step: 1. We can check all available objects one by one using the below commands:
docker image ls
docker volume ls
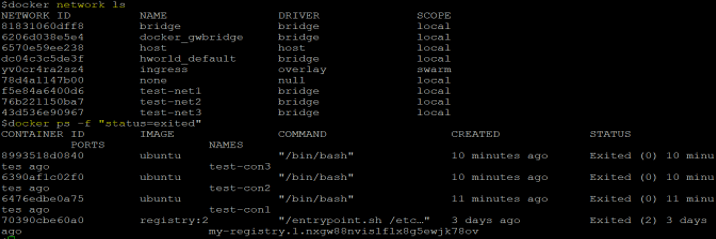
docker network ls
docker ps -f “status=exited”
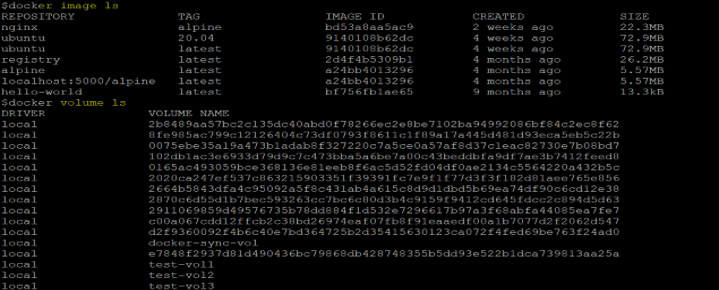
In the above snapshot, we can see that there are lots of objects, however, all objects are not useful so let’s removed objects that are not referenced by any container and stopped the container as well.
Step: 2. Let’s run the ‘docker system prune’ to remove the unused objects as shown below:
docker system prune
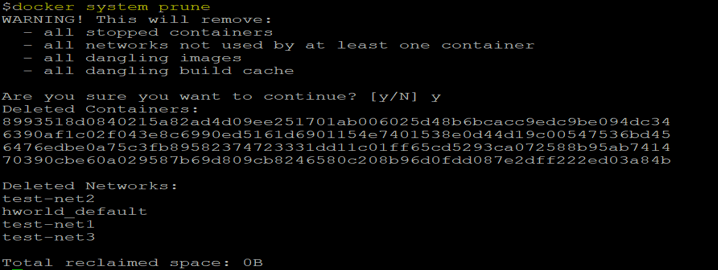
In the above snapshot, we can see that only containers and networks are got deleted, however, images are not removed because there are unreferenced images but no dangling image exists and volumes are also not removed because Docker version is above 17.06.1 so we need to explicitly use the ‘–volumes’ option to remove the volumes.
Example #2: Remove all objects including unreferenced images, not only the dangling one
Step: 1. As we can see in the below image, there are no images are deleted in the previous command.
docker image ls

Step 2. We have to use the ‘–all’ or in short ‘-a’ option to delete the unreferenced images as shown below:
docker system prune –a
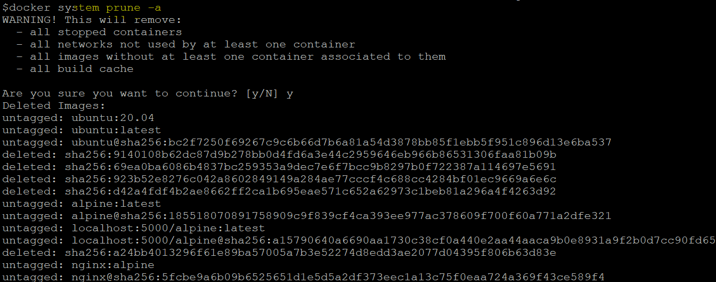
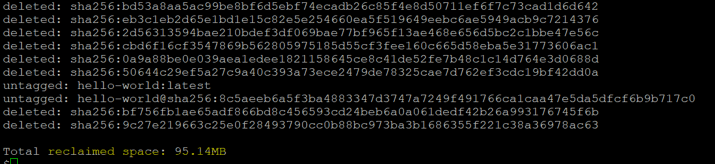
In the above image, we can see that the images are removed now and about 95 MB of space has been reclaimed. Now, if we check the list of available images on the host, we can see that only one Docker image is remaining because there is one container running using that image in the below snapshot:
docker image ls
![]()
Example #3: Remove the unreferenced volumes as well with other objects
Step: 1. Let’s list the available volumes as we can that volumes are still not removed by any of the above examples:
docker volumes ls

Step: 2. Now, in order to remove the volumes as well, we need to explicitly use the ‘–volumes’ option as already discussed so let go ahead and use this option to delete all unused volumes as shown below:
docker system prune --volumes
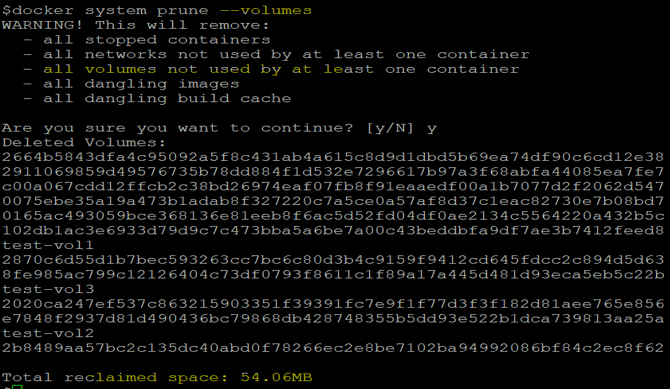
In the above snapshot, we can see that one more line has been added in the ‘WARNING’ section that indicates volumes are also removed if it is not used by at least one container and after confirmation, it removed the unused volumes and about 54 MB space has been reclaimed.
Example #4: Remove the unused objects that satisfy a certain condition based on timestamp or label
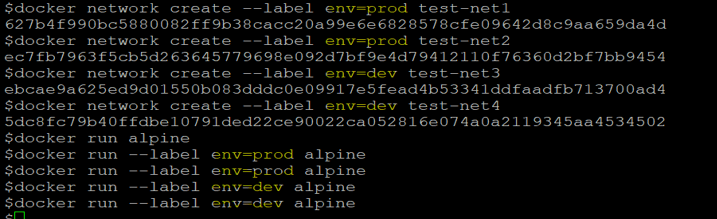
Step: 1. Let’s create a few containers and networks with labels ‘env=prod’ and a few with labels ‘env=dev’ as shown below:
docker network create --label env=prod test-net1

docker network create --label env=dev test-net3

docker run --label env=prod alpine

docker run --label env=dev alpine
Step: 2. Now, let’s remove the unused objects which have the label ‘env=dev’ by using the ‘–filter’ option as shown below: –
docker system prune --filter “label=env=dev”
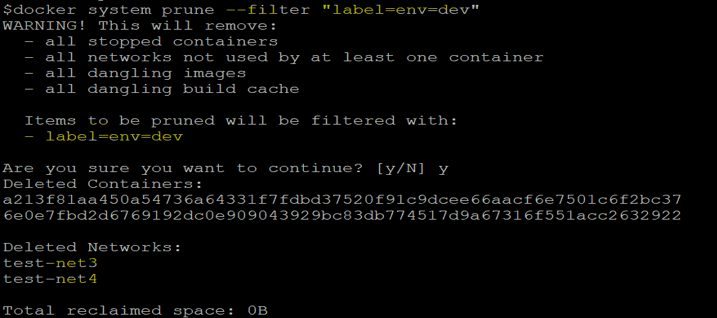
In the above snapshot, we can see that the daemon is giving WARNING about the mentioned label as well and it has removed ‘test-net3’, ‘test-net4’, and the containers only because these have label ‘env=dev’, other networks are still present. Also, no space has been reclaimed because these objects are not utilizing any space on the Docker host.
Step: 3. We can use the label with no condition to remove all the objects that do not meet the mentioned condition. For example, we can remove the objects with the label ‘env=prod’ using the below command:
docker system prune --filter “label!=env=dev”
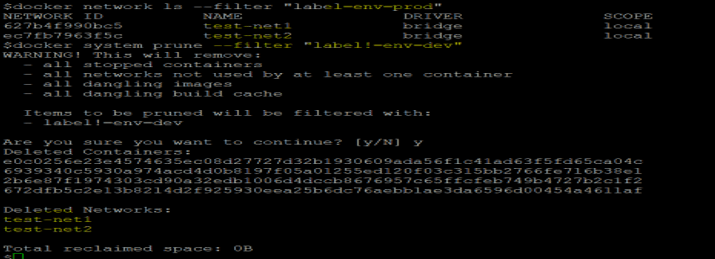
In the above snapshot, we can see that the remaining objects are also removed, however, this command also deletes the objects that do not have any labels.
Step: 4. We can use the ‘until’ keyword with the ‘–filter’ option to remove objects that are created before a given timestamp or duration as shown below: –
docker system prune -a --filter “until=2m”
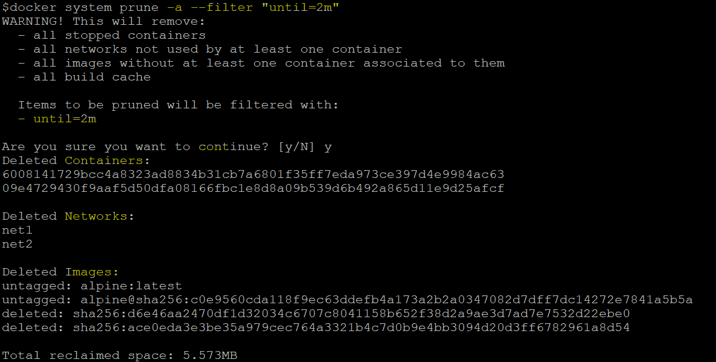
In the above snapshot, we can see that it has removed all unused objects created 2 mins ago. We can also use Unix timestamps or date formatted timestamps.
Note: We cannot use the ‘–volumes’ option with the ‘until’ keyword while using the ‘filter’ option.
Scenario #5: Remove objects without asking for confirmation to use in scripts
Step: 1. Let’s assume we have to run this command weekly and want to automate this task using a script, we have seen in the above examples that we have to confirm the action before deletion but we don’t want the daemon to ask for confirmation otherwise script will get stuck. We can use the ‘–force’ or in short ‘-f’ to remove objects without prompting for confirmation as shown below:
docker system prune -a -volumes -f
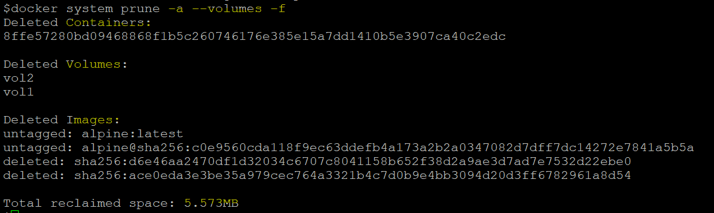
In the above snapshot, we can see that daemon deleted all objects including volumes as well as unreferenced images without asking for confirmation.
Advantages
- It helps us to reclaim disk space consumed by unused objects at once.
- It helps us to protect data as it does not remove volumes by default.
- It has the ‘-f’ flag to remove the object without any confirmation that helps to automate the task.
- It also has the ‘–filter’ option that provides flexibility to remove the unused objects.
Conclusion
It is a very useful and easy command for host disk cleanup, however, be cautious before running this command. We should be sure enough about the objects that are going to be deleted.
Recommended Articles
This is a guide to Docker system prune. Here we also discuss the introduction and How system prune works in Docker along with different examples and its code implementation. You may also have a look at the following articles to learn more –
0
Shares
Share


![Toni Kroos là ai? [ sự thật về tiểu sử đầy đủ Toni Kroos ]](https://evbn.org/wp-content/uploads/New-Project-6635-1671934592.jpg)


